

Dull skies are the most common way an otherwise good photograph fails. A flat white band above the horizon is what you get whenever you expose for the land — almost always the right call — and it leaves a picture with nothing happening in its top third.
Photoshop has a one-click Sky Replacement command and this tutorial deliberately doesn’t use it. Not because it’s bad, but because what makes a replaced sky convincing is never the selection. It’s whether the new sky’s brightness, color and light direction agree with the ground beneath it — and whether you faded the horizon with a gradient instead of leaving a hard line.
Free practice files
Practice Files for This Tutorial
The 2 sample images, the layered PSD and the 4-page PDF guide from the video, so you can follow every step on the same files.
This tutorial includes 2 sample images, 1 sample PSD and 1 PDF guide.


Create a free PHLEARN account to download, or log in if you already have one. One account gets you the files for every free tutorial.
description
Enjoying This Free Tutorial?
Image Source


To Fix Dull Skies, Spend Your Time on the Match, Not the Selection
Dull skies are the most common way an otherwise good photograph fails. A flat white band above the horizon happens whenever you expose for the land, which is almost always the right call, and it leaves you with a picture that has nothing happening in its top third.
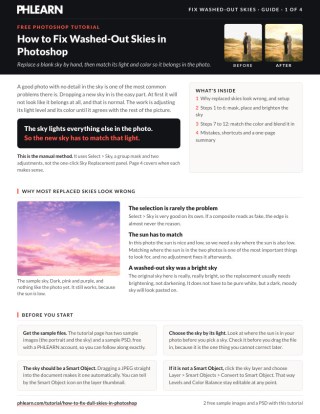
Photoshop has a one-click Sky Replacement command, and this tutorial deliberately doesn’t use it. Not because it’s bad, but because the thing that makes a replaced sky convincing isn’t the selection — it’s whether the new sky’s brightness, color and light direction agree with the ground beneath it. Doing the swap by hand is what leaves those three things under your control.
Why Most Replaced Skies Look Wrong
The Selection Is Rarely the Problem
Select > Sky is very good on its own. If a composite reads as fake, the edge is almost never the reason.
The Sun Has to Come From the Same Side
Before anything else, look at where the light falls in your original photograph and choose a sky whose brightest area sits on that side. No amount of adjustment fixes a sun on the wrong side of the frame.
A Washed-Out Sky Was a Bright Sky
This is the counter-intuitive part. If the original sky blew out, the day was bright — so your replacement usually needs to be brightened, not darkened, to belong in that scene. The instinct is to reach for a moody dark sky, and that instinct is why so many sky swaps look pasted on.
Select the Sky and Mask the New One In
-
Open Your Image, Select the Background Layer, and Go to Select > Sky
Photoshop finds the sky and makes the selection. Leave it active.
-
Drag Your Replacement Sky Into the Document
Choose it with the light angle in mind — that decision is made now, not fixed later.
-
Group the New Sky Layer With Cmd/Ctrl + G, Then Click the Layer Mask Icon
Masking the group rather than the layer is the whole trick of this method. It leaves the sky layer itself with a free mask slot, which you’ll use at the end for the blend.
Position It, Then Make It Non-Destructive
-
Move the Sky With the Move Tool (V)
You’re deciding where the interesting part of the cloud formation sits inside the visible area. Slide it around properly before settling.
-
Resize With Free Transform if Needed
Cmd/Ctrl + T. Bigger clouds read as closer and lower; a scaled-down sky reads as more distant.
-
Convert the Sky Layer to a Smart Object
Do it before the adjustments, not after. Levels and Color Balance then apply as editable Smart Filters, so the matching — the part you’ll want to revisit — stays adjustable.
Match the Light and the Color
-
Open Levels With Cmd/Ctrl + L and Brighten the Sky
Usually brighter, for the reason above. Judge it against the brightest parts of the land, not against your memory of what a dramatic sky looks like.
-
Open Image > Adjustments > Color Balance
Push the sky towards the colors already in the scene — the yellows of late light, the greens bouncing up off a field. Real skies carry the color of the same light that lit everything else, and this single step does more for believability than anything else here.
Blend the Horizon With a Gradient
-
Add a Second Layer Mask, This Time on the Sky Layer Itself
Not the group mask — the layer’s own. This is why you grouped it in step 3.
-
Drag a Black-to-White Linear Gradient Downwards With the Gradient Tool (G)
Start at the top of the sky and pull down towards the horizon. The new sky fades out as it approaches the land, which mimics the atmospheric haze that makes real skies pale near the horizon. Without this, the join is a hard line and your eye finds it immediately.
Where It Goes Wrong
Picking a Dramatic Sky for a Bright Photo
Storm clouds over a scene lit by flat midday sun will never sit right. Match the weather, then the color.
Masking the Layer Instead of the Group
You lose the second mask and with it the gradient blend. Group first.
Forgetting the Smart Object
Matching light is iterative — you will come back to those Levels twice. Bake them in and you can’t.
Skipping the Gradient
A sky that is equally strong at the horizon and at the top of the frame is the clearest sign of a composite.
Ignoring the Sun’s Direction
It is the one thing you cannot correct afterwards. Check it before you drag the file in.
Why the Manual Method Is Still Worth the Extra Minutes
The automatic Sky Replacement panel does all of this in one dialogue, and for a quick job it is the sensible choice. What it doesn’t give you is the habit of looking at a photograph and asking which direction the light comes from, how bright the day was, and what color that light is.
Those three questions are the whole of compositing, not just sky swaps. Doing the swap by hand a few times teaches them in a way that moving a slider labelled “Sky Brightness” never will — and afterwards the automatic tool gets better results too, because you finally know what to adjust.
Fix One of Your Dull Skies Today
Pick a photo with a blown-out sky, run Select > Sky, drag in a replacement whose light comes from the same side, group it and mask the group. Download the two free sample images and the sample PSD and work through the matching properly — convert to a Smart Object, brighten with Levels, pull the scene’s colors in with Color Balance, then fade the horizon with a gradient on the layer’s own mask. For compositing, masking and light matching done at depth, our PRO Photoshop Learning Path is where to go next.
Quick Reference: Keys, Menus and Settings
- Bring in the skyDrag the JPEG onto the canvas, Enter (it arrives as a Smart Object)
- Select the old skyHide the sky layer, click the Background, Select > Sky
- Mask itShow the sky layer, Cmd/Ctrl + G to group it, click Add Layer Mask with the selection active
- Place itV to move, Cmd/Ctrl + T to scale or flip (contextual taskbar)
- Not a Smart Object?Layer > Smart Objects > Convert to Smart Object
- Match the brightnessCmd/Ctrl + L, drag the midpoint left; Blue channel down for warmer highlights
- Match the colorImage > Adjustments > Color Balance: toward yellow and green; check Shadows, Midtones, Highlights
- Blend the horizonLayer mask on the sky, G, Basics > black to white, linear, drag downward
Both adjustments land as Smart Filters; double-click them to change the settings later.
Image source
Free Downloads
Follow Along on the Same Photos
Get the portrait and the sunset sky from the video, the layered PSD with the Levels and Color Balance smart filters, and the PDF guide. Free with a PHLEARN account.
Fixing Dull Skies: Common Questions
How do I choose a replacement sky?
Match the sun. The photo in the video was shot with the sun low, so Aaron picked a sunset sky with the sun low as well. Direction and height of the light matter more than color, which you fix afterwards.
How do I select the old sky?
Hide the new sky layer, click the Background layer and choose Select > Sky. Then show the sky layer, group it with Cmd/Ctrl+G and click Add Layer Mask. The group mask limits the new sky to where the old one was.
Why put the sky in a group?
The mask lives on the group, so you can move, scale, flip or swap the sky inside it (or stack several skies) without redoing the selection.
The new sky looks pasted on. What’s wrong?
Brightness and color. The sky lights the rest of the photo, so a dark, saturated sky over a bright scene never works. Use Levels to brighten it until it sits with the original exposure, then Color Balance to pull in the colors already in the scene.
Why does the sky need to be a Smart Object?
So Levels and Color Balance become Smart Filters you can toggle and re-edit by double-clicking. A dragged-in JPEG is already a Smart Object; otherwise use Layer > Smart Objects > Convert to Smart Object.
How do I know which Color Balance sliders to move?
Look at the haze in the original (here a yellow-green through the trees) and push toward it. Then click each slider in Shadows, Midtones and Highlights and drag left and right to see what helps. The blue channel in Levels adds warmth to the highlights.
How do I blend the horizon?
Add a layer mask to the sky layer itself (inside the group), press G, choose the black-to-white basic gradient and drag downward. The new sky fades into the original near the horizon.
Why not just use Sky Replacement?
This method gives you control over every part: which sky, where it sits, how bright, what color and how it fades. Everything stays editable, and no AI or credits are involved.
Are the sample files free?
Yes, with a free PHLEARN account. You get the portrait and the sky, the layered PSD and the PDF guide.
Master Photoshop, Lightroom and Photography
Join PHLEARN PRO for $12.99 a month or $99.99 a year. Cancel anytime, with a 100% money-back guarantee.





