
description
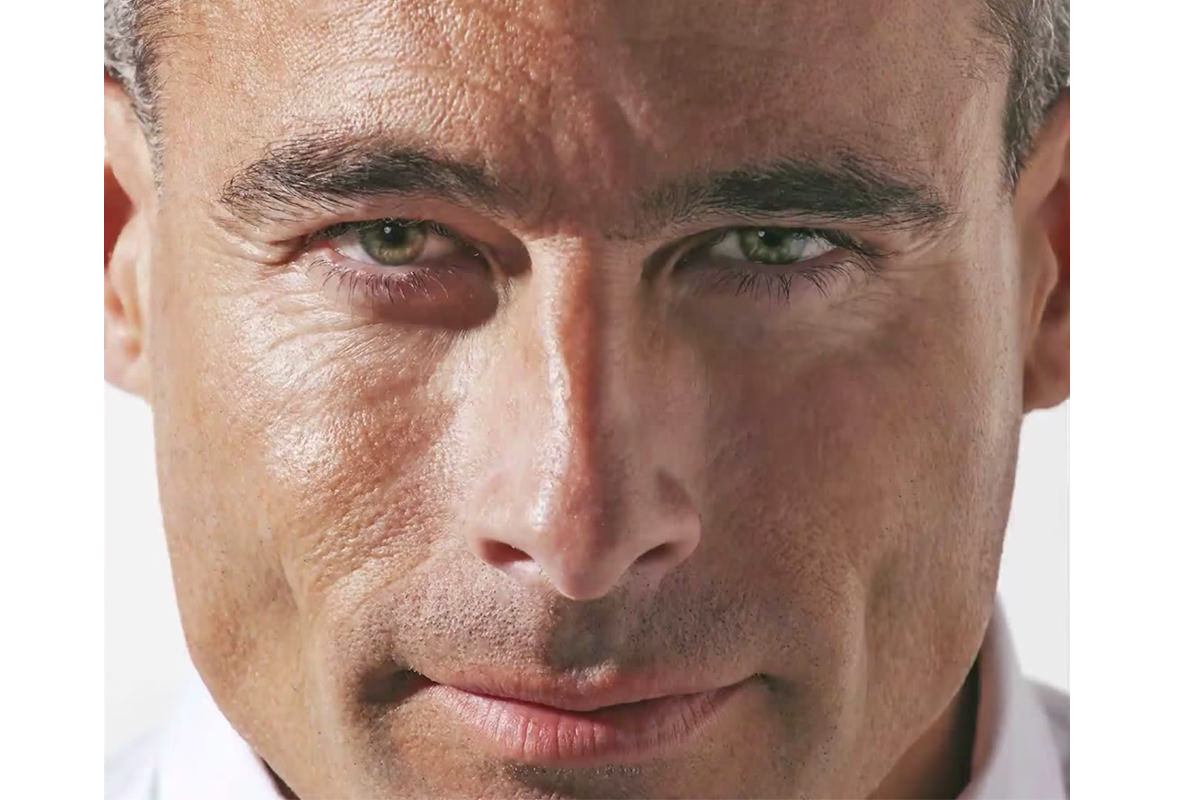
Retouching an older subject calls for a different approach than the techniques usually shown for smooth, youthful skin. This tutorial uses Shadows/Highlights to soften the deep shadows that make wrinkles and pores read as harsh, smooths texture with a Content-Aware Spot Healing Brush on a layer dialed back to partial opacity, and paints saturation back into the eyes and lips with a masked Hue/Saturation layer, keeping the result a real person.
Enjoying This Free Tutorial?
We publish a new free tutorial every week, each one with sample images and PSDs you can download and follow along with. Sign up and they land straight in your inbox, along with early word on sales, events and subscriber-only offers.
How to Retouch Mature Skin in Photoshop
Retouching an older subject calls for a different approach than the techniques usually shown for smooth, youthful skin. This tutorial focuses on softening deep shadows that emphasize wrinkles and pores, smoothing texture with the Spot Healing Brush, and restoring a bit of natural color to skin, eyes, and lips, all while keeping the result looking like a real person rather than someone decades younger.
Duplicating the Background Layer
Working on a duplicate layer keeps the original portrait safe underneath while every adjustment happens above it.
-
Select the Background Layer
Click the background layer in the Layers panel to select it.
-
Duplicate the Layer
Press Cmd/Ctrl+J to duplicate the background layer before making any adjustments.
Recovering Shadow Detail With the Shadows/Highlights Adjustment
The Shadows/Highlights adjustment can bring light back into the darker areas of a face, softening how deep wrinkles and pores appear without touching the highlights.
-
Open the Shadows/Highlights Adjustment
Go to Image > Adjustments > Shadows/Highlights.
-
Reset the Sliders and Show More Options
Bring every slider back to zero, then click Show More Options if it isn’t already visible to access the full set of controls.
-
Raise the Shadows Amount
Bring the Shadows Amount slider up to around 40 to recover detail and light in the darker areas of the face.
-
Adjust the Tone and Radius
Set the Tone to around 40 and adjust the Radius, such as 50, testing different values since the right radius varies from image to image.
Why the Highlights Slider Is Left Alone
Recovering detail in the highlights tends to make wrinkles and texture stand out even more rather than softening them. Working only with the Shadows slider targets the darker areas responsible for deep-looking wrinkles and pores, without introducing that same unwanted effect in the brighter parts of the skin.
Adding Color Back Into the Skin
The same Shadows/Highlights dialog includes a Color adjustment slider that helps restore some of the color skin can lose with age.
-
Raise the Color Slider
In the same Shadows/Highlights dialog, raise the Color slider, such as to 10, to bring a bit more color back into the subject’s face.
-
Confirm the Adjustment
Click OK to apply the combined shadow recovery and color adjustment.
Smoothing Wrinkles With the Spot Healing Brush Tool
The Spot Healing Brush’s Content-Aware option automatically finds nearby texture to fill in wherever it’s painted, making it a simple and effective way to soften wrinkles and pores.
-
Duplicate the Layer Again
Press Cmd/Ctrl+J once more to create a new layer to work on with the healing tool.
-
Select the Spot Healing Brush Tool
Click and hold on the healing brush tool group and choose the Spot Healing Brush Tool.
-
Set the Mode to Content-Aware
In the options bar, make sure Content-Aware is selected.
-
Paint Over Wrinkles and Blemishes
Draw directly over wrinkles, pores, and other small blemishes, letting the tool fill each area with surrounding, similar-looking texture.
Zooming Out to See the Whole Face While Retouching
Working zoomed in close makes it easy to miss larger, softer areas of unevenness that only become obvious when viewing the face as a whole.
-
Zoom Out Periodically
Press Cmd/Ctrl+Minus a couple of times to zoom out and view the face as a whole.
-
Enlarge the Brush for Broader Areas
Increase the Spot Healing Brush’s size for larger uneven areas, such as a patch of skin that looks a little darker or rougher overall.
Why Zooming Out Helps While Retouching
Zoomed in tight on a single wrinkle, it’s easy to lose track of how the face reads as a whole, and to miss broader, softer texture issues that aren’t tied to one specific line. Zooming out regularly makes it much easier to see which areas actually need attention, since the tool itself handles most of the fine texture-matching work already.
Lowering the Healing Layer’s Opacity to Preserve Realism
Reducing the opacity of the healed layer blends the smoothed skin back with some of the original texture, keeping the result from looking artificially smooth.
-
Compare the Layer On and Off
Toggle the healing layer’s visibility to compare the smoothed result against the original.
-
Lower the Layer’s Opacity
Reduce the healing layer’s opacity to around 50% so wrinkles and pores are softened but still visible.
Restoring Color to the Eyes and Lips With a Masked Hue/Saturation Layer
A Hue/Saturation adjustment layer, hidden behind a black mask and painted back in only over the eyes and lips, targets color restoration to exactly the areas that need it.
-
Add a Hue/Saturation Adjustment Layer
Create a new Hue/Saturation adjustment layer above the retouched layers.
-
Raise the Saturation Slider
Bring the Saturation slider up to add noticeably more color across the image.
-
Fill the Layer Mask With Black
Press Shift+Delete, choose Black, and fill the layer mask so the added saturation is hidden everywhere.
-
Paint White Over the Eyes and Lips
Press B for the Brush tool, choose white, and paint over the eyes and lips to reveal the added saturation only in those areas.
Why a Partial-Opacity Brush Beats an On/Off Mask
Painting a layer mask fully white or fully black only ever produces two states, an area is either completely affected or not affected at all. Switching to a black brush at 50% opacity and painting back over an area that was too saturated, such as the lips, allows a mask to hold any level of partial visibility in between, refining the effect rather than starting over.
Softening Oversaturated Areas With a Partial-Opacity Brush
A black brush set well below full opacity dials back an area that received too much color without removing the added saturation entirely.
-
Switch to a Black Brush
Choose black as the foreground color while still using the Brush tool on the layer mask.
-
Lower the Brush Opacity
Press 5 on the keyboard to set the brush opacity to 50%.
-
Paint Over the Oversaturated Area
Paint over an area like the lips that picked up too much color, reducing the added saturation there by roughly half instead of removing it completely.
Why This Approach Works
Recovering shadow detail before touching a single wrinkle addresses the underlying light and shadow that makes texture look deep in the first place, so less healing work is needed afterward. Lowering the healed layer’s opacity keeps enough of the original skin texture visible that the subject still looks like a real person rather than artificially smoothed. Painting saturation back in selectively, with a brush that can hold any opacity in between fully on and fully off, restores natural-looking color exactly where it’s needed without overdoing any single area.
Final Thoughts
Retouching mature skin works best as a light touch: soften the deepest shadows, smooth some of the texture with the Spot Healing Brush, and bring a little color back into the skin, eyes, and lips, without erasing every line in the process. The same shadow-recovery, healing, and selective-saturation combination shown here applies to any subject whose skin could use a bit more light and color, not just this one.
Quick Reference: Keys, Menus and Settings
- DuplicateCmd/Ctrl + J
- Fill the shadowsImage > Adjustments > Shadows/Highlights, Show More Options: Amount 40, Tone 40, Radius 50; Highlights 0
- Add skin colorSame dialog, Adjustments: Color 10
- Soften wrinklesSpot Healing Brush Tool, Content-Aware, on a new copy; Cmd/Ctrl + - to zoom out
- Keep it realHealing layer Opacity 50%
- Eyes and lipsHue/Saturation layer, raise Saturation; Shift + Delete to fill the mask black; B, paint white
- Tone it downBlack brush, press 5 for 50% opacity
No AI, no generative credits.
Retouching Mature Skin: Common Questions
How is retouching older skin different?
The goal is to soften, not to make someone look 20 or 30 years younger. Fill in the deep shadows, reduce some wrinkles and pores, and bring back a little color.
Where is Shadows/Highlights in Photoshop?
Image > Adjustments > Shadows/Highlights. If you only see two sliders, click Show More Options for the full set.
What Shadows/Highlights settings soften wrinkles?
In the video: Shadows Amount 40, Tone 40 and Radius 50. The radius changes from image to image. The Highlights stay at zero, since recovering highlights makes wrinkles look worse.
How do I bring color back into the skin?
In the same Shadows/Highlights dialog, raise the Color slider in the Adjustments section. Aaron uses 10.
What is the best tool for wrinkles?
The Spot Healing Brush Tool set to Content-Aware, on a duplicate layer. Paint over a wrinkle and it fills the area with similar texture from nearby.
Should I retouch zoomed in close?
Zoom out often with Cmd/Ctrl + Minus. You see the face as a whole and spot broader uneven areas that you can fix with a larger brush.
How do I keep the skin from looking fake?
Don’t remove every line. Lower the healing layer’s opacity to about 50% so wrinkles and pores are softened but still there.
How do I add color to just the eyes and lips?
Add a Hue/Saturation adjustment layer and raise Saturation. Press Shift + Delete and fill the mask with black, then press B and paint white over the eyes and lips.
The lips look like lipstick. How do I tone them down?
Switch to a black brush, press 5 for 50% opacity and paint over the lips. It takes away about half of the added saturation.
Master Photoshop, Lightroom and Photography
Join PHLEARN PRO for $12.99 a month or $99.99 a year. Cancel anytime, with a 100% money-back guarantee.





