

Download Assets
This tutorial includes 1 sample image, 1 sample PSD and 1 PDF guide. Downloads are free with a PHLEARN account.
- Download the sample images and PSDs from every free tutorial on PHLEARN
- New free tutorials published every week
- One free account — sign up once, then download anything
Free PDF Guide · 2 Pages
This Tutorial as a Step-by-Step PDF
Every step from the video in order: Quick Actions and Retouch, the Blemishes tap, the Amount slider that keeps skin looking like skin, the Remove icon for anything it missed, and the press-and-hold before and after. Keep it next to your phone.
description
Lightroom Mobile’s blemish removal tool clears skin in one tap, then hands the decision back with Amount and Fade sliders. Retouch a portrait in the field.
Enjoying This Free Tutorial?
We publish a new free tutorial every week, each one with sample images and PSDs you can download and follow along with. Sign up and they land straight in your inbox, along with early word on sales, events and subscriber-only offers.


The Blemish Removal Tool Does the Tedious Half of Retouching
Clearing spots off a portrait has always been the least interesting part of retouching — twenty minutes of clicking at a healing brush before you get to any of the decisions that actually matter. It was also work that needed a desktop, which meant nothing usable came out of a shoot until you were back at one.
Lightroom Mobile’s Blemishes tool clears the lot in a single tap, then gives you two sliders to decide how far it went. That’s the useful part: it isn’t an all-or-nothing filter, it’s an automated first pass you can dial back.
Why the Sliders Matter More Than the Tap
Fully Cleared Skin Looks Wrong
Real faces have texture. An automatic tool set to maximum removes every mark including the ones that made the person look like themselves, and the result reads as plastic.
Amount Controls How Much It Removes
Slide left and natural detail comes back; slide right and the clearing is more complete. Somewhere short of the top is almost always where you want to be.
Fade Blends Marks Back In
Separate from Amount, and more subtle — it eases marks back rather than reinstating them fully. Use it when the automatic pass was close but slightly too keen.
Open Quick Actions
-
Open Your Portrait in Lightroom Mobile
Any portrait. The AI features are looking for a face, so this workflow is specific to people.
-
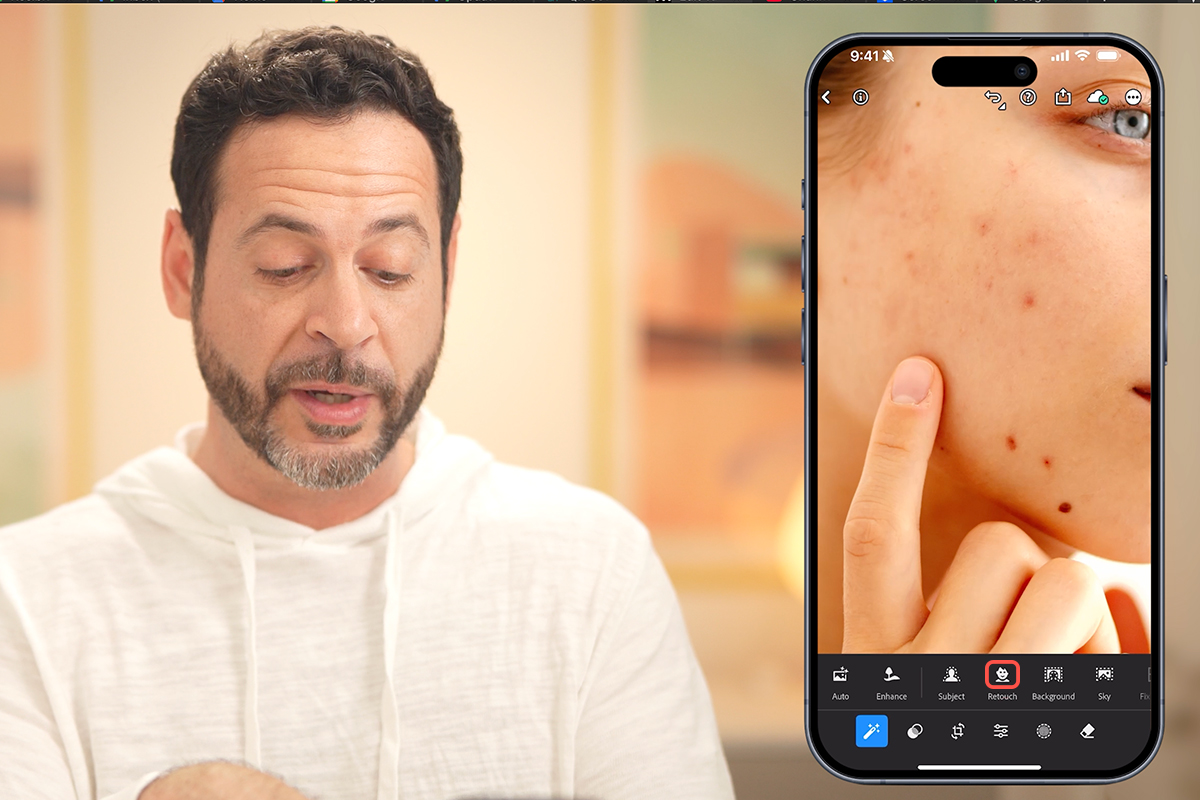
Tap the Quick Actions Wand
Bottom left, the magic-wand icon. Because the app recognises there’s a person in the frame, it surfaces the Retouch category automatically rather than making you find it.
-
Zoom In With Two Fingers First
Pinch to zoom onto the skin before you do anything. On a phone screen at fit-to-view you cannot see what the tool is about to change, and you certainly can’t judge whether it went too far.
Run the Automatic Pass
-
Select Blemishes From the Retouch Menu
One tap. Lightroom analyses the whole face and removes spots and imperfections at once — the part that used to take twenty minutes.
-
Pull the Amount Slider Back
Start at whatever the default gave you, then bring it left until skin texture returns. Watch the areas beside the nose and across the forehead, where over-clearing shows first.
-
Use Fade for the Final Adjustment
If a few removals look too clean but the overall level is right, Fade blends those marks partly back rather than restoring them entirely. It’s the finer of the two controls.
Clean Up What It Missed
The automatic pass is good but not exhaustive. Anything left over is handled without leaving the workflow.
-
Tap the Remove Eraser Icon
Bottom right. This is manual, but still AI-driven — it’s the generative removal tool rather than a clone stamp.
-
Paint Over Anything Remaining
Stray hairs, a mark on clothing, something in the background. The app generates replacement content to fill the gap rather than copying from elsewhere in the image.
-
Tap the Checkbox to Commit
This confirms the manual removals and returns you to the main edit.

Check Before You Save
-
Press and Hold to See the Before
Anywhere on the image. Holding shows the original and releasing returns to your edit — the quickest honesty check there is, and the one most likely to tell you the Amount slider is still too high.
-
On a Tablet With a Keyboard, Use the Shortcuts
The backslash key toggles the original view, and Q jumps straight into the healing tools. Worth learning if you edit on an iPad with a keyboard attached.
-
Tap the Final Checkmark
Saves the edit. Lightroom’s edits stay non-destructive, so you can reopen and change the Amount later if you decide it went too far.
What to Watch Out For
Leaving Amount at Maximum
The single most common mistake, and the one that makes AI retouching identifiable at a glance. Skin needs texture.
Judging From the Zoomed-Out View
Everything looks fine on a phone at full-frame. Zoom in before deciding, and zoom in again before saving.
Removing Permanent Features
Freckles, moles and scars are part of how somebody looks. An automatic tool doesn’t know the difference between a spot that will be gone next week and a birthmark — you do.
Treating It as the Whole Retouch
This handles blemishes. Tone, color and contrast are still yours to do, and a cleanly retouched face over an unedited photo looks stranger than either.
The Decision the Tool Can’t Make
Automating blemish removal removes the labour but not the judgement. How much of a face to clean is a question about the person, the purpose of the photograph, and what they’d want — and no slider default knows any of that.
Which is why the Amount and Fade controls are the real feature here. A tool that only cleared everything would be faster and worse. The version that does the tedious work and then hands the decision back is the one worth using.
Try It on Your Next Shoot
Open the portrait in Lightroom Mobile, tap the Quick Actions wand, pinch to zoom in, choose Blemishes, pull Amount back until texture returns, use Fade for the last bit, then the Remove eraser for anything left, and press-and-hold to check before you save. Download the free sample image and PSD and follow the exact edit — then try it on a portrait straight off a shoot, which is exactly the situation this tool exists for. To go further with retouching on the desktop, our PRO Photoshop Learning Path is where to go next.
Quick Reference: Keys, Menus and Settings
- Open the toolLightroom mobile > Quick Actions (bottom left) > Retouch; it appears when the app finds a person
- Remove the blemishesTap Blemishes; they clear at once
- Keep it naturalThe Amount slider fades the blemishes back in; find the point that still looks like skin, then the checkmark
- Anything it missedRemove icon (bottom right), paint over the spot, checkmark
- Before and afterPress and hold on the image
Recorded on Lightroom mobile; the tool was exclusive to the mobile app at the time.

Free Downloads
Follow Along on the Same Photo
Get the sample image, the PSD with the before and after, and the PDF guide, and run the same one-tap retouch. Free with a PHLEARN account.
Blemish Removal in Lightroom Mobile: Common Questions
Where is the blemish tool in Lightroom mobile?
In Quick Actions, bottom left. When Lightroom recognizes a person in the photo it offers Retouch, and Blemishes is inside that.
What happens when I tap Blemishes?
Every blemish it finds disappears at once. There’s no painting involved; the AI locates them and removes them in one pass.
Why is there an Amount slider?
So you can bring some skin back. Dragging the slider fades the blemishes in and out, and a little texture left in looks more natural than a fully smoothed face. Set it, then tap the checkmark.
It missed a spot. What do I do?
Zoom in, tap the Remove icon at the bottom right and paint over it. That removal also uses AI, and you confirm it with the checkmark.
How do I see the before and after?
Press and hold on the image. Let go and the edit comes back.
Is it in Lightroom on the desktop or in Photoshop?
When this was recorded it was only in Lightroom mobile. Photoshop has since gained its own Blemish Removal tool in Camera Raw; there’s a free tutorial on it in Keep Learning.
Does it use generative credits?
The video doesn’t show any credit use for the blemish pass or the Remove touch-ups. If you’re unsure on your plan, check your balance in the Creative Cloud app.
Are the sample files free?
Yes, with a free PHLEARN account. You get the sample image, the PSD and the PDF guide.
Master Photoshop, Lightroom and Photography
Join PHLEARN PRO for $12.99 a month or $99.99 a year. Cancel anytime, with a 100% money-back guarantee.





