Download Sample Images
Click the link below to download the sample images and follow along with this tutorial.
DownloadTutorial Description
There are plenty of ways to remove backgrounds from photos in Photoshop. But when you’re working with areas that have intricate textures and details, nothing does it better than the Clone Stamp Tool! Follow along and learn how to use the Clone Stamp Tool to sample details and textures and use them to cover up anything in an image. We also show you powerful techniques to match the color and light of any Clone Stamped areas for the most realistic results possible.
The Healing Brush & Spot Healing Brush
The Healing Brush Tool and the Spot Healing Brush Tool are commonly used and are each extremely useful in certain situations. If you’re doing any skin retouching, hair retouching, or removing objects that are on a low-detail background, these are the best tools for the job.
As good as they can be for removing distractions, they falter a bit when working around areas where there are intricate details, lines, and textures. You might remove something successfully only to have it replaced by a muddy mess. Say, for example, you want to remove a car from the background of a portrait, but that car is in front of a building. If you try to remove it using the Spot Healing Brush, the car will be removed, but it will not do very well at recreating the hard lines and details of the building behind.
So keep keep this in mind! When you’re working with parts of a photo where there either isn’t much detail or, if there is,
Using the Clone Stamp Tool
Before we get started with removing distractions, we have a few important tips for using the Clone Stamp Tool:
1.) Always work on a new Layer! If you want to remove something from a photo with the Clone Stamp Tool, make those edits on a new, blank Layer. This way you can always get back to your original image and make changes/edits to your Clone Stamped areas (which, as you’ll see, will be important later).
2.) When using the Clone Stamp Tool on a new Layer, be sure to check ‘Sample Current and Below’ in the tool options. This setting allows you to sample and paint on a blank Layer using the pixel information from all of the Layers below.
3.) Go to the Window Menu and select the Clone Source option. This will open the Clone Source dialog which allows you to enable a preview of what you have sampled. It can be helpful to see exactly what you’ll be painting with the Clone Stamp when sampling detailed areas that need to be lined up in a particular way.
Once you’re done with these steps, you’re ready to start removing distractions!
Removing Objects & Distractions
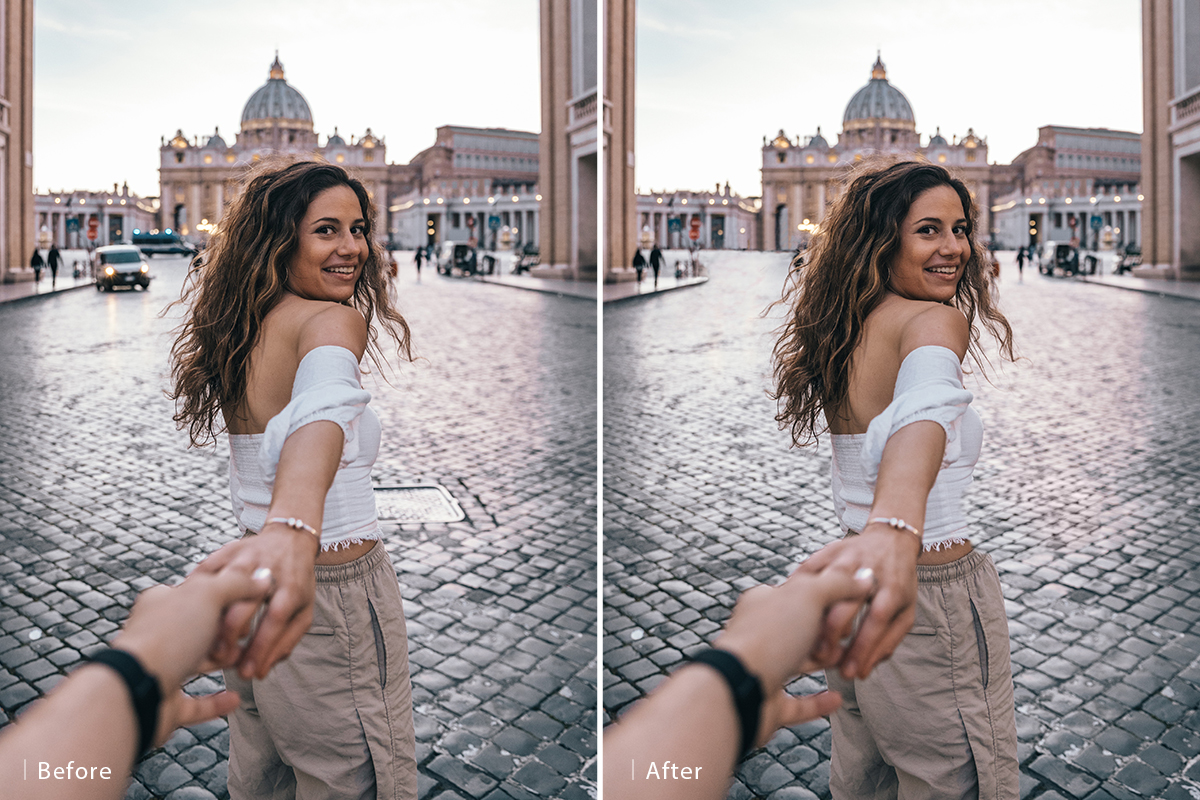
The Clone Stamp Tool is very easy to use once it’s set up. Simply hold ALT or OPTN to Sample the part of the photo you want to use to cover up a distraction. In our example, we wanted to remove a sewer grate that was next to our subject. We created a new Layer, sampled an area of the cobblestone road that matched, and then paint with that sample over the grate.
In general, it’s always better to overpaint and make refinements later than to underpaint and potentially miss some spots.
So don’t worry about painting perfectly. You can always go back and make adjustments using a Layer Mask. Just add a Layer Mask to your Clone Stamp Layer and paint black on areas that you want to erase.
Once you have the area covered, it might help to make some additional adjustments with the Transform Tool. Hit CTRL or CMD + T and then you can move, scale, and rotate the layer to line up better with the details in the original background.
Matching Light & Color
If you’re following along, you might notice that your Clone Stamp Layer still doesn’t quite fit in with the rest of the photo. Oftentimes you’ll be sampling other parts of a photo where the light and color are slightly different than the are you want to cover. Fortunately, we can easily make adjustments to the light and color of the Clone Stamp Layer using a variety of Layers and Adjustment Layers.
For example, if we wanted to adjust the color of our newly Clone Stamped Layer, we can create a new Layer, Sample a color from nearby bricks in the original photo, and then paint over the Clone Stamp Layer. Right click on the paint Layer and select ‘Create Clipping Mask’. This will make it so that the color only appears where the Clone Stamp Layer is visible. Change the Blending Mode of the painted color Layer to Color and adjust the Opacity until it looks natural.
This same process can be done using Adjustment Layers as well. Try experimenting with Curves, Levels, and Hue/Saturation Adjustment Layers in combination with Clipping Masks to get an even closer match to the original photo.