Catalog > Free Tutorials > How to Create a Vignette in Photoshop
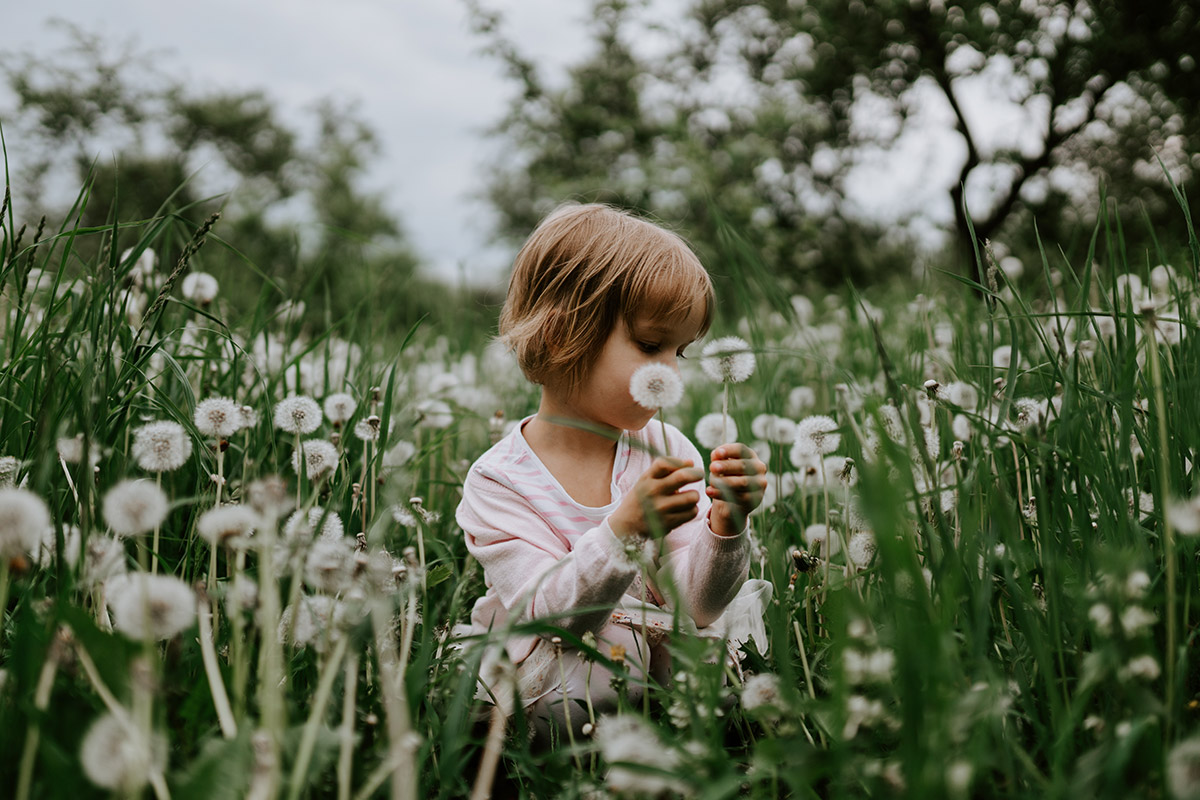
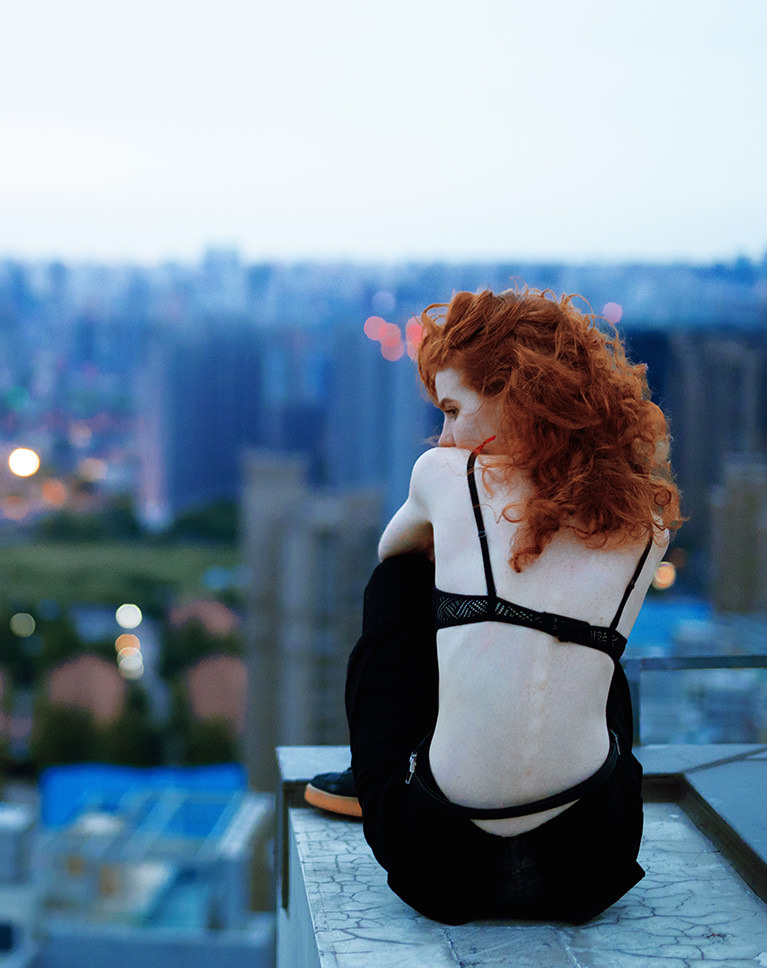
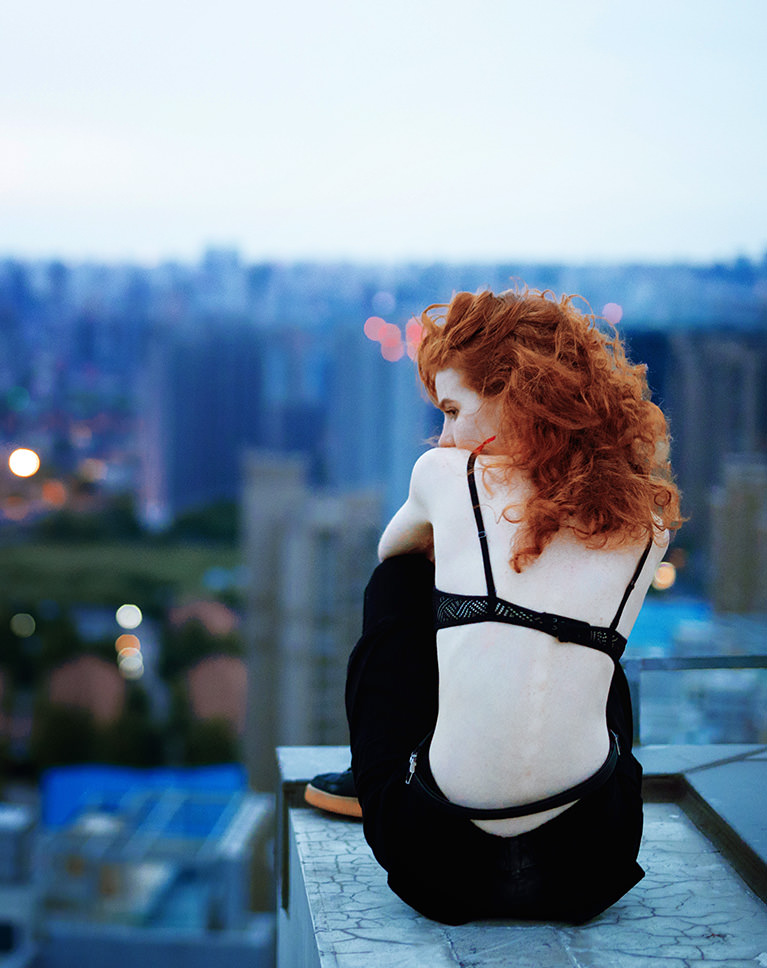
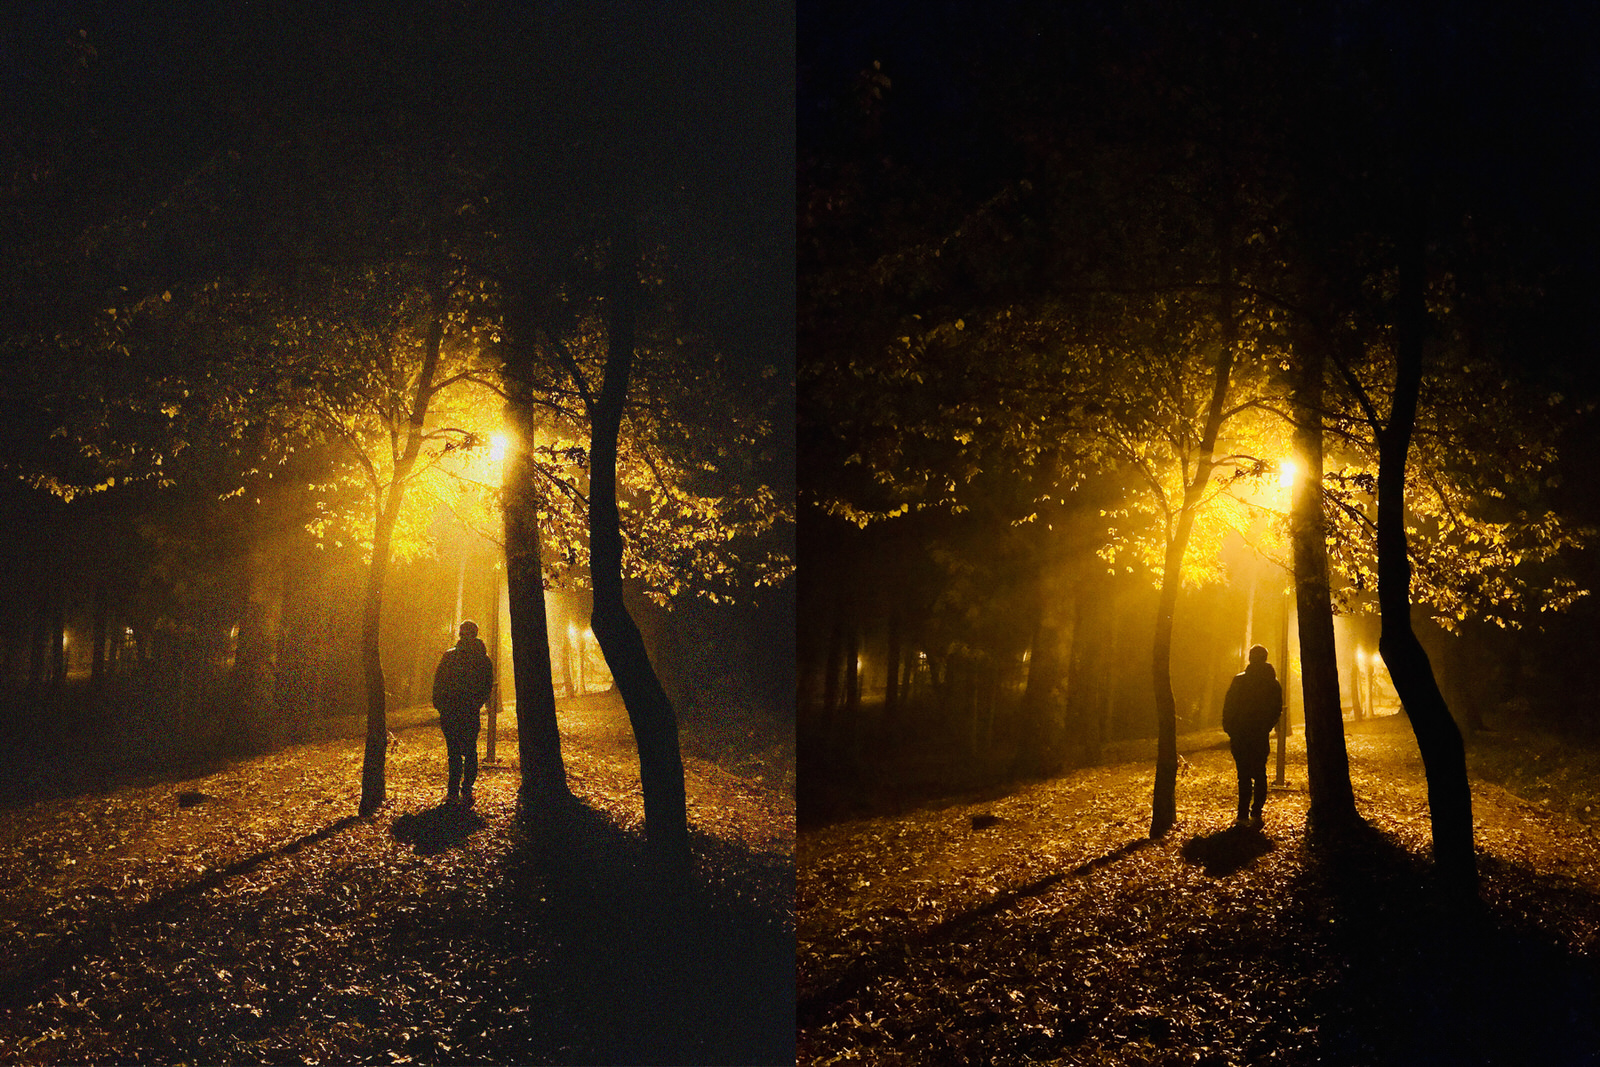
BEFORE
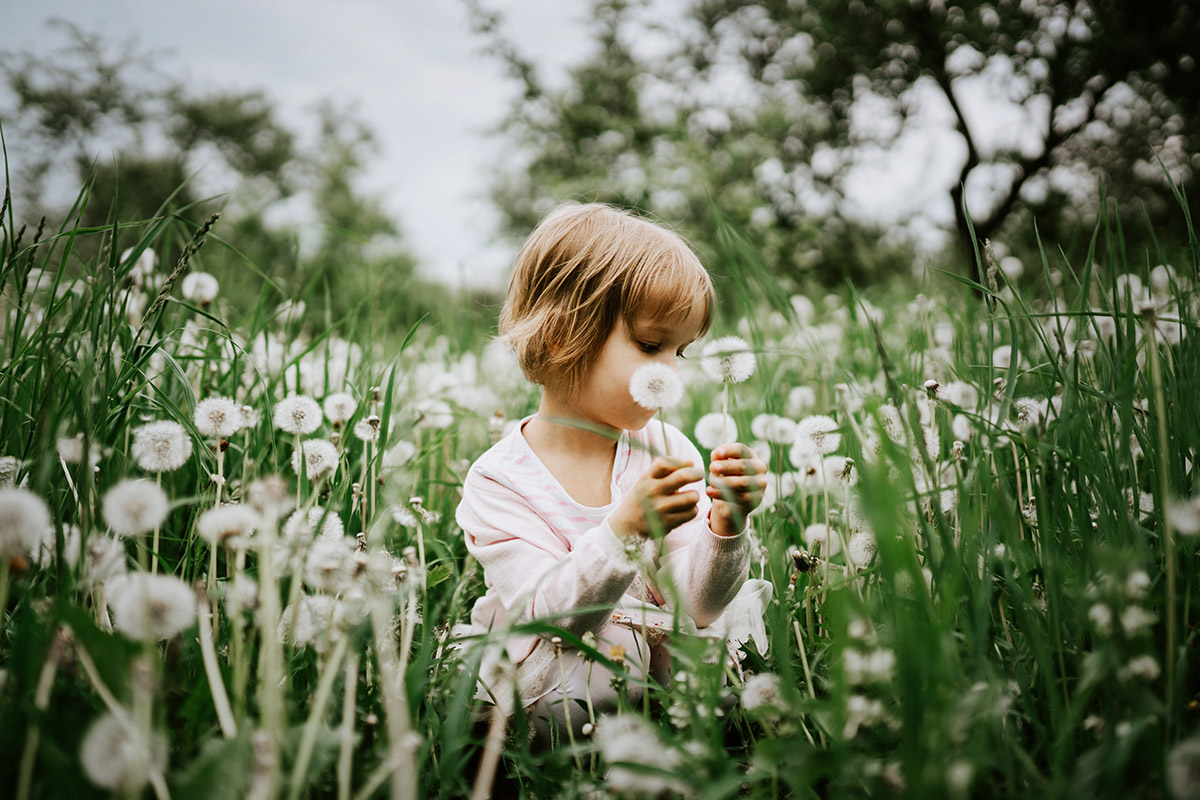
AFTER
Download Sample Images
Click the link below to download the sample images and follow along with this tutorial.
DownloadTutorial Description
Learn how to draw more attention to your subjects with soft, natural-looking vignettes in Photoshop! Follow along as we edit a photo using Curves Adjustment Layers to brighten up the areas that matter most, while darkening the corners and edges. Vignettes can be a powerful tool when used correctly and this is the best way to apply them in Photoshop.
Find Your Subject
Our eyes are naturally drawn to lighter areas in a photo. And vignettes work by brightening the spot where you want viewers to look while slightly darkening everything else. While it sounds simple, it can be tricky to pull off without the effect looking unnatural. The key to a great vignette is making it soft and subtle. Remember, small changes can have a huge impact on your final images.
We’ll show you how to use a combination of Curves Adjustment Layers and Gaussian Blurs to create a beautiful, natural-looking vignette effects that will help your subjects stand out!
Counting on Curves
Curves are one of the most powerful tools in Photoshop, capable of everything from exposure adjustments to precision coloring. To create a vignette, we’ll need two separate Curves Adjustment Layers–a slightly brighter one on our subject and a slightly darker one along the edges.
So how do we tell Curves what to brighten and what to darken? Let’s start by helping our subject stand out a bit more. Grab the Elliptical Marquee Tool and make a selection around the subject. We recommend making it slightly larger than the subject overall. With the new selection active, go to Layers, New Adjustment Layer, and select Curves Adjustment Layer. A new Curves Adjustment Layer will appear in the Layer stack and, best of all, it will automatically load the selection we made into the Layer Mask! Click along the center line of the Curves adjustment dialog and drag it up. Just don’t lift it too high! We want to make these changes appear as subtle as possible.
We’re nearly there! We’ve got an area around our subject which is now brighter due to the Curves Adjustment Layer. There’s just one problem; the transition from the new light area to the rest of the photo is too harsh. If you zoom in, you’ll see a noticeable line where the Curves Layer starts and ends. Let’s soften that edge with a Gaussian Blur.
Gaussian Blur
To create a natural fade from light to dark, we need only add a Gaussian Blur to the Layer Mask of the Curves Adjustment Layer. Select the Layer Mask, then go to Filter, Blur, and select Gaussian Blur. Before applying a blur, we recommend zooming out from the image. The more zoomed out you are, the easier it will be to tell if a transition between light and dark looks unnatural. Once you’re zoomed out, drag the slider in the Gaussian Blur menu up until you get a look that you like! It’s best to err on the side of too blurry than not, so don’t be afraid to crank it up!
With the blur applied, we’ve completed half of our vignette effect. Next, we need to complement our new bright area with some darker areas along the corners and edges of the image.
Corners & Edges
The classic vignette look usually involves darkening the corners of an image. Making the corners very dark might be nice for replicating an old-style film effect, but our goal is still to keep things soft and subtle.
To add the darkening effect, simply repeat the same steps as listed above–but with a few changes. Try and make the Elliptical Marquee Selection about as large as the entire image. Then once you add the Curves Adjustment Layer, you’ll want to Invert the Layer Mask by hitting CTRL or CMD + I. This will select the areas of the image outside of the elliptical selection. Then simply drag the Curves down to darken, zoom out, and soften it with a Gaussian Blur.
You’re done! You should be left with a subtle vignette that helps your subject stand out! And since you’re working with Curves, you can go back and change the amount of lightening and darkening at any time.
How to Create a Vignette in Photoshop
-

-
Add to
favorites
-
DifficultyEasy
-
Length15 mins
-
Software
-
CompatibilityPhotoshop CS6 & Newer
Photoshop Action Downloads
DESCRIPTION
Draw more or attention to your subjects with our easy-to-use Smart Vignette Photoshop Action. Just download, install, and click play!
THIS COURSE INCLUDES
- 4 Sample Images
- 1 Photoshop Action
- 1 Photoshop Install Video
- 1 PDF Quick Install Guide
Share

Simple & Powerful Vignettes.
SMART VIGNETTE
Subjects that Pop
Our Smart Vignette Photoshop Action is designed to help your subjects stand out. Add silky-smooth transitions from light to dark with photorealistic results!
Focus on the Subject

EASY VIGNETTES IN A CLICK
ORIGINAL
How to Install Photoshop Actions
Photoshop Actions are designed to save you time without sacrificing quality. Get a professional-level finish with our custom Vignette Photoshop Action! Follow along with included instructions to put more focus on the subject of an image by making natural-looking adjustments to the lights and darks.
Using Vignettes
Vignettes can have a powerful effect, but they can be tricky to apply without looking unnatural. Our Photoshop Vignette Action is designed to add instant vignettes with soft fades and blurs for realistic blending.
All About Curves
Our Vignette Photoshop Actions utilizes the power of Curves to make delicate changes to the light and dark levels in any photo. Now you can quickly and easily brighten a subject and darken the edges of an image with amazing results.
DRAW MORE ATTENTION TO THE SUBJECT
ORIGINAL
Subjects that Stand out
Sometimes photos can feel flat making it a little tougher for a viewer to find what they should be looking at. Help the important parts of your images stand out with vignettes in Photoshop!
Light & Shadow
Our eyes are naturally drawn to the brighter areas in an image. Our Smart Vignette Photoshop Action works two-fold, brightening the area you want to stand out while darkening the edges of a photo.
Fully Customizable
Actions are great for speeding up workflow, but sometimes you’ll still want to add that personal touch. Not only does our Action allow you to adjust both the positioning and blur, you’re also able to go back and modify any of the pieces at any time.
SOFT & SUBTLE VIGNETTES
ORIGINAL
Install & Get Started
Follow along with the included video tutorial where Aaron guides you through the process of installing and using our Smart Vignette Photoshop Action!
Actions, Presets & LUTs
This is just a small part of our extensive library of Photoshop Actions, Lightroom Presets, and custom LUTs. Best of all, everything is included in your PHLEARN PRO subscription.
Learn all About Photoshop
Photoshop is one of the most powerful tools for the modern photo editing and learning how to use it has never been easier. The Beginner’s Guide to Photoshop is the most comprehensive, easy-to-follow tutorial out there. Learn how to basic editing, retouching, photo compositing, and more!
Reviews
There are no reviews yet.
Ever noticed how some photos have that darkness creeping in around the edges, drawing your eye toward the middle of the image? You might have wondered if it was an accident or if the photographer did it on purpose, and how exactly it happened either way. The answers are as follows: maybe, possibly, and read this guide to find out.
The effect is called “vignetting” in the photography world, and it can happen several different ways. Use it effectively and it’s a powerful artistic tool. Botch it and you’re likely to be pegged as an amateur. The word is French in origin, dating back to the vine-like illustrations that sometimes used to run around the edge of a book page back in the 1800s. Like those illustrations, modern photographic vignetting is all about utilizing those often-forgotten edges of your image. In this guide, we’ll talk about the different causes of vignetting, why some of them are more desirable than others, and what to do about a vignette once you have one (whether you wanted it or not).
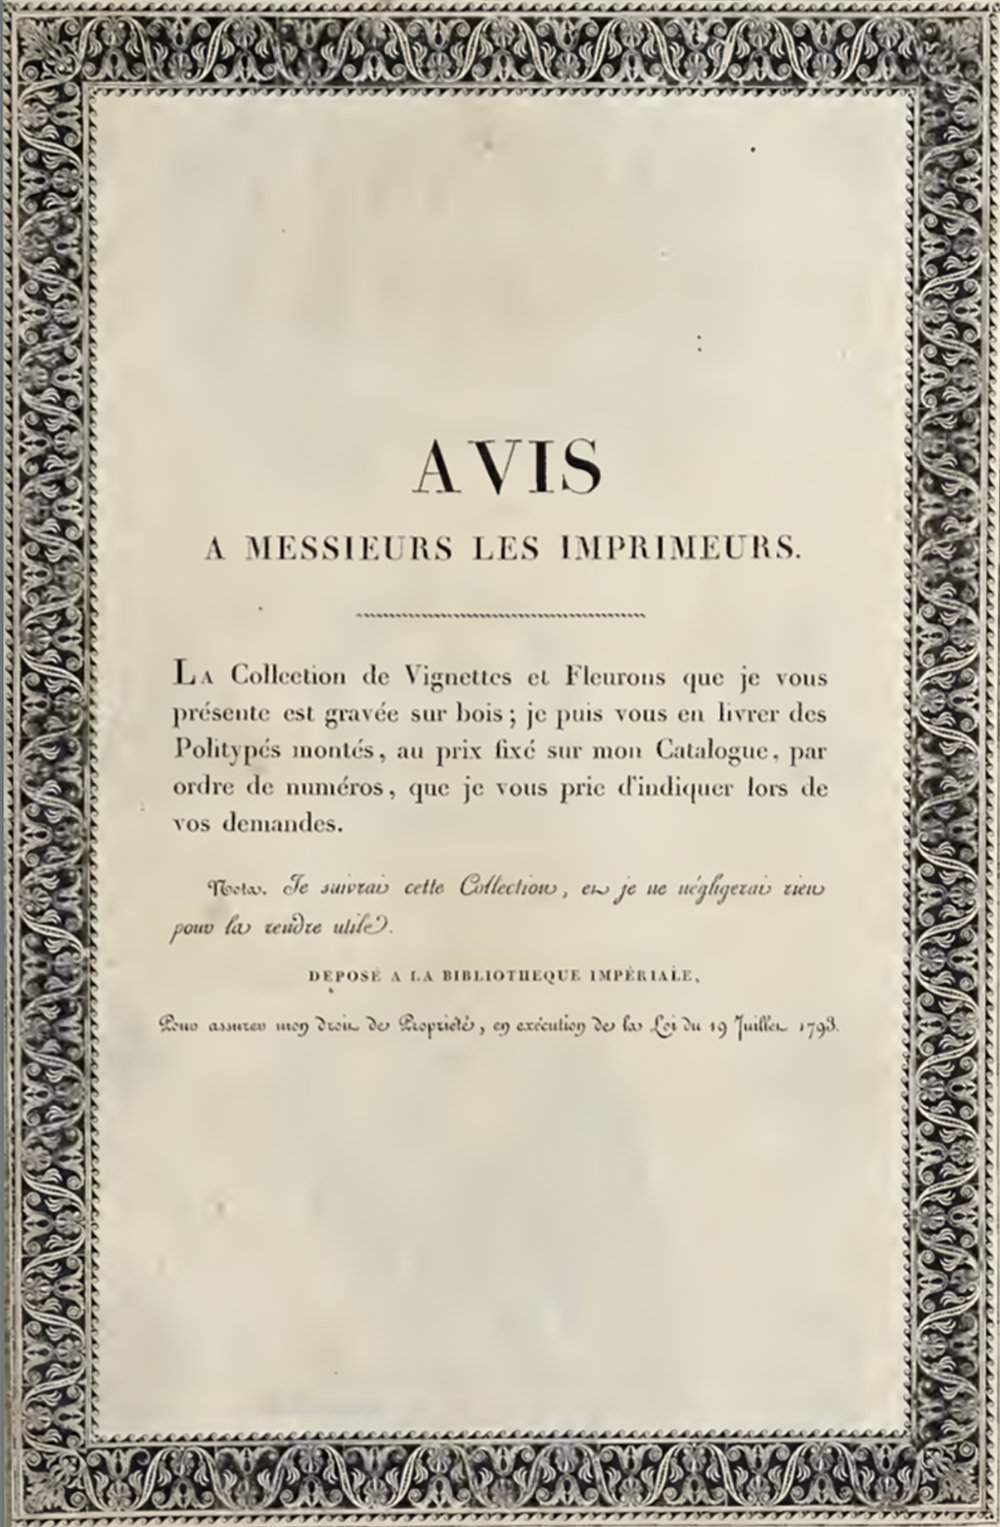
From Recueil des divers caractères, vignettes et ornemens de la fonderie et imprimerie de J.G. Gillé, by Joseph-Gaspard Gillé, d. 1826
How Does Vignetting Happen?
You may already associate vignetting with photo filters you’ve used on an app or on social media, but sometimes the effect is born out of pure accident. Let’s look at a few types of vignetting you might see in your photography:
- Mechanical – When accessories like third-party lenses, lens hoods, and filters (especially when they’re stacked) physically block light, you’ll get a pronounced vignette in your image. Think about sitting on a covered porch. As the angle of the sun changes, the shadow from the awning will creep in one direction or the other.
- Lens – All lenses cause a certain amount of vignetting, but it’s often more pronounced in lenses that contain a lot of elements. Imagine you’re looking at a window through five or six clear shower curtains. You’re still getting the light, but it’s going to behave differently than it would if it were just you and the window.
- Pixel – This type of vignetting is exclusive to digital photography. You’ve got a round, curved lens and a flat, rectangular sensor, so the entire sensor isn’t going to be experiencing the same amount of light at the same time.
- Post-Processing – Also known as “vignetting on purpose.” A vignette can be added during the editing stage for compositional or artistic effect. We’ll talk about how to do that a little later on.
This is not an exhaustive list of ways vignetting can occur (and a lot of people have their own names for the processes we’ve just named) but at a certain point you begin splitting hairs. The main takeaway from this section is that vignetting can be caused by improper use of accessories, intentional use of post-processing techniques, and the way cameras work in general. The most important factor is how you use it.
Pro Tip
If you’re using a petal-shaped lens hood and are seeing some mechanical vignetting, try turning the lens hood so that the largest petals are at the top and bottom of your lens, rather than angled diagonally so that they are visible in the corners. You may be able to place the petals out of the path of your lens rather than give up on that accessory altogether.
The Good, the Bad, and the Unphotogenic
How do you tell whether vignetting is enhancing your image or detracting from it? That’s largely a matter of opinion, but there are some guidelines you can remember when you evaluate the use of this effect in your work.
When Is Vignetting Useful?
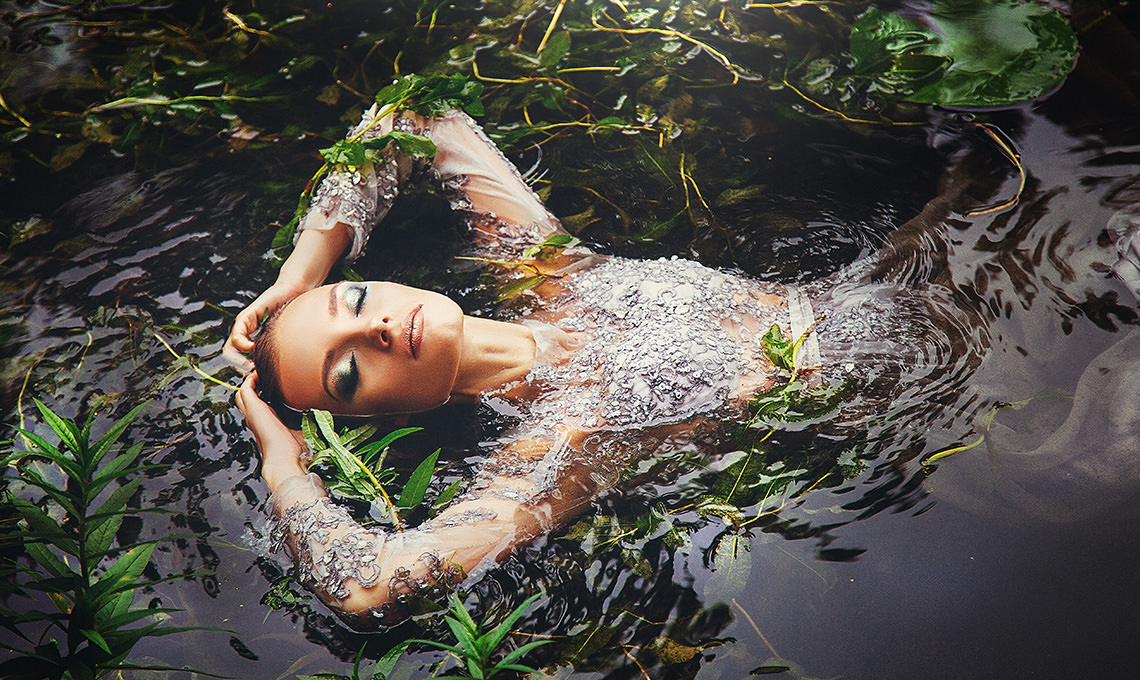
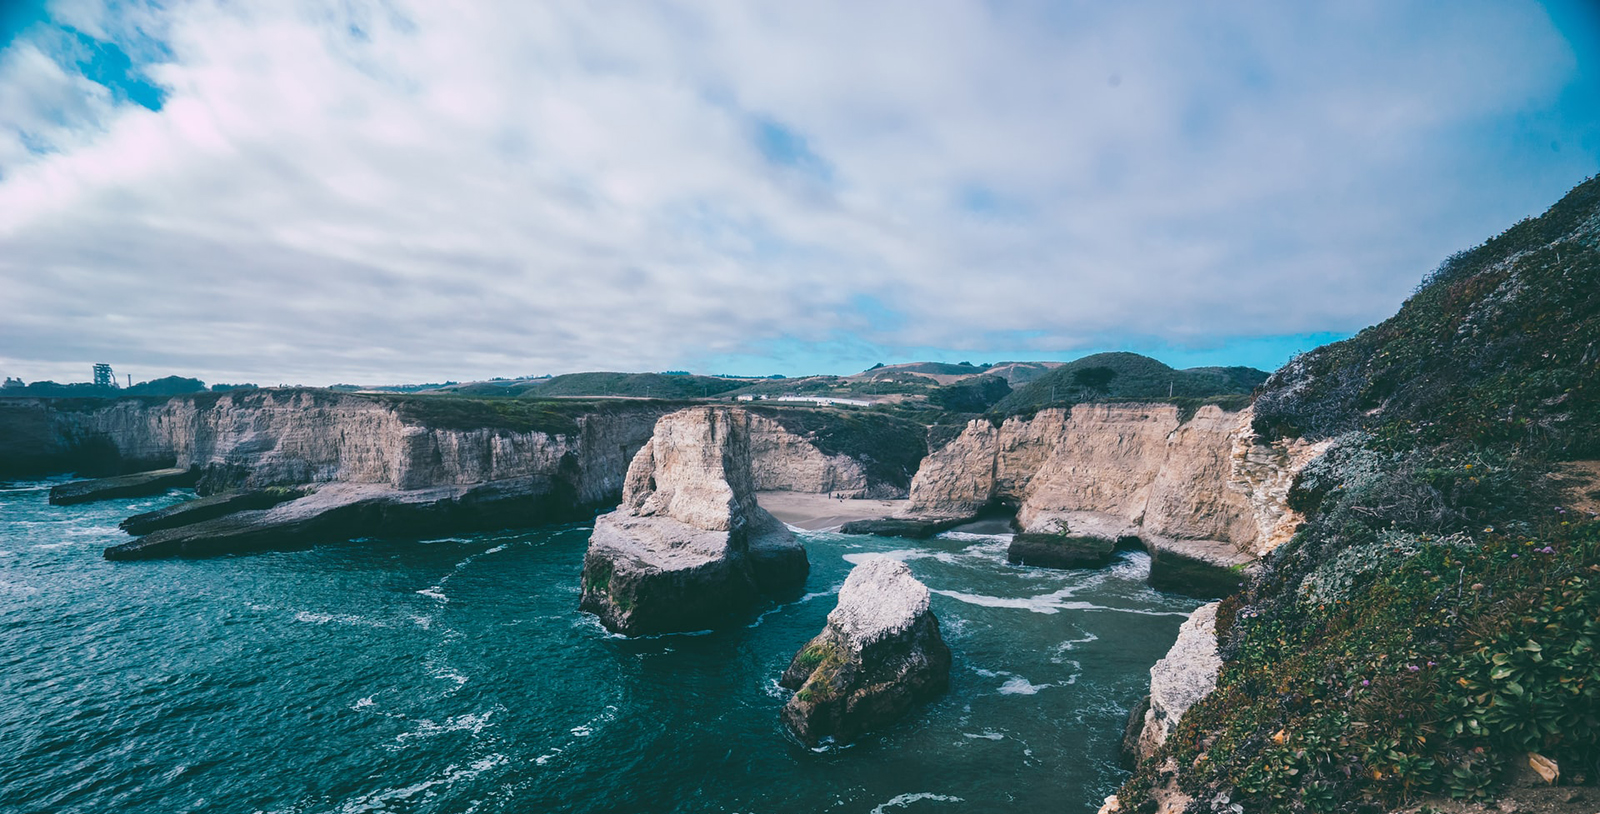
One “good” use of vignetting is to mute distracting elements at the edge of your photo. Bright colors or strong linework could lead your eye right out of the image otherwise. In the same vein, you can use vignetting to draw attention to one portion of your image. Usually this will be the center, but you can get creative with an off-center vignette for a more creative composition, as you’ll see in the image below. This type of vignette is easiest to create in post-processing.
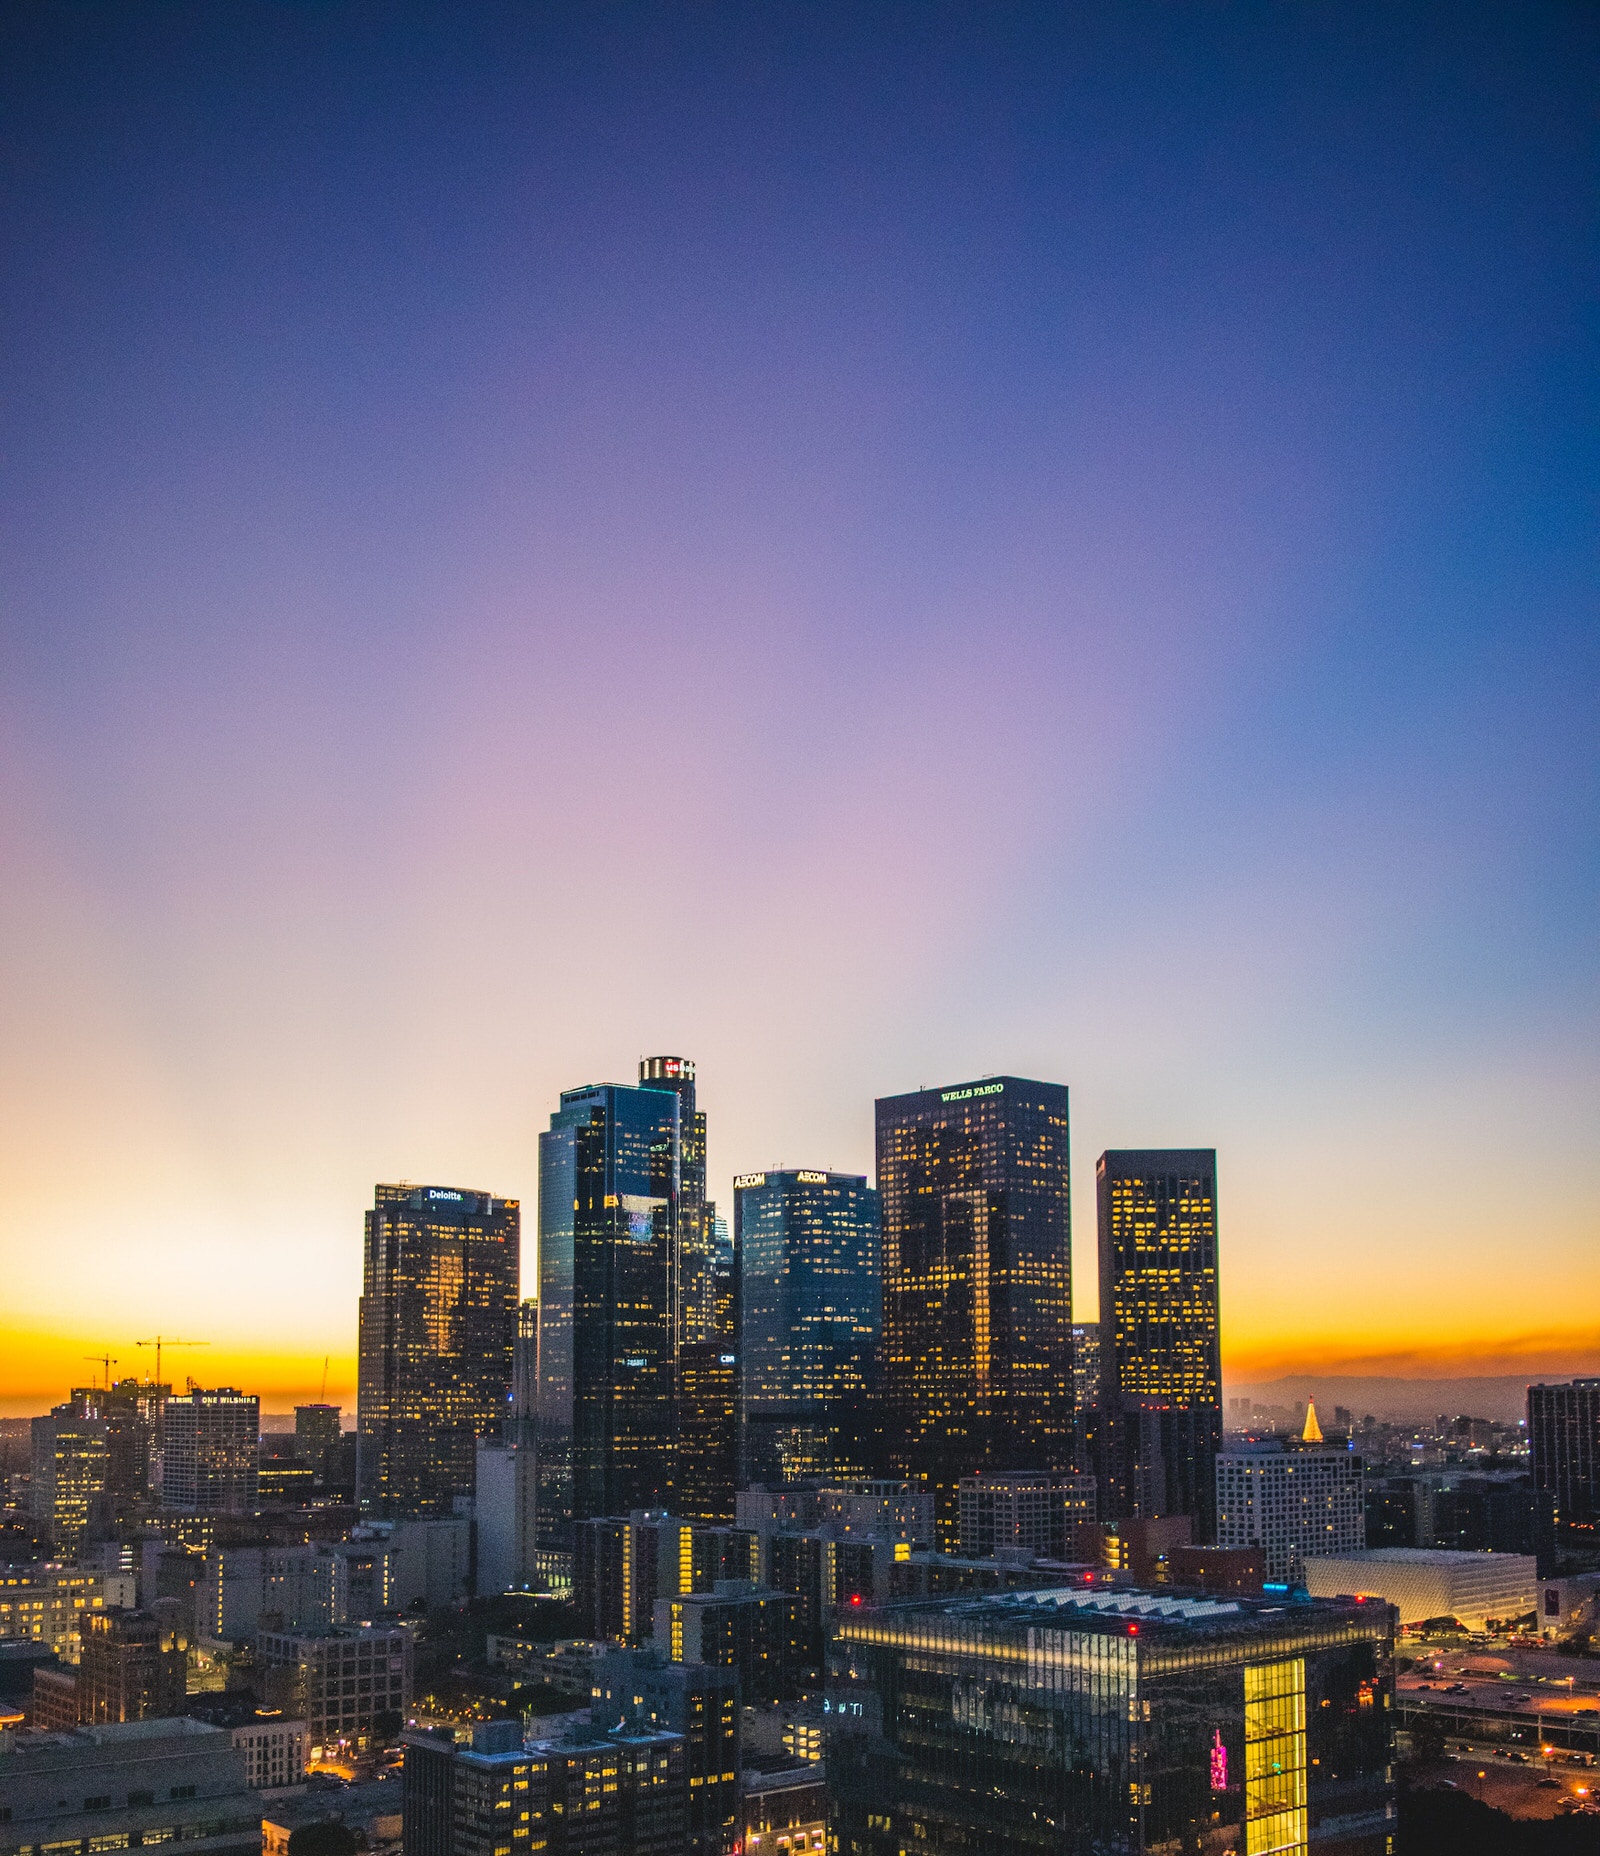
Photo by Shea Rouda on Unsplash
You may find after some experimentation that the best vignette is the one no one notices. A subtle effect that leads the eye without distracting from the composition will make the viewing experience a lot more organic. It’s like the difference between following step-by-step directions on your GPS and relaxing in the passenger seat. Your viewers’ eye should go where you want it to, but your viewers themselves shouldn’t have to put a lot of thought into it.
When Is It Ineffective?
Though some prefer a stronger vignette than others, most photographers can agree that a vignette that works against your composition is not a good use of that effect. If you’re not putting enough thought into your composition to be able to evaluate that, it’s time to start learning a little bit about how to compose your photographs effectively.
That’s not to say a vignette can never be a happy accident, but it’s good to be aware of the things that trigger vignetting in your setup so that you can plan for them. In most cases, a vignette that gives you a stark silhouette of your lens hood at the corners of your photo will not do your work any favors. Unless you have a very specific reason for using that type of vignetting, it will likely be perceived as a rookie mistake. Something like that can color your audience’s feelings toward the rest of your photography.
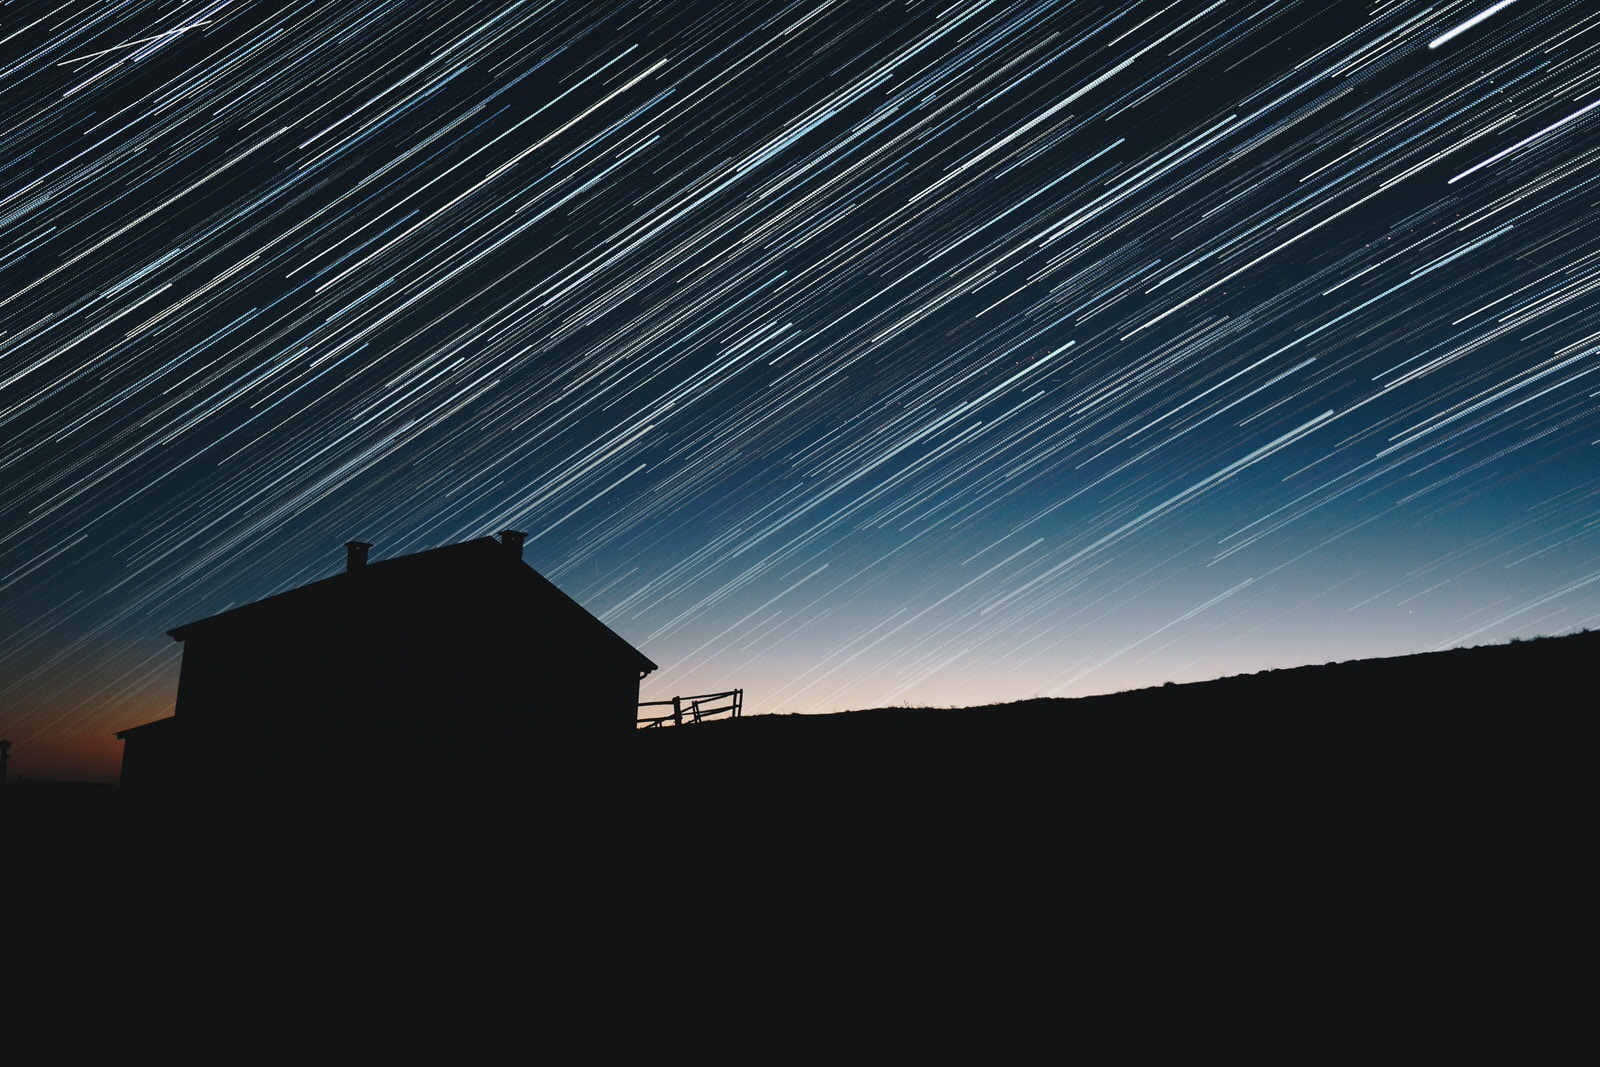
Let’s look at an example. None of the three images below are technically breaking any rules, but one is definitely working better than the others. The first image is consistently bright throughout, but because of that your eye gets a little lost in all the “sameness”. The second image is bordering on kitschy. The vignette is heavy-handed and obvious. It pushes your eye quickly down the snow-covered road and there’s kind of no going back at that point. In the last photo, you’ve got a subtle, feathered darkening at the edges that gently leads your gaze down the road, allowing you to linger on everything else in the composition as you go. Bingo.

Photo by Pigoff PhotographY on Unsplash
Pro Tip
You may also hear vignetting called “light falloff” or “illumination falloff”.
Taking Control of Vignetting
Vignetting is like everything else in the photographic arts: subjective. You’re unlikely to find one specific way to use it that will please everyone. But now that you understand it, you can learn to harness it in your photography. Regardless of personal preferences, other photographers will usually be able to recognize when you’ve used an effect thoughtfully and intentionally, and should respect that even if they don’t particularly care for how it turned out.
How Do We Get It When We Want It?
In-Camera
In the field, it all really boils down to experimentation. That’s one reason it’s a good idea to rent equipment before committing to it; every lens, camera, and filter has its own quirks. If you notice that a particular lens gives you a pleasing vignette, write down the settings that worked for you. Stopping up or down, zooming, and the angle you are shooting at can all affect the amount and quality of the vignetting you get from it.
Lightroom
In post-processing, the sky really is the limit. For a straightforward, hassle-free vignette, go down to the Lens Corrections section in the Develop panel of Adobe Lightroom. There are two foolproof sliders – one for the amount of the effect you get and one to set a midpoint that determines how far into the image your vignette will reach. You can also feather a large brush and paint your vignette on to increase blacks/shadows and decrease whites/highlights at the edges of your photo.
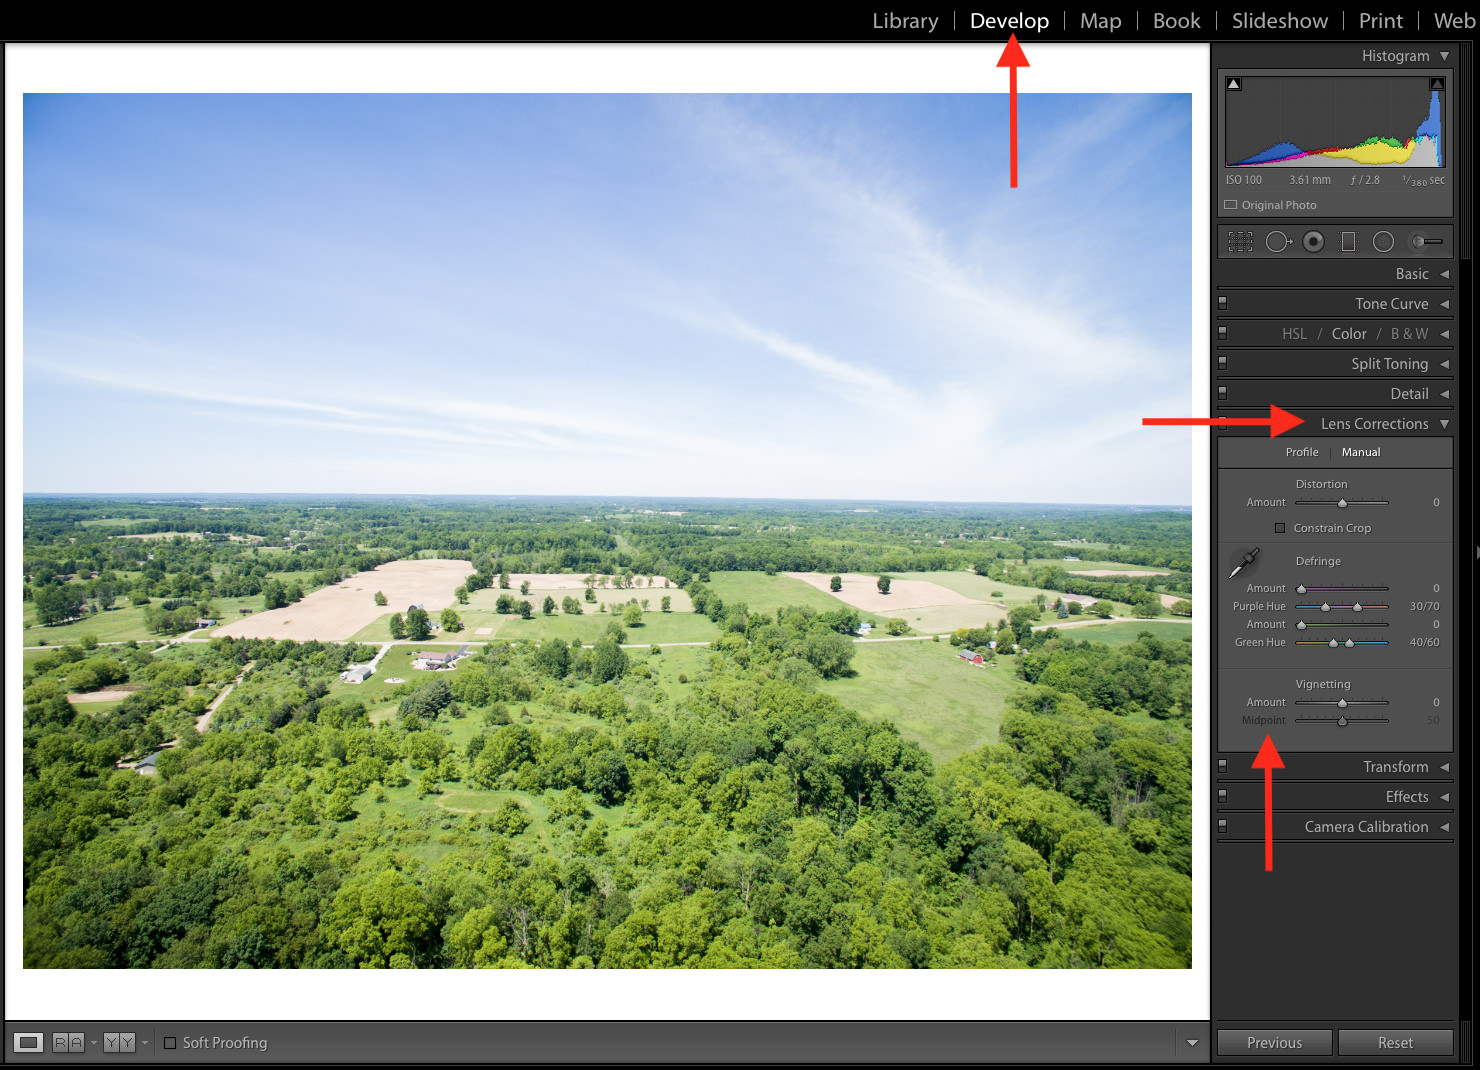
You can also add a radial filter and lower the sliders on only the elements you want to affect. This method gives you a little more control once you start to feel comfortable with adding vignettes.
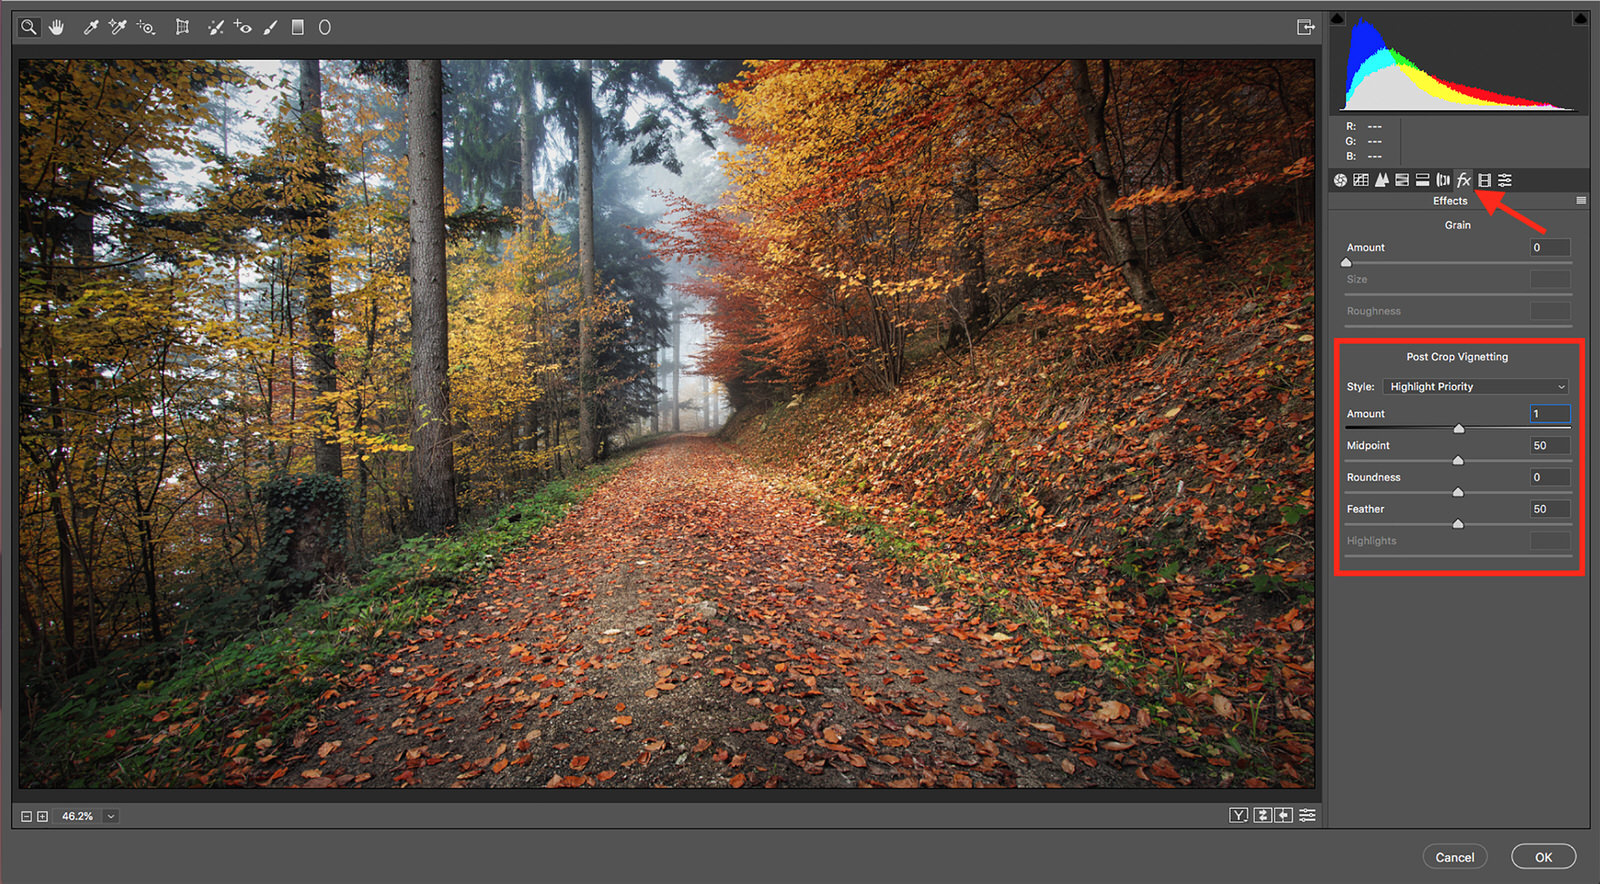
Photoshop
There are actually a couple of ways to add a vignette in Photoshop. Under the Effects section in Camera Raw, you can control the amount, midpoint, roundness, feathering, and highlights in the effect with a series of sliders.
For more control, fill a layer with solid black and add a layer mask. Use Command + I (Ctrl + I for Windows) to invert your mask, then use a feathered white brush to paint your vignette on where desired. Try different blend modes to see which one works most naturally with your image or get creative with different solid colors. This is great for off-center vignettes!
You can use the same masking technique with adjustment layers like Levels and Curves to affect the dynamic range of your vignetted areas in different ways. This is a good solution if you just want to tone down the highlights without punching up the blacks (or vice-versa).
How Do We Avoid It When We Don’t Want It?
Mechanical vignetting isn’t terribly hard to avoid. It’s simply a matter of using only accessories that are made specifically for your camera/lens model. Of course, there is a price tag that goes along with that solution.
Vignetting from the lens itself is usually most dramatic from wide-angle lenses and wide open apertures. This can be minimized by stopping down (increasing your f-number) and choosing your lens wisely in the field. Your lens may have known issues that can be offset by settings in your camera, but be aware that these settings will probably be ignored by your editing software if you are shooting in RAW.
Pixel vignetting is caused by the angle of the light that’s hitting your sensor, so changing your f-number isn’t going to help you much. The only way to really control this is to change your angle, but if your composition is dependent on your camera staying put, a little post-processing should manage this pretty well for you.
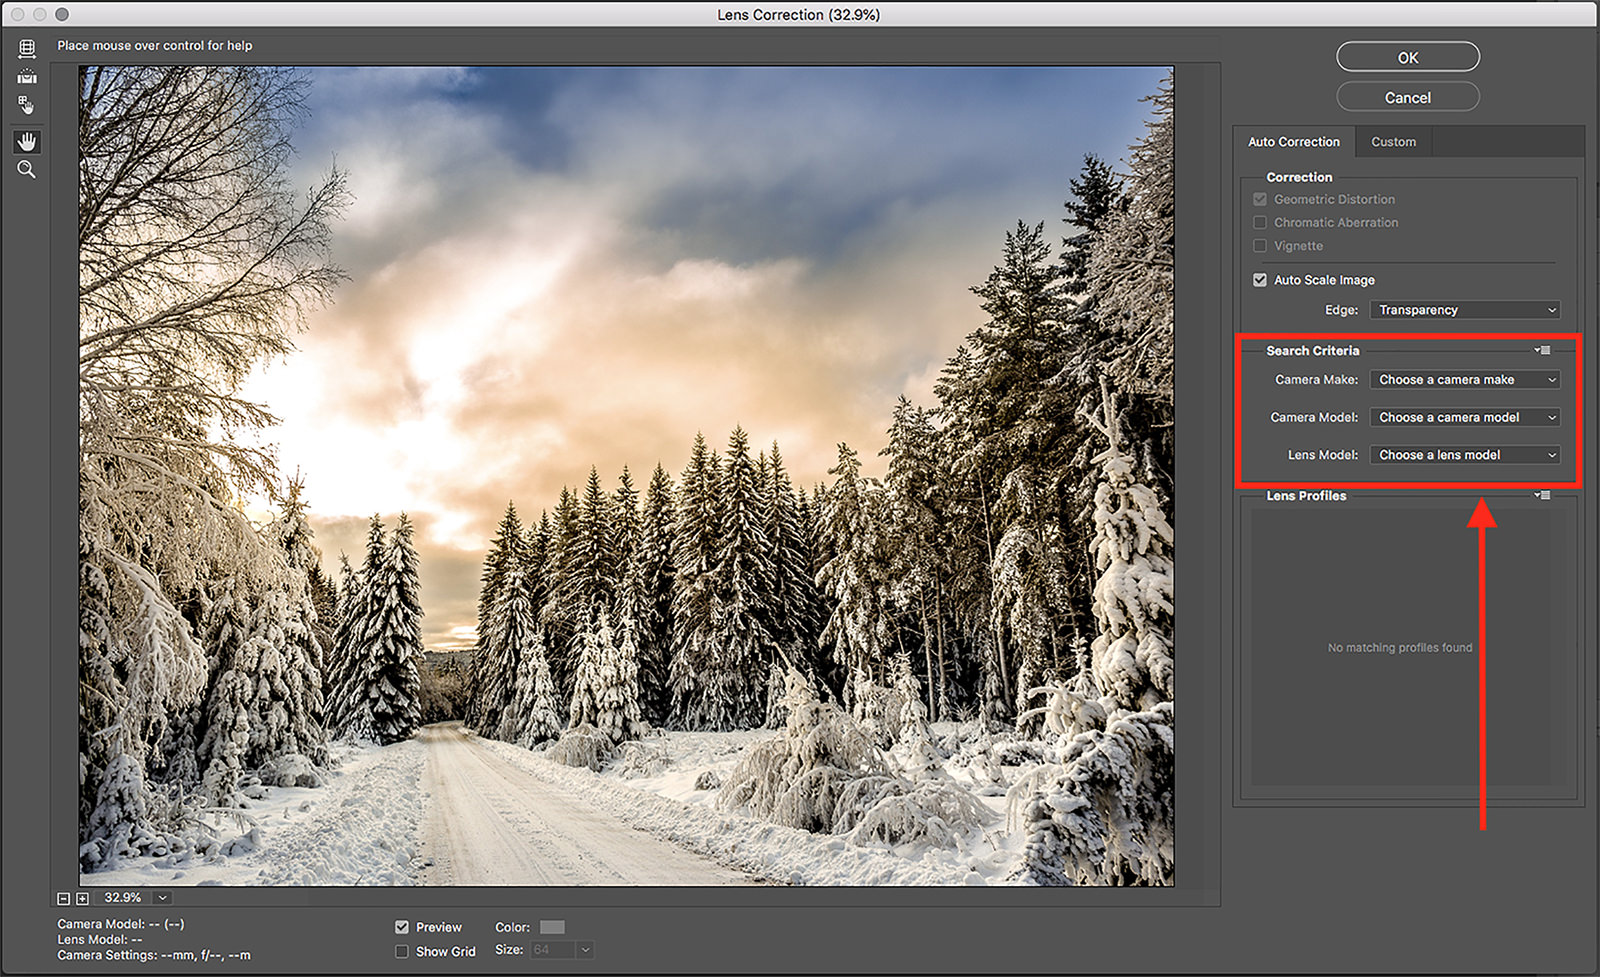
How Do We Get Rid of It Once We’ve Got It?
If you shoot in RAW and were disappointed to hear that your in-camera lens corrections would be ignored by Photoshop, perk up. Both Lightroom and Photoshop (and a host of other editing softwares) have Lens Correction options that can manage the known eccentricities of your equipment. We discussed finding the Lens Corrections section in the Develop tab of Lightroom earlier. In Photoshop, go to Filter > Lens Correction. Your equipment info may show up in the metadata, but you can also enter it manually.
For harsh, tunnel-like vignettes caused by accessories, a good crop might be in order. If the effect extends so far into your image that you can’t crop it out completely without a considerable dip in quality, try cropping only some of it and reconstructing the remaining areas with a cloning or healing tool. If you know in advance that you’ll be shooting with an accessory that causes this problem, zoom out as far as you can to allow yourself plenty of cropping room in post.
Don’t forget that you can try to reverse a vignette using the same techniques you would use to create one. Masking with a lighter solid color layer or a brightened Levels/Curves adjustment layer can make a huge difference. You can also nudge the Amount slider toward the lighter side in the vignetting section of Lightroom or Camera Raw.
Pro Tip
Try experimenting with solid colors besides black when you add vignetting with an adjustment layer mask. By using the Eyedropper (I) tool to select a color that blends with your composition and finding a darker version of that color in the Color Picker, you can integrate a vignette more seamlessly into your photo.
Vignetting is a useful compositional tool and an easy one to create. By understanding it and utilizing it thoughtfully, you’ll be able to subtly (or not-so-subtly) up your compositional game both in-camera and during the editing process. You can also avoid being surprised by it during a shoot! Most importantly, you now have the control to only allow quality, intentional vignetting to appear in your work.
RELATED ARTICLES

The Photographer’s Complete Guide to Facebook Marketing
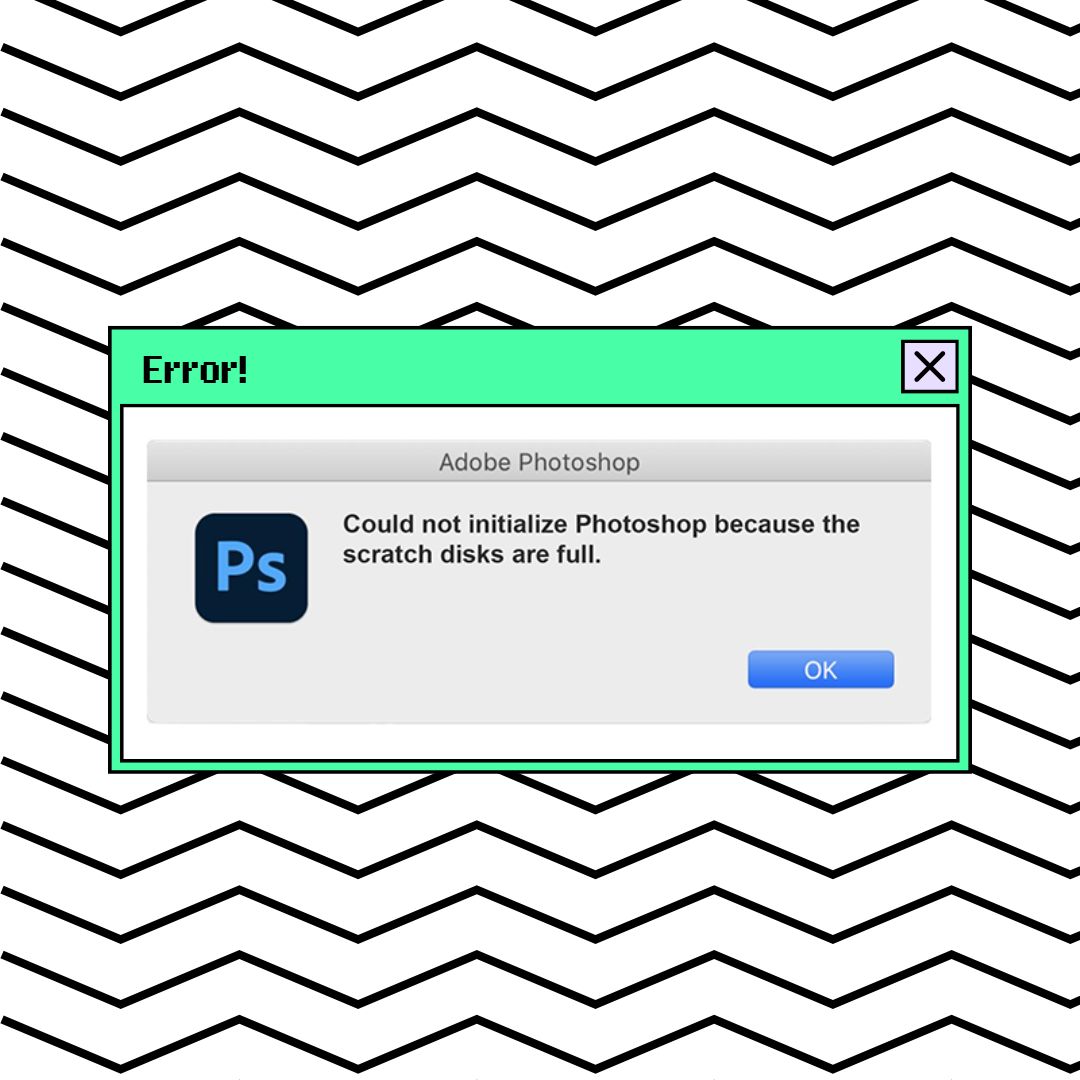
Easy Fix for the Photoshop Scratch Disk Full Error
The Beginner’s Guide to Time-Lapse Photography
Managing Digital Noise: The Good, the Bad, and the Ugly
How to Market Yourself to Win New Photography Clients This Holiday Season
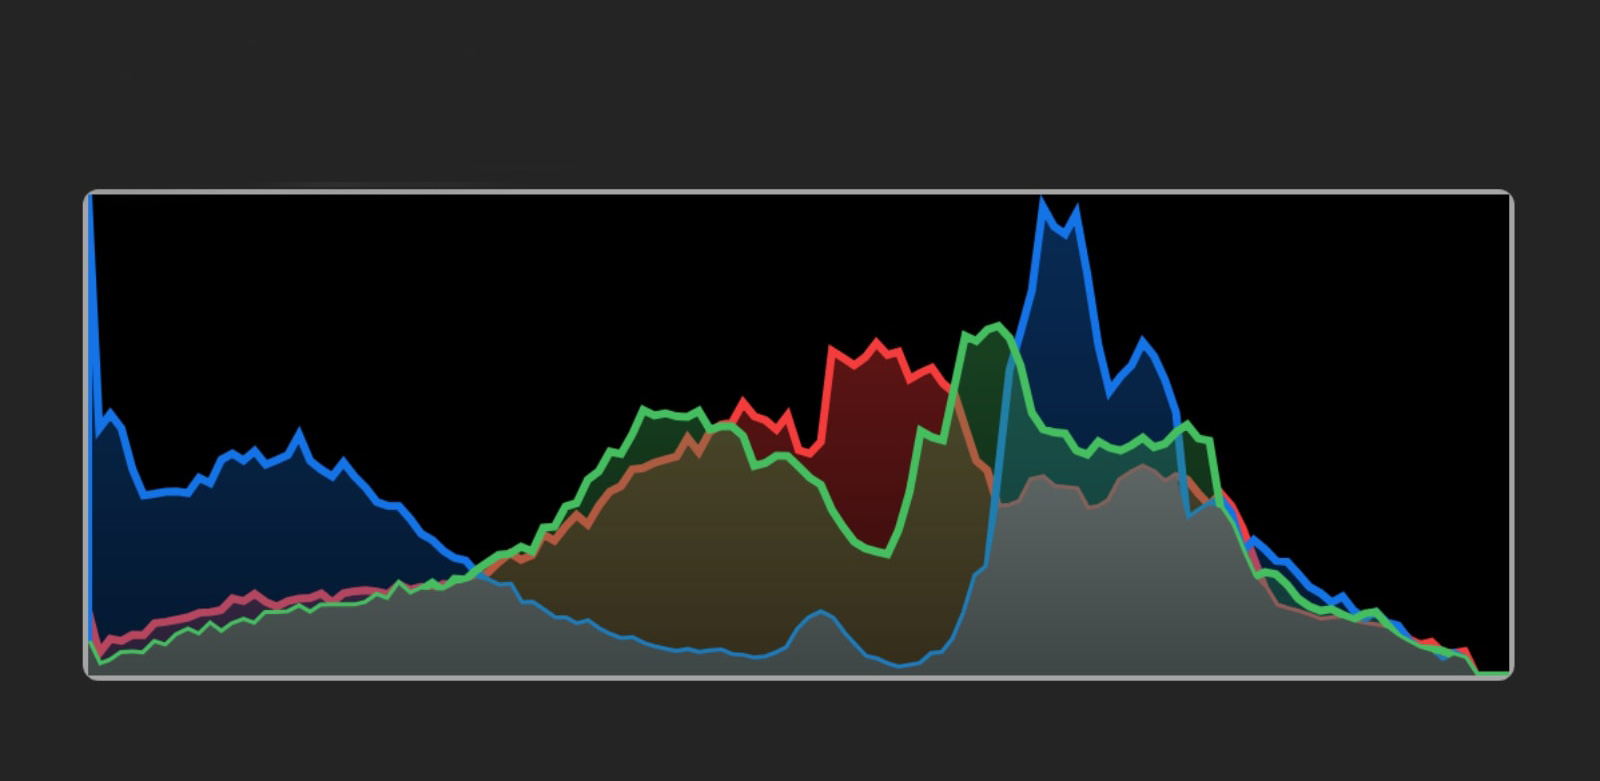
Histograms: How to Read Them and Use Them to Take Better Photos
How to Apply a Color Grading LUT in 13 Different Programs
Catalog > Free Tutorials > 3 Steps to Editing Children’s Photos in Photoshop

Tutorial Description
These three simple steps will take your children’s photos to the next Level!
Step One: Add a Vignette
A Vignette is a great way to Draw attention to a specific area of a photo. By darkening the edges of a photo, the viewer’s eyes will be drawn towards the center of the image, and ultimately the subject of the photo.
A Vignette can be added in many different ways, in this episode we use a Radial Gradient to add a Vignette in Photoshop.
First, choose the Gradient Tool and select ‘radial’ from the top menu. Then click on the gradient editor and choose ‘black, white’ as the gradient. To create a gradient, make a New Layer and click-drag from the center of the image outwards. The goal is to have white in the center of the image and black on the edges. If the opposite appears, check the ‘Reverse’ box at the top of the Screen.
After making the Radial Gradient, change the layer Blend Mode to ‘Soft Light’ and lower the layer Opacity until the effect looks natural.
Step Two: Add a Warming Filter
A warming Filter is a great way to warm Skin tones in an image and give the overall photo a warm glow.
To create a warming Photo Filter, go to ‘Layer – New Adjustment Layer – Photo Filter’ and choose ‘Warming Filter (85)’ from the drop-down menu. Adjust the density of the warming Filter to best suit the photo.
This simple step can make a big Difference to a photo.
Step Three: Enhance the Eyes
Eyes are the window to the soul, learn how to enhance them in step three.
The first step is to add Color to the eyes, by using the Vibrance Adjustment Layer. Go to ‘Layer – New Adjustment Layer – Vibrance’ and increase the Vibrance and Saturation sliders until the eye Color pops. This layer should only be visible over the eyes, so be sure to fill the Layer Mask with black and paint white just over the eyes.
Next, add Brightness and contrast by using the Brightness/Contrast Adjustment Layer. Go to ‘Layer – New Adjustment Layer – Brightness/Contrast. Increase both Brightness and Contrast to add more attention to the eyes, then make the Layer Mask black by going to ‘Edit – Fil – Black’ and painting white over the eyes.
Lastly, create a New Layer and use the Sharpen Tool to paint over the eyes, adding a bit of sharpening. Be sure to make the sharpening visible yet subtle, too much sharpening can ruin a photo.