

Download Assets
This tutorial includes 1 Photoshop brush. Downloads are free with a PHLEARN account.
- Free sample files with every tutorial on PHLEARN
- New tutorials published every week
- Unlimited downloads with your free PHLEARN account
description
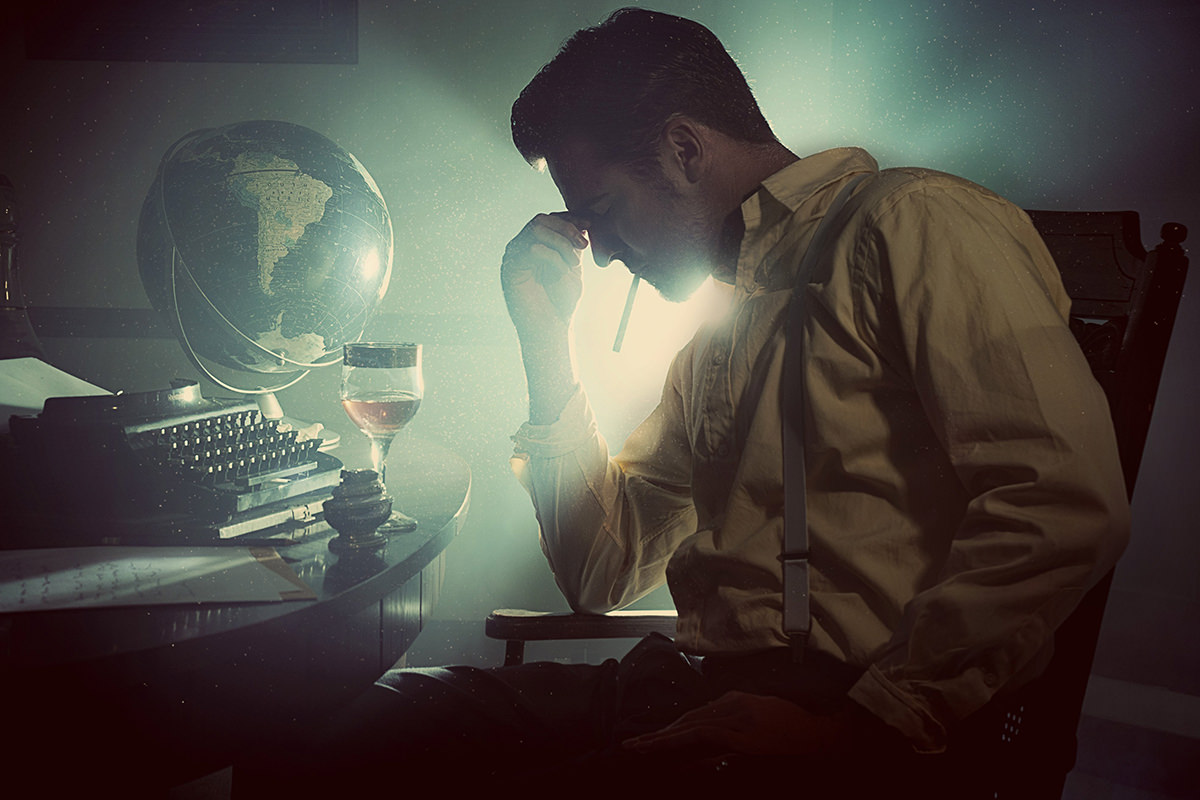
Floating dust catching the light adds real atmosphere to a backlit portrait, and it takes one custom brush. This free tutorial paints a loose cluster of specks, defines it as a brush preset, then turns Size Jitter, Angle Jitter and Scattering all the way up so no two stamps repeat. The dust color is sampled from the scene’s own light rather than left white, and a mask keeps it only where light is actually passing through.
Enjoying This Free Tutorial?
We publish a new free tutorial every week, each one with sample images and PSDs you can download and follow along with. Sign up and they land straight in your inbox, along with early word on sales, events and subscriber-only offers.

Create Dust From Scratch in Photoshop
A little bit of floating dust catching the light adds real atmosphere to almost any backlit portrait, and building it as a custom brush means it’s built once and reusable forever after. This tutorial creates that brush from scratch, then shows how to paint and mask it into a backlit image so the dust reads as part of the light rather than sitting on top of it.
Creating the Basic Dust Shape
The foundation of the brush is a small, hand-drawn cluster of random specks rather than a single clean shape.
-
Create a New 500×500 Pixel Document
Press Cmd/Ctrl+N to create a new document and set it to 500 by 500 pixels.
-
Paint a Cluster of Random Specks
Using a small brush, paint a scattering of specks spaced loosely apart. Vary their density and size deliberately — some more solid, some lighter — rather than making them perfectly round or evenly spaced, since real floating particles aren’t uniform.
Defining the Custom Brush Preset
Turning that painted cluster into an actual brush is what gives you real control once you start using it on an image.
-
Define a Brush Preset From the Cluster
Go to Edit > Define Brush Preset, name it, and click OK. Painting with the new brush will now stamp out that same cluster shape.
Adding Shape Dynamics for Random Variation
The brush’s raw shape alone still looks too repetitive to pass as real dust, so the Brush panel’s dynamics settings are what actually sell the effect.
-
Open the Brush Panel and Enable Shape Dynamics
Go to Window > Brush to open the Brush panel, then turn on Shape Dynamics.
-
Turn Up Size Jitter and Lower Minimum Diameter
Turn Size Jitter all the way up and bring the minimum diameter down, so each stamp of the brush varies noticeably in size.
-
Turn Up Angle Jitter
Turn Angle Jitter all the way up as well, so the cluster shape rotates randomly with each stamp instead of repeating at the same angle.
Why Shape Dynamics Makes the Brush Look Organic
Without Shape Dynamics, the same painted cluster repeats identically every time you stamp the brush, which reads as an obvious pattern rather than random dust. Randomizing size and angle on every stamp is what breaks up that repetition and gives the brush the organic, unpredictable look real floating particles actually have.
Adding Scattering and Adjusting Count
Two more settings in the same Brush panel control how the specks spread out and how densely they lay down.
-
Turn On Scattering
Enable Scattering in the Brush panel so individual specks spread out randomly as you paint instead of staying clustered along your brush stroke.
-
Adjust Count for More or Less Density
Raise the Count setting to lay down more particles at once for a denser effect, or lower it for a sparser one.
Why Scattering and Count Shape the Overall Density
Scattering is what turns a straight brush stroke into a natural-looking spread of individual particles rather than a line of dust. Count then controls how much of that scattered effect shows up per stroke, giving you a simple way to make the dust feel light and sparse or thick and heavy depending on the image.
Sampling Dust Color From the Image Itself
Dust should never default to plain white, since very few real images have perfectly neutral light.
-
Sample a Light Color From Near the Light Source
Press B for the Brush tool, then hold Alt/Option and click a light area near where the light is coming from in the image to sample its color.
Why Dust Color Should Match the Scene’s Own Light
An image that’s been color toned rarely has a pure white light source, so painting dust in plain white would look artificial and disconnected from the rest of the photo. Sampling the color directly from the light in the image ties the dust into the same color story as everything else in the frame.
Painting the Dust Into the Image
With the brush and color both set up, actually adding the dust is just a matter of painting where it makes sense.
-
Paint Dust Around the Light Source
On a new layer, paint the dust brush around where the light is entering the frame, adding more in some areas and less in others rather than spreading it evenly.
Masking Dust Into Highlight Areas Only
Dust floating in areas that aren’t lit doesn’t read correctly, so a layer mask is what keeps it confined to where it actually belongs.
-
Add a Layer Mask and Paint Black to Hide Unwanted Areas
Add a layer mask to the dust layer, then paint black at a flow of around 30–40% over any areas where the dust shouldn’t be visible, letting it fade away gradually rather than cutting off sharply.
-
Keep Dust Concentrated in the Highlights
Make sure the dust stays mostly in highlight areas where light is actually passing through, and mask it away from anything blocking the light, since dust isn’t visible in areas with no light hitting it.
Why Dust Needs to Stay in the Light
Dust only becomes visible where light is catching it directly, which is why dust painted into a shadowed or blocked area looks wrong rather than atmospheric. Masking the effect so it only shows up in genuine highlight areas keeps it reading as something the light is illuminating, not something sitting on top of the image.
Saving the Brush as a New Preset
Once the brush is dialed in, saving it as its own preset means it’s ready to reuse on the next backlit image without rebuilding it from scratch.
-
Save a New Brush Preset
From the Brush panel menu, choose New Brush Preset and give it a name. It will then appear at the end of your brush list any time you right-click with the Brush tool.
-
Load a Downloaded Brush File if Needed
To load the dust brush included with this tutorial, or any other PHLEARN brush, go to Window > Brush Presets, open the panel menu, choose Load Brushes, and locate the downloaded .abr file.
Why This Approach Works
Building dust as a custom brush rather than painting individual specks by hand is what makes this technique practical and reusable. Shape Dynamics and Scattering do the work of randomizing size, angle, and placement automatically, so every stroke looks organic instead of repetitive, while sampling color directly from the image ties the dust into the scene’s existing light rather than looking pasted on. Masking the result so it only appears in genuine highlight areas is the final piece that keeps the effect physically believable — dust that shows up in shadow reads as a mistake rather than atmosphere.
Final Thoughts
This effect works on any backlit image, indoors or outdoors, though outdoor scenes may call for a slightly larger brush to suggest bigger floating particles like leaf fragments rather than fine indoor dust. Once the brush is saved, adding this kind of atmosphere to a new image takes only a couple of minutes, and it’s a technique worth reaching for anytime a photo has strong light coming through from behind the subject.
Quick Reference: Keys, Menus and Settings
- Brush documentCmd/Ctrl + N, 500 x 500 pixels; paint small, uneven specks
- Make the brushEdit > Define Brush Preset
- RandomizeWindow > Brush: Shape Dynamics, Size Jitter and Angle Jitter all the way up, Minimum Diameter down
- Spread it outScattering on; Count up for more particles, down for fewer
- Dust colorB, then Alt/Option-click a light area near the light source
- Save or loadBrush panel menu > New Brush Preset; Window > Brush Presets > Load Brushes for the .abr
- Keep it in the lightLayer mask, paint black at 30 to 40% flow away from the highlights
No AI, no generative credits.
Free Downloads
Paint With the Same Brush
Get the finished dust brush from the video, ready to load into Photoshop and paint floating particles into any backlit photo. Free with a PHLEARN account.
Dust Brush in Photoshop: Common Questions
Why make a custom brush instead of painting each speck?
Painting specks one by one is slow and looks deliberate. A custom brush stamps a whole random cluster with every click, and the Brush panel settings vary it for you.
What size document do I paint the dust shape in?
Press Cmd/Ctrl + N and make it 500 by 500 pixels. Paint small specks spaced apart, some denser than others, and none of them perfectly round.
How do I turn my painted specks into a brush?
Go to Edit > Define Brush Preset, give it a name and click OK. The Brush tool now paints that same cluster shape.
Why does my dust brush look like a repeating pattern?
Shape Dynamics is off. In Window > Brush, turn on Shape Dynamics, push Size Jitter and Angle Jitter all the way up and lower the Minimum Diameter, so every stamp changes size and rotation.
How do I get more or fewer particles per stroke?
Turn on Scattering, then raise Count for a denser spread or lower it for sparse dust. The same brush works for stars, too.
Should dust be white?
Usually not. Press B for the Brush tool, hold Alt/Option and click a light area near the light source. A color-toned photo rarely has pure white light, so the sampled color fits better.
Why does some of my dust look like stars?
Dust in dark areas reads as tiny light sources. Add a layer mask and paint black at about 30 to 40% flow so the dust fades out, keeping it in the highlights and away from anything blocking the light.
The dust looks too big. How do I make it smaller?
Make the brush smaller. The particles scale with the brush size. For outdoor scenes a slightly bigger brush can suggest larger bits, like pieces of leaf.
How do I save or load the dust brush?
To save it, choose New Brush Preset from the Brush panel menu. To load a downloaded .abr file, go to Window > Brush Presets, open the panel menu and choose Load Brushes. It appears at the end of the list when you right-click with the Brush tool.
Is the dust brush free?
Yes, with a free PHLEARN account. You get 1 Photoshop brush: the finished dust brush from the video, ready to load with Load Brushes.
From the Magazine View all
Stories, interviews and guides for photographers, new every week.
 BusinessHow to Compete With AI: Give Your Clients MoreEveryone has the same tools now, and your clients know it. The way to compete is to give them more.
 EditingLightCraft vs Lightroom: Is the Free Clone Any Good?The free clone on the same RAW files: what matches, what breaks and who should switch.
 EditingHow to Tell If a Photo Is AI, and Prove Yours Is RealThe tells that still work in 2026, why detectors disagree, and how to prove your own photos.
Master Photoshop, Lightroom and Photography
Join PHLEARN PRO for $12.99 a month, or $99.99 a year (save 36%). Cancel anytime, with a 100% money-back guarantee.





