
Download Assets
This tutorial includes 1 sample RAW file and 1 PDF guide. Downloads are free with a PHLEARN account.
- Download the sample images and PSDs from every free tutorial on PHLEARN
- New free tutorials published every week
- One free account — sign up once, then download anything
Free PDF Guide · 4 Pages
This Tutorial as a Step-by-Step PDF
The guide walks through each Adjustment Brush pass in Camera Raw: Feather up and Flow about 5 for the waves, a warmer brush for the lights, a Luminance Range Mask on the sky, Shadows way up on the dark rock, then a Smart Object and Filter > Sharpen > Unsharp Mask. Keep it next to your keyboard.
description
Most of the work behind a more impactful landscape edit happens before the file ever reaches Photoshop. This walkthrough stays in Adobe Camera Raw, using a low-flow adjustment brush to dodge and burn one region at a time instead of pushing a single global slider — brightening specific areas, adding a warm glow to light sources, bringing drama to the sky with range masking, and recovering shadow detail, before finishing in Photoshop with non-destructive sharpening as a Smart Filter.
Enjoying This Free Tutorial?
We publish a new free tutorial every week, each one with sample images and PSDs you can download and follow along with. Sign up and they land straight in your inbox, along with early word on sales, events and subscriber-only offers.
How to Give Your Landscape Photos More Impact in Photoshop
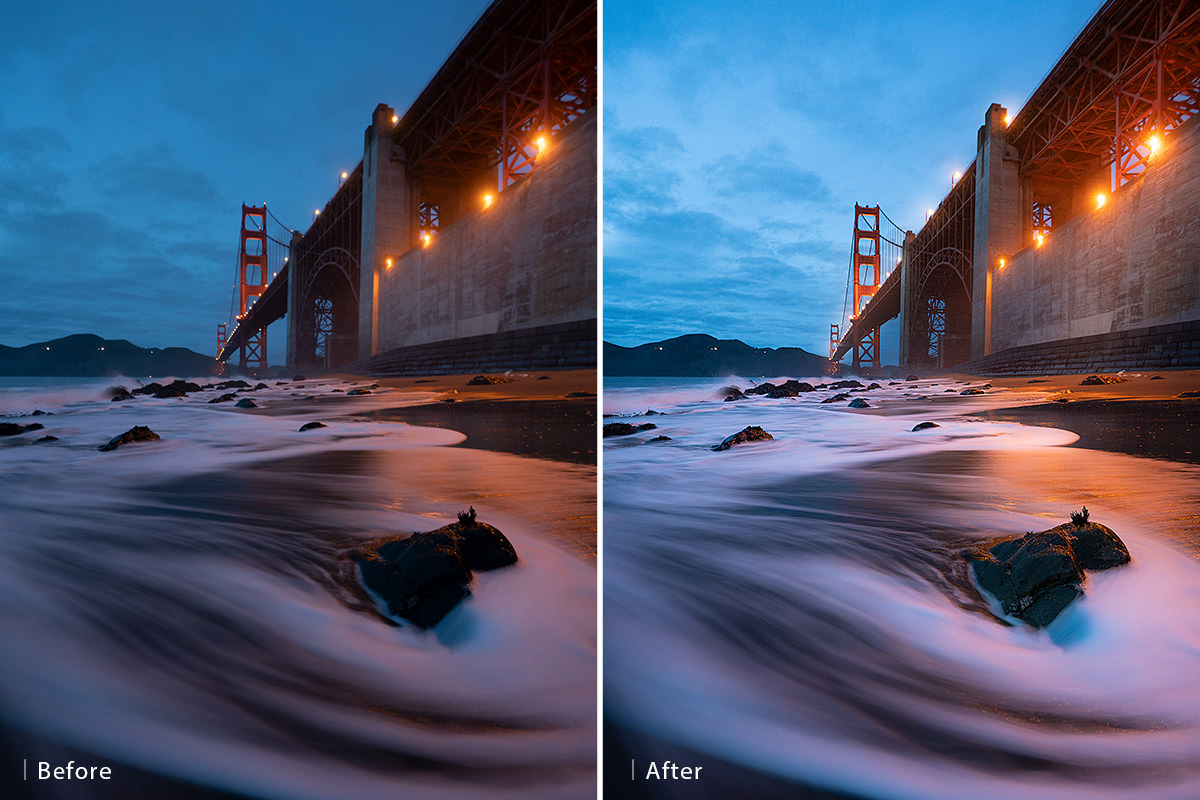
Most of the work behind a more impactful landscape edit happens before the file ever reaches Photoshop — inside Adobe Camera Raw, using the adjustment brush to dodge, burn, recover shadow detail, and add glow to specific areas of a raw photo one region at a time, rather than adjusting the whole image with a single global slider.
Getting Started in Adobe Camera Raw
A raw file always opens into Adobe Camera Raw first, which is where the majority of this edit actually happens before the image ever reaches the main Photoshop canvas.
-
Open the Raw File
Drag the raw image directly into Photoshop. The photo is a raw DNG by Aaron’s friend Andrew, who goes by Andrew Optics (@andrewoptics) on Instagram; download it and follow along. Because it’s a raw file, it opens into Adobe Camera Raw automatically, where the bulk of the editing for this workflow takes place.
Brightening Specific Areas with a Low-Flow Adjustment Brush
The adjustment brush allows you to paint an edit onto just one part of an image, but the Flow setting determines whether that edit builds up naturally or switches on at full strength immediately.
-
Lower the Flow Before Painting
Select the adjustment brush (the [ and ] keys make it smaller and larger), raise Feather all the way for a soft edge, and bring Flow down to around 5. Raise Exposure, then paint over the area you want brighter — like a set of white waves — building the effect up gradually with repeated strokes rather than applying it at full strength in one pass.
-
Erase Overpainted Areas
Hold Alt/Option to switch the brush into an eraser and pull back any area where the effect built up more than intended.
Why Low Flow Looks More Natural Than High Flow
At a high flow setting, painting over an area applies the adjustment at essentially full strength in one pass, which reads as an obvious on-off effect rather than a gradual one. A low flow setting lets repeated strokes build up an effect incrementally, the same way a hand-painted highlight would gradually intensify, which is what keeps the result looking like natural light rather than a flat digital overlay.
Adding a Warm Glow to Light Sources
A second adjustment brush pass targets the photo’s actual light sources, warming their color and increasing their brightness to make them feel like they’re genuinely glowing.
-
Click Directly on Each Light Source
Create a new adjustment brush with a higher flow this time, since each click should apply consistently, then click directly on each light in the frame, twice on each, so they all get about the same level.
-
Warm the Color Temperature
Raise the Exposure to brighten the lights, then warm the Temperature and add a touch of Magenta so the glow reads as a warm, orange-toned light rather than a cool white one.
-
Extend the Glow to Nearby Surfaces
Add to the same adjustment pin by painting over nearby areas that would realistically be lit by those lights, like a shoreline or the underside of a bridge, so the glow feels like it’s actually illuminating its surroundings. To check your progress, click the button that looks like a small Y below the preview for a side-by-side before and after, then go back to the single view.
Adding Drama to the Sky with Range Masking
Painting a brightening effect directly over a sky often spills onto other elements underneath it, like a bridge or mountains — Range Masking fixes that by confining the adjustment to just the tones you actually want it to affect.
-
Paint Broadly Over the Sky
Create a new adjustment brush and bring Temperature back to 0, since a new brush keeps the last brush’s settings. Raise Exposure so you can see what you are doing, and raise Flow too, because this pass only needs to cover the sky. Paint freely over the sky and anything beneath it; precision doesn’t matter yet, since Range Masking will clean this up in the next step.
-
Apply a Luminance Range Mask
Set Range Mask to Luminance and drag the range slider so the effect is hidden in the shadows and only shows up in the highlights — the same underlying idea as Blend If in Photoshop. This keeps the brightening confined to the sky’s highlights while protecting the darker mountains and bridge underneath. Visualize Luminance Map shows which areas are affected, and the Smoothness slider usually looks good around the middle, though it depends on the image.
Recovering Shadow Detail in Dark Areas
Areas that read as a featureless black blob often still hold real detail — it’s just buried too deep in the shadows to see without help.
-
Paint Shadow Recovery into a Dark Area
Create a new adjustment brush, reset Exposure and Tint to zero, and raise the Shadows slider significantly. Paint over the dark area, a foreground rock for instance, to reveal texture and detail that was there all along, just hidden in the shadow tones. Warm the brush’s Temperature a little as well, then zoom out and add any other dark areas you want brighter, such as the area under the bridge.
-
Protect the Highlights with a Range Mask
Because a strong Shadows adjustment can still nudge nearby highlights, set Range Mask to Luminance again and confine the effect to the shadow tones only, so brighter areas stay untouched.
Checking Which Brush Affected Which Area
With several adjustment brush pins active on one image, it’s easy to lose track of which pin controls which area. Clicking a pin and enabling the mask overlay shows exactly where that specific adjustment is painted, making it much easier to erase or refine the right one instead of guessing.
Finishing with Global Adjustments and a Smart Object
Once every local area has been addressed individually, the last Camera Raw pass applies gentle global adjustments before bringing the file into Photoshop as an editable Smart Object.
-
Raise Vibrance, Clarity, and Texture Slightly
Switch back to the Hand tool to edit the whole image, and raise Vibrance a bit, Clarity a touch for mid-tone contrast, and Texture for a subtle sharpening effect — each in moderation, since pushing Clarity too far tends to look harsh. Press P to toggle the before and after. Aaron wanted more light in the foreground, so he clicked the first pin (a selected pin turns red), lowered Flow again and painted more of the waves into that same adjustment. Choose Fit in View from the zoom menu to see the whole photo again.
-
Open as a Smart Object
Set Color Space to Adobe RGB (1998) and Bit Depth to 16-bit, then check Open in Photoshop as Smart Objects before clicking Open Object.
Why Opening as a Smart Object Matters
Opening as a Smart Object keeps every Camera Raw adjustment fully editable later — double-clicking the layer thumbnail reopens Camera Raw with every previous adjustment brush pin, range mask, and slider exactly where it was left, so nothing needs to be redone from scratch to make a further change.
Sharpening Non-Destructively as a Smart Filter
With the image now a Smart Object, even a final sharpening pass stays fully editable.
-
Apply Unsharp Mask
Go to Filter > Sharpen > Unsharp Mask, raise the Amount, and keep Radius relatively low to avoid an unnatural, over-sharpened edge.
Keeping Sharpening Fully Reversible
Because the layer is a Smart Object, Unsharp Mask applies as a Smart Filter rather than a permanent pixel change — it can be toggled off entirely or double-clicked and reopened to adjust its settings at any point, with no loss of quality from reapplying it repeatedly.
Why This Approach Works
What separates this edit from a handful of global slider adjustments is that every change is confined to exactly the area it’s meant to affect, using pins, Range Masking, and adjustment brush flow to keep each effect from bleeding into surrounding tones. That’s a fundamentally more controllable approach than adjusting exposure, shadows, or vibrance for the whole photo at once, because each local pin can be revisited and refined independently at any point — including well after the file has moved into Photoshop as a Smart Object. For anyone who wants to combine this kind of local dodging and burning with even more advanced tonal control, luminosity masking and manual HDR both build on the same principle of targeting adjustments to specific tonal ranges rather than the image as a whole.
Final Thoughts
The real lesson behind this edit isn’t any single slider, it’s the discipline of addressing each part of a photo — the waves, the lights, the sky, the shadows — individually before ever touching a global adjustment. By the time Vibrance, Clarity, and Texture get applied at the end, most of the heavy lifting is already done, which is exactly why those final global tweaks can stay so subtle. Keeping the whole edit inside a Smart Object means none of that work is locked in permanently either — every adjustment brush pin, range mask, and the final sharpening pass can all be revisited later without starting over.
Quick Reference: Keys, Menus and Settings
- Brush size and softness[ / ]; Adjustment Brush with Feather all the way up and Flow about 5
- Erase from an adjustmentAlt/Option + paint; click Add to paint again
- Keep it off the shadowsRange Mask > Luminance, drag the Luminance Range slider in from the left
- Move around zoomed inHold Spacebar
- Before and afterP, or the Y button below the preview for side by side
- Open as a Smart ObjectAdobe RGB (1998), 16 bits, Open in Photoshop as Smart Objects, then Open Object; double-click the thumbnail to reopen Camera Raw
- SharpenFilter > Sharpen > Unsharp Mask: Amount up, Radius low

Free Downloads
Follow Along on the Same RAW File
Get the raw DNG landscape by Andrew Optics that Aaron edits in Camera Raw, plus the 4-page PDF guide. Free with a PHLEARN account.
Landscape Edits in Camera Raw: Common Questions
Why does my raw photo open in Camera Raw instead of Photoshop?
A raw file always goes through Adobe Camera Raw on its way into Photoshop. Most of this edit happens there, with the Adjustment Brush, before the photo ever reaches the Photoshop canvas.
What Flow should I use on the Adjustment Brush?
For dodging, raise Feather all the way and bring Flow down to about 5, so each pass builds up a little. With Flow all the way up the effect is simply off, then 100% on. For clicking on lights or covering the sky, a higher Flow is fine.
How do I erase part of an adjustment I painted?
Hold Alt/Option to turn the brush into the eraser, or click Erase. The eraser has its own Size, Feather and Flow. Click Add to go back to painting.
How do I go back and change an earlier brush?
Click the Adjustment Brush and then the pin for that adjustment; turn on the Overlay option if you don’t see pins. A selected pin turns red, anything you paint joins it, and its sliders change the whole adjustment.
Why does my new brush already have Temperature or Exposure set?
A new brush keeps the last brush’s sliders. Aaron brings Temperature back to 0 before painting the sky, and Exposure and Tint back to 0 before the shadow brush.
How do I brighten the sky without brightening the bridge and mountains?
Paint loosely over the sky, then set Range Mask to Luminance and drag the Luminance Range slider in from the left. That hides the effect from the shadows, so only the bright part of the sky gets lighter. It works much like Blend If in Photoshop.
How do I bring back detail in a dark area?
Make a new brush, set Exposure and Tint to 0 and crank Shadows way up, then paint over the dark area. Aaron also warms the Temperature a little and sets Range Mask to Luminance so the brush only affects the shadows.
How do I compare before and after in Camera Raw?
Press P to toggle the preview, or click the button that looks like a small Y below the preview to see the before and after side by side.
Why open the photo as a Smart Object?
Check Open in Photoshop as Smart Objects (with Adobe RGB (1998) and 16 bits per channel) and click Open Object. Double-clicking the layer thumbnail later reopens Camera Raw with every pin as you left it, and Unsharp Mask stays editable as a Smart Filter.
Is the sample file free?
Yes, with a free PHLEARN account. You get 1 sample RAW file and 1 PDF guide: the raw DNG landscape by Andrew Optics and a 4-page step-by-step guide to this edit.
Master Photoshop, Lightroom and Photography
Join PHLEARN PRO for $12.99 a month or $99.99 a year. Cancel anytime, with a 100% money-back guarantee.





