

Download Assets
This tutorial includes 1 sample image, 1 sample PSD and 1 PDF guide. Downloads are free with a PHLEARN account.
- Download the sample images and PSDs from every free tutorial on PHLEARN
- New free tutorials published every week
- One free account — sign up once, then download anything
Free PDF Guide · 4 Pages
This Tutorial as a Step-by-Step PDF
The guide walks through Layer > New Adjustment Layer instead of Image > Adjustments, the Levels input and Output Levels sliders and the same moves in Curves, color channels and eyedroppers, adding curve points, the hand icon on the Red channel, Auto, presets, blue and yellow toning and a radial gradient on the mask. Keep it next to your keyboard.
description
Curves vs Levels comes down to two real differences, and neither is the one people expect. Both set black, white and midtones, both work on color, and both belong on an adjustment layer.
Elevate your photo editing skills with Levels and Curves. Learn how to use these powerful Adjustment Layers to make precise exposure and color adjustments in any image.
Enjoying This Free Tutorial?
We publish a new free tutorial every week, each one with sample images and PSDs you can download and follow along with. Sign up and they land straight in your inbox, along with early word on sales, events and subscriber-only offers.


Curves vs Levels in Photoshop: What the Difference Actually Is
Curves and Levels are two of the most powerful adjustments in Photoshop, and they are more alike than most people realize. Neither one reaches information the other cannot — they read the same tonal and color data and offer different interfaces onto it.
The differences that matter are narrower and more specific than “Curves is the advanced one.” This tutorial covers what each does, the small number of things only Curves can do, and which to reach for in practice.
Always Use an Adjustment Layer
Before anything else, a habit worth fixing.
You can apply either adjustment through Image → Adjustments → Curves (or Levels). Do not. That bakes the change into the pixels — there is no going back and refining it later.
Use an adjustment layer instead, either way:
-
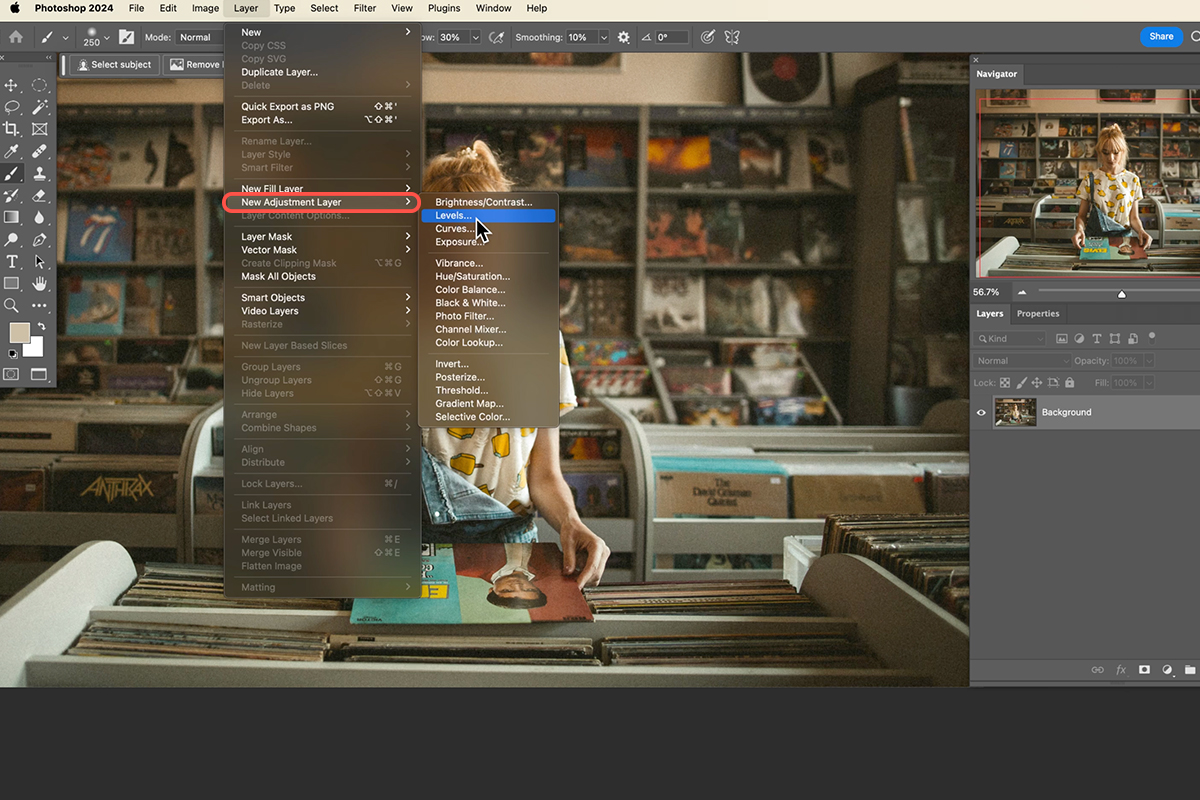
Layer → New Adjustment Layer → Curves or Levels
Through the menu.
-
Or the half-filled circle icon at the bottom of the Layers panel
Faster, and identical in result.
You get two things this way. The adjustment stays editable forever — double-click its thumbnail and every setting is where you left it. And it arrives with a layer mask, so you can confine it to part of the image.
There is essentially no situation where applying these destructively is the better choice.
What Levels Does
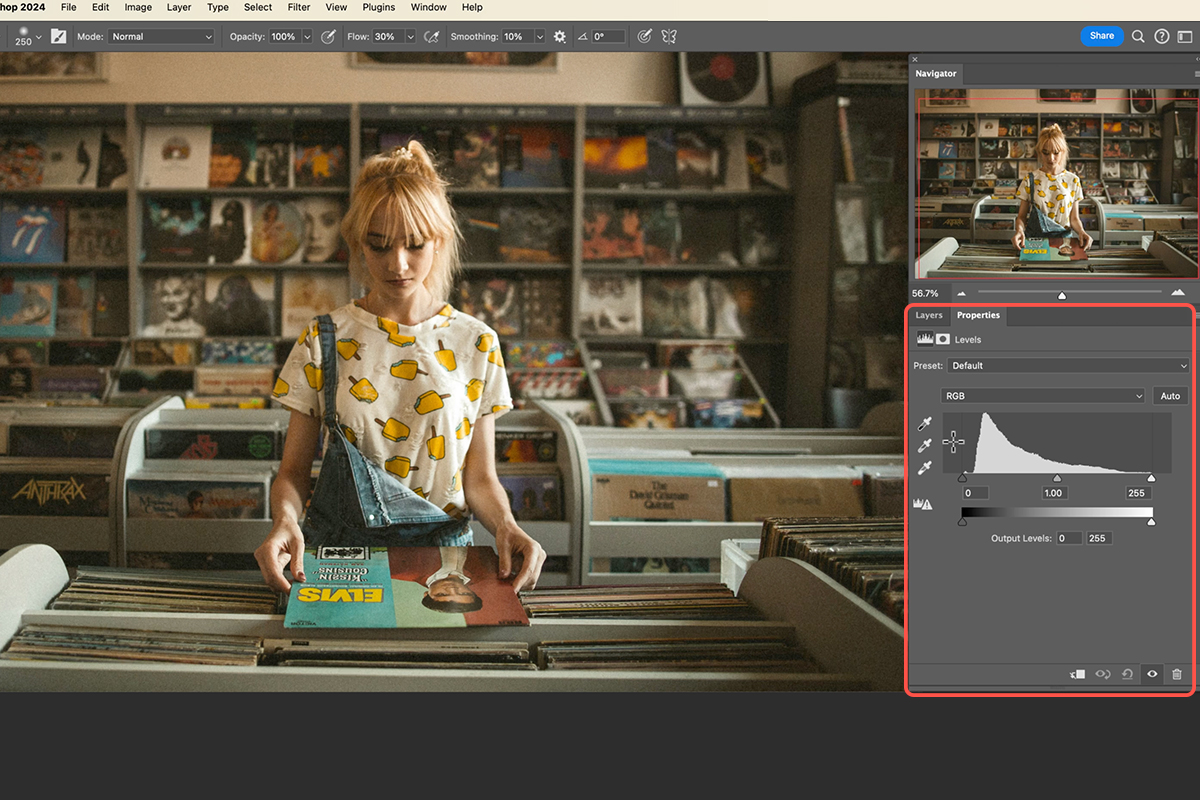
Levels gives you two sliders. Most people use the top one and never touch the second.
Input Levels — the Top Slider
This sits under the histogram and has three controls.
The black point on the left: drag it right and everything to its left is forced to pure black. The white point on the right: drag it left and everything to its right becomes pure white. The midpoint in the middle: drag it either way to brighten or darken the midtones without moving the two endpoints.
Between them, that is your contrast and exposure control.
Output Levels — the Bottom Slider
This is the one people miss, and it does the opposite job. Rather than setting which values become black and white, it sets how dark your blacks and how bright your whites are allowed to be.
Drag the left control right and your darkest tone becomes gray instead of black. Drag the right one left and your brightest tone stops short of white.
That is how you get a faded, matte, low-contrast look — the film-emulation treatment where nothing quite reaches black. It also has a practical use: pulling the white point down slightly keeps highlights inside a printable range.
Curves Does All of That Too
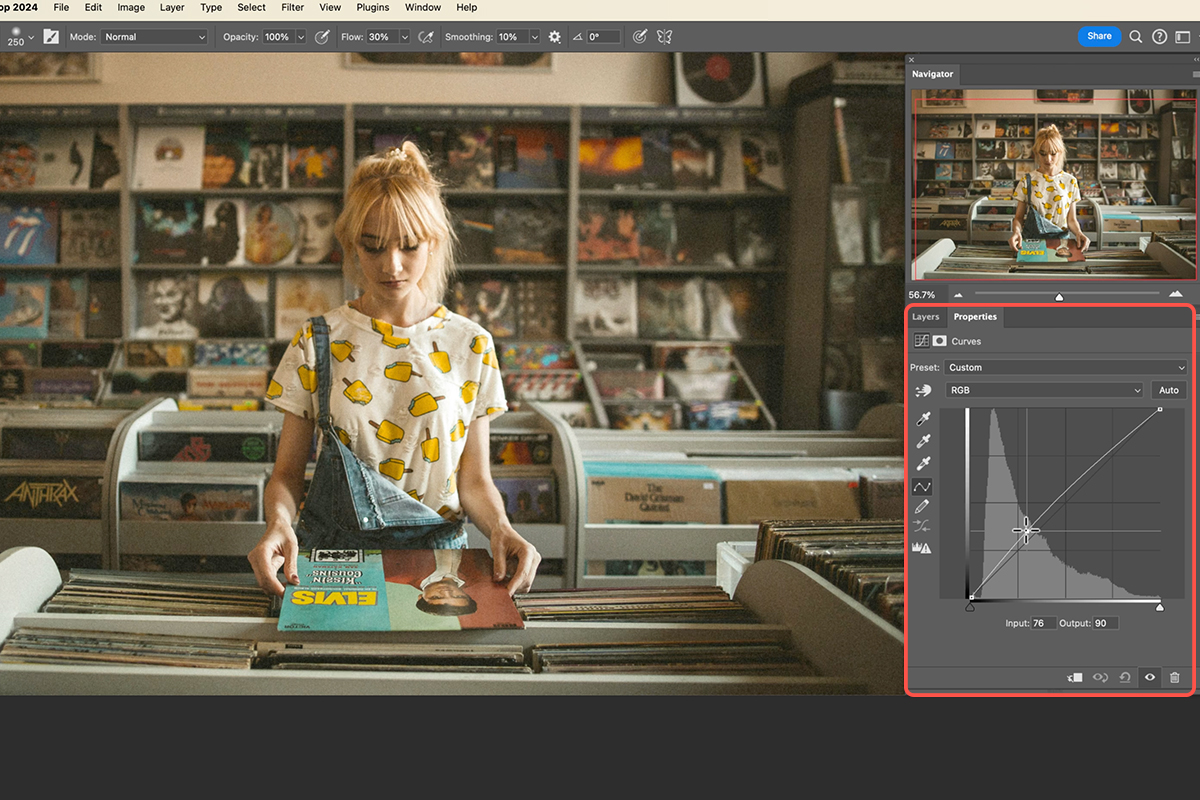
Everything above is available in Curves, just drawn differently. The line’s lower-left end is your black point, the upper-right end is your white point, and shadows run left to highlights right.
Drag the bottom-left point inward along the base to set the black point. Drag it upward instead and you lift the blacks — the same result as the Levels output slider. The top-right end works the same way for whites.
So both tools reach the same endpoints. The difference is that Curves puts them in one graph where Levels splits them across two sliders.
Both Do Color
The channel dropdown at the top of either panel switches from RGB — which affects brightness only — to the individual Red, Green, and Blue channels.
Worth memorizing, because it governs all color work in both tools: red opposes cyan, green opposes magenta, blue opposes yellow. Pushing a channel up adds that color; pulling it down adds its opposite. Want warmer highlights? Pull the blue channel down.
The Eyedroppers
Both panels have three eyedroppers for setting the black, mid, and white points by clicking on the image rather than dragging sliders.
The black and white ones are straightforward — click something that should be pure black, or pure white.
The middle one is the interesting one: it neutralizes color. Click something that should be neutral gray and Photoshop removes any color cast from the whole image. The catch is that it does exactly what you tell it — click on something yellow, and Photoshop assumes yellow should be gray and swings the entire image blue to compensate. Only click on things you know are meant to be neutral.
The First Real Difference: Number of Points
Levels gives you five fixed controls — three input, two output. You cannot add a sixth, and you cannot put one somewhere specific.
Curves lets you click anywhere on the line to add a point, as many as you like. That means you can target a narrow band of tones — deep shadows without touching mid-shadows, bright highlights without touching midtones — which Levels simply cannot express.
To remove a point, hold Ctrl or Cmd and click it, or drag it off the graph.
Classic Curve Shapes
Pull the shadows down and push the highlights up and you get an S-curve — more contrast. Do the reverse and contrast drops. These are the two moves you will make most often.
The Second Real Difference: The On-Image Adjustment Tool
This is the feature that genuinely separates the two, and it is exclusive to Curves.
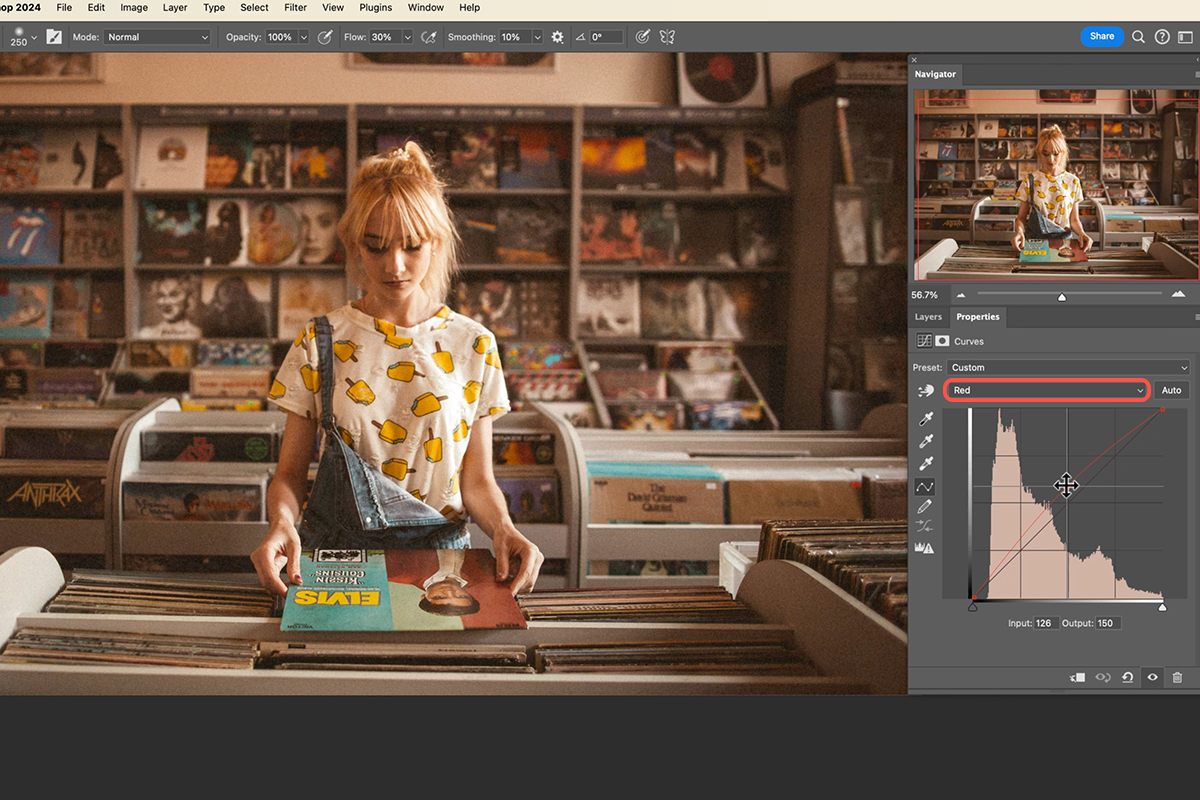
Click the small hand icon in the Curves panel, then click and drag directly on your photograph. Drag up to brighten, down to darken.
What makes this powerful is that Photoshop identifies the tonal value where you clicked and places a point there automatically. You do not have to work out which part of the curve corresponds to your subject’s face — you click on the face and drag.
That removes the main difficulty with Curves. Staring at an abstract graph and guessing which region maps to which part of your image is what makes the tool feel opaque. Clicking on the thing you want to change removes the translation step entirely.
It Works on Color Channels Too
Here is where it becomes the best color-correction tool in Photoshop. Switch to the Red channel, click the hand icon, then click and drag on your subject’s skin. You are adding red at exactly the tonal value of that skin — not to the midtones generally.
Work through red, green, and blue this way and you can correct skin that reads slightly green or flat in a few seconds, with each adjustment targeted at the tones that need it.
One thing to be clear about: this targets a tonal value, not a region. It is not selecting your subject. Anything else in the image at that same brightness gets the same change — which is usually fine, and occasionally the reason a correction goes somewhere unexpected.
Levels has no equivalent. You can add red to the midtones of the whole image, but you cannot target a specific tonal band.
Auto and Presets
Both panels have an Auto button, and it is better than its reputation. On an image that needs a general exposure correction it often lands somewhere sensible, and it is a reasonable starting point you can then adjust.
Both also carry presets — Lighter, Strong Contrast, Cross Process, and so on. Most are too heavy to use as they come. Their real value is educational: apply one and look at what it did to the curve. Seeing that Cross Process means specific opposing moves across all three color channels teaches you more than any description of it.
Color Toning With Either
A quick, reliable look: blue in the shadows, yellow in the highlights.
In Curves, switch to the Blue channel, lift the shadow end slightly, and pull the highlight end down slightly. In Levels, switch to Blue and nudge the shadow slider and the highlight slider in opposite directions. Same result — a cool-shadow, warm-highlight grade that flatters most images.
Keep it subtle. Both tools will happily take this much further than looks good.
Use the Layer Mask
Every adjustment layer comes with a mask, and this is where either tool becomes genuinely local.
Press Ctrl+I or Cmd+I to invert the mask to black, hiding the adjustment everywhere. Take the Gradient Tool (G), set it to Radial, white to black, and drag outward from your subject’s face. Now a brightening adjustment applies only there, falling off naturally.
Hold Alt or Option and drag a mask thumbnail onto another adjustment layer to copy it — useful for applying the same local shape to several adjustments.
So Which Should You Use
For brightness and contrast, Levels is easier. Three clearly labeled controls doing obvious things beats interpreting a graph, and the output slider gives you faded looks in one drag.
For color correction, Curves wins outright, entirely because of the on-image adjustment tool combined with channel selection. Clicking on skin and dragging to correct it has no equivalent in Levels.
For anything needing precision in a narrow tonal band, Curves — you can put a point exactly where you need one.
Otherwise they are interchangeable, so use whichever you read more comfortably. And whichever you pick, apply it as an adjustment layer.
Quick Reference: Keys, Menus and Settings
- Make it editableLayer > New Adjustment Layer > Curves or Levels, or the half-filled circle icon in the Layers panel
- LevelsTop slider: black point, midpoint, white point; Output Levels below for lighter blacks and darker whites
- ColorChannel menu: Red, Green or Blue; red/cyan, green/magenta, blue/yellow
- Curve pointsClick the line to add; Cmd/Ctrl-click or drag off the graph to remove
- Drag on the photoClick the hand icon in Curves, then drag up or down on the image
- Color toningBlue channel: shadow end up, highlight end down
- Limit itCmd/Ctrl + I, G for a white to black Radial gradient; Alt/Option-drag the mask to copy
No AI, no generative credits.

Free Downloads
Follow Along on the Same Photo
Get the photo used in the video, the sample PSD and the 4-page PDF guide that maps every Levels control to its Curves twin. Free with a PHLEARN account.
Curves vs Levels: Common Questions
What’s the difference between Curves and Levels?
They edit the same light, dark and color information, just shown two ways. Curves adds two things Levels can’t do: as many points as you want, and the hand icon for dragging on the photo.
Should I use Image > Adjustments or an adjustment layer?
Use an adjustment layer. Image > Adjustments bakes the change into the layer, while Layer > New Adjustment Layer (or the half-filled circle icon in the Layers panel) lets you double-click and change it any time, with a layer mask included.
What does the bottom slider in Levels do?
That’s Output Levels. Drag its left point right to make the blacks a light gray, or its right point left to make the whites darker, for a faded, matte look. In Curves, drag the ends of the line up or down for the same result.
How do I change color with Curves or Levels?
Switch the menu from RGB to Red, Green or Blue. Red is opposite cyan, green is opposite magenta and blue is opposite yellow, so for more yellow, decrease the blue.
Why did the middle eyedropper turn my photo blue?
The middle eyedropper also neutralizes color, so it needs something that’s actually gray. Click on a yellow and Photoshop compensates by making the whole image blue.
How do I add or remove points on a curve?
Click anywhere on the line to add one; shadows are on the left and highlights on the right. To remove a point, Cmd/Ctrl-click it or drag it off the graph. Levels is limited to five fixed points.
What does the hand icon in Curves do?
Click it, then drag up or down on the photo. Photoshop finds the light level where you clicked and adds a point there. On the Red, Green or Blue channel it’s a fast way to color correct skin, but it changes every area of that brightness, not just the subject.
Can I apply Curves or Levels to just one area?
Yes. Press Cmd/Ctrl + I to turn the mask black, then press G and drag a white to black Radial gradient out from the subject. Alt/Option-drag the mask to copy it to another adjustment layer.
Should I use Curves or Levels?
For simple light and dark work, Aaron finds Levels easier. For color correction, use Curves because of the hand icon combined with the color channels. Otherwise use whichever you’re more comfortable with.
Are the sample files free?
Yes, with a free PHLEARN account. You get 1 sample image, 1 sample PSD and 1 PDF guide: the photo from the video, the sample PSD and a 4-page guide.
Master Photoshop, Lightroom and Photography
Join PHLEARN PRO for $12.99 a month or $99.99 a year. Cancel anytime, with a 100% money-back guarantee.





