
Download Assets
This tutorial includes 1 sample image, 1 sample PSD and 1 PDF guide. Downloads are free with a PHLEARN account.
- Download the sample images and PSDs from every free tutorial on PHLEARN
- New free tutorials published every week
- One free account — sign up once, then download anything
Free PDF Guide · 3 Pages
This Tutorial as a Step-by-Step PDF
Every step from the video in order: Object Selection and the Selection Brush, the Gradient tool set to the new editable gradient, dragging it across the selection, blend mode Color (or Hue), clicking a stop to change its color, and Shift-drag for a second gradient on its own layer. Keep it next to your keyboard.
description
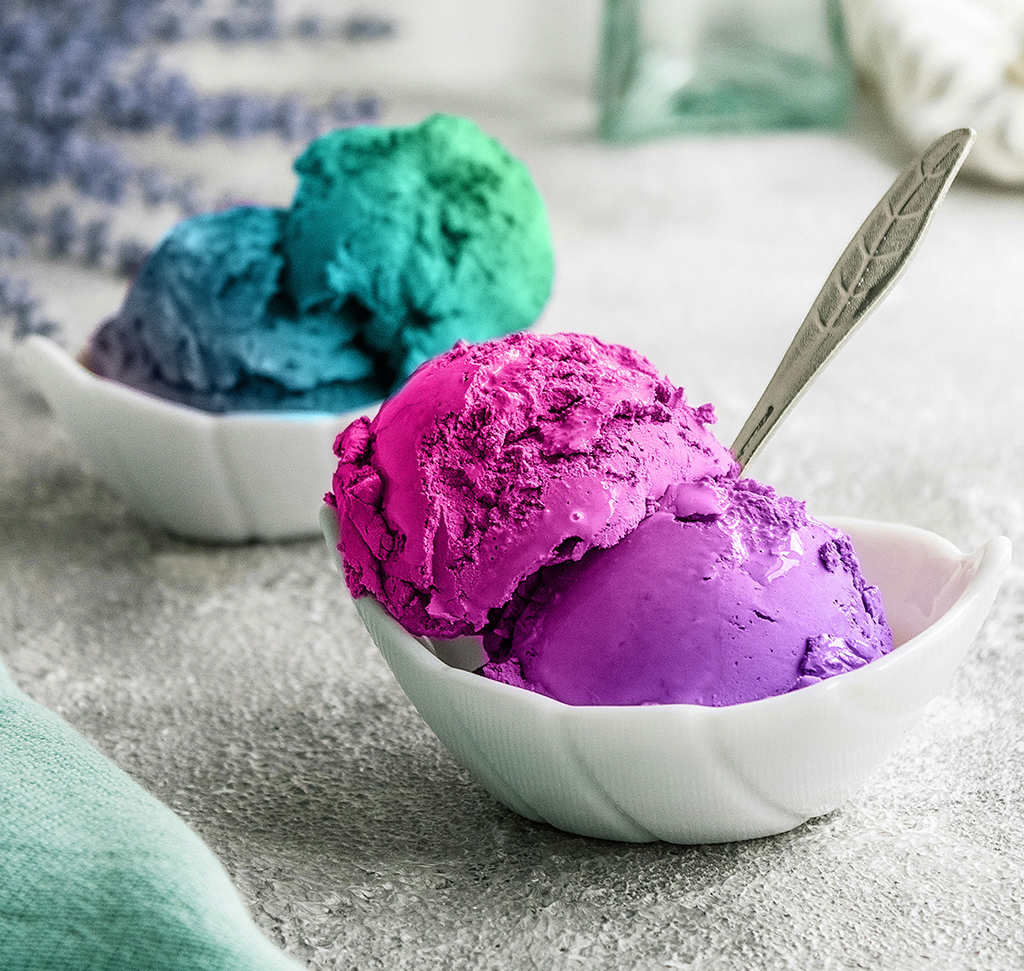
Change any color into a gradient and a flat object suddenly has light falling across it. This tutorial guides you through selecting objects, applying custom gradients, and adjusting blend modes for vibrant results.
Enjoying This Free Tutorial?
We publish a new free tutorial every week, each one with sample images and PSDs you can download and follow along with. Sign up and they land straight in your inbox, along with early word on sales, events and subscriber-only offers.
Image Source

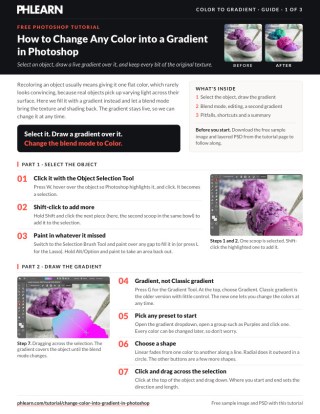
How to Change Any Color into a Gradient in Photoshop
Recoloring an object in Photoshop usually means giving it one flat color, which rarely looks convincing — real objects pick up varying light across their surface. Filling with a gradient instead and setting the layer to a color blend mode keeps every bit of the original texture and shading while replacing the color entirely, and it stays editable indefinitely.
The whole technique is three steps: select the object, draw a gradient over it, change the blend mode. What makes it worth learning is that nothing is baked in — you can drag the gradient’s control points, swap individual colors, or cycle presets long after the fact.
Select the Object
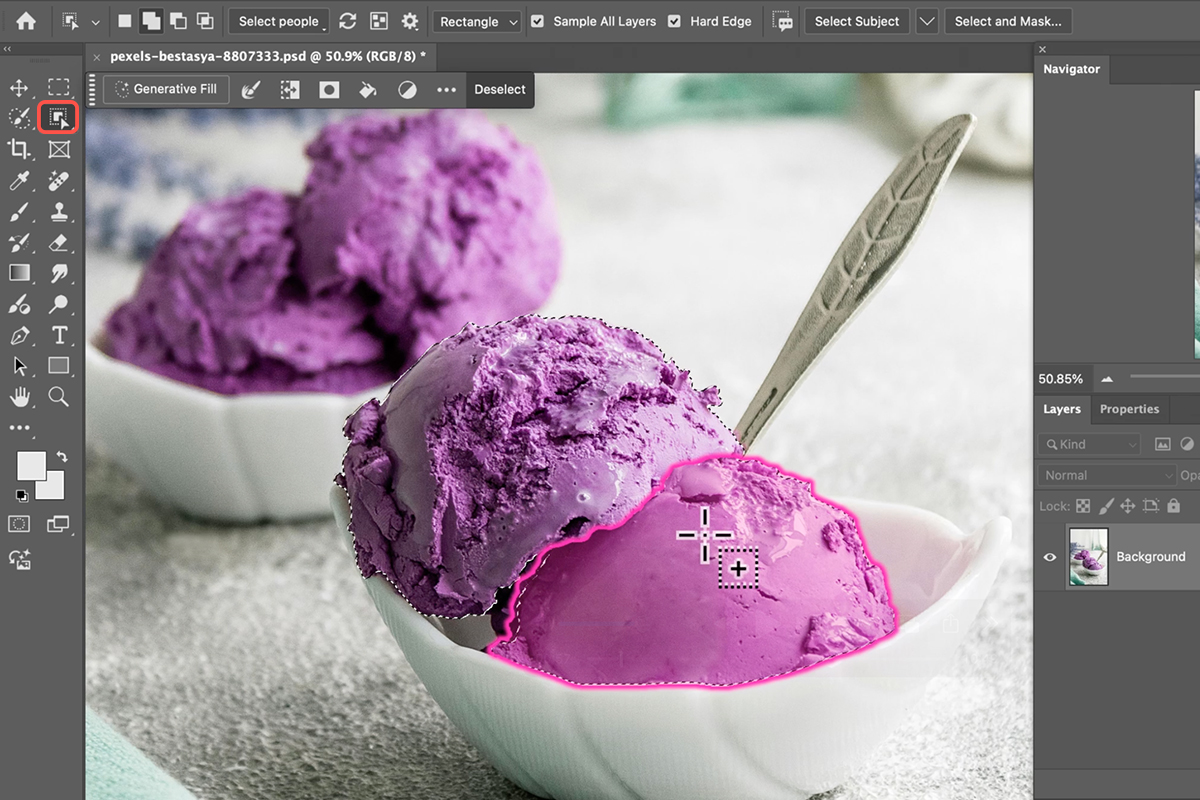
Press W for the Object Selection Tool and hover over your subject — Photoshop highlights what it thinks you mean. Click to select it. Hold Shift and click to add other elements.
Clean It Up by Painting
Automatic selection usually misses something, or grabs too much — selecting a bowl along with the ice cream in it.
The Selection Brush Tool fixes both quickly. Paint to add, hold Alt or Option and paint to subtract. No path to close, no accuracy required.
Precision matters more here than in most tasks, because you are about to change color dramatically — and a selection edge that strays onto the background produces an obvious halo of the wrong color.
Draw the Gradient
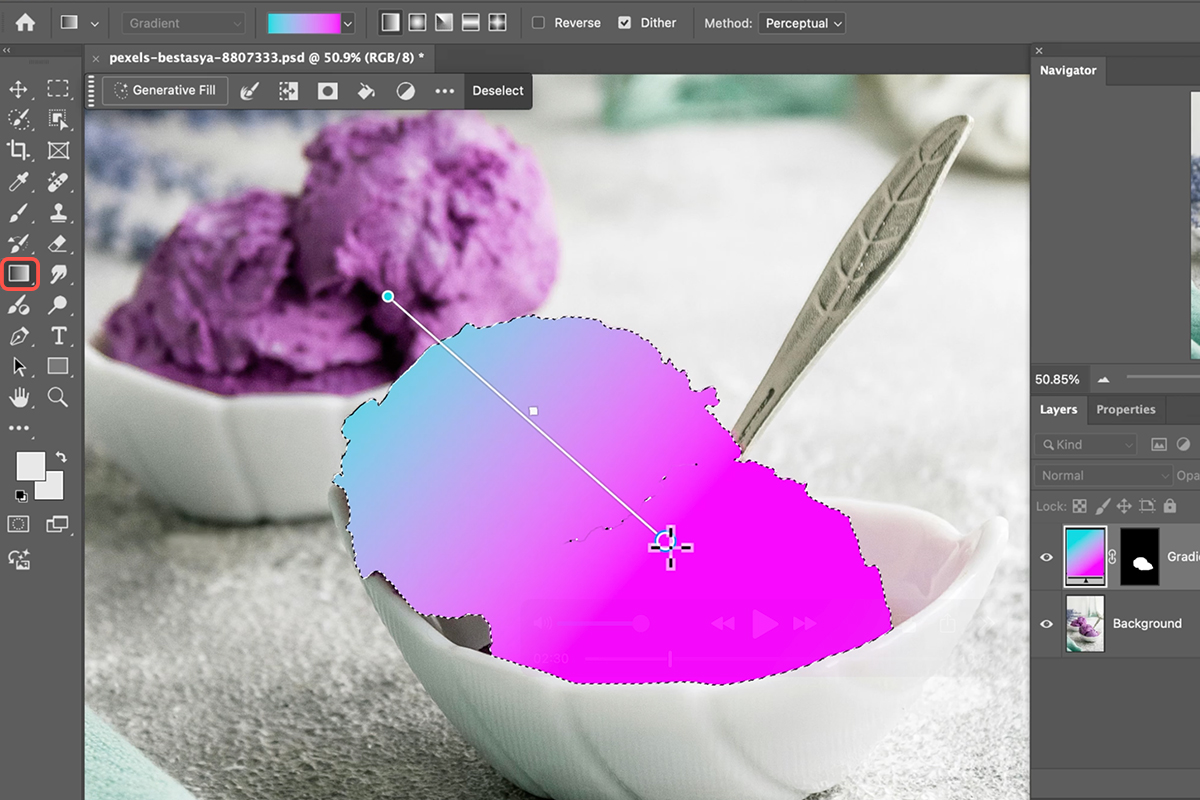
Press G for the Gradient Tool. In the options bar, make sure it is set to Gradient and not Classic Gradient.
This matters. Classic Gradient is the older behavior and renders pixels directly — once drawn, it cannot be edited. The current Gradient tool creates a live gradient fill layer with on-canvas controls you can adjust forever. Everything below depends on using the newer one.
Open the gradient dropdown to browse the built-in sets — Purples, Oranges, and so on. Pick anything close; the colors are all changeable later.
Choose a shape: Linear fades along a straight line, Radial spreads from a center point, and there are angle, reflected and diamond options too.
Then click and drag across your selection. Where you start and end sets the gradient’s direction and length.
Set the Blend Mode to Color
At this point the gradient is sitting flatly on top, hiding the object. One change fixes it.
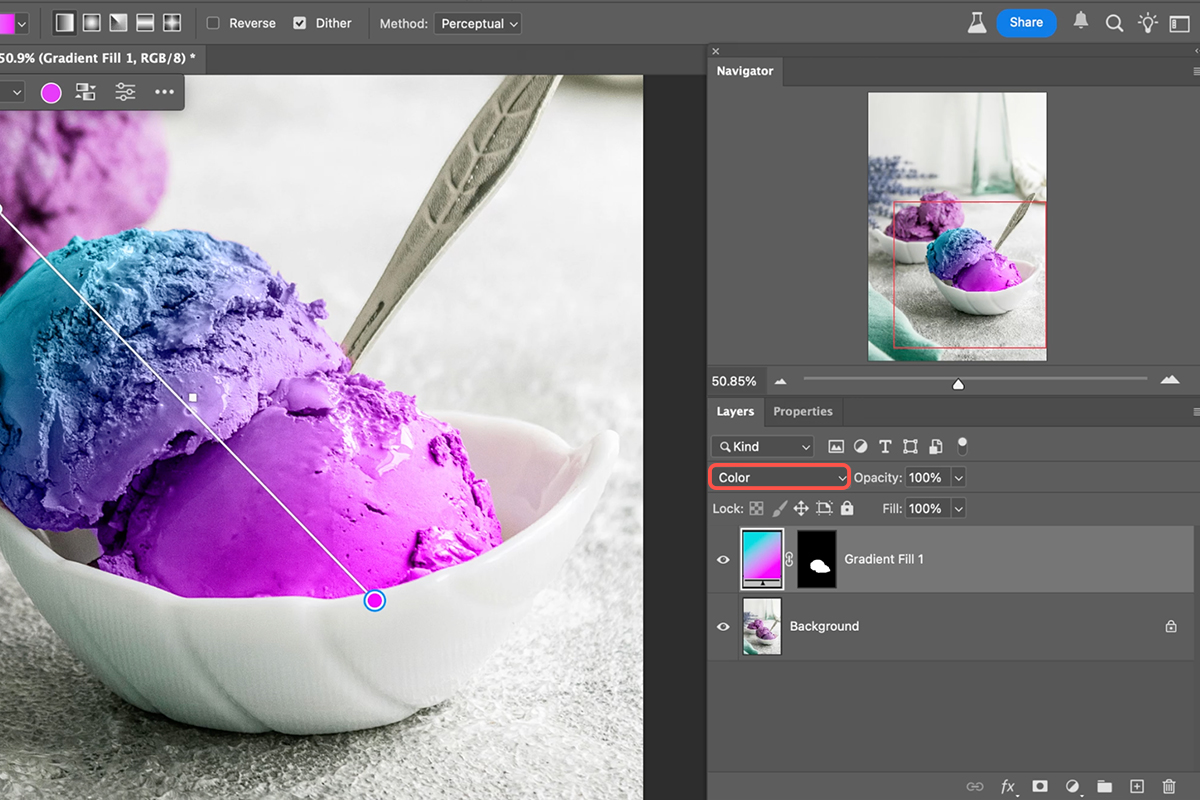
In the Layers panel, change the layer blend mode from Normal to Color — at the very bottom of the list.
Color mode takes the hue and saturation from the gradient and the luminosity from the layers underneath. Every highlight, shadow and texture of the original object survives; only its color is replaced. That is why this reads as the object being a different color rather than as paint laid over it.
Hue for Something Subtler
Hue mode is the gentler alternative: it takes only the hue from your gradient and keeps the original saturation. Color gives a bolder result; Hue preserves more of how saturated the object originally was. Try both — it is one click.
Keep Editing It
Here is the payoff. The gradient is live, so nothing about it is final.
Move the control points. Drag the on-canvas handles to change where the gradient starts, ends, and how quickly one color becomes the other.
Change individual colors. Click a color stop and its swatch appears in the Contextual Task Bar. Click that and pick any color — the object updates live.
Swap the whole gradient. With the layer selected, click through the presets in the dropdown and watch each one apply instantly. This is the fastest way to explore options: you are not committing to anything, just looking.
Adding a Second Gradient
To recolor another object in the same image, there is one thing that catches people out.
With a gradient fill layer active, drawing on the canvas modifies that existing gradient rather than making a new one. It is a common source of confusion — every attempt to start fresh just moves the first gradient around.
Hold Shift while you click and drag to create a new gradient fill layer instead. Then set its blend mode to Color as well, and it works independently of the first.
Repeat as many times as you have objects. Each gets its own layer, its own gradient, and its own colors.
The Short Version
Select the object with the Object Selection Tool, tidy it with the Selection Brush. Press G, confirm you are on Gradient rather than Classic Gradient, pick a preset and drag across the selection. Set the layer blend mode to Color, or Hue for something softer. Then adjust the control points, click individual color stops to change them, or cycle presets until something works.
For a second object, Shift-drag to start a new gradient rather than editing the existing one.
Quick Reference: Keys, Menus and Settings
- Select the objectW (Object Selection), click it; Shift-click to add; Selection Brush or L for the bits it missed
- Gradient toolG; options bar set to Gradient (not Classic); pick a preset from the dropdown; Linear or Radial
- Draw itDrag across the selection; it lands on its own gradient layer
- Make it a recolorLayer blend mode Color (Hue for a subtler version)
- Edit laterDrag the on-canvas handles; click a stop and pick a new color in the contextual taskbar; or choose another preset
- Second objectSelect it, then hold Shift and drag so a new gradient layer is created instead of editing the first
No AI, no generative credits.
Free Downloads
Follow Along on the Same Photo
Get the ice cream photo from the video, the PSD with both gradient layers, and the PDF guide. Free with a PHLEARN account.
Color to Gradient: Common Questions
How do I turn an object’s color into a gradient?
Select the object, press G, drag a gradient across it and set the gradient layer’s blend mode to Color. The texture stays, the color becomes the gradient.
What’s the fastest way to select the object?
Object Selection (W): hover and click. Shift-click adds another part. Where it misses a bit, paint it in with the Selection Brush.
Gradient or Classic Gradient?
Gradient. The newer mode keeps the gradient editable on its own layer, with handles you can drag and colors you can change. Classic paints pixels and is done.
Color or Hue blend mode?
Both recolor without flattening the texture. Color is more vivid; Hue is subtler. Try each.
Can I change the colors afterwards?
Yes. Click a stop on the canvas and pick a new color in the contextual taskbar, drag the end points to move the fade, or click through the presets in the options bar.
My second gradient keeps changing the first one. Why?
The gradient layer is still selected, so dragging edits it. Hold Shift while you drag and Photoshop makes a new gradient layer instead.
Does it have to be a straight fade?
No. The options bar offers linear, radial and a few other shapes. Radial fades out from a center point.
Are the sample files free?
Yes, with a free PHLEARN account. You get the ice cream photo, the PSD with both gradient layers and the PDF guide.
From the Magazine View all
Stories, interviews and guides for photographers, new every week.
 EditingLightCraft vs Lightroom: I Edited the Same RAW Files in BothThe free clone on the same RAW files: what matches, what breaks and who should switch.
 InspirationRare Historical Photos: 13 of the Rarest Pictures Ever TakenFrom the earliest surviving picture of a person to the last passenger pigeon: who took each one and why it survives.
 EditingArtCraft: Photoshop Cloned by AI in Two Weeks. Is It Legal?ArtCraft cloned Photoshop and Lightroom with AI and gave them away. Any good? Legal? Safe?
Master Photoshop, Lightroom and Photography
Join PHLEARN PRO for $12.99 a month, or $99.99 a year (save 36%). Cancel anytime, with a 30-day money-back guarantee.