
Download Assets
description
Learn how to create a realistic mockup in Photoshop. This tutorial guides you through three key phases: using the new remove tool to clear your canvas, applying a graphic to a smart object for accurate perspective, and adding shadows and highlights for a lifelike finish.
Follow along with all 30 episodes as we explore the the magic of Photoshop together!
Watch Next
JOIN 30 DAYS OF PHOTOSHOP (FOR FREE!)
Ready to jump in? Sign up and we’ll email you a printable calendar and daily class schedule so you can get started right away!
Image Source
- Klaudia Piaskowska
- Alissa Schilling
Images sourced from Unsplash.
Share
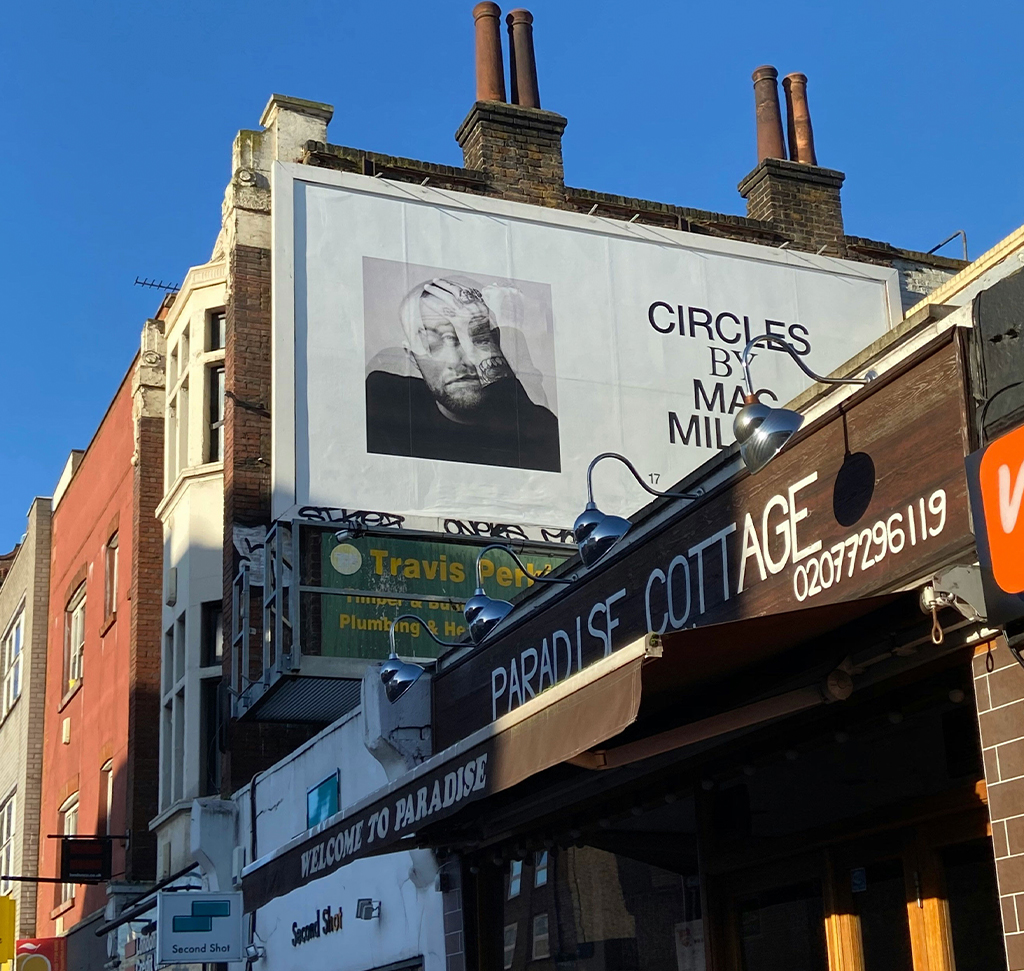

AFTER
BEFORE
Mockups Made Easy
Mockups allow you to showcase your designs in a realistic context, helping clients and stakeholders visualize the final product. This guide will walk you through the process of creating a realistic mockup in Photoshop, covering everything from cleaning up your image to adding a realistic touch.
Clean Up
The first step is to prepare your background image by removing any existing graphics.
1. Use the Remove Tool and ensure that “Generative AI” is on, “Remove after each stroke” is unchecked, and “Create new layer” is checked. This allows you to highlight objects you want to remove, such as text or other elements.
2. Once highlighted, click the checkmark icon to let Generative AI do the work. This will clean your canvas, leaving you with a blank space for your design.
Smart Object
3. Next, you’ll create a Smart Object to place your graphic. To get the correct shape, use the Polygonal Lasso Tool to create a selection that approximates the shape of the billboard or space where your design will go.
4. Create a new layer and fill it with white.
5. Now, use the Rectangular Marquee Tool to draw a new, perfect rectangle over your filled shape.
6. Delete the old layer and convert your new rectangle layer into a Smart Object (Layer > Smart Objects > Convert to Smart Object). Now, you can transform it to fit the perspective of your photo by hitting Ctrl/Command + T and dragging the corners while holding Ctrl or Command.
Add Realism
To make your mockup look realistic, you need to add the highlights and shadows from the original photograph.
7. Make your Smart Object invisible for a moment.
8. Create a new layer and apply the image by going to Image > Apply Image. Now, hold Alt/Option and click between the new layer and your Smart Object layer to create a clipping mask.
9. Make your Smart Object visible again.
10. Change the blending mode of your highlights layer to Soft Light to blend the original details into your mockup.
11. For even more control, you can hit Ctrl/Command + L to use the Levels adjustment to fine-tune the shadows and highlights.
Final Touches
The great thing about this method is the flexibility a Smart Object provides. You can double-click on the Smart Object layer thumbnail at any time to open it in a new window, where you can edit your design in a two-dimensional workspace. Any changes you make and save in the Smart Object file will automatically update in your mockup. This allows you to perfect your design and see the results in real time.
We hope you enjoyed this tutorial! Tomorrow, we’ll continue our series with a new lesson on how to do sky replacement.


