

Lightroom vs Photoshop gets asked as though one of them has to win. It doesn’t work that way in practice — almost every working photographer uses both, and what separates a fast workflow from a slow one is knowing which of the two a given job belongs to.
The short version: Lightroom handles many photos, Photoshop handles one photo. Organise and cull in Lightroom, batch the base edit with Sync Settings, then hand the few frames that need layers over to Photoshop with Edit In. Day 29 of 30 Days of Photoshop.
This is Day 29 of 30 Days of Photoshop, 2025 Edition — our most-watched series, rebuilt from the ground up for today’s tools.
Free practice files
Practice Files for This Tutorial
The 17 sample images and the layered PSD from the video, so you can follow every step on the same files.
This tutorial includes 17 sample images and 1 sample PSD.


Create a free PHLEARN account to download, or log in if you already have one. One account gets you the files for every free tutorial.
Watch the Full Series
30 Days of Photoshop · 2025 EditionOur most-watched series, updated for 2025 — watch all 30 free
description
Continue Watching 30 Days of Photoshop
JOIN 30 DAYS OF PHOTOSHOP (FOR FREE!)
Image Source


Lightroom vs Photoshop: It’s Not a Choice, It’s a Sequence
Lightroom vs Photoshop gets asked as though one of them has to win. It doesn’t work that way in practice. Almost every professional photographer uses both, and the thing that separates a fast workflow from a slow one is knowing which of the two a given job belongs to — and in what order.
The short version: Lightroom handles many photos. Photoshop handles one photo. Everything below follows from that one distinction.
The Actual Difference Between Them
Lightroom Is a Catalogue With an Editor Attached
It was built to hold thousands of images, let you sort them, and apply the same treatment across a whole shoot. The editing is global and parametric — you’re adjusting settings, not pixels.
Photoshop Is a Layer Stack
No catalogue, no batch anything. What it has instead is layers, masks and selections, which means it can do things Lightroom structurally cannot: put something into a photograph that was never there, or take something out.
Which Is Why the Order Is Always the Same
Organise and cull in Lightroom, batch the base edit in Lightroom, then send the handful of images that need real work to Photoshop. Going the other way around means retouching photos you were going to throw out.
Start by Organizing in Lightroom
-
Import Your Photos Into the Catalogue
From a card or a drive — drag them into the Lightroom Classic catalogue. This is the step that makes everything after it searchable.

-
Use Folders and Renaming to Impose Structure Early
Library > Rename Photos. Ten minutes here saves an hour six months from now when you’re trying to find one frame from one shoot.
-
Cull With Grid View, Flags and Star Ratings
Press G for Grid View, hold Cmd/Ctrl to select several images and compare them side by side, then assign flags or 1–5 star ratings. Filter to your picks and the shoot goes from four hundred frames to twelve.

Batch the Base Edit in Lightroom
-
Edit One Image Properly in the Develop Module
Exposure, white balance, contrast, colour. Get one frame from the set exactly where you want it.
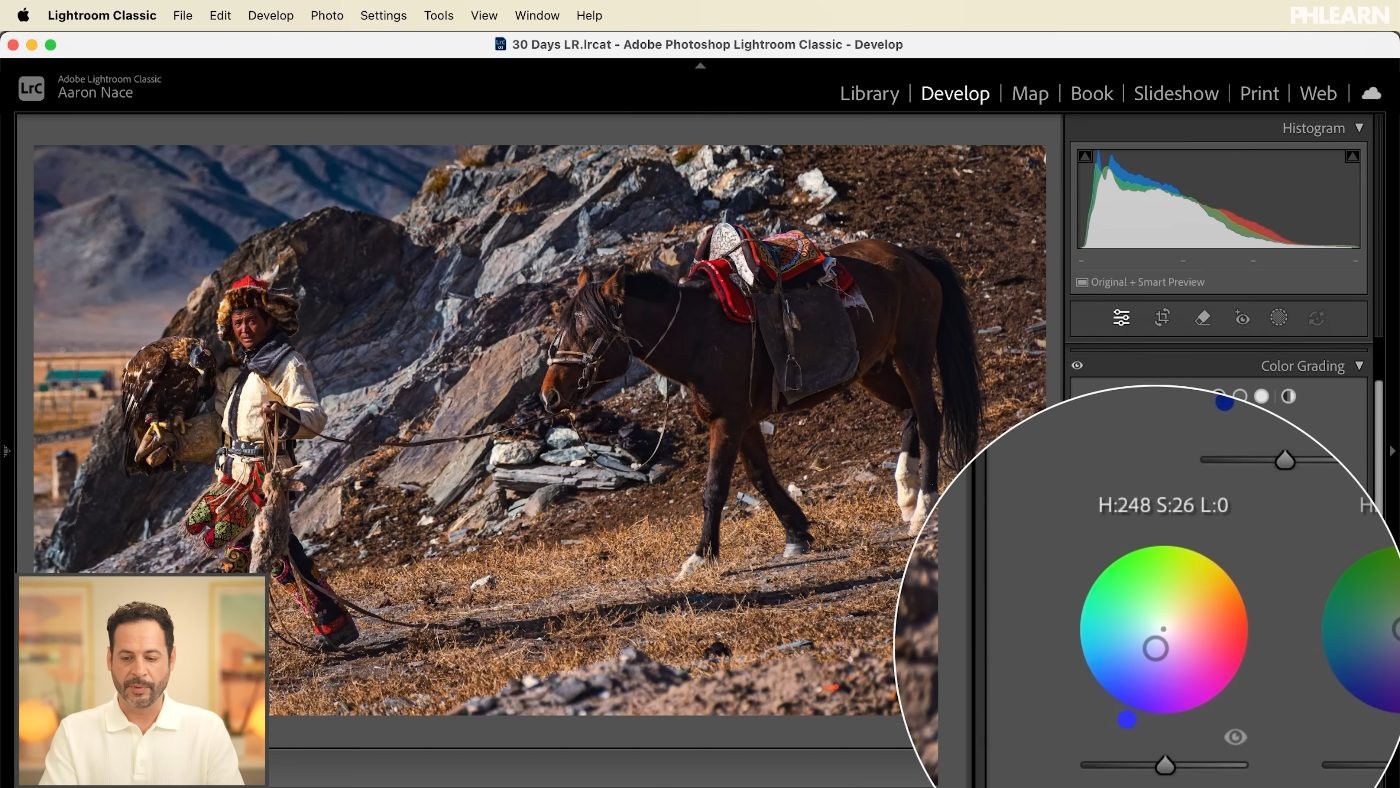
-
Go Back to Library and Select the Rest of the Set
Your edited image stays the active one — that’s the image the settings will be copied from.
-
Click Sync Settings
Every selected photo takes the same exposure, white balance and colour treatment. On a wedding or an event this is the single biggest time saving available to you, and it’s the reason Lightroom exists.
Hand Off to Photoshop for the Ones That Need It
-
Right-Click the Image and Choose Edit In > Photoshop
The image opens in Photoshop with your Lightroom adjustments already applied, and when you save it comes back into the catalogue alongside the original. Nothing leaves the library.
-
Work in Layers, Because That’s the Point
Photoshop’s edits are non-destructive in a different way to Lightroom’s: each change sits on its own layer, with its own mask, and can be turned off. That’s what makes complex work reversible.

-
Do the Things Lightroom Cannot Do
Sky replacement, object removal, adding an element from another photograph, serious retouching. For a sky: place the new image on its own layer, run Select Sky, and turn that selection into a layer mask so the clouds sit behind everything in the frame.
Where Photographers Lose Time
Almost every workflow problem is a Lightroom vs Photoshop problem in disguise — the right task done in the wrong application. These are the five that cost the most.
Retouching Before Culling
The most common and the most expensive. Cull first, always — there is no point perfecting a frame you were never going to deliver.
Doing Global Adjustments in Photoshop
Exposure and white balance across forty images belong in Lightroom’s Sync Settings, not in forty separate Photoshop documents.
Trying to Composite in Lightroom
It has masking, and the masking is very good, but it has no layers. If the job involves two photographs becoming one, it is a Photoshop job.
Opening Photoshop From the Desktop
Use Edit In from Lightroom instead. Open the file directly and the edited version lives outside your catalogue, which is how photographers end up with two versions of everything.
Never Learning the Handoff
Plenty of people are competent in one application and avoid the other. The workflow gain isn’t in either program — it’s in the seam between them.
Why This Lesson Comes Second-to-Last
Twenty-eight days of this series have been about Photoshop tools. Putting the Lightroom comparison at day 29 is deliberate: you can only see clearly what Photoshop is for once you know what it does, and the honest answer is that most of your photographs never need it.
That isn’t a criticism of Photoshop, and it’s why Lightroom vs Photoshop is the wrong framing. It’s the reason the pairing works. Lightroom takes the volume off the table so that Photoshop can be reserved for the frames that actually deserve an hour. Photographers who feel slow are usually not slow at either program — they’re doing the work in the wrong one. Sorting out the handoff between the two is the fix.
Run One Shoot Through the Whole Workflow
Take a folder you haven’t touched yet. Import it into Lightroom, cull it down with flags in Grid View, edit one frame in Develop, then Sync Settings across the rest. Pick the two or three images that need more, right-click and Edit In Photoshop, and do the layer work there. Download the free sample images to practise on. When you’re ready to go properly deep on both applications, our PRO course Master Photoshop & Lightroom 2026 covers the whole pipeline end to end.
Quick Reference: Keys, Menus and Settings
- ImportDrag photos into the Lightroom Classic catalog, choose Add, then Import
- CullG Grid View, Cmd/Ctrl-click two, C Compare; arrow keys to cycle, Up to promote
- Rate and filterFive stars or a pick flag, then Library Filter > Attribute
- Batch editEdit one in Develop, select the set in Library, Sync Settings > Synchronize
- RenameCmd/Ctrl + A, Library > Rename Photos
- ExportFile > Export: JPEG, quality about 70, long edge 2,000 pixels in the video
- Hand offRight-click > Edit In > Photoshop; Select > Sky, layer mask, blend mode Screen, Cmd/Ctrl + L
Image source
Free Downloads
Follow Along on the Same Photos
Get a whole shoot of 22 photos to import, cull and batch edit in Lightroom, plus the layered PSD of the one image finished in Photoshop. Free with a PHLEARN account.
Lightroom vs Photoshop: Common Questions
What is the difference between Lightroom and Photoshop?
Lightroom is built for many photos at once: importing, organizing, choosing favorites and batch editing. Photoshop works on one image at a time with layers, so it can combine photos, add text and graphics, or remove things.
Which Lightroom is used in this tutorial?
Lightroom Classic on the desktop. The family also includes Lightroom, the cloud-based desktop app, and Lightroom mobile for phones and tablets.
Should I edit in Lightroom or Photoshop first?
Lightroom first. Cull and batch edit the whole shoot there, then send only the few images that need more work to Photoshop. Otherwise you end up retouching photos you were going to throw out.
Should I choose Copy, Move or Add when importing?
Add brings photos into the catalog while leaving the files where they are. Copy and Move put them in a new location, and Copy as DNG is worth it for raw files but not for JPEGs.
How do I pick my best photos in Lightroom Classic?
Press G for Grid View, Cmd/Ctrl-click two images and press C to compare them. Use the arrow keys to cycle candidates, the Up arrow to promote one, then give your favorites five stars or a pick flag. Library Filter > Attribute shows just those.
How do I apply one edit to a whole set of photos?
Edit one photo in Develop, go back to Library and select the rest with that photo still active. Click Sync Settings, tick the settings you changed and click Synchronize.
How do I rename a batch of photos in Lightroom?
Select them with Cmd/Ctrl + A and go to Library > Rename Photos. A custom name with a sequence gives you files like Mongolia 1, Mongolia 2 and so on, on your computer too.
Do Lightroom edits change the files on my computer?
No. To get edited files you export them with File > Export, where you can rename, choose JPEG and resize. Folders you create in Lightroom Classic are real folders on your drive, though.
How do I send a photo from Lightroom to Photoshop?
Right-click it and choose Edit In > Photoshop, then pick Edit Original, Edit a Copy or a copy with Lightroom adjustments. Save in Photoshop, and if the PSD doesn’t show up, right-click the folder in Lightroom and choose Synchronize Folder.
Are the sample files free?
Yes, with a free PHLEARN account. You get 22 sample images and 1 sample PSD: a real shoot to organize and batch edit, and the layered file of the image finished in Photoshop.
Master Photoshop, Lightroom and Photography
Join PHLEARN PRO for $12.99 a month, or $99.99 a year (save 36%). Cancel anytime, with a 100% money-back guarantee.





