
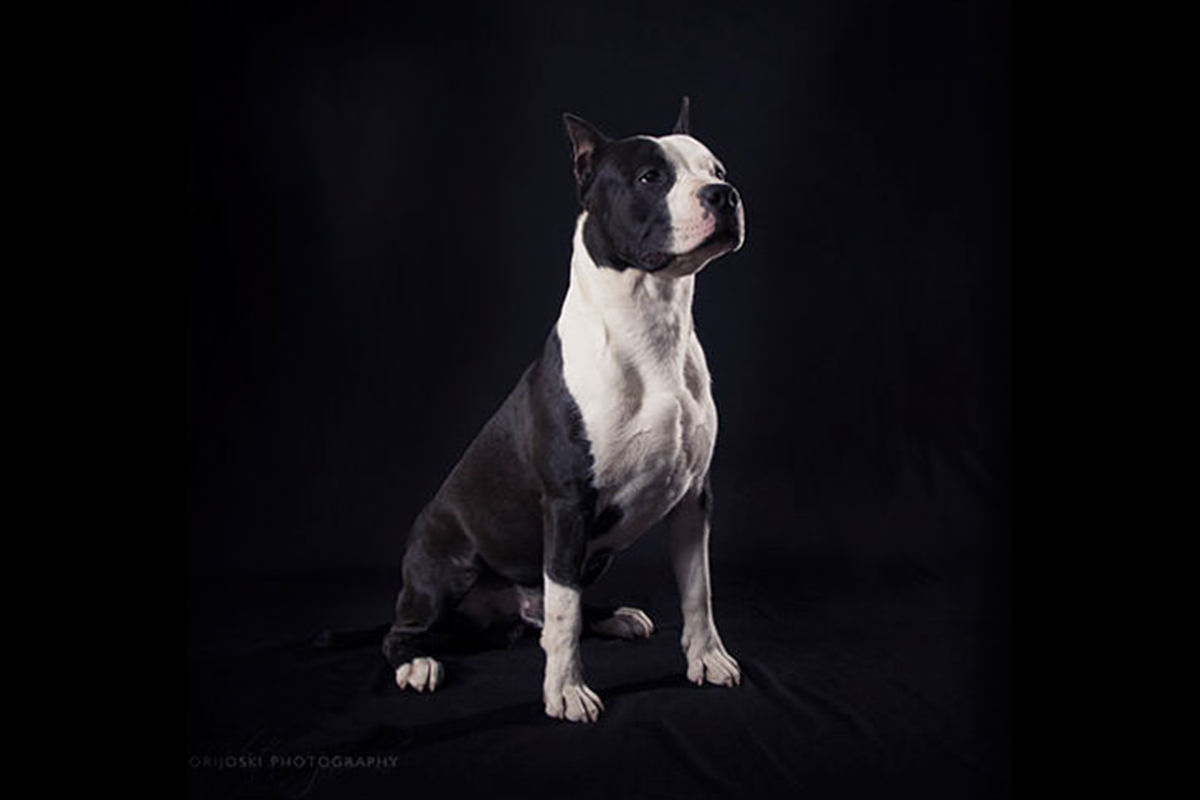

description
Traditional dodge and burn means painting light and shadow in by hand, pass after pass. This free tutorial gets a similar result far faster: duplicate the background, set it to Soft Light, and run High Pass at a much larger radius than you would for sharpening — around 17 pixels — so it captures broad areas of light and dark instead of edges. Three stacked copies give it strength, and a black group mask lets you paint the contrast in only where it belongs.
Enjoying This Free Tutorial?
We publish a new free tutorial every week, each one with sample images and PSDs you can download and follow along with. Sign up and they land straight in your inbox, along with early word on sales, events and subscriber-only offers.

How to Dodge and Burn Using High Pass
Traditional dodge and burn involves painting highlights and shadows in by hand over many careful passes. This technique gets a similar effect in a fraction of the time by letting a High Pass filter do the heavy lifting, then using a layer mask to control exactly where that added contrast shows up.
Identifying a Good Candidate for This Technique
Not every photo benefits equally from this approach — the best results come from images that already have a solid range of light and dark tones to work with.
-
Look for Existing Highlights and Shadows
Choose a photo with a good amount of natural contrast already present, such as visible highlights on skin or fur alongside clear shadow areas. An image with this kind of contrast built in is an ideal candidate for this dodge and burn technique.
Duplicating the Background and Setting Soft Light
The entire technique starts from a duplicated layer set to a specific blending mode before any filter is applied.
-
Duplicate the Background Layer
Press Cmd/Ctrl+J to duplicate the background layer.
-
Change the Blending Mode to Soft Light
Change the duplicated layer’s blending mode from Normal to Soft Light, which is what allows the upcoming High Pass filter to add contrast rather than simply sharpening the image.
Applying a High Pass Filter at a Higher Radius
The High Pass filter is usually associated with sharpening, but a larger radius setting turns it into a contrast-boosting tool instead.
-
Apply High Pass With a Larger Radius
Go to Filter > Other > High Pass and choose a noticeably higher radius than you would for sharpening — somewhere around 17 pixels is a reasonable starting point, adjusted based on the preview. If the first value doesn’t look right, simply undo and try again.
Why This Radius Is Higher Than a Sharpening High Pass
A small High Pass radius isolates only the finest edge detail, which is what makes it useful for sharpening. A larger radius captures broader areas of light and dark, which is exactly the kind of information needed to build up dodge and burn-style contrast rather than just crisp edges.
Duplicating the Layer for More Intensity
A single High Pass layer at Soft Light is usually too subtle on its own to produce a strong effect.
-
Duplicate the High Pass Layer Twice More
Press Cmd/Ctrl+J twice to create two more copies of the High Pass layer, bringing the total to three stacked copies, all set to Soft Light.
Grouping and Masking to Control Visibility
Three full-strength High Pass layers stacked together will make the entire image look oversharpened and unrefined, which is where a group and a mask come in.
-
Group the Three Layers
Shift-click all three High Pass layers and press Cmd/Ctrl+G to group them together.
-
Add a Black Layer Mask to the Group
Hold Alt/Option and click the layer mask icon to add a mask filled with black, hiding the entire group’s effect by default.
Why a Black Mask Hides Everything by Default
A layer mask works by hiding whatever is painted black and revealing whatever is painted white. Starting from a fully black mask means the intense, three-layer High Pass effect starts out completely invisible, giving you full control over exactly where it gets introduced rather than having to paint it away from everywhere it doesn’t belong.
Painting In Highlights Selectively
With the effect hidden, painting white back onto the mask is what actually creates the dodge and burn look.
-
Paint White Over Key Highlight Areas
Select the Brush tool and paint white directly onto the group’s layer mask over the strongest highlight areas — highlights around the eye, shine on the ear, or similar bright spots — rather than making the effect visible across the entire image.
Comparing Before and After, Then Refining
Checking the effect against the original regularly is the best way to judge how much is actually enough.
-
Toggle the Mask to Compare
Hold Shift and click the layer mask to toggle it on and off, comparing the image with and without the effect to judge how much of a difference it’s actually making.
-
Undo and Pull Back if It’s Too Strong
If painting in more white starts to look unnatural or oversharpened in a particular spot, press Cmd/Ctrl+Z to undo, and keep the effect concentrated in fewer, more deliberate areas instead.
Why Subtlety Matters With This Technique
Because three stacked High Pass layers carry a lot of contrast, painting the mask in too broadly quickly makes an image look sharpened and artificial rather than dodged and burned. The goal is to introduce just enough definition in the right highlight and shadow areas that the effect reads as intentional lighting rather than an obvious filter.
Why This Approach Works
This technique works because it separates the two hard parts of dodge and burn into two simple steps. The High Pass filter, at a larger-than-usual radius and set to Soft Light, automatically generates the added contrast that would otherwise take painstaking hand-painting to build up highlight by highlight. Grouping those layers under a black mask then hands full control back to you over exactly where that contrast appears, without requiring any manual dodge or burn brushwork at all. The combination gives you the visual result of traditional dodge and burn with a fraction of the manual effort, as long as you stay disciplined about only painting the mask in where the image actually calls for it.
Final Thoughts
This High Pass method is one of the fastest ways to add convincing dimension to a photo that already has decent contrast to work with. The two things worth remembering are to start from a fully black mask so nothing shows until you choose it to, and to stay subtle when painting the effect in — a little bit of added definition in the right highlight areas goes a long way, while too much quickly starts to look like an obvious filter rather than natural light and shadow.
Quick Reference: Keys, Menus and Settings
- DuplicateCmd/Ctrl + J, blend mode Soft Light
- High PassFilter > Other > High Pass, about 17 pixels
- More intensityCmd/Ctrl + J twice for three copies
- GroupShift-click the layers, Cmd/Ctrl + G
- Black maskAlt/Option-click the layer mask button
- Paint it inBrush tool, white on the mask over the highlights
- Compare and undoShift-click the mask; Cmd/Ctrl + Z if it’s too strong
No AI, no generative credits.
High Pass Dodge and Burn: Common Questions
How can a High Pass filter dodge and burn?
On a layer set to Soft Light, High Pass at a larger radius adds contrast to the light and dark areas. A layer mask then decides where that extra definition shows, so there is no hand-painted dodging and burning.
Which photos work best for this?
Photos that already have a good amount of contrast, with clear highlights and shadows. The dog photo in this video, with its shiny highlights, is an ideal candidate.
What High Pass radius should I use?
Higher than you would for sharpening. Aaron lands around 17 pixels in Filter > Other > High Pass. If it doesn’t look right, undo and try again.
Which blend mode does the High Pass layer use?
Soft Light. Duplicate the background with Cmd/Ctrl + J and change the copy from Normal to Soft Light, then run the High Pass filter on it.
Why make three copies of the High Pass layer?
One Soft Light layer is subtle. Press Cmd/Ctrl + J twice to stack three copies for a stronger effect, then control it with a mask.
Why does my whole photo look over-filtered?
The effect isn’t masked yet. Shift-click the three layers, press Cmd/Ctrl + G to group them, then Alt/Option-click the layer mask button to add a black mask that hides the group.
Where should I paint the effect back in?
Paint white on the group’s mask mostly over the highlight and shine areas, like around the eye and on the ear in this photo. Don’t make it visible everywhere.
How do I compare with and without the effect?
Hold Shift and click the group’s layer mask to turn it off, then click again to turn it back on.
What if it starts to look sharpened and weird?
Press Cmd/Ctrl + Z and paint less. Be as subtle as you can while still getting the effect across.
From the Magazine View all
Stories, interviews and guides for photographers, new every week.
 EditingLightCraft vs Lightroom: I Edited the Same RAW Files in BothThe free clone on the same RAW files: what matches, what breaks and who should switch.
 InspirationRare Historical Photos: 13 of the Rarest Pictures Ever TakenFrom the earliest surviving picture of a person to the last passenger pigeon: who took each one and why it survives.
 EditingArtCraft: Photoshop Cloned by AI in Two Weeks. Is It Legal?ArtCraft cloned Photoshop and Lightroom with AI and gave them away. Any good? Legal? Safe?
Master Photoshop, Lightroom and Photography
Join PHLEARN PRO for $12.99 a month, or $99.99 a year (save 36%). Cancel anytime, with a 100% money-back guarantee.





