
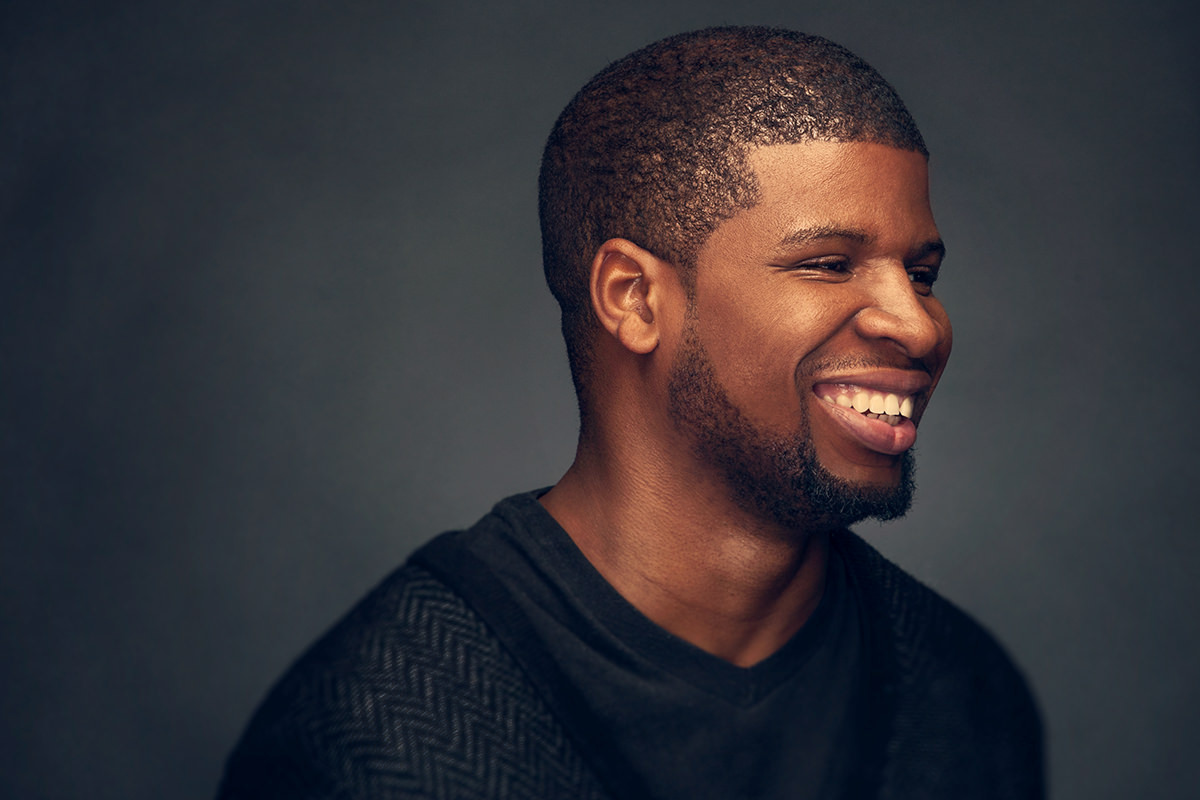

description
Part two of this editorial headshot series picks up where the skin retouching left off. A desaturated Soft Light layer with a large High Pass radius, restricted to the highlights with Blend If, does most of the dodge-and-burn work automatically. The rest of the tutorial is hairline cleanup: a feathered Pen tool path checked in Quick Mask, the Clone Stamp working along that edge, and hand-painted strands over a dark base.
Enjoying This Free Tutorial?
We publish a new free tutorial every week, each one with sample images and PSDs you can download and follow along with. Sign up and they land straight in your inbox, along with early word on sales, events and subscriber-only offers.

Editorial Headshot Retouching, Part 2 of 3
With the skin retouching from Part 1 in place (you can also see the behind the scenes from this same shoot), this second part adds a controlled dodge-and-burn using High Pass, then cleans up and refines the hairline using the Pen tool, the Clone Stamp, and some hand-painted hair strokes.
Dodging and Burning Skin With High Pass
A different High Pass setup than a pure texture pass adds controlled highlights on top of the already-retouched skin.
-
Stamp a Visible Layer and Desaturate It
Press Shift+Option/Alt+Cmd/Ctrl+E to stamp a merged layer, then press Shift+Cmd/Ctrl+U to desaturate it.
-
Set the Layer to Soft Light and Apply High Pass
Change the layer’s blending mode from Normal to Soft Light, then go to Filter > Other > High Pass and choose a relatively large radius — a lower radius favors recovering skin tone and sharpness, while a higher radius favors this kind of dodge-and-burn styling.
Isolating Highlights With Blend If
Restricting the High Pass effect to just the highlights keeps it from also darkening the shadows.
-
Open Blending Options and Restrict With Blend If
Double-click the layer to open Blending Options, hold Alt/Option, and drag the underlying layer’s black slider from left to right so the effect isn’t visible where the underlying layer is darker.
Why Blend If Keeps This Effect in the Highlights Only
Restricting the layer so it isn’t visible where the underlying image is dark means the Soft Light and High Pass combination only brightens and adds character to areas that are already light. That’s what gives the skin its highlight character without also affecting or darkening the shadow areas of the face.
Grouping and Masking the Highlight Layer
Grouping the effect and controlling it with a mask keeps the added highlights confined to exactly where they’re wanted.
-
Duplicate and Group the Layers
Press Cmd/Ctrl+J to duplicate the layer, then shift-click both layers and press Cmd/Ctrl+G to group them.
-
Add and Invert a Layer Mask
Add a layer mask to the group, then invert it and use a soft brush to paint the highlight effect back in wherever it adds life to the skin, on top of the retouching already done in part one.
Adding a Second, Subtler Highlight Pass
A second, slightly different version of the same technique gives more localized control over other areas like the neck.
-
Repeat Desaturate, Soft Light, and High Pass
Stamp another visible layer, desaturate it, set it to Soft Light, and apply another High Pass filter at a slightly larger radius.
-
Mask It Into Specific Areas
Add a layer mask, invert it, and paint the effect in only where it’s needed, such as the neck, rather than across the whole image.
Using the Pen Tool to Define a Precise Hairline
Cleaning up a hairline calls for a much more precise selection than a brush alone can give.
-
Trace the Hairline With the Pen Tool
On a new layer, press P for the Pen tool and click and drag to place points along the hairline, holding Cmd/Ctrl to adjust angle points and close the path into a defined shape.
-
Convert the Path to a Feathered Selection
Right-click inside the path, choose Make Selection, and set a small feather radius such as 3 pixels.
-
Check and Soften the Selection With Quick Mask
Press Q to view the selection as a Quick Mask, apply a Gaussian Blur (about 3.4 pixels here) to soften its edge further if needed, then press Q again to return to the normal selection.
Why Quick Mask Confirms the Feather Before Committing
A feather amount is hard to judge from the marching-ants selection alone. Viewing the selection as a Quick Mask turns it into a visible, blurrable image so the exact softness of the edge can be checked and adjusted with a filter before it’s converted back into the selection actually used.
Cloning the Hairline Into Shape
With the selection defined, the Clone Stamp tool reshapes the hairline itself.
-
Hide the Selection and Clone From Outside In
Press Cmd/Ctrl+H to hide the selection edges while keeping it active, then use the Clone Stamp tool to sample from just outside the selection and paint into it, effectively giving the hairline a cleaner edge.
Refining the Edge With an Eraser and Layer Mask
A hairline cloned at full strength usually looks too crisp and obviously edited on the first pass.
-
Erase Any Overly Sharp Areas
Use the Eraser tool to soften or remove parts of the cloned edge that look too artificial.
-
Deselect and Mask the Layer
Deselect, add a layer mask, and paint black right along the very edge of the cloned area so the transition looks natural rather than obviously retouched.
Filling Gaps and Hand-Painting Additional Hair
A final pass fills in any remaining thin spots, first with the Clone Stamp and then, where needed, by hand.
-
Clone Stamp Set to Darken for Thin Areas
On a new layer, use the Clone Stamp tool with its blending mode set to Darken to sample nearby hair and add a bit more density to a thin area without lightening anything.
-
Hand-Paint Additional Hair Strokes
On a new layer, choose a small brush close to the size of the existing hair strands, and paint individual strokes to fill out the edge further, working patiently one small shape at a time.
-
Add Highlight Colors Over a Dark Base
If adding lighter or highlighted strands, paint a darker base layer of hair first, then add lighter color over it, rather than painting light strands directly.
-
Mask and Blend the New Hair
Add a layer mask and fade the new hair strokes in so they blend naturally rather than looking pasted on.
Why a Dark Base Layer Comes Before Highlight Color
Hair with any texture or dimension has darker strands underneath before lighter strands sit on top of them, so replicating that same order when hand-painting keeps the added hair reading as physically layered rather than flat. Painting a highlight color directly onto bare skin, without a dark base first, tends to look like a stray colored line instead of a strand of hair.
Why This Approach Works
High Pass paired with Soft Light and Blend If turns dodge and burn into something largely automatic — instead of hand-painting light and dark areas, the filter and blending mode combination does most of that work, leaving masking as the only manual step. The Pen tool’s precision is what makes reshaping a hairline believable rather than obviously smudged, since a feathered, quick-mask-checked selection gives the Clone Stamp an edge to work along instead of a rough approximation. Finishing with hand-painted strands, dark base first and highlight color second, follows the same logic as every other step here: match the real physical structure of what’s being recreated, rather than faking the surface appearance alone.
Final Thoughts
None of these techniques demand a specific hairstyle or a particular subject — the High Pass dodge-and-burn setup works on any portrait, and the Pen tool hairline cleanup is worth having in your toolkit even if it’s only useful occasionally. The next part of this series moves on to stylizing the portrait further and working with color.
Quick Reference: Keys, Menus and Settings
- Stamp and desaturateShift + Alt/Option + Cmd/Ctrl + E, then Shift + Cmd/Ctrl + U
- High Pass shineSoft Light, Filter > Other > High Pass at a fairly large radius
- Highlights onlyDouble-click the layer, Alt/Option-drag the Underlying Layer black slider to the right
- Group and maskCmd/Ctrl + J, Cmd/Ctrl + G, add a mask, Cmd/Ctrl + I, paint white
- Hairline selectionP, right-click > Make Selection, Feather 3 px; Q, Gaussian Blur, Q
- Clone the edgeCmd/Ctrl + H hides the edges; Clone Stamp from outside in, then mask the edge
- Paint hairSmall brush on a new layer, dark strands first, then a mask to blend
High Pass Shine and Hairlines: Common Questions
How does High Pass work as a dodge and burn?
Stamp a visible layer, desaturate it, set it to Soft Light and run Filter > Other > High Pass at a fairly large radius. Soft Light does the lightening and darkening for you, so the only hand work is the mask.
Should the High Pass radius be low or high?
For this shine, high. Aaron explains that lower radius values are better for recovering skin tone and sharpening, while higher values are better for styling like this.
How do I keep the effect in the highlights only?
Double-click the layer to open Blending Options. Under Underlying Layer, hold Alt/Option and drag the black slider from left to right. The layer then shows on the highlights and leaves the shadows alone.
How do I paint the shine only where I want it?
Duplicate the layer with Cmd/Ctrl + J, Shift-click both and group them with Cmd/Ctrl + G. Add a mask to the group, invert it with Cmd/Ctrl + I and paint white with a soft brush.
Does this undo the skin retouching from Part 1?
No. The stamp visible layer is made from the retouched image, so the detail comes back on top of that work rather than from the original photo.
How do I draw a clean hairline with the Pen tool?
On a new layer, press P, then click and drag along the hairline. Hold Cmd/Ctrl to move a point or handle, close the path, right-click inside it and choose Make Selection with a Feather Radius of 3 pixels.
How can I check how soft the selection edge is?
Press Q for Quick Mask to see the selection as an image. Run Filter > Blur > Gaussian Blur if it needs to be softer (Aaron uses about 3.4), then press Q again to get the selection back.
How do I clone the hair into the new shape?
Press Cmd/Ctrl + H to hide the selection edges while the selection stays active. Clone Stamp from just outside the selection into it. Then deselect, add a mask and paint black along the edge so it doesn’t look too crisp.
Can I paint hair by hand?
Yes. On a new layer, pick a small brush about the size of the hair strands and paint short strokes one at a time. Put a dark base down before any lighter strands, then mask the layer to blend it.
From the Magazine View all
Stories, interviews and guides for photographers, new every week.
 EditingLightCraft vs Lightroom: I Edited the Same RAW Files in BothThe free clone on the same RAW files: what matches, what breaks and who should switch.
 InspirationRare Historical Photos: 13 of the Rarest Pictures Ever TakenFrom the earliest surviving picture of a person to the last passenger pigeon: who took each one and why it survives.
 EditingArtCraft: Photoshop Cloned by AI in Two Weeks. Is It Legal?ArtCraft cloned Photoshop and Lightroom with AI and gave them away. Any good? Legal? Safe?
Master Photoshop, Lightroom and Photography
Join PHLEARN PRO for $12.99 a month, or $99.99 a year (save 36%). Cancel anytime, with a 100% money-back guarantee.





