


description
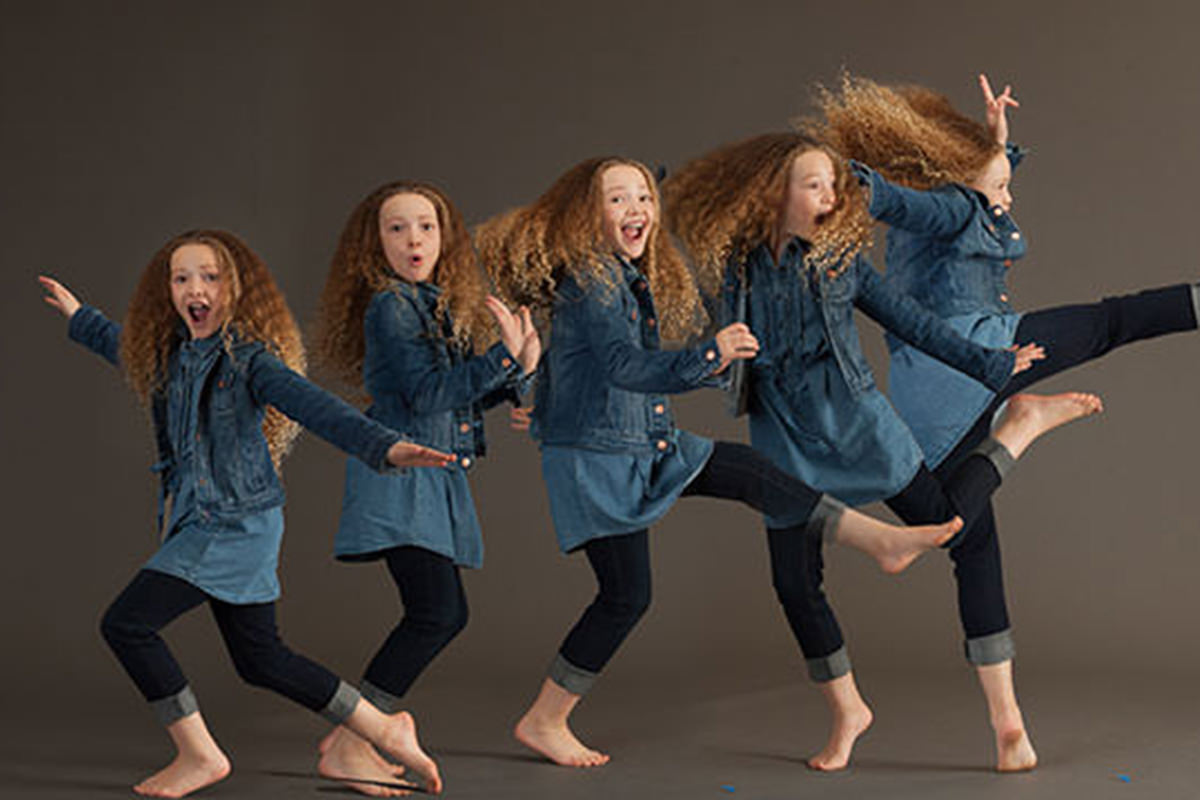
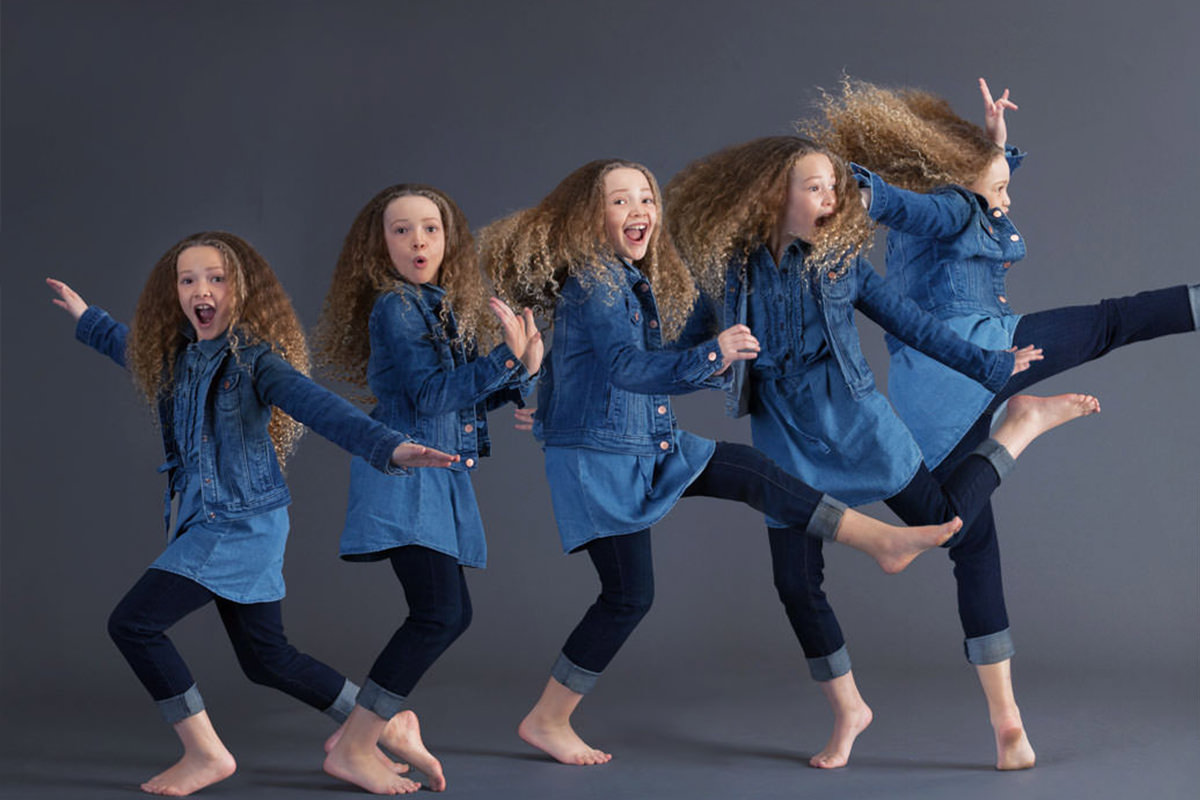
Part one of this two-part fashion ad project is all composite, no retouching yet. The same model, photographed several times on gray seamless, is loaded into a single stack; each version is cut out by selecting the flat backdrop and Alt-clicking for an already-inverted mask. The instances are then arranged and scaled across the frame, and several separate pieces of backdrop are painted together with clipped Curves layers hiding the seams.
Enjoying This Free Tutorial?
We publish a new free tutorial every week, each one with sample images and PSDs you can download and follow along with. Sign up and they land straight in your inbox, along with early word on sales, events and subscriber-only offers.
Fashion Ad Retouching, Part 1: Building the Composite
This two-part series recreates a retail fashion ad campaign from scratch, using the same model photographed several times on a gray seamless backdrop. Part one covers everything that happens before any real retouching starts: cutting each version of the subject out, arranging them into a single composition, and blending the different backdrop pieces together into one seamless scene. You can see how the shoot itself came together in the behind the scenes post.

Bringing All the Source Images Together
With several separate photos of the same model to combine, the first step is getting them all into one working file.
-
Load Files Into a Stack
Go to File > Scripts > Load Files into Stack, click Browse, and choose the images to bring together, then click OK to load them all as separate layers in one document.
Cutting Out the Subject on Each Layer
Because the subject was photographed on a plain gray seamless backdrop, a simple selection tool is enough to cut her out cleanly on every layer.
-
Select the Background, Not the Subject
Press W for the Magic Wand tool and click on the background just outside the subject, rather than trying to click on the subject herself.
-
Refine the Selection
Hold Shift and click with the Magic Wand a few more times, or hold Shift and use the Lasso tool, to add any remaining background area to the selection until the subject is well isolated.
-
Add an Inverted Layer Mask
Hold Alt/Option and click the Add Layer Mask button, which adds a mask that’s already inverted so the subject is visible and the background is hidden.
-
Repeat for Each Remaining Layer
Select the Magic Wand tool again, click the background on the next layer, refine the selection, and Alt/Option-click to add another inverted mask, repeating this for every layer in the stack.
Why Selecting the Background Is Easier Than Selecting the Subject
Clicking directly on a person with the Magic Wand rarely selects them cleanly in one click, since skin, clothing, and hair all have different tones. A plain gray seamless backdrop, on the other hand, is close to one flat color, so selecting it and then relying on the layer mask to flip the result is a far more reliable way to isolate the subject.
Why Alt/Option-Clicking Adds an Already-Inverted Mask
Adding a normal layer mask from an active selection hides the selected area and reveals everything else, which is the opposite of what’s needed when the selection is the background rather than the subject. Holding Alt/Option while adding the mask flips that relationship immediately, so the subject shows and the selected background disappears in a single step instead of requiring a separate invert afterward.
Arranging Multiple Instances of the Same Subject
With every layer cut out, the next step is deciding how the repeated instances of the same model will interact with each other in the frame.
-
Reorder Layers to Control Who’s in Front
Drag layers up or down in the layers panel, or hold Cmd/Ctrl and click to select multiple layers at once, to control which instance of the subject appears in front of another.
-
Reposition and Resize Each Instance
Drag each layer into place and press Cmd/Ctrl+T to transform it, scaling individual instances slightly larger or smaller to build a sense of progression across the frame.
-
Focus on Spacing Before the Backdrop
Concentrate on how the different instances relate to one another and their spacing, without worrying yet about how the backdrop looks underneath them.
Why Compositing Comes Before Retouching
Getting the overall arrangement roughly right first establishes the base image everything else builds on top of. Doing detailed retouching work before the composite itself is settled risks redoing that retouching later if a layer needs to move, resize, or change position in the stack.
Blending Several Backdrop Pieces Into One Seamless Scene
Since no single piece of seamless backdrop was large enough to cover the whole composition, multiple backdrop layers are blended together by hand.
-
Turn Off Unneeded Layer Masks
On the bottommost layer, turn off its layer mask since that backdrop will now be visible everywhere as the base.
-
Paint White at Low Opacity to Blend Backdrops
Select a backdrop layer’s mask, choose a soft brush at around 50% opacity, and paint white to bring more of that backdrop through in specific areas, working away from any subject that shouldn’t be covered.
-
Reuse Whichever Backdrop Piece Fits Best
If one backdrop layer doesn’t give a usable transition, switch to painting white on a different backdrop layer’s mask instead, so the whole scene reads as one continuous piece of seamless.
Cropping to Lock In the Composition
Once the arrangement and backdrop blending are roughly in place, cropping helps confirm the composition is working.
-
Crop With the Crop Tool
Press C for the Crop tool and adjust the crop to frame the composition well, spending real time here since composition matters a great deal for this kind of image.
-
Leave Delete Cropped Pixels Unchecked
Uncheck Delete Cropped Pixels in the options bar before committing the crop, so any cropped-out area can still be recovered later if the composition needs to change.
Blending Backdrop Tones With Clipped Curves Layers
Even after painting the masks together, the different backdrop pieces can still show a visible seam between lighter and darker areas.
-
Add a Clipped Curves Layer
Add a Curves adjustment layer, then press Option/Alt+Cmd/Ctrl+G to clip it so it only affects the backdrop layer directly below it.
-
Darken or Lighten to Match the Seam
Click the middle of the curve and drag it down to darken a lighter backdrop piece, or drag it up to lighten a darker one, until the transition between pieces reads as one even fade.
-
Adjust Strength as Needed
Click the up or down arrow keys to fine-tune how dark or light the adjustment is until the fade looks even across the seam.
Why Clipping the Curves Layer Keeps the Fix Localized
An unclipped Curves adjustment would darken or lighten everything above it in the layer stack, including the subject standing on that backdrop. Clipping the adjustment to just the backdrop layer beneath it means the fix only affects the seam that actually needs it, leaving every other layer untouched.
Protecting the Subject From the Backdrop Adjustment
A Curves layer meant only for the backdrop can still darken the subject standing in front of it if it isn’t masked correctly.
-
Paint Black Over the Subject on the Curves Mask
On the Curves adjustment layer’s own mask, paint black directly over any part of the subject that’s being affected, so the darkening or lightening only touches the backdrop.
-
Reload the Original Selection If Needed
Shift-click the subject’s layer mask to turn it off, select the backdrop again with the Magic Wand (W), invert the selection, then use it on the Curves layer’s mask to precisely exclude the subject from the adjustment.
Grouping the Finished Composite
With the composite and backdrop blending in place, grouping everything keeps the file organized heading into part two.
-
Select All Related Layers
Shift-click to select every layer that makes up this composite.
-
Group and Name the Layers
Press Cmd/Ctrl+G to group the selected layers, then double-click the group’s name to rename it something descriptive.
Why This Approach Works
Selecting the background instead of the subject, then flipping the result with an Alt/Option-clicked mask, turns an otherwise fiddly selection into a one-click, repeatable step across every layer in the stack. Doing the compositing and backdrop blending before any retouching establishes a solid base image first, which is exactly why the tutorial keeps circling back to spacing, layer order, and backdrop seams rather than jumping into finer detail work. Clipping every Curves adjustment to just the layer it’s meant to affect, and masking the subject out of any adjustment meant only for the backdrop, is what keeps a multi-layer composite like this one from turning into a tangle of adjustments doing unintended things to each other.
Final Thoughts
None of the individual steps here are complicated on their own — a magic wand selection, an inverted mask, and a couple of clipped Curves layers — but combining them carefully is what makes a multi-image composite like this one hold together convincingly. Part two of this series picks up from here to refine the selections further, work on color, and drop in the ad’s logo to finish the piece.
Quick Reference: Keys, Menus and Settings
- Load the photosFile > Scripts > Load Files into Stack
- Select the backdropW for the Magic Wand, Shift-click to add; Shift with the Lasso for leftovers
- Mask the modelAlt/Option-click Add Layer Mask, or Cmd/Ctrl + I to invert
- Arrange the posesReorder layers; Cmd/Ctrl + T to resize
- Blend backdropsBrush at about 50% opacity, white on the layer masks
- CropC, uncheck Delete Cropped Pixels
- Even out a seamCurves, Alt/Option + Cmd/Ctrl + G to clip, middle point down or up, arrow keys to fine-tune
Fashion Ad Compositing: Common Questions
How do I get several photos into one Photoshop file?
Go to File > Scripts > Load Files into Stack, click Browse, choose the images and click OK. Each photo comes in as its own layer in one document.
Why select the background instead of the person?
On gray seamless, one click outside the model with the Magic Wand (W) grabs most of the backdrop. Hold Shift to add more clicks, or hold Shift with the Lasso to add any leftover areas.
My mask hid the model instead of the background. How do I fix it?
Press Cmd/Ctrl + I to invert the mask. Next time, hold Alt/Option as you click the Add Layer Mask button; that adds the mask already inverted.
Do I need the Magnetic Lasso or other fancy tools?
Not here. Aaron’s advice is to use the easiest tool you know that does the job. On a plain backdrop the Magic Wand and Lasso are enough.
Should I retouch or composite first?
Composite first. Getting the arrangement close sets the base image, and you work up from there instead of redoing retouching when a layer moves.
How do I control which pose sits in front?
Drag the layers up or down in the Layers panel. Hold Cmd/Ctrl to click a layer in the image, and press Cmd/Ctrl + T to make one pose a little larger or smaller for a sense of progression.
The seamless wasn’t big enough. How do I make one backdrop?
Turn off the mask on the bottom layer so its backdrop shows everywhere. On the other layers’ masks, paint white at about 50% opacity to bring in more backdrop, working away from the other poses.
How do I crop without losing pixels?
Press C for the Crop tool and uncheck Delete Cropped Pixels before you commit. You can still change the crop later.
How do I hide a light and dark seam between backdrop pieces?
Add a Curves layer, clip it with Alt/Option + Cmd/Ctrl + G and drag the middle of the curve down or up. The arrow keys fine-tune it. Paint black on the Curves mask wherever it darkens the model.
From the Magazine View all
Stories, interviews and guides for photographers, new every week.
 EditingLightCraft vs Lightroom: I Edited the Same RAW Files in BothThe free clone on the same RAW files: what matches, what breaks and who should switch.
 InspirationRare Historical Photos: 13 of the Rarest Pictures Ever TakenFrom the earliest surviving picture of a person to the last passenger pigeon: who took each one and why it survives.
 EditingArtCraft: Photoshop Cloned by AI in Two Weeks. Is It Legal?ArtCraft cloned Photoshop and Lightroom with AI and gave them away. Any good? Legal? Safe?
Master Photoshop, Lightroom and Photography
Join PHLEARN PRO for $12.99 a month, or $99.99 a year (save 36%). Cancel anytime, with a 100% money-back guarantee.





