
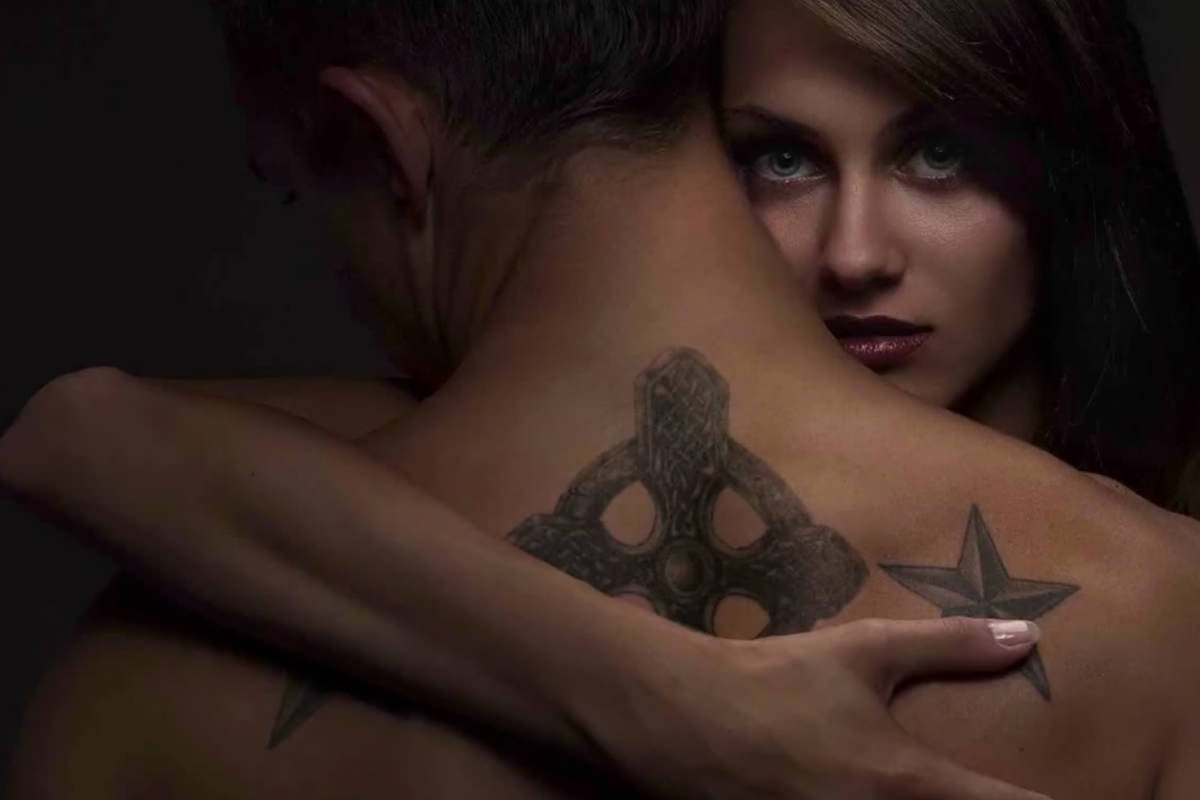

description
Placing a tattoo on someone in Photoshop only works if the ink behaves like ink. This free tutorial cuts a tattoo out of one photo with the Magic Wand and Lasso, then blends it onto another subject’s back with Multiply mode and Blend If, so the skin’s own tone becomes the tattoo’s light areas. A clipped Hue/Saturation layer gives the ink a bluish cast, a group mask hides it behind the arm, and a top highlight layer lets the real skin highlights show through.
Enjoying This Free Tutorial?
We publish a new free tutorial every week, each one with sample images and PSDs you can download and follow along with. Sign up and they land straight in your inbox, along with early word on sales, events and subscriber-only offers.
How to Add a Tattoo to a Person in Photoshop
Lifting a tattoo from one photo and placing it convincingly on someone else’s skin takes more than a simple copy and paste — it means matching the way ink actually sits into skin, with the right blend mode, color, and highlights. This tutorial cuts a tattoo out of one image, blends it into another subject’s back with Multiply and Blend If, colorizes it, and finishes with a highlight layer that makes it look like it was always there.
Bringing the Tattoo Into the New Image
The first step is simply getting the tattoo positioned roughly where it needs to go.
-
Select and Move the Tattoo Image In
Use the Marquee tool to select the relevant portion of the tattoo image, then use the Move tool to drag it into the new document.
-
Position and Transform to Fit
Lower the layer’s opacity temporarily to see through it, position it where the tattoo should sit, then press Cmd/Ctrl+T to transform, scale, and straighten it to match the subject’s back.
Cutting the Tattoo Out With the Magic Wand and Lasso
Using an existing tattoo image, rather than a plain drawing, means the line art already looks like real ink and just needs to be isolated from the surrounding skin.
-
Select the Skin Around the Tattoo
Press W for the Magic Wand tool, raise the tolerance so it selects more of the surrounding skin at once, and hold Shift while clicking to add more areas to the selection.
-
Refine With the Lasso Tool
Hold Shift and use the Lasso tool to add any missed areas, or hold Alt/Option to subtract an area that shouldn’t be included.
-
Add and Invert a Layer Mask
Click the Add Layer Mask button, then click the mask and press Cmd/Ctrl+I to invert it so the tattoo itself is visible instead of the surrounding skin.
-
Clean Up Any Remaining Bits
Use the Lasso tool to select any leftover unwanted bits, fill them with black on the mask using Shift+Delete, and deselect.
Blending the Tattoo Into Skin With Multiply and a Clipped Curves Layer
A tattoo without white ink relies entirely on the skin’s own tone to read as its lighter areas, which points directly to one specific blend mode.
-
Set the Tattoo Layer to Multiply
Change the tattoo layer’s blending mode from Normal to Multiply, which only darkens the image beneath it and never lightens it.
-
Add a Clipped Curves Layer
Add a Curves adjustment layer, right-click it, and choose Create Clipping Mask so it only affects the tattoo layer.
-
Resize as Needed
Press Cmd/Ctrl+T to shrink or reposition the tattoo further if it’s overlapping any existing marks on the subject’s skin.
Why Multiply Is the Right Blend Mode for This Tattoo
Many tattoos, this one included, don’t use white ink at all, relying instead on the skin’s own natural tone to serve as their lightest areas. Multiply blending only ever darkens what’s underneath it, never lightens it, which matches exactly how this kind of tattoo actually behaves sitting on real skin.
Restricting the Blend With Blend If
Blend If gives finer control over exactly which parts of the tattoo layer show up based on how light or dark the layer underneath is.
-
Open Blending Options
Double-click the tattoo layer to open its Blending Options.
-
Split the Underlying Layer Slider
Hold Alt/Option and drag either half of the underlying layer’s slider to control where the tattoo layer becomes visible or invisible based on the skin’s own tone beneath it.
Colorizing the Tattoo to Match Skin Tone
A clipped Hue/Saturation layer gives the tattoo a more natural, slightly blue-tinted ink color instead of flat black.
-
Add a Clipped Hue/Saturation Layer
Add a Hue/Saturation adjustment layer and press Option/Alt+Cmd/Ctrl+G to clip it to the tattoo layer.
-
Colorize With a Blue-Leaning Tone
Check the Colorize option and choose a subtle blue hue, since real tattoo ink often has a bluish cast, then adjust saturation and lightness to taste.
Refining the Mask Edge
A too-sharp mask edge is one of the fastest ways to give away that a tattoo was added digitally.
-
Open Refine Mask
Select the tattoo’s layer mask and go to Select > Refine Mask.
-
Feather and Adjust the Edge
Add a small amount of feathering and adjust the edge until the tattoo’s border matches the softness of similar real tattoos elsewhere in the image.
-
Touch Up the Feathered Edge
Paint black directly on the mask along the newly feathered edge if it needs further cleanup after the Refine Mask adjustment.
Masking the Tattoo Behind the Arm With a Group Mask
Part of the tattoo needs to disappear behind the subject’s arm, but editing the tattoo’s own mask directly would make it harder to adjust later.
-
Group All the Tattoo Layers
Shift-click every layer that makes up the tattoo effect and press Cmd/Ctrl+G to group them together.
-
Add a Mask to the Group Instead
Add a layer mask to the group itself, then use the Lasso tool to roughly trace around the arm and, with the arm still selected, press Cmd/Ctrl+I on the mask so the tattoo disappears behind it.
Why the Arm Gets Its Own Group Mask, Not an Edit to the Tattoo’s Mask
The tattoo’s own layer mask may still need adjusting later, whether that means repositioning the tattoo or refining its edge further. Masking the entire group instead of editing that individual mask keeps the arm cutout completely separate, so either piece can be changed independently without affecting the other.
Adding Realism With a Skin Highlight Layer on Top
A final layer on top of everything lets the skin’s own natural highlights show through over the tattoo, which is what makes the whole effect read as real.
-
Duplicate the Background Layer to the Top
Press Cmd/Ctrl+J to duplicate the original background layer, then drag it above every other layer.
-
Restrict It to Highlights With Blend If
Double-click the layer, hold Alt/Option, and drag the left half of the This Layer slider to the right so the copy only shows where the skin is lighter, letting the tattoo show through in the darker areas.
Why This Top Highlight Layer Is What Sells the Realism
Without it, the tattoo sits as a flat layer with no connection to the actual light falling on the subject’s back. Letting the skin’s own highlights show through on top, restricted with Blend If, makes the tattoo look like it’s genuinely part of the surface rather than something pasted over it.
Why This Approach Works
Multiply blending does the fundamental work of making the tattoo behave like real ink sitting on skin, but Blend If is what gives fine control over exactly where that darkening shows up — the same technique used again later to let genuine skin highlights shine through on top. Keeping the arm’s cutout on a separate group mask, rather than folding it into the tattoo’s own mask, is a small organizational choice that pays off the moment either piece needs adjusting independently. Every step here builds toward the same goal: making a flat, borrowed image of ink behave like it’s actually embedded in someone’s skin, responding to the same light and shadow as everything around it.
Final Thoughts
This same method works for placing any tattoo design onto any subject, and it’s a genuinely useful way to preview what a real tattoo might look like before committing to one. Keeping every piece — the cutout, the color, the arm mask, and the highlight layer — on its own independent layer is what makes the whole composite this flexible to move, resize, and adjust even after the fact.
Quick Reference: Keys, Menus and Settings
- Place the tattooMarquee, drag in with the Move tool, lower the opacity, Cmd/Ctrl + T
- Cut it outW Magic Wand, higher tolerance, Shift to add; Lasso with Alt/Option to subtract; mask, Cmd/Ctrl + I
- Blend into skinBlend mode Multiply; clipped Curves (right-click > Create Clipping Mask)
- Blend IfDouble-click the layer, Alt/Option-drag to split the slider
- Ink colorHue/Saturation, Alt/Option + Cmd/Ctrl + G to clip, Colorize, subtle blue
- Soften and hideSelect > Refine Mask, Feather; Cmd/Ctrl + G and mask the group behind the arm
- Skin on topCmd/Ctrl + J the background, drag it to the top, Blend If on This Layer
No AI, no generative credits.
Adding a Tattoo: Common Questions
Can I use this to preview a tattoo before I get one?
Yes. Aaron suggests exactly that: put a photo of the design on a photo of yourself with the same steps and see how it looks.
Should I start from a drawing or a real tattoo?
A photo of a real tattoo looks most convincing, since its line art already looks like ink in skin. A line drawing works too, but it won’t look exactly like a tattoo.
How do I cut the tattoo out of the skin?
Select the skin around it with the Magic Wand (W) at a higher tolerance, Shift-clicking to add. Fix misses with the Lasso: Shift adds, Alt/Option subtracts. Add a layer mask and press Cmd/Ctrl + I to invert it.
Which blend mode makes a tattoo look like ink?
Multiply. Many tattoos have no white ink and use the skin as their lightest color, and Multiply only darkens what is underneath.
How does Blend If help the tattoo blend in?
Double-click the layer to open its blending options. Hold Alt/Option and drag half of a slider to split it, so the layer fades out gradually depending on how light or dark the pixels are.
How do I give the tattoo a real ink color?
Add a Hue/Saturation layer, clip it with Alt/Option + Cmd/Ctrl + G, check Colorize and pick a subtle blue. Tattoo ink tends to have a bluish color.
The tattoo’s edge looks too sharp. How do I soften it?
Select the tattoo’s layer mask and go to Select > Refine Mask. Add a little Feather to match the softness of the subject’s other tattoo, then touch up the edge with black.
How do I put the tattoo behind the arm?
Group the tattoo layers with Cmd/Ctrl + G and mask the group instead of the tattoo. Lasso around the arm and press Cmd/Ctrl + I on the group mask. The tattoo’s own mask stays free to change.
What makes the tattoo look like it’s really in the skin?
A copy of the background on top. Press Cmd/Ctrl + J on the background, drag the copy to the top and use Blend If so only the lighter skin shows. The skin’s highlights then sit over the ink, and you can still move the tattoo underneath.
From the Magazine View all
Stories, interviews and guides for photographers, new every week.
 EditingLightCraft vs Lightroom: I Edited the Same RAW Files in BothThe free clone on the same RAW files: what matches, what breaks and who should switch.
 InspirationRare Historical Photos: 13 of the Rarest Pictures Ever TakenFrom the earliest surviving picture of a person to the last passenger pigeon: who took each one and why it survives.
 EditingArtCraft: Photoshop Cloned by AI in Two Weeks. Is It Legal?ArtCraft cloned Photoshop and Lightroom with AI and gave them away. Any good? Legal? Safe?
Master Photoshop, Lightroom and Photography
Join PHLEARN PRO for $12.99 a month, or $99.99 a year (save 36%). Cancel anytime, with a 100% money-back guarantee.





