
How to Remove Anything in Photoshop
-

-
Add to
favorites
-
DifficultyMedium
-
Length6.5 hours
-
Software
Description
While it may seem like magic, the ability to remove anything in Photoshop isn’t a trick–it’s a skill that anyone can learn! In this tutorial, we break down the tools and techniques necessary to clean up landscapes and help subjects stand out.
Learn about the Healing Brush Tool, Clone Stamp Tool, Patch Tool and more. From people and cars, to buildings and reflections, if there’s a distraction in an image, we have a method to seamlessly remove it. Just need to remove a background? Try this PRO tutorial!
THIS COURSE INCLUDES
- 18 Sample Images
Share
Table of Contents
-
01 - Tools & Techniques Overview7:01m
-
02 - Tools & Techniques (Part 1)13:05m
-
03 - Tools & Techniques (Part 2)8:58m
-
01 - Mountain Landscape10:26m
-
02 - Sky & Gradients31:10m
-
03 - Smooth Surface3:09m
-
04 - Sky & Clouds5:08m
-
01 - Beach20:01m
-
02 - Street Portrait32:31m
-
03 - Indoor Portrait11:44m
-
04 - Storefront31:37m
-
05 - Animal Closeup12:30m
-
06 - Urban Landscape37:21m
-
07 - Urban Skyline10:07m
-
08 - Winter Landscape7:36m
Course Downloads
Remove Distractions


AFTER OBJECT REMOVAL
ORIGINAL
Less is More
Unless you’re shooting in controlled studio environment, it’s easy for unwanted objects and distractions to sneak into frame. Anything that draws attention away from your subject has the potential to diminish the message or the story that you’re trying to tell. No matter how large, or how small, we’ll demonstrate how to remove these things from any image while recreating the environment behind them.
Buildings & Structures
Removing street signs, construction cranes, garbage bins, and sometimes entire buildings can improve a photograph. Learn to eliminate all of these and more from an image while leaving the surrounding structures, architecture, and natural elements seemingly unaffected.
People
Whether you’re snapping pictures on vacation at a spot swarmed with tourists or you’re a wedding photographer trying to get an intimate photo of the bride and groom, a few too many people can ruin the shot. With the power of Photoshop, you can ensure that your final edit contains only the people that need to be there.


AFTER OBJECT REMOVAL
ORIGINAL


AFTER OBJECT REMOVAL
ORIGINAL
Skills for Any Photographer
The skills in this tutorial are useful no matter what type of photography or editing you do. If you’re shooting products, weddings, landscapes, or architecture, you’re sure to learn the skills to take your images to the next level.
Portraits
The ideal portrait will make sure that the viewer’s eyes are always on the subject. Not only do we cover how to eliminate any background distractions, we also provide tips and tricks to help identify some of the not-so-obvious things that might draw attention where you don’t want it.
Landscapes
Do you want a nature landscape to appear untouched by any signs civilization? How about an urban landscape to be free of all of the congestion that comes with being in the center of a city? Whether it be scenic mountains or soaring skyscrapers, we’ll show you how to maintain the scope and grandeur of a landscape by eliminating the pesky things that interfere with it.

Remove Anything!
Learn how to remove anything from a photo–no matter the size! Use tools like the Spot Healing Brush and Clone Stamp Tool to cover up distractions and recreate the environment around them.


AFTER OBJECT REMOVAL
ORIGINAL
Tools & Techniques
Photoshop is a creative sandbox, oftentimes providing many different methods to solving a single problem. If you’re on a tight deadline, you might prefer to take advantage of the smart tools to do the heavy lifting for you. If time is on your side, maybe you decide to take the meticulous approach and use the wide variety of manual tools at your disposal. Whatever your approach, we’ll show you the ropes of every tool and technique that we know so that you can make the choice with confidence.
Brush Tools
Quickly and accurately remove objects with the Spot Healing Brush Tool, swap to the Clone Stamp Tool to maintain a continuous edge, or use the standard Brush Tool to sample and paint in details to match the surrounding environment. Like real brushes to a painter, the brush tools in Photoshop each serve a purpose and we’ll make sure you’re ready to call on any of them to get the job done.
Selection Tools
When it comes to object removal, selections allow you to work with far greater accuracy and speed within Photoshop. Learn methods like using Content-Aware Fill with any selection to have Photoshop intelligently remove an object for you or use the Pen Tool tool to create a precision cut-out of an area so you can freely use the brush tools without jeopardizing other parts of an image.


AFTER OBJECT REMOVAL
ORIGINAL
Fundamentals for Retouching & Compositing
Whether you’re looking to become a professional retoucher or to create magical scenes as a compositing artist, this tutorial is a great starting point to develop the Photoshop prowess you’ll need to succeed.
Exercises for Any Skill Level
This tutorial is divided into simple, intermediate, and advanced level exercises. If you’re newer to Photoshop, start from the beginning to cultivate your skillset. If you’re a veteran looking for a challenge, dive into the latter sections to test your mastery.
Learn Creative Problem Solving
Learning the tools and techniques within Photoshop is oftentimes the easy part. Understanding how to mix and match techniques to solve specific problems is the real challenge. In this tutorial we present 20 different scenarios that will help prepare you for dealing with a whole new variety of challenges unique to the work that you do.


AFTER OBJECT REMOVAL
ORIGINAL


AFTER OBJECT REMOVAL
ORIGINAL


AFTER OBJECT REMOVAL
ORIGINAL


AFTER OBJECT REMOVAL
ORIGINAL

Aaron Nace
PHLEARN Founder
Aaron Nace is a photographer, Photoshop artist and founder of PHLEARN. He is the #1 Photoshop instructor in the world with millions of YouTube subscribers.


Reviews
New & Popular Tutorials


Training Site in
the World
Tutorials!
Ratings
and Counting
Subscribers
I’m really thankful about this specific course because I needed to improve my “remove anything” skills. It has helped a lot in a work project because, where I work, we’re not allowed to use AI Generate. So, thank you sooo much!!! From Costa Rica! 🇨🇷
The one hour car example was very comprehensive and interesting. With so many educational steps and ‘tricks’, it would be excellent if it could be accompanied with a written script, outlining the steps. A lot to learn !!!
Can you please stop saying F for full screen and simillar simple stuff that you keep repeating and waisting everyones time. Also, if you say some course is advance then treat people who watch that accordingly, please stop repeating simple boring stuff. Most of your videos I have to keep fast forwarding. Thank you.
Chapter 4 ‘Intermediate Examples’, part 2 ‘Street Portrait’. I found the location of the photo on Google Maps (https://bit.ly/32pGTaj) by searching for the name of the restaurant on the right. This way you can use Maps to see what’s behind the object you’re removing. Maybe it’s possible to copy missing parts from Street View to fill in the missing parts.
Exceptional tutorial, everything is perfectly covered and explained. Guys, I also recommend watching How to Select & Change Any Color in Photoshop , only by knowing how to remove distractions and changing any color, your photography game will go up. Knowing how to use Photoshop will give you the liberty to create your own syle. Aaron, you simply make learning fun !
If you are serious about learning Photoshop you must become a Phlearner!! Aaron is a genius! I am so grateful for him for transforming me into a Photoshop wizard. When you sit in front of your computer seeing the magic tricks that he uses and you just want to learn all of them. The way he teaches is fantastic, it’s like a show. The Photoshop is so simple and so easy, that’s what you will say when you finish the courses. He inspires you and nevertheless he shows you everything about photoshop step by step. There is no unanswered question. Thank you very much Aaron and Phlearn Team for this amazing experience.
Awsome tutorial! very detailed and well explaind. Thank you so much!! I have a question though… how can I remove reflections from an object (for ex. a phone, or an alarm clock..etc.) without cancelling what’s behind?
nice nice nice nice….very good stuff! Thanks Aaron
This is a very very cool class! I won’t be struggling anymore about removing stuff on my images. I have only one little question about the red car. The class is perfect and the removal is amazing, but I’m just wondering how would we manage to kind of keep the shine of the rear? With the brush tool, it seems a bit mat. Is there a way?
This is an excellent insightful tutorial! I have been using all these tools for years but with amazing humour and in-depth examples, you opened my eyes to how to use the tools in a refined way. You have changed the way I use the brush tool , opened up a whole new level of retouching for me. Thank you!
After this tutorial I be like going to in 5 4 3 2 1.. P.S ; when you said ima though this computer out of the window I felt that lol
Congratulations to the PhLearn team as this has been one hell of a tutorial. The proof is in the pudding and since watching the tutorial I have completed several paid jobs where I had to remove some complex objects. I would not have managed to complete the jobs if I had not learned these techniques.
One of my favorite tutorials I’ve watched from Aaron. I never used the brush tool for retouching, but I’ve started to now and see so many great opportunities for using it in my work. Also, overpainting, overhealing, over-cloning and then masking out the “Over” parts works fantastic, great tip and again, something I didn’t do before until now. I like also the use of the healing brush tool to bring texture into the brush painted retouches. I seem to get more than just the texture, and I’m not sure why. Is it best to obtain your texture from lighter colored areas of the photo rather than ones that are darker than the area you want the texture to be applied? Any particular settings to use with the healing brush tool to just extract the texture? I notice you tend to have your flow around 60 percent. Is that the secret? Thanks again for a fantastic video tutorial. If you struggle with cutting things out, I highly recommend this tutorial whether you are a beginner, intermediate or advanced user of Photoshop.
Watching Aaron in this tutorial is like viewing the painting of the Mona Lisa as it was being created. A grand master making things look simple. Especially the episode involving the retouching of the automobile. A must see for any artist who also likes cameras.
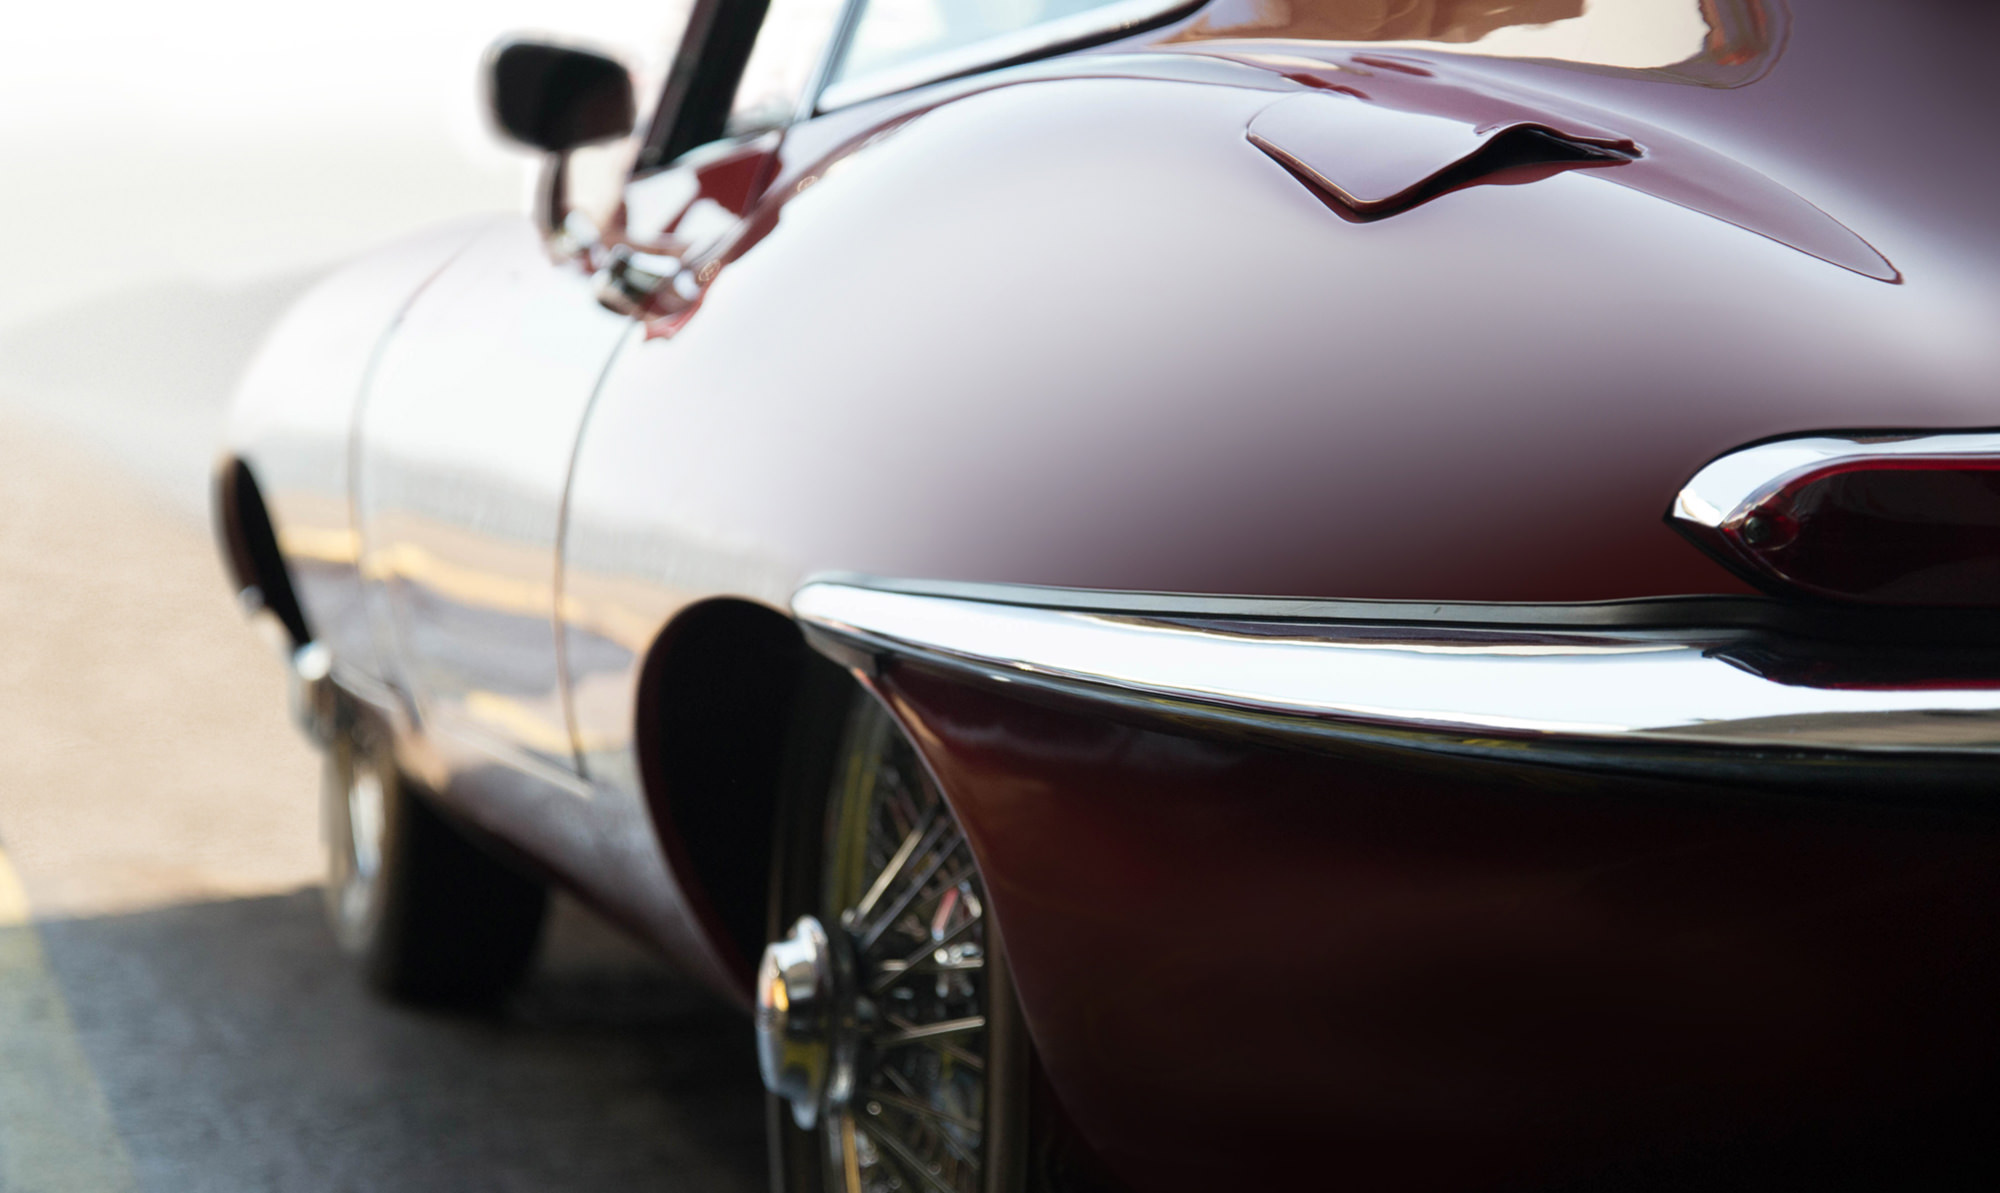
Fantastic tutorial, I have learned so much from it and it has helped me progress my Photoshop skills quite a lot. Re the car in advanced section, it is an E type Jaguar. It has two mirrors on the drivers side as one is a wing mounted mirror and one is a door mounted mirror. Thanks for the easy relaxed way you have in schooling us.
Great tutorial. Learned a ton. Well worth the time spent watching.
Intermediate Removal Urban Landscape clip I believe the little kids door you place into the image was a doorway that extended up. Because the window above it has the wrong perspective. I watched this and waited and waited for you to notice that. You do fantastic work though.
Well, I do feel like I can remove anything in Photoshop now, so well done team Phlearn! This is absolutely the most comprehensive, most organized, most well-taught object removal series out there. Furthermore, watching Aaron go at it with the brush tool is just as soothing as watching Bob Ross paint… just thought I’d throw that out there…
Excellent course! It makes you feel almost like a magician, when you’re removing stuff from your photos. Now you see it, now you don’t 😀
Great tutorial very well presented. learnt new ways to remove objects, never realised the power of the brush tool.
Great tutorial, and Aaron is right about the photo he uses in the “Urban Landscape” section – the picture has been taken in Spain. To be more precise, it’s Guardia Street in the old town quarter of Barcelona.
I purchased the pro version 6 month ago, not sure what I was thinking as I’ve been using Photoshop for about 10 year. What could I actual learn that in my mind I didn’t already know. Well after taking this in-depth course it blew my mind, yes I know all the tools and how to use them. But it’s the finishing touches that are helping me to push my skills to the next level. Thanks Aaron and your thanks to your staff. …Bob
another great tutorial
Your video are absolutely awesomeee . Thanks Phlearn
Oh man. You helped explain the best tools for removing things from a photo. There are some very cleve, aha, tips in this tutorial. Thank you!
This course has given me the knowledge and confidence to tackle photos that I had previously marked as unusable. Aaron takes you from simple to complex without demeaning his audience. I’ve learned more from PHLEARN in 5 hours than I’ve learned from all other sources in 5 months. Stop wasting time with other books and courses, and go straight to PHLEARN. It’s a decision that you won’t regret.
Wow! Thanks for the kind words! Love that you are getting so much from our classes. Please keep on PHLEARNing.
Wow!! loved the way it progressed from the simple, easier methods – to the more expert and complicated. I loved what you did with the couple photo. Just amazing. Not very experienced with Photoshop (which is why I purchased this course) and at my age I’ll probably reach my expiration date before mastering these techniques but I will love practicing and playing around with your techniques. So happy I purchased this….
Awesome! We loved creating this course, as it had been requested so many times by our students. Glad it was exactly what you needed.
Terrific. The course logically built from simple to more complex and added tools and techniques as it went along. It will take some time to truly master them but seeing them practically applied makes quite a big difference. In fact, when I was only half way through with the course, I pulled out a couple of my own images from years past that I really like, but that suffer from errant … stuff in the frame and for the first time, really fixed them the way I would want them to be seen. This course alone justifies my Pro membership as far as I’m concerned.
Awesome! This is the type of feedback that makes it all worth it. We pour so many hours into these tutorials, hoping they will be useful in real world scenarios, so it’s great to see them have an impact!
Aaron, this is an awesome tutorial, mad cool! I’m not new to photoshop and although I know all these tools used I learned a bunch of new things. It’s incredible! I love your way to teach: humorous and always straight to the point! This subscription was one of my best investments ever! Greetings from Vienna Brigitta
Yay! That’s awesome that we were able to help out. Thank you for Subscribing!
Excellent series. Very comprehensive and interesting. I have learned so much. Since Aaron asked, the car is an E-type Jaguar. On its release in March 1961, Enzo Ferrari called it “the most beautiful car ever made”.
Thank you! We were wondering what car that was 🙂
Fantastic series. This has used SO MANY tools and taught me more than all the previous tutorials put together, thank you.
Thank you! We tried to go REALLY in-depth in the training on this tutorial to cover nearly and situation you might ever come across.
Wonderful tutorial as usual. Just one thing…in CS6 the regular healing brush does not work the way you describe or at least I cannot get to work that way.
I really liked this one, i get something form them all and have improved so much by watching your videos. so thanks for that! But one portion of this series really made me say wow, and that one was the Spain part (or where ever), that one inspired me. i feel that i will be able to do similar stuff when presented with it, with practice of course!
Yes! The goal of that example was to show you that you can take total control over your images, even when the original shot wasn’t exactly what you wanted! This tutorial helps you save any image where a distraction has spoiled it.
If you are comfortable with the basic framework of Photoshop then you will learn a lot from this. I have already used most of these techniques, but Aaron takes it all to the next level. This one tutorial has put me ahead at least a year compared to just figuring it all out by myself.
We’re really happy to hear this, because the goal of the tutorial was to take a common Photoshop problem people face and go really deep into advanced techniques to solve it.
Again, always learning from your tutorials and best of all you make it fun!
What’s learning without a little fun!
Again I have learned a lot of very useful tips & tricks. Some new stuff too. One word for this course Great!
Happy to know we were able to deliver again for you! We have more great tutorials coming!