

Color correction is the unglamorous step that everything else depends on. Grade an image whose white balance is wrong and you are decorating a mistake — skin goes orange or grey, and no amount of styling afterwards rescues it.
Day 20 is short because the answer is short: the Camera Raw filter, either one click with the white balance eyedropper on something that should be neutral, or the Auto button, which is better than it has any right to be. It works on JPEGs as well as raw files.
This is Day 20 of 30 Days of Photoshop, 2025 Edition — our most-watched series, rebuilt from the ground up for today’s tools.
Free practice files
Practice Files for This Tutorial
The sample image and the layered PSD from the video, so you can follow every step on the same files.
This tutorial includes 1 sample image and 1 sample PSD.


Create a free PHLEARN account to download, or log in if you already have one. One account gets you the files for every free tutorial.
Watch the Full Series
30 Days of Photoshop · 2025 EditionOur most-watched series, updated for 2025 — watch all 30 free
description
Continue Watching 30 Days of Photoshop
JOIN 30 DAYS OF PHOTOSHOP (FOR FREE!)
Image Source


Color Correction Is What Everything Else Depends On
Every photograph is recorded under light of some particular color, and cameras guess at what that color was. When the guess is off, the whole image tilts — too warm, too cool, faintly green. Correcting that is the first thing you should do to any file and the last thing most people think about.
Color Correction Comes Before the Grade
Correction Makes It Right
Neutral things in the scene should look neutral. It is a technical fix with a right answer, and it should happen before anything else.
Grading Makes It a Look
Warm highlights, cool shadows, a film palette — entirely a matter of taste, and only meaningful once the file is neutral underneath. Day 21 covers that; today is the step before it.
Convert to a Smart Object First
Filter > Convert for Smart Filters on the background layer. Camera Raw then applies as a Smart Filter you can toggle, re-open and re-tune later — and white balance is exactly the kind of judgement you will want to revisit with fresh eyes.

Open Camera Raw and Go to Color
Filter > Camera Raw Filter. The right-hand panel opens on Light, which handles exposure and contrast. The Color section below it holds white balance.
Worth knowing: if you open a genuine raw file into Photoshop it launches Camera Raw automatically, and the White Balance dropdown offers the camera presets — Daylight, Cloudy, Shade, Tungsten, Fluorescent, Flash. On a JPEG that list is limited, because a JPEG has already had a white balance applied. The eyedropper and Auto still work on both.
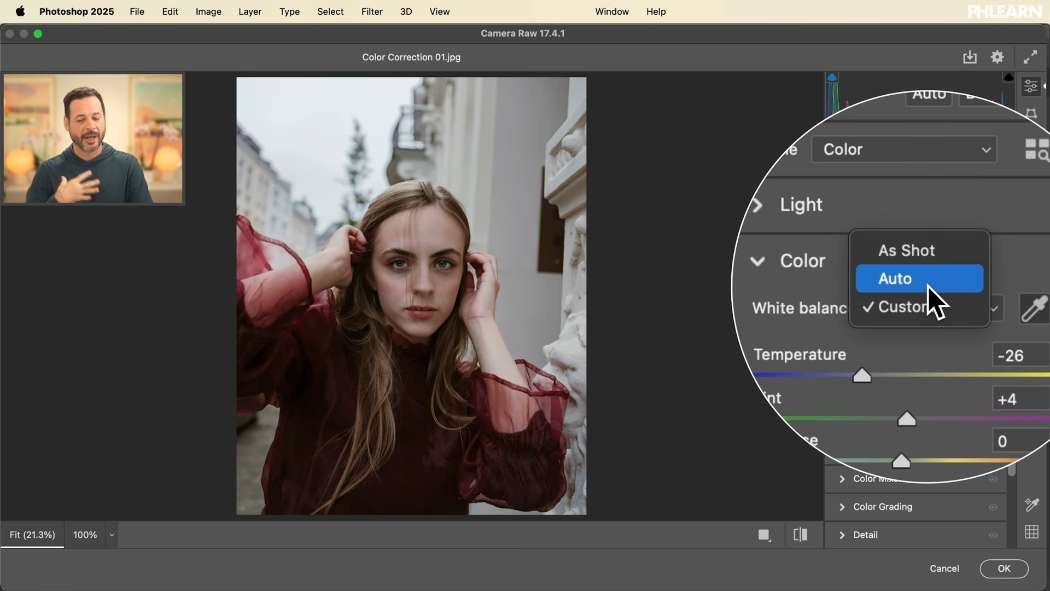
Color Correction With the White Balance Tool
-
Select the Eyedropper in the Color Section
It sits beside the White Balance dropdown.
-
Find Something That Should Be Gray
A concrete wall, a white shirt, asphalt, a paper cup. The brightness does not matter — light gray, mid gray and dark gray all work. What matters is that it had no color of its own.
-
Click It
Photoshop shifts every color in the image so that the pixel you clicked becomes exactly neutral. If your guess was right, the whole photograph falls into place at once.
What Happens to Color Correction When You Click Something Colored
Click a red jacket and the image turns cyan. That is not a bug — you told Photoshop that red should be gray, and cyan is the opposite of red, so it removed enough red to comply.
Understanding that makes the tool predictable rather than mysterious. It always does the same thing: whatever you click becomes neutral, and everything else moves with it.
Carry a Gray Card
If color accuracy matters to your work — product photography, anything with fabric, any client who cares — a gray card removes the guesswork entirely. It is a piece of calibrated 18% gray card, they cost very little, and pocket-sized ones exist.
Shoot one frame with your subject holding it under the same light, then eyedropper that card in Camera Raw and copy the resulting settings across the shoot. Perfect white balance, every time, with no estimating.
When Auto Color Correction Is Genuinely Good
There is an Auto button in the Color section. It analyzes the whole frame and sets both sliders for you, and on both raw files and JPEGs it lands close to right far more often than it has any business doing.
Try it first. If it looks right, it is right — you are not being lazy, you are being fast. Then look at the two numbers it moved, because they tell you what the file needed.
Temperature
Blue at one end, yellow at the other. Negative values cool the image, positive ones warm it. Correcting a warm indoor shot usually means a negative temperature shift.
Tint
Green against magenta, the axis people forget. Fluorescent and mixed lighting throw green casts that no amount of temperature adjustment will fix, and this is the slider for them.

Judge It With the Smart Filter Toggle
Click OK and Camera Raw sits under the layer as a Smart Filter. Toggle its eye icon on and off.
This comparison is the point of the whole exercise, because a color cast is almost invisible until you see the corrected version beside it. An image you thought was fine reveals itself as clearly too warm, and skin tones look markedly more natural once the cast is gone.
Correct One of Your Own
Download the sample image and try both routes — eyedropper on a neutral, then Auto — and compare them. Then run Auto on a few of your own files, including ones you did not think had a problem. That is where this becomes a habit.
Day 10 introduced Camera Raw in full. Tomorrow, Day 21 moves from correction to color grading.
Quick Reference: Menus and Settings
- Keep it editableFilter > Convert for Smart Filters on the background layer
- Open the controlsFilter > Camera Raw Filter > Color
- Click a neutralWhite Balance tool, then click something that should be gray
- Let Photoshop do itAuto in the Color section; here Temperature -20, Tint -3
- CompareClick OK, then toggle the Camera Raw Smart Filter’s eye icon
Image source

Free Downloads
Follow Along on the Same Photo
Get the slightly warm JPEG to color correct and the layered PSD with Camera Raw applied as a Smart Filter, so the white balance stays adjustable. Free with a PHLEARN account.
Color Correction: Common Questions
What is the difference between color correction and color grading?
Correction makes neutral things look neutral; it has a right answer and comes first. Grading adds a look, like warm highlights, and is a matter of taste once the file is neutral.
Why convert to a Smart Object before color correcting?
Filter > Convert for Smart Filters makes Camera Raw apply as a Smart Filter. You can switch it off and on to compare, or reopen it to change the white balance later.
Where is white balance in Camera Raw?
Open Filter > Camera Raw Filter and go to the Color section, below Light. The White Balance dropdown, the White Balance tool and the Auto button are all there.
Does this work on JPEGs or only RAW files?
Both. RAW files get the full White Balance preset list, like Daylight, Shade and Tungsten; the White Balance tool and Auto work on JPEGs too.
How do I use the White Balance tool?
Click it, then click something in the photo that should be gray, a target neutral. Light gray, dark gray or white all work. Photoshop shifts the colors so that spot becomes neutral.
Why did my photo turn cyan when I clicked it?
You clicked something colored. Clicking red tells Photoshop red should be gray, so it pushes the whole image toward cyan. Click something that had no color of its own.
What is a gray card and do I need one?
A calibrated 18% gray card. Have your subject hold it in one frame, then click it with the White Balance tool for perfect white balance. It helps most when accurate color matters.
Is the Auto white balance any good?
Yes, it works really well on both JPEGs and RAW files. In the video Auto moved Temperature to -20 and Tint to -3, cooling the warm photo.
What do Temperature and Tint control?
Temperature runs from blue to yellow; negative values cool the image. Tint runs from green to magenta and fixes casts that Temperature cannot.
Are the sample files free?
Yes, with a free PHLEARN account. You get 1 sample image and 1 sample PSD: the warm photo to correct and the layered file with Camera Raw as a Smart Filter.
Master Photoshop, Lightroom and Photography
Join PHLEARN PRO for $12.99 a month or $99.99 a year. Cancel anytime, with a 100% money-back guarantee.





