

Download Assets
This tutorial includes 2 sample images, 2 sample PSDs, 1 Photoshop LUT and 1 PDF guide. Downloads are free with a PHLEARN account.
- Download the sample images and PSDs from every free tutorial on PHLEARN
- New free tutorials published every week
- One free account — sign up once, then download anything
Free PDF Guide · 3 Pages
This Tutorial as a Step-by-Step PDF
Every step from the video in order: the Color Balance, Levels and Gradient Map layers, File > Export > Color Lookup Tables, the Color Lookup adjustment layer and Load 3D LUT, the .cube file, and the Presets > 3D LUTs folder that puts your LUT in the menu. Keep it next to your keyboard.
description
LUTs in Photoshop are easier to make than to find. This tutorial covers creating, exporting and importing them. This tutorial walks you through using adjustment layers like Color Balance and Gradient Maps to create a unique color effect, then saving it as a reusable LUT file for use in Photoshop and other video editing programs. We’ve even included a LUT to help you get started!
Enjoying This Free Tutorial?
We publish a new free tutorial every week, each one with sample images and PSDs you can download and follow along with. Sign up and they land straight in your inbox, along with early word on sales, events and subscriber-only offers.
Image Source
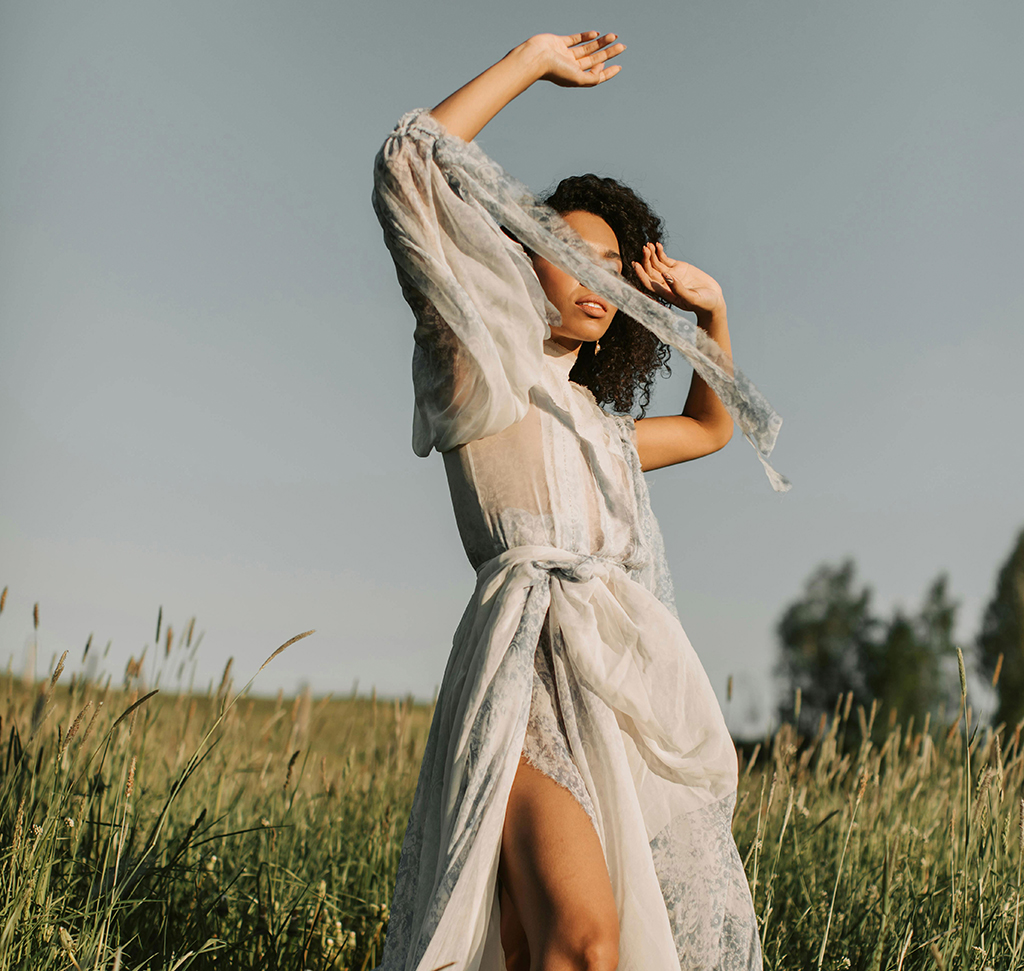
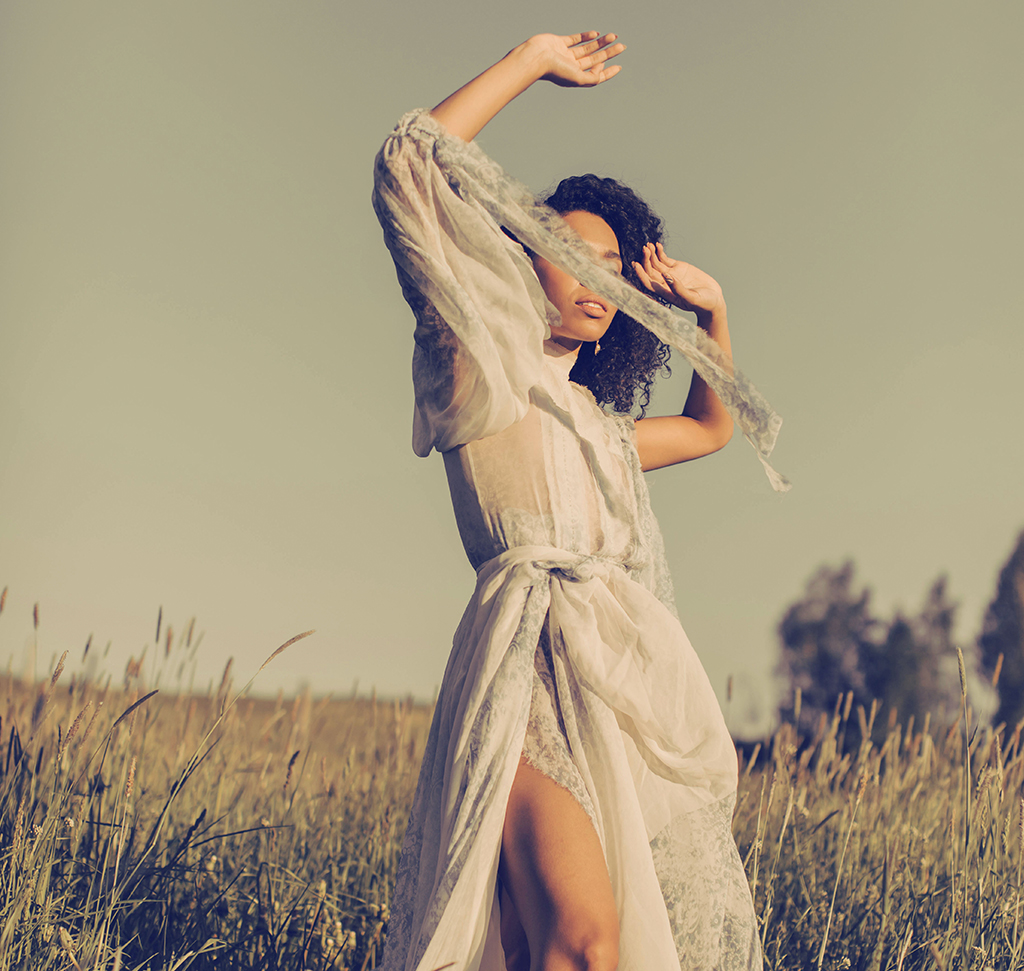
How to Create and Import LUTs in Photoshop
A LUT — a Look Up Table — is a color grade saved as a portable file. You build the look once in Photoshop using adjustment layers, export it, and from then on it applies as a single layer to any image. The same file also loads into Premiere Pro, DaVinci Resolve, and most other video applications.
That portability is what makes LUTs worth learning. A Photoshop action or a stack of adjustment layers only works in Photoshop. A LUT is a look you can carry between programs, reuse across a whole shoot, and hand to someone else.
This tutorial covers building the grade, exporting it, loading it back in, and installing it permanently so it appears in Photoshop’s own list.
Build the Grade With Adjustment Layers
One rule governs everything here: the look must be built entirely from adjustment layers. Direct edits to the pixels cannot be exported. Photoshop reads your adjustment layers to calculate the LUT, so anything applied another way is invisible to the export.
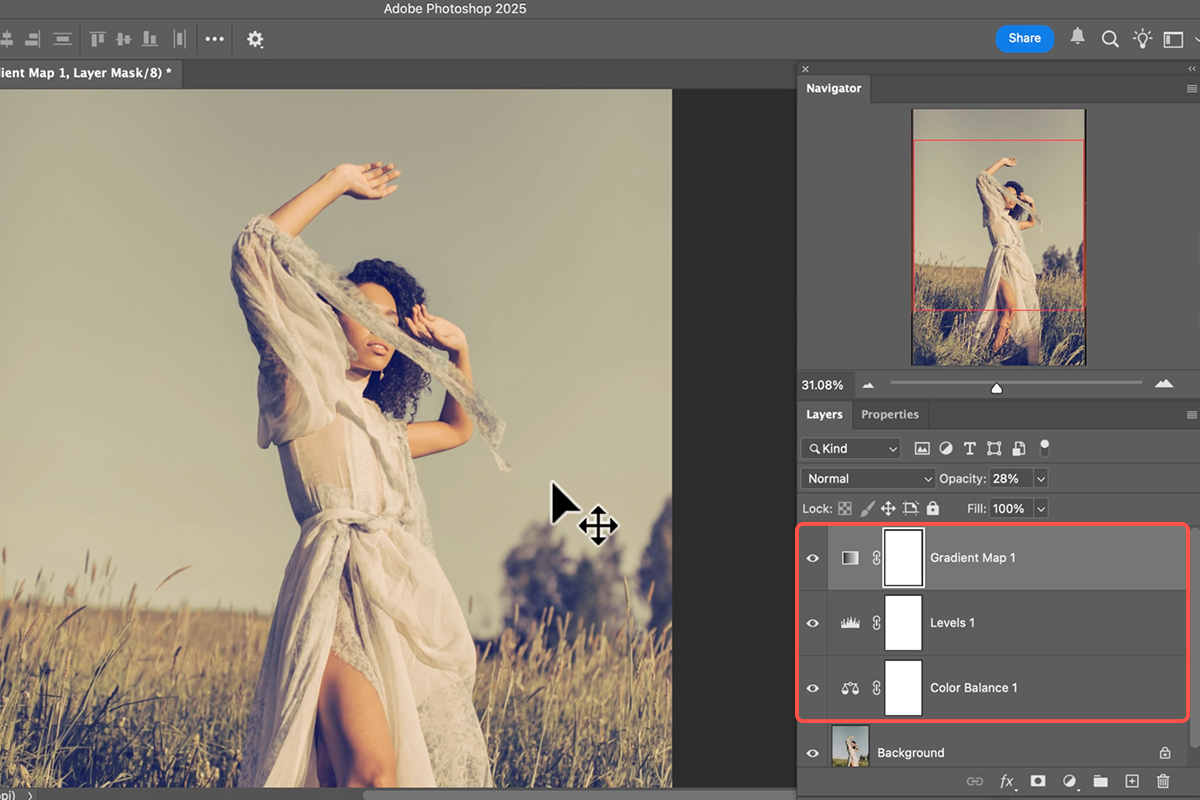
Add each one through Layer > New Adjustment Layer. The three used here stack into a warm-highlight, cool-shadow grade.
Color Balance
Start broad. Pushing slightly toward cyan, then a little toward yellow, sets the overall temperature of the image before anything more specific happens.
Levels, Working the Blue Channel
This is where the grade gets its character. Add a Levels layer, then switch the channel dropdown in the Properties panel from RGB to Blue.
On the bottom output slider, pull the highlight end down to push yellow into the highlights. Then balance it by lifting the shadow end to add blue to the shadows. Warm highlights against cool shadows is the most reliable grade in color work — it reads as natural light because it mimics the real relationship between sunlight and open shade.
Toggle the layer off and on. The shift is significant for two small slider moves.
Gradient Map, Heavily Reduced
Add a Gradient Map and expect it to look wrong immediately. Two fixes:
Click Reverse in the Properties panel. Gradient maps assign the dark end of the gradient to shadows, which is frequently backwards from what you want; reversing usually fixes it in one click.
Then drop the layer opacity hard. Gradient maps always arrive far too strong. 10 to 30 percent is where they stop being an effect and start being a grade — enough to tint the image without overwhelming what is underneath.
Click the gradient itself to choose a different one. The purples are a good place to start for this kind of look.
Export as a LUT
-
Select every adjustment layer in the grade
Hold Shift and click each one. Only selected adjustment layers are included.
-
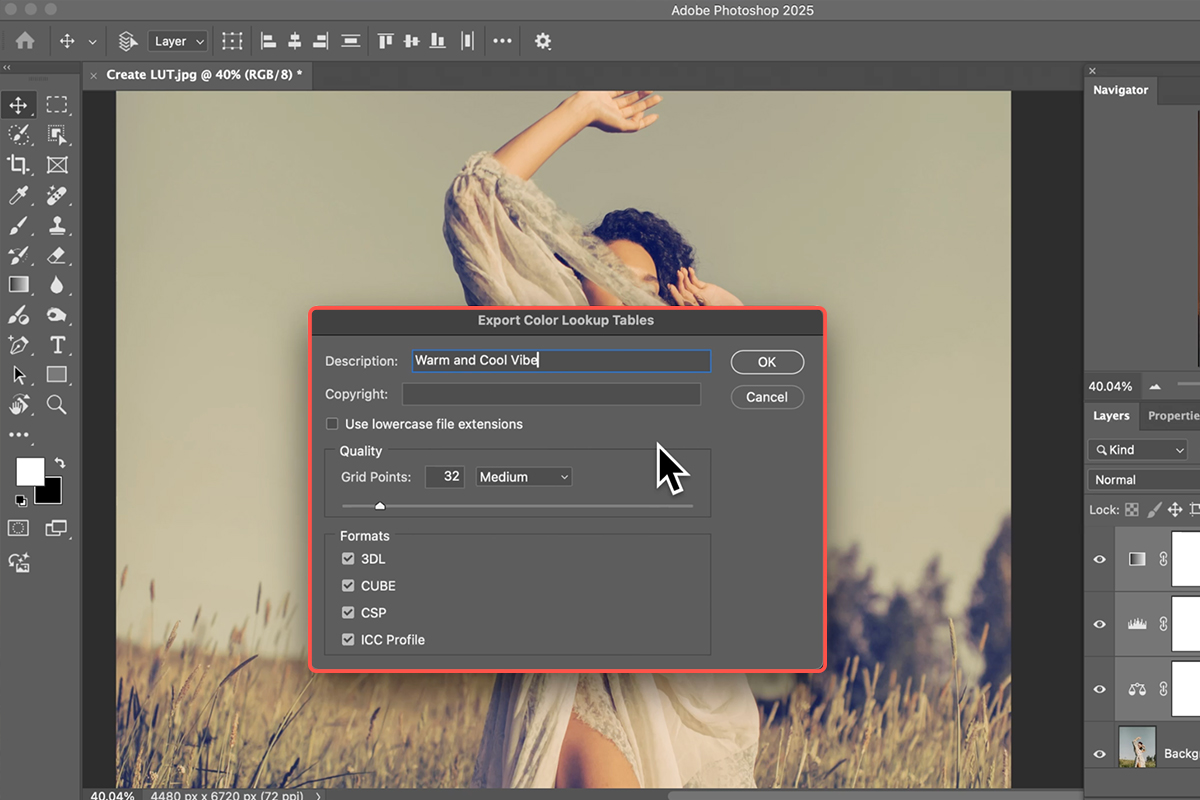
Go to File > Export > Color Lookup Tables
Note the menu wording — Photoshop calls them Color Lookup Tables here, not LUTs.
-
Name the grade
This name is what you will see in the list later, so make it descriptive. There is an optional copyright field.
-
Leave Quality at default and export every format
Different applications want different formats. Exporting all of them means the same grade works in Photoshop and in your video editor without going back.
-
Choose where to save it
A dedicated LUTs folder keeps things findable.
Which File Does What
You get several files from one export. .cube is the one Photoshop loads, and it is also the most widely supported format across video applications. The .3dl files serve other programs. Keep them all together — they cost almost nothing in disk space and save you re-exporting later.
Load a LUT Onto Another Image
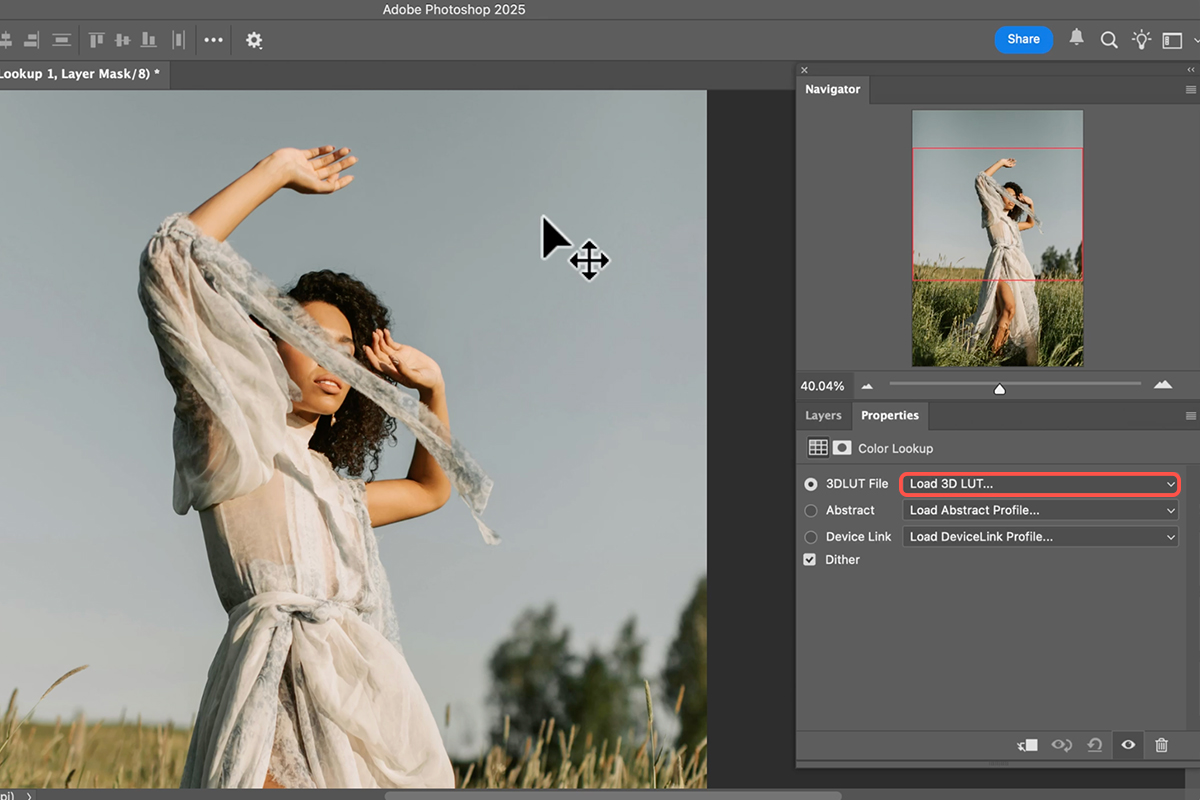
Open a different photograph and go to Layer > New Adjustment Layer > Color Lookup.
Photoshop’s naming is inconsistent here and it trips people up: you export from Color Lookup Tables, you apply through Color Lookup, and the field inside is labeled 3D LUT File. Three names, one thing.
The dropdown already holds LUTs that ship with Photoshop — Crisp Winter, Fuji Eterna, Late Sunset, Night From Day. Your own is not there yet.
Open the 3D LUT File dropdown, choose Load 3D LUT, navigate to your export, and select the .cube file.
The entire grade — three adjustment layers’ worth — now sits on one layer, and applies identically to any image you put it on.
Why That Matters
This is the practical value: consistency across a set. Every image in a shoot gets exactly the same color treatment, not an approximation rebuilt by hand each time. And because it is an adjustment layer, it stays maskable, reducible in opacity, and switchable off.
Install It Permanently
Loading the file every time gets old quickly. Put the LUT where Photoshop looks and it joins the built-in list.
-
Open your Photoshop application folder
Photoshop 2025, or whichever version you run.
-
Go to Presets, then 3D LUTs
The LUTs that ship with Photoshop live here.
-
Copy your LUT in
Either .cube or .3dl works. Hold Alt or Option while dragging to copy rather than move, so your original stays where it is.
-
Restart Photoshop
The list is read at launch, so it will not appear until you relaunch.
Your LUT now sits in the Color Lookup dropdown alongside Adobe’s, no loading required.
Clear Out What You Do Not Use
The same folder is where you remove things. Delete any of the bundled LUTs you never reach for and they disappear from the dropdown, leaving a short list of grades you actually use rather than a long one you scroll past.
Sharing and Selling
A LUT is just a file, so distributing one is trivial — zip it and send it. This is how LUT packs are sold, and it is a legitimate product to build if you develop a look people want.
It is also why LUTs are the standard handoff format between a photographer and a video editor, or between a colorist and a client. The look travels; the software does not have to match.
The Whole Process
Build the grade from adjustment layers only. Shift-select them all. File > Export > Color Lookup Tables, export every format. To use it: Layer > New Adjustment Layer > Color Lookup, then Load 3D LUT and pick the .cube. To install it permanently: drop it in Photoshop’s Presets ? 3D LUTs folder and restart.
Two things worth remembering. Only adjustment layers export. And keep gradient maps low — the difference between a grade that looks professional and one that looks like a filter is usually just opacity.
Quick Reference: Keys, Menus and Settings
- Build the lookLayer > New Adjustment Layer: Color Balance (toward cyan, yellow, green), Levels (Blue channel: output down for warm highlights, input up for blue shadows), Gradient Map (pick a preset, Reverse if it looks wrong, Opacity 10–30%)
- Export the LUTShift-click all the adjustment layers > File > Export > Color Lookup Tables; name it, default quality, all formats
- Use itLayer > New Adjustment Layer > Color Lookup > 3D LUT File > Load 3D LUT > the .cube file
- Put it in the menu for goodCopy the .cube into Applications > Adobe Photoshop > Presets > 3D LUTs, restart Photoshop
- Other appsThe export also writes the formats Premiere, DaVinci Resolve and others read
- Tidy the listDelete the built-in LUTs you never use from that same folder
Photoshop calls it Color Lookup Tables on export, Color Lookup as a layer, and 3D LUT in the panel. Same thing.

Free Downloads
Follow Along on the Same Photos
Get both sample images, the two PSDs with the adjustment layers and the Color Lookup layer, the Warm Cool Vibe LUT itself, and the PDF guide. Free with a PHLEARN account.
LUTs in Photoshop: Common Questions
What is a LUT?
A lookup table: a color preset saved as a file. You build a look with adjustment layers in Photoshop, export it, and apply it to any photo or video in Photoshop, Premiere, DaVinci Resolve and most other editors.
Which adjustment layers can go into a LUT?
Color adjustments. The video uses Color Balance, Levels with channel tweaks and a Gradient Map at low opacity. Select them all before exporting.
My gradient map looks terrible. What did I miss?
Click Reverse in the Properties panel, then drop the layer opacity to somewhere between 10 and 30 percent. Gradient maps always come in too strong.
How do I export it?
Shift-click the adjustment layers, then File > Export > Color Lookup Tables. Name it, keep the default quality, export all formats and choose a folder.
How do I apply it to another photo?
Layer > New Adjustment Layer > Color Lookup, then in Properties choose Load 3D LUT and pick the .cube file. One layer gives you the whole look.
Which exported file do I use where?
The .cube for Photoshop. The other formats are for video and other editing programs.
Can I share or sell my LUTs?
Yes. Zip the exported files and send or sell them; the Warm Cool Vibe LUT from the video is in this page’s download.
Are the sample files free?
Yes, with a free PHLEARN account. You get both sample images, the two PSDs, the LUT and the PDF guide.
Master Photoshop, Lightroom and Photography
Join PHLEARN PRO for $12.99 a month or $99.99 a year. Cancel anytime, with a 100% money-back guarantee.





