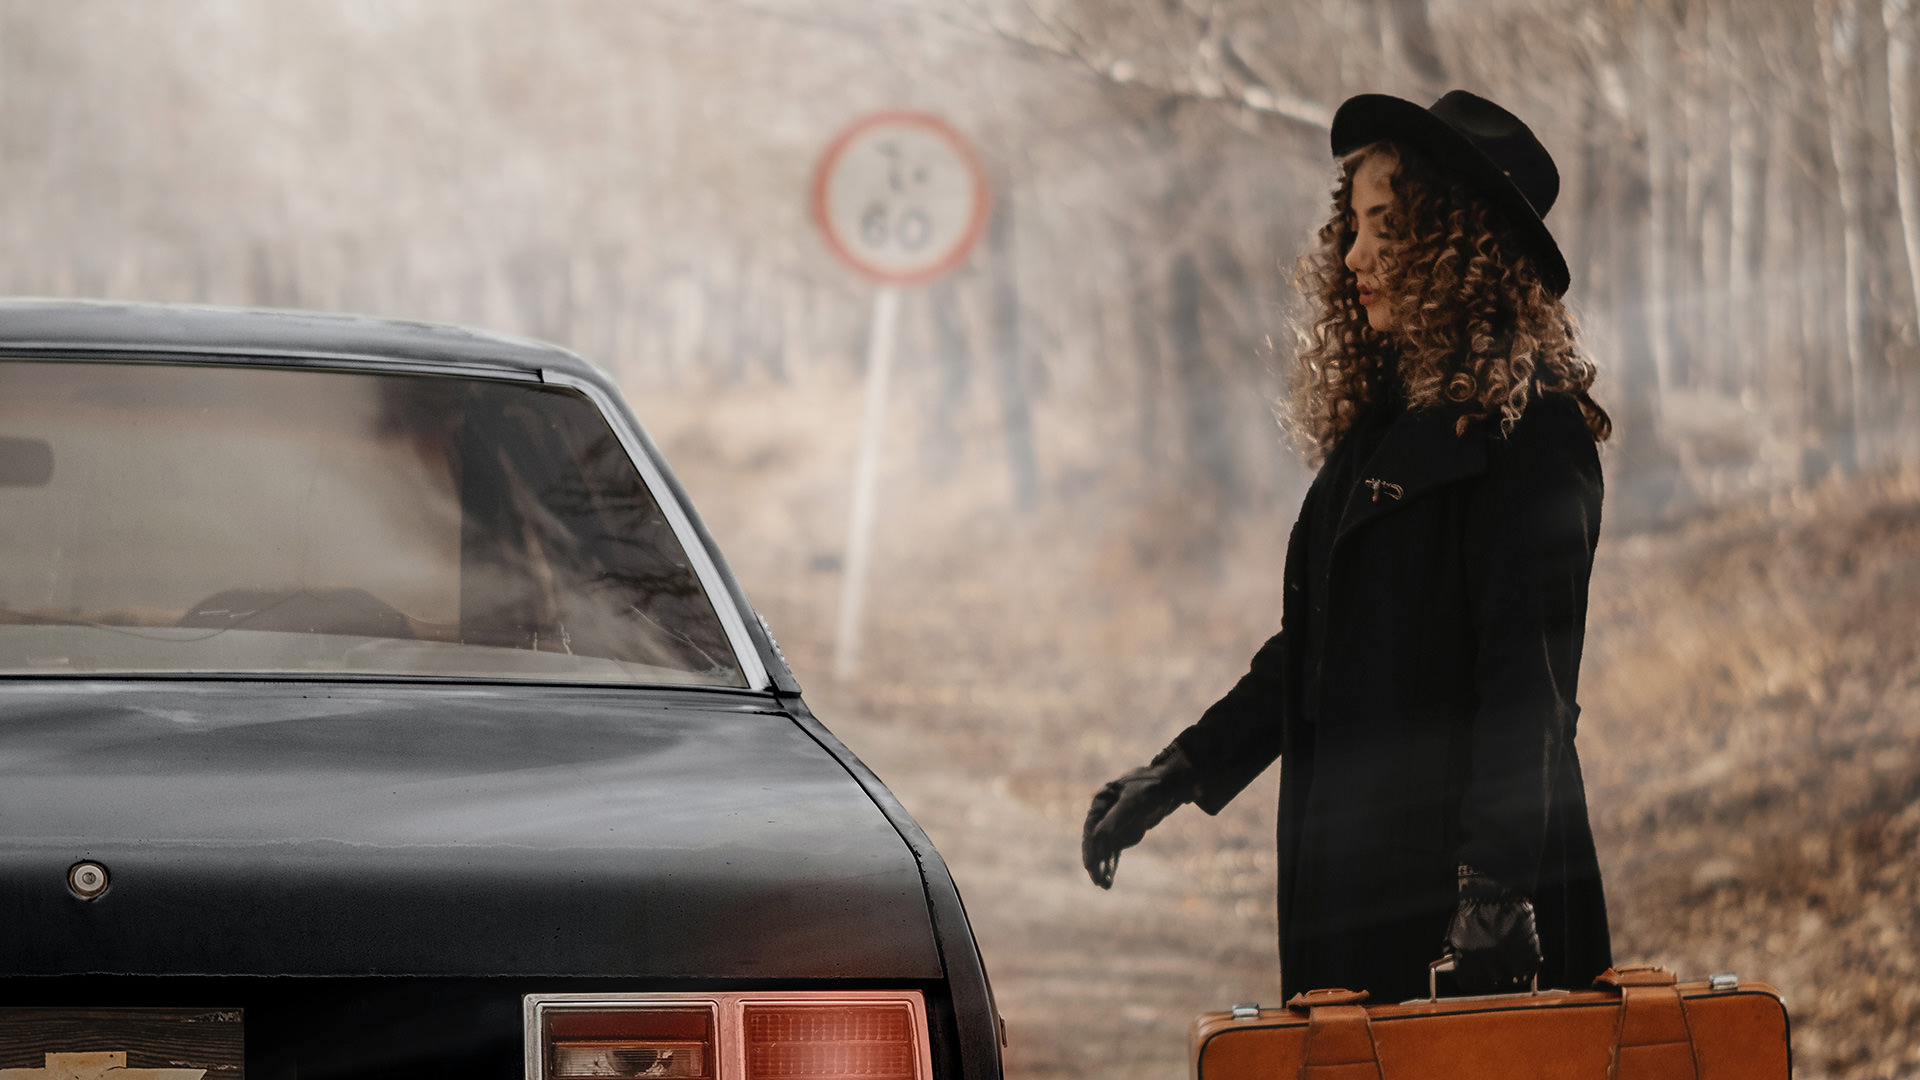

Download Assets
This tutorial includes 2 sample images, 2 sample PSDs, 1 Photoshop brush and 1 PDF guide. Downloads are free with a PHLEARN account.
- Download the sample images and PSDs from every free tutorial on PHLEARN
- New free tutorials published every week
- One free account — sign up once, then download anything
Free PDF Guide · 5 Pages
This Tutorial as a Step-by-Step PDF
The 5-page guide walks through pulling a cloud out of the Red channel, Edit > Define Brush Preset, the Shape Dynamics, Scattering and Transfer settings, a depth mask from Select > Focus Area, and two sets of light rays from a Levels mask with Motion Blur at 2000 pixels. Keep it next to your keyboard.
description
Realistic fog in Photoshop comes down to three things working together. Learn how to build a custom fog brush from a photo of a real cloud so the fog has natural texture, how to mask it with Focus Area so it builds up in the distance instead of blanketing the whole frame, and how to paint, blur and transform light rays that match the light already in your scene. We also cover the brush settings that keep every stamp of fog from looking identical.
Enjoying This Free Tutorial?
We publish a new free tutorial every week, each one with sample images and PSDs you can download and follow along with. Sign up and they land straight in your inbox, along with early word on sales, events and subscriber-only offers.
Image Source
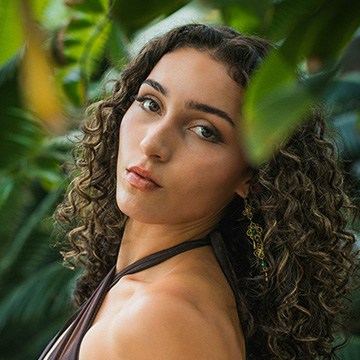
Photo by Ali Karimi via Pexels


How to Create a Fog Brush in Photoshop
Realistic fog in Photoshop isn’t one trick, it’s three working together: a custom brush built from an actual cloud so the fog has natural texture, a depth mask so fog builds up in the distance instead of sitting evenly across the whole photo, and a set of angled light rays painted through the haze. None of the individual pieces is difficult, but skipping any one of them is usually what makes a fog effect look pasted-on rather than atmospheric.
Getting Started
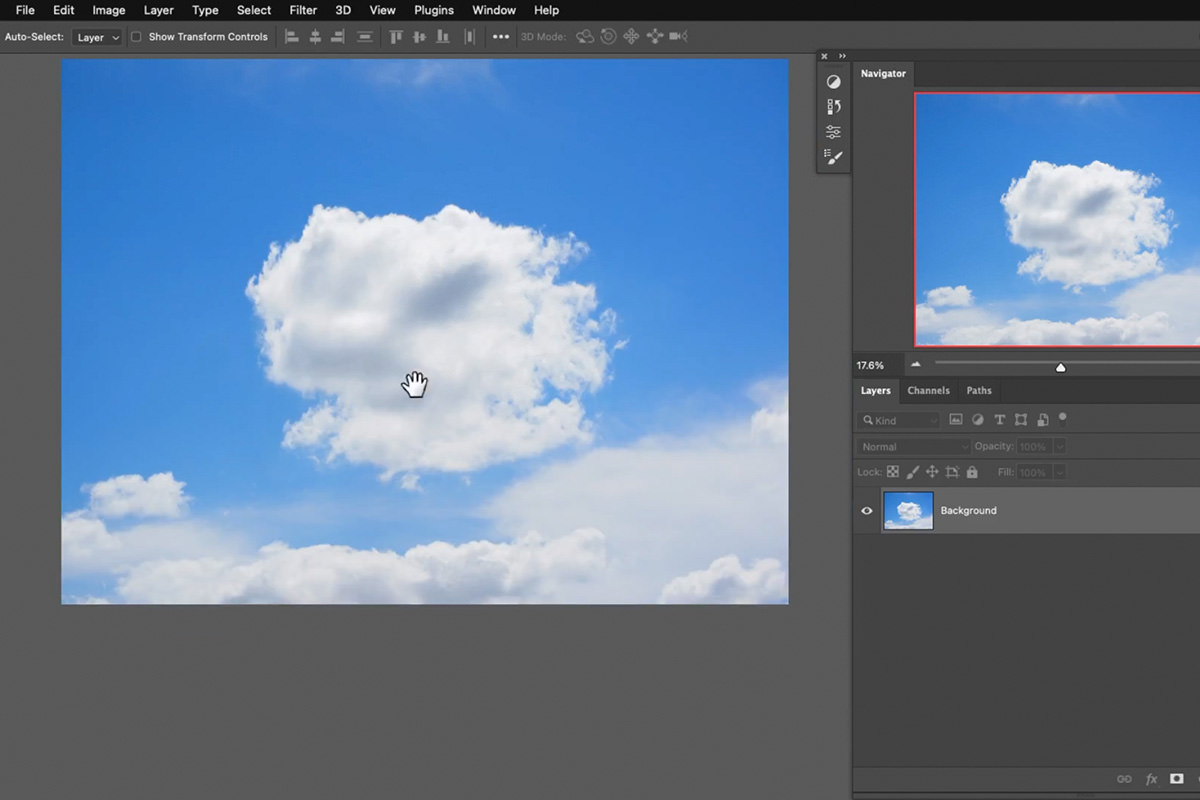
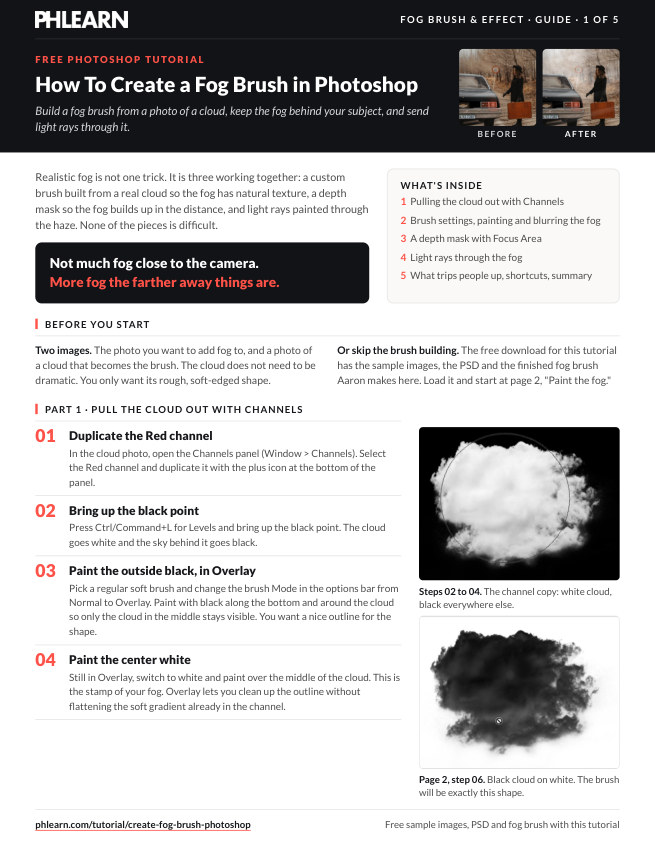
You’ll need two images: the photo you want to add fog to, and a second reference photo of an actual cloud that gets turned into a custom brush. The cloud photo doesn’t need to be dramatic — you’re only after its rough, soft-edged shape.
Extracting the Cloud with Channels
The channels panel gives a cleaner extraction of the cloud shape than trying to select it directly.
-
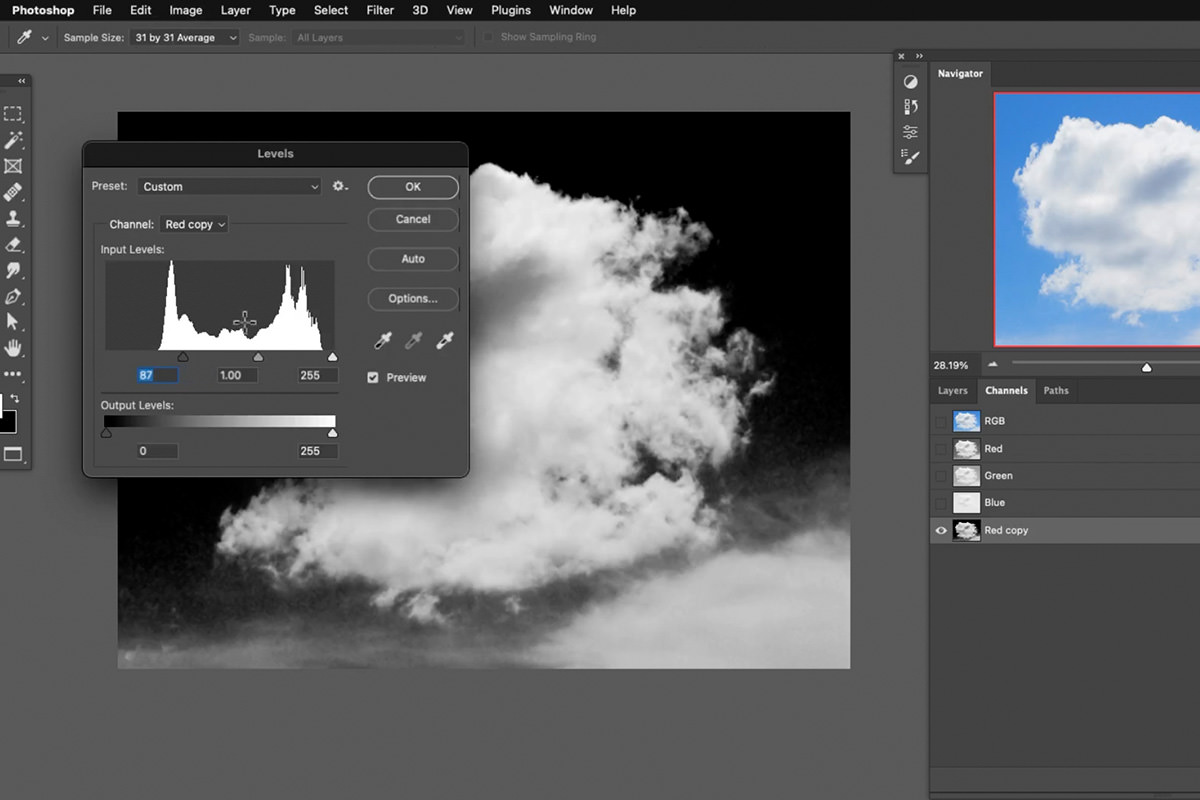
Duplicate the Red Channel and Boost Levels
Open Window > Channels, select the Red channel, and duplicate it by clicking the small plus icon. Press Ctrl + L on PC (Cmd + L on Mac) and bring up the black point until the cloud reads as white against a black background.
-
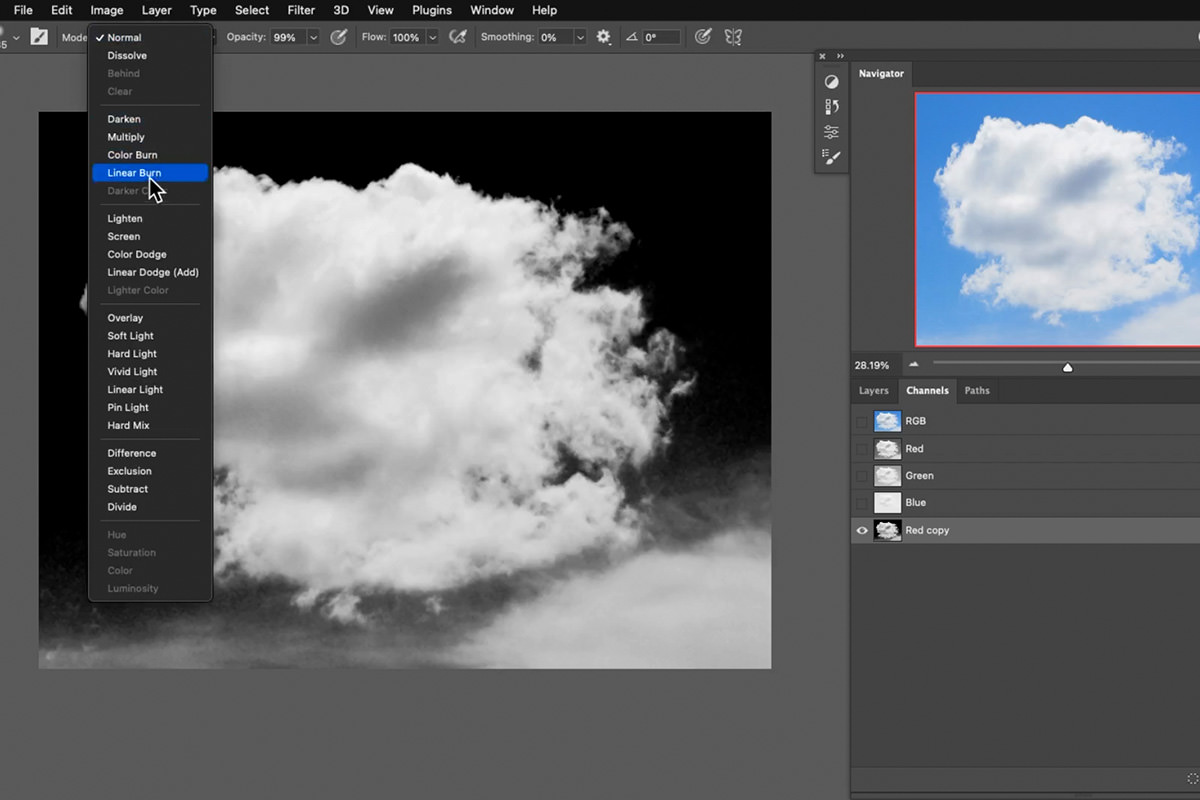
Paint the Cloud Outline in Overlay Mode
Using the Brush Tool (Keyboard Shortcut “B”) with a regular soft brush set to Overlay blending mode, paint black around the outer edges and white through the center of the cloud shape. Overlay mode lets you refine the shape’s outline without flattening the soft gradient already in the channel.
Building the Fog Brush from the Cloud Shape
Once the shape looks right in the channel, it needs to be converted into an actual brush tip.
-
Turn the Shape into a Selection and Fill It
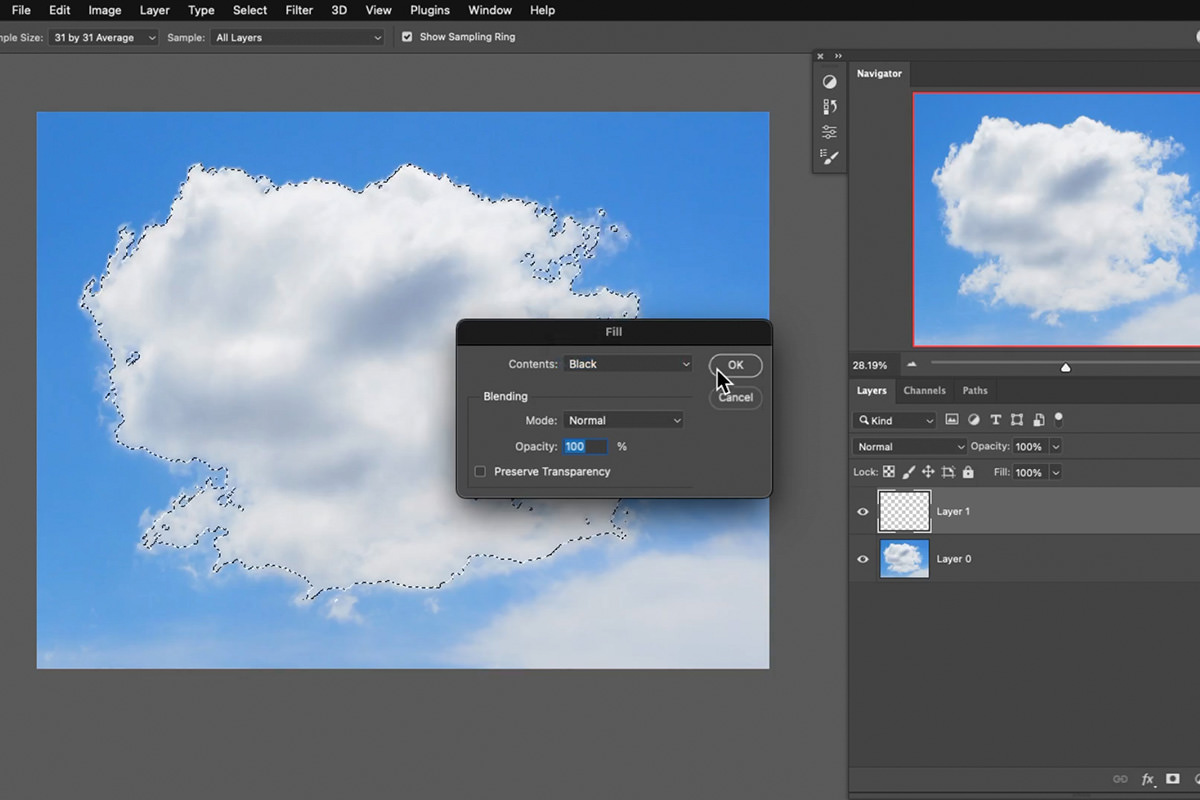
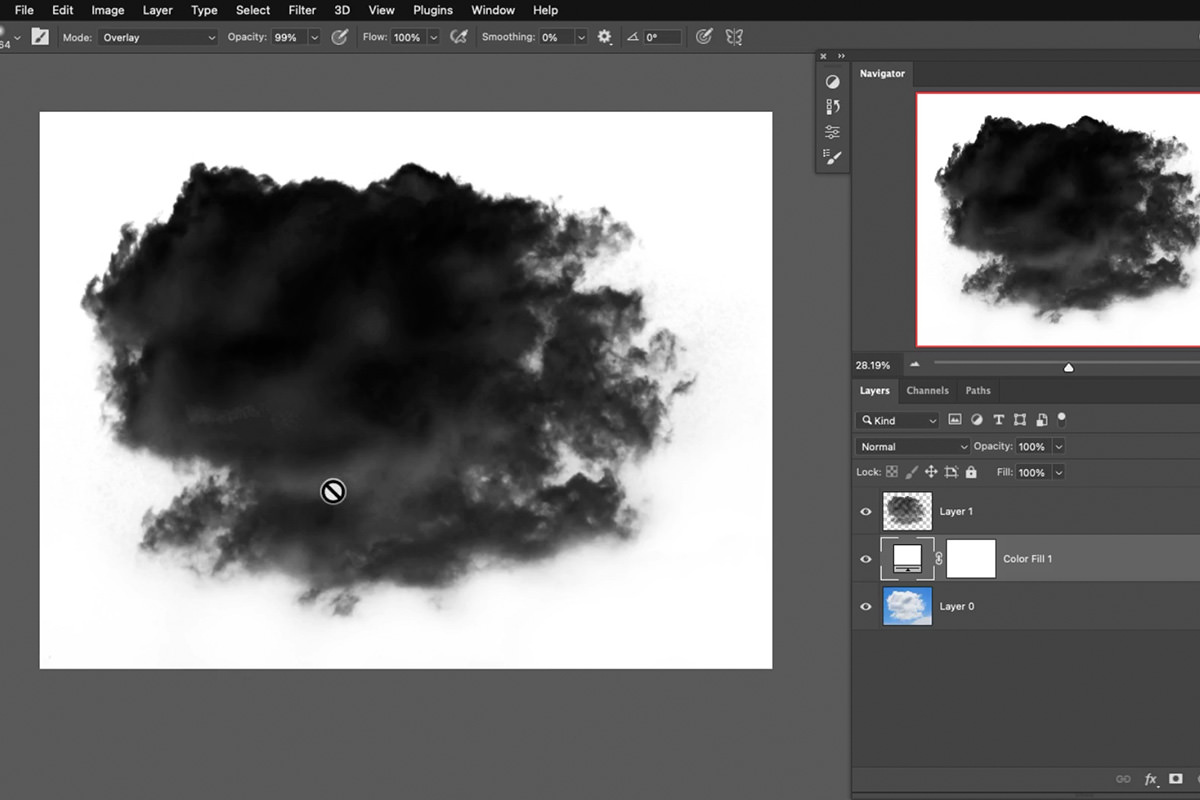
Hold Ctrl on PC (Cmd on Mac) and click the channel’s thumbnail to load it as a selection, then switch back to the Layers panel. Create a new layer, fill the selection with black (Edit > Fill), and add a solid white fill layer underneath it.
-
Define the Brush Preset
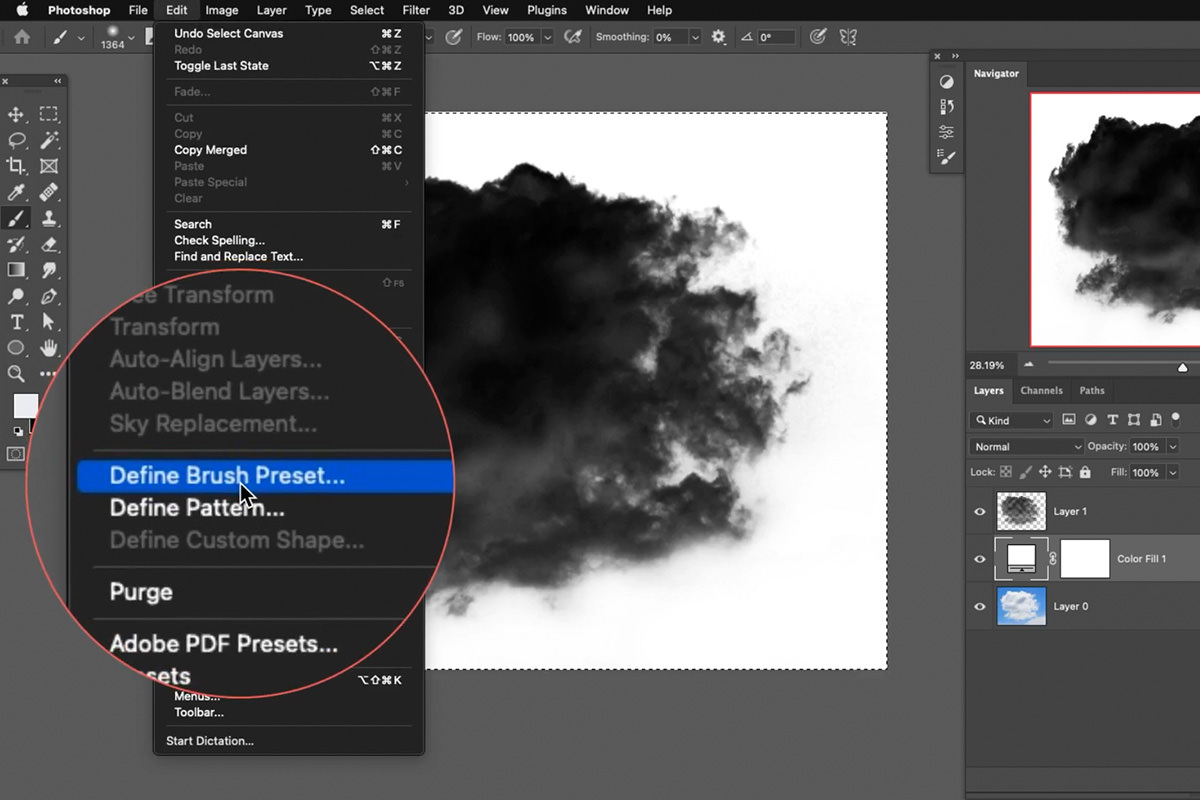
Select all (Ctrl/Cmd + A), then go to Edit > Define Brush Preset and name it. This black cloud shape on white is exactly what Photoshop reads as a brush tip.
Dialing In the Fog Brush Settings
A freshly defined brush stamps the same cloud shape identically every time, which looks obviously artificial. The Brush Settings panel is what fixes that.
-
Turn On Shape Dynamics
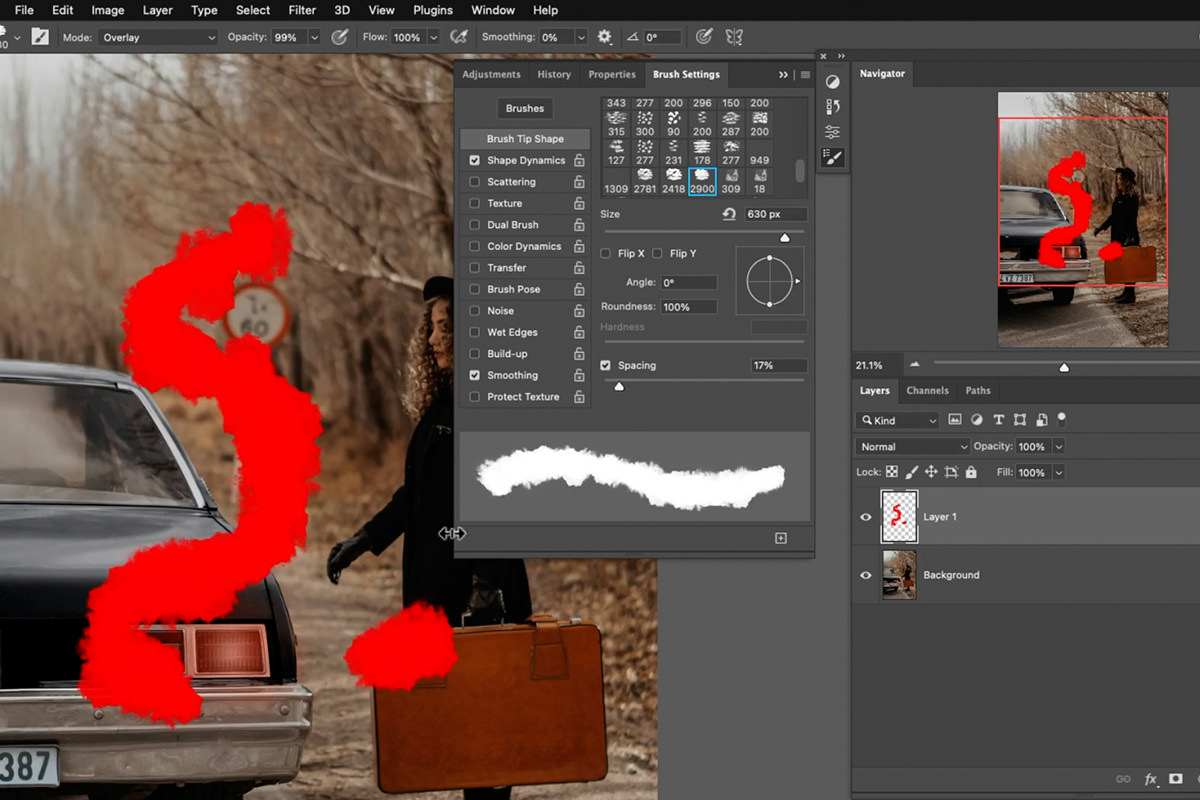
In Window > Brush Settings, enable Shape Dynamics. Push Size Jitter and Angle Jitter both up, and flip on both the X and Y jitter axes, so every stamp varies in size and rotation instead of repeating identically.
-
Increase Spacing and Turn On Scattering
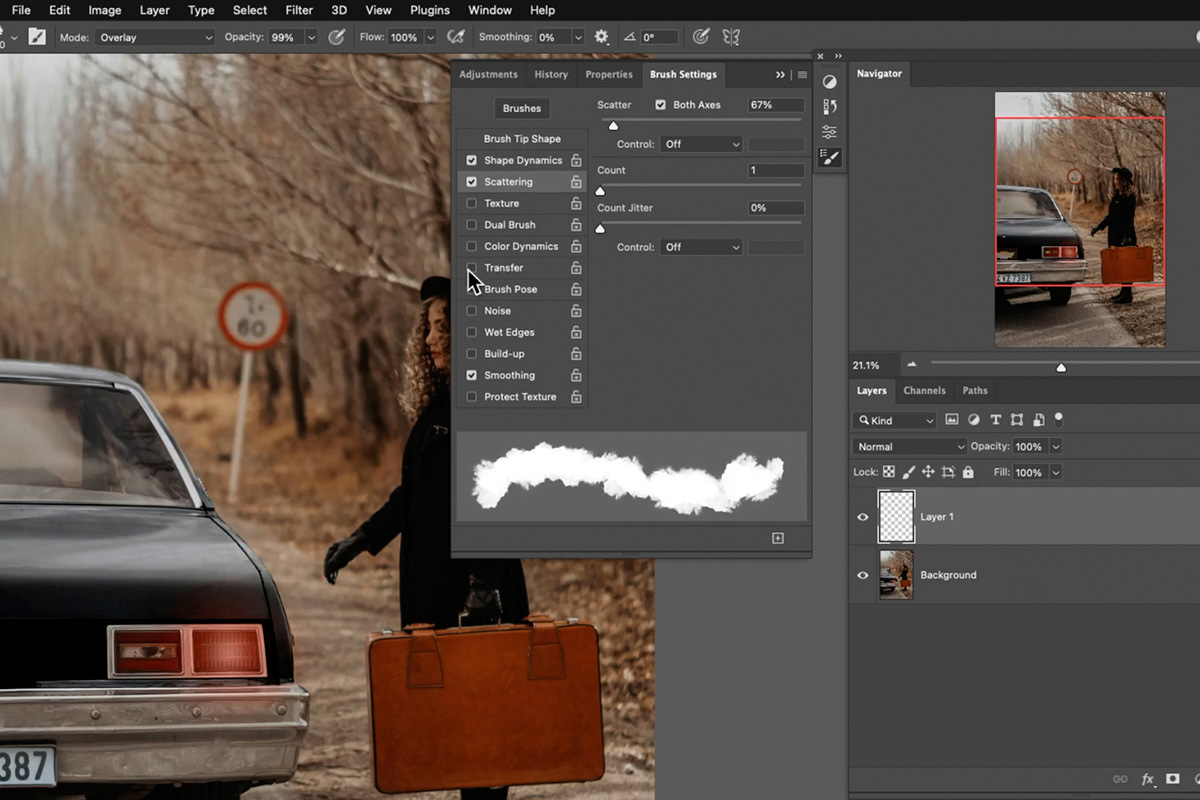
In Brush Tip Shape, increase the spacing so individual stamps sit a little farther apart. Then enable Scattering on both axes and dial it back until the spread looks natural rather than chaotic.
-
Turn On Transfer and Flow Jitter
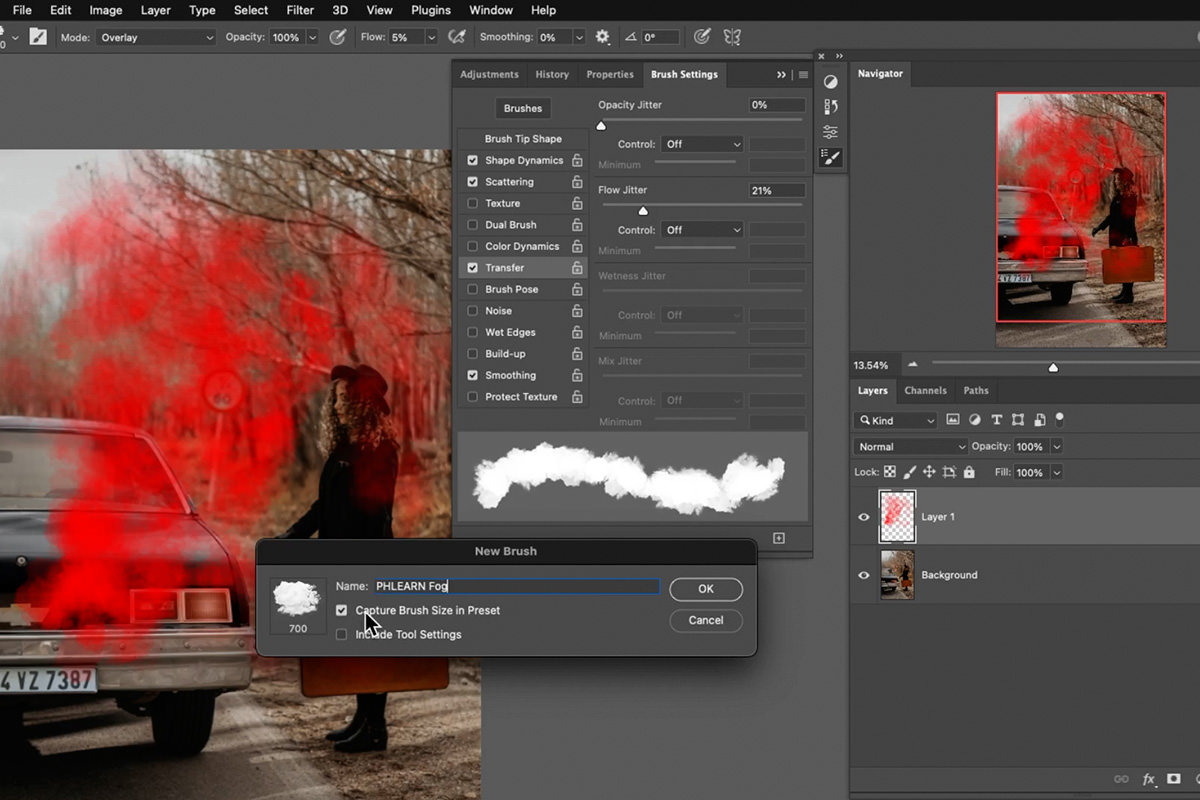
Enable Transfer and turn up Flow Jitter, setting its control to Pen Pressure if you’re using a pressure-sensitive tablet. Also lower the brush’s own Flow to around 5–10%, so light pressure lays down a thin wisp of fog rather than a solid stamp.
-
Save the Brush as a New Preset
Once the settings feel right, save the whole configuration as a new brush preset so Shape Dynamics, Scattering, and Transfer all come back together every time you select it.
Painting Without a Pressure-Sensitive Tablet
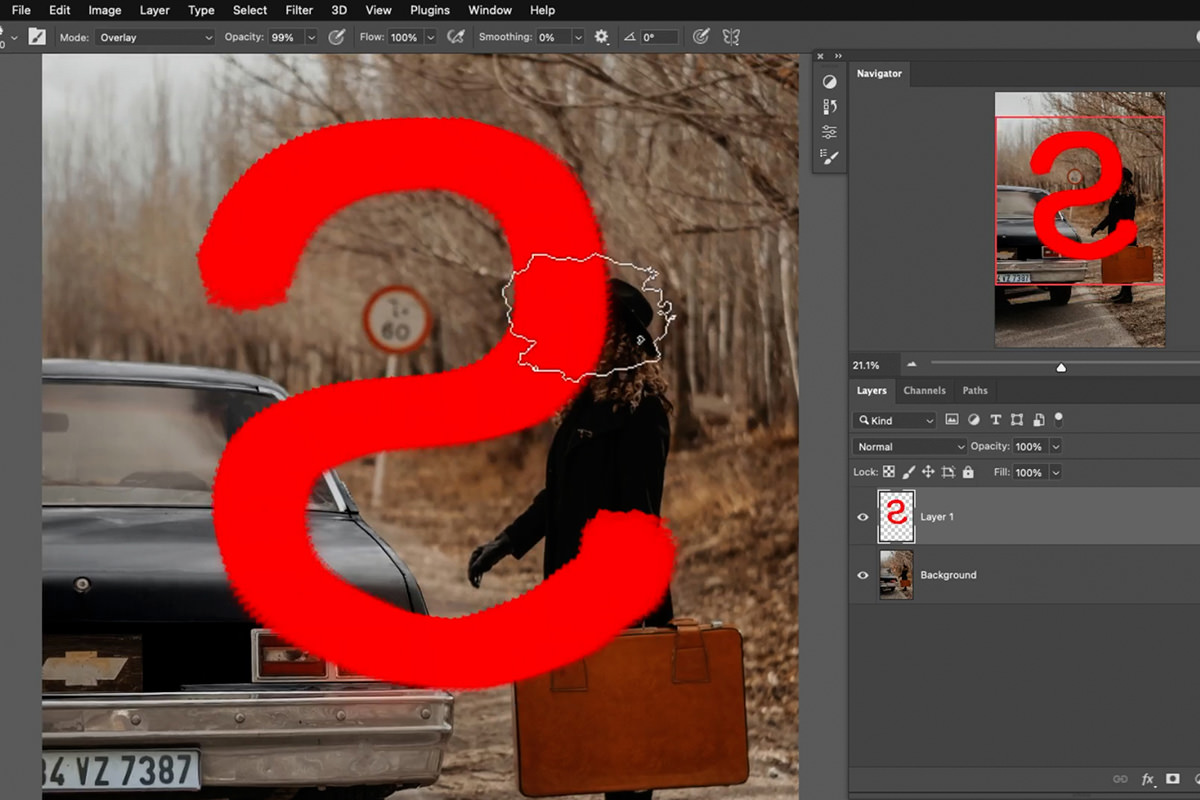
None of this requires a tablet. With a mouse, set the Flow Jitter Control to Off, still turn Flow Jitter up, and keep the brush Flow low, around 5 to 10%. Aaron paints most of the fog in this tutorial with a mouse on purpose, and with Shape Dynamics and Scattering on it still paints a textured, non-repeating cloud shape.
Painting the Fog and Softening It with Blur
With the brush ready, painting the fog itself is straightforward, but the raw result usually needs one more pass to look convincing.
-
Paint Your Large Background Fog First
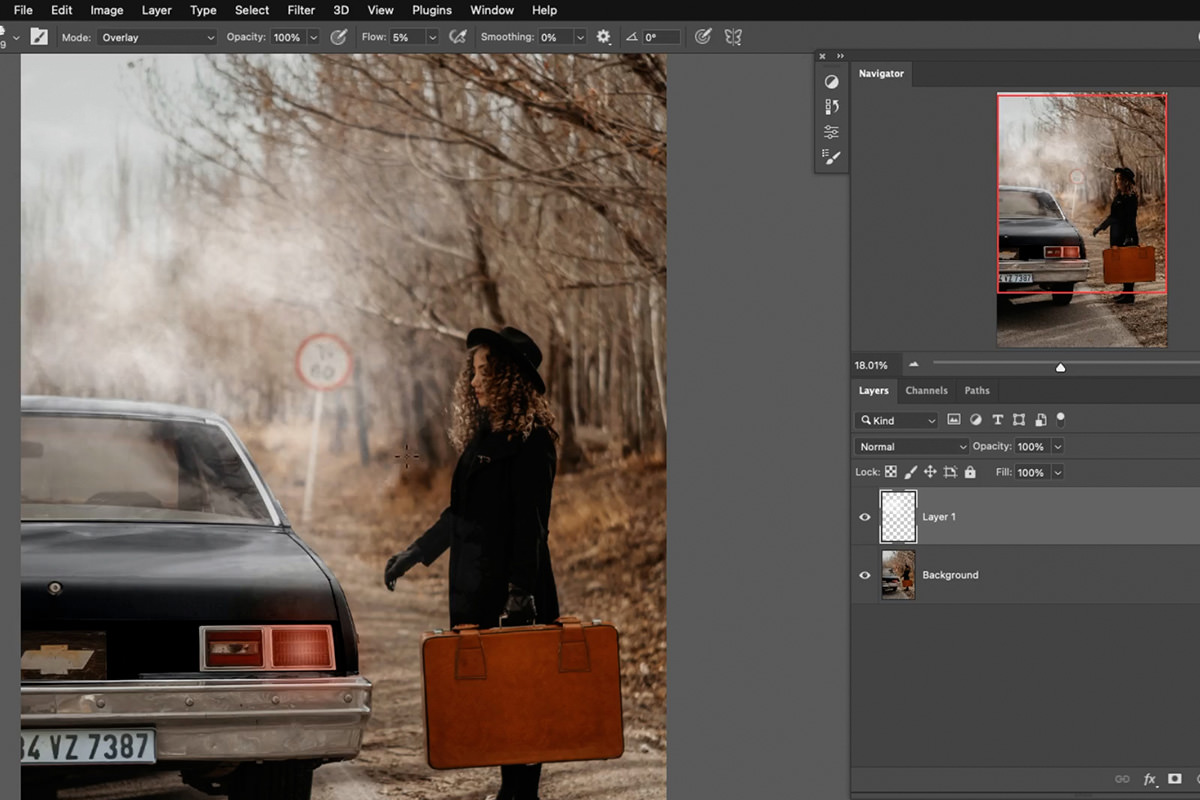
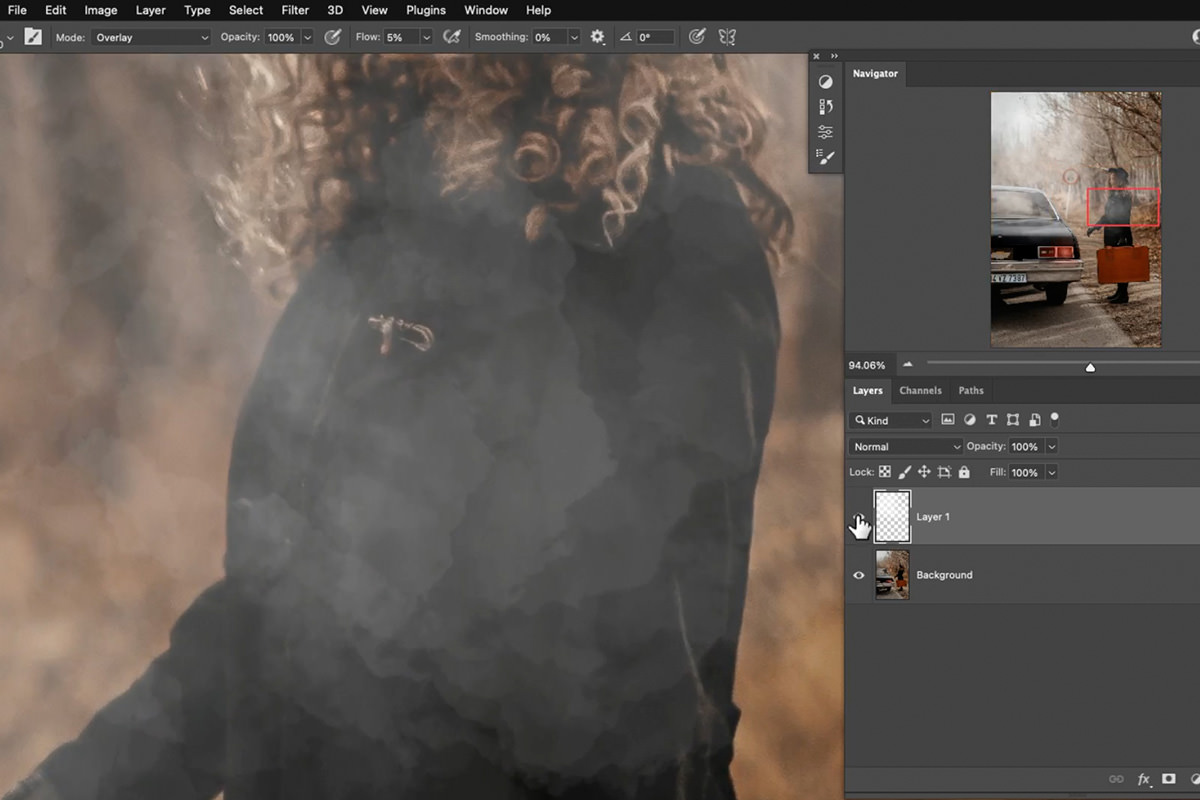
On a new layer, paint with white using your fog brush, starting with larger background fog before working toward smaller, more detailed wisps. Vary your brush size as you go for a mix of large and small fog shapes.
-
Soften the Fog with Gaussian Blur
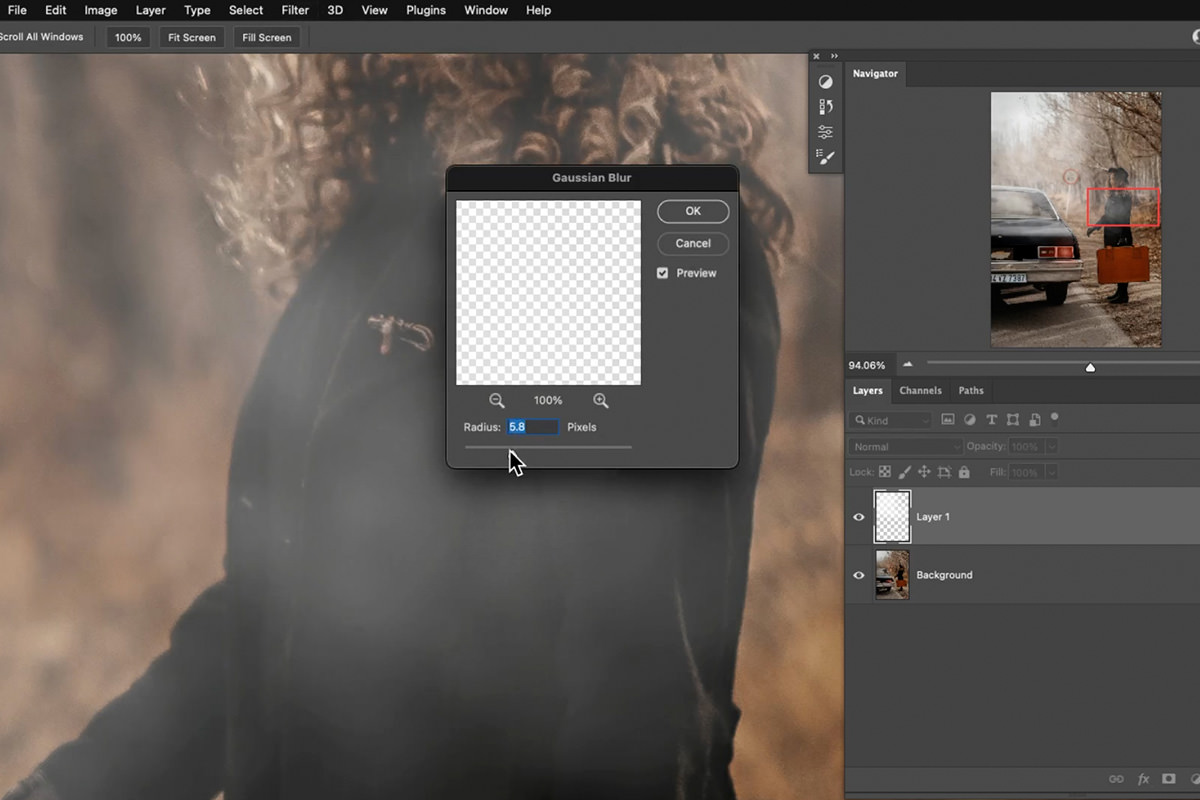
Go to Filter > Blur > Gaussian Blur and apply a moderate blur. You’re looking for a middle ground — enough blur that the edges aren’t sharp and obviously brush-stamped, but not so much that the fog turns into a shapeless blob with no volume left.
How Much Blur Is Too Much
If the fog starts to lose all sense of shape and reads as a flat haze with no structure, the blur has gone too far. Real fog still has some visible density and form to it — the goal is softened edges, not the total erasure of the brushwork underneath.
Masking Fog Behind Your Subject with Focus Area
Real fog is denser the farther it is from the camera, which means it needs to sit behind your subject rather than blanket the whole image evenly.
-
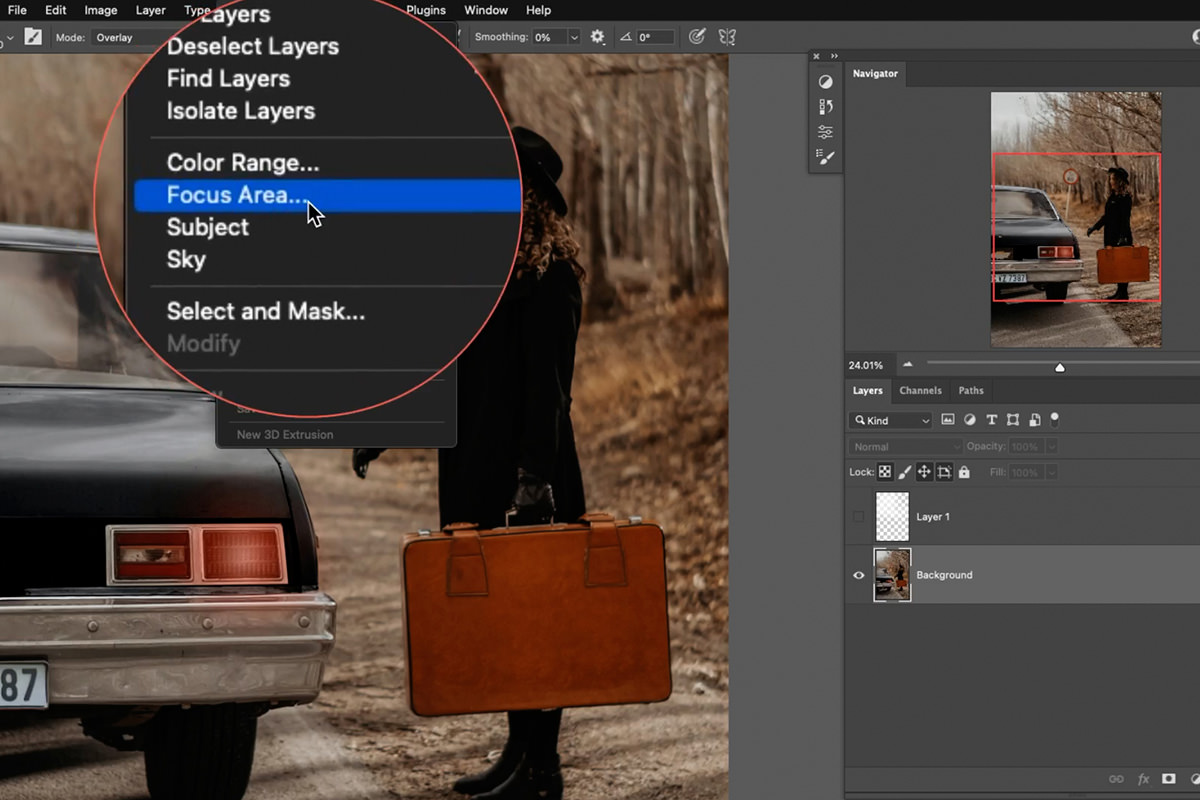
Select the In-Focus Areas with Focus Area
Go to Select > Focus Area, which isolates whatever is sharply in focus — typically your subject — and separates it from the softer, farther background where the fog should build up.
-
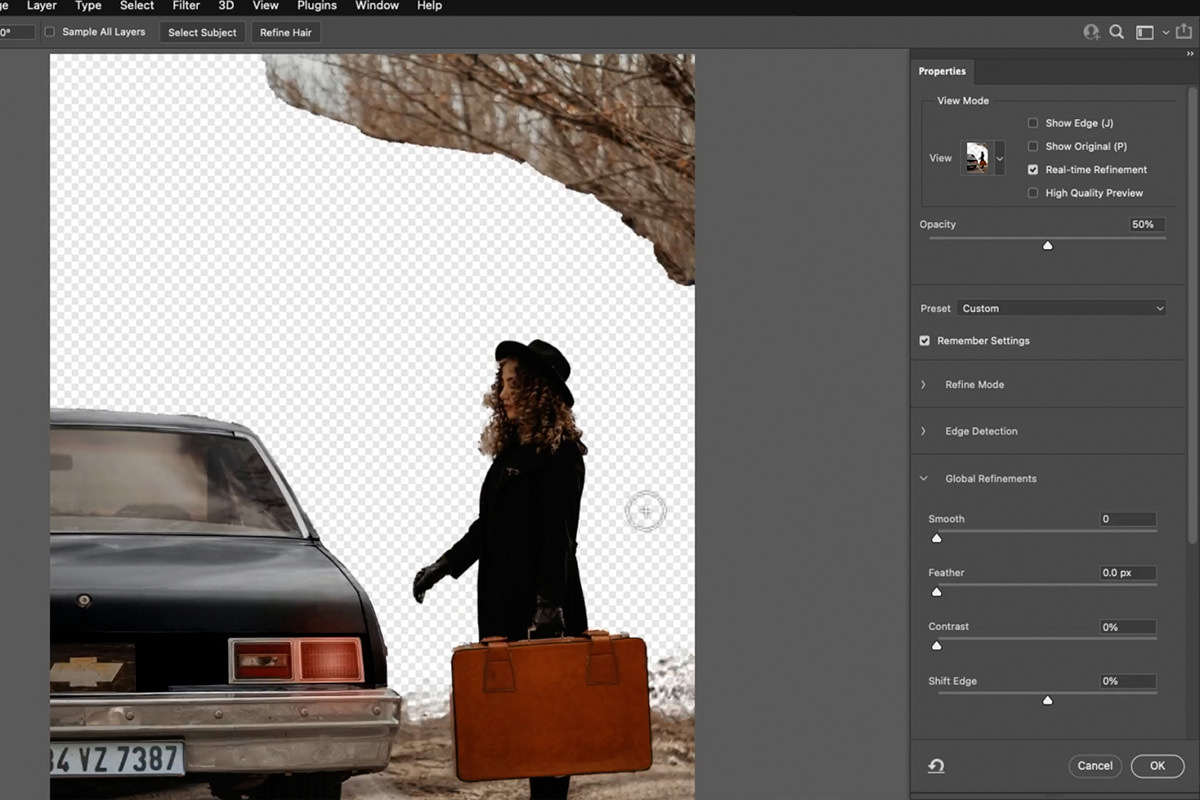
Refine the Selection and Output a Layer Mask
Click Select and Mask to clean up tricky edges like hair with the Refine Edge brush, then set the output to a new layer with a layer mask. The selection doesn’t need to be pixel-perfect — spend more time on it only if your subject will have heavy fog interaction right at the edge.
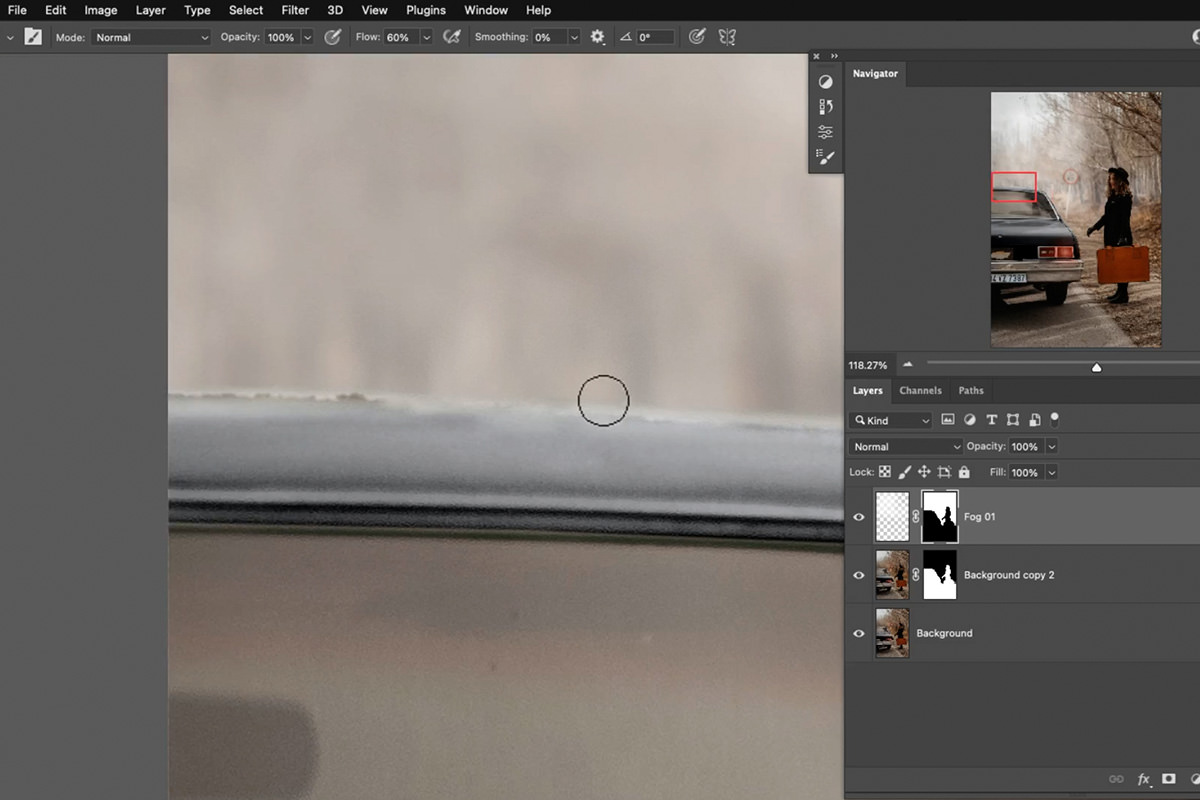
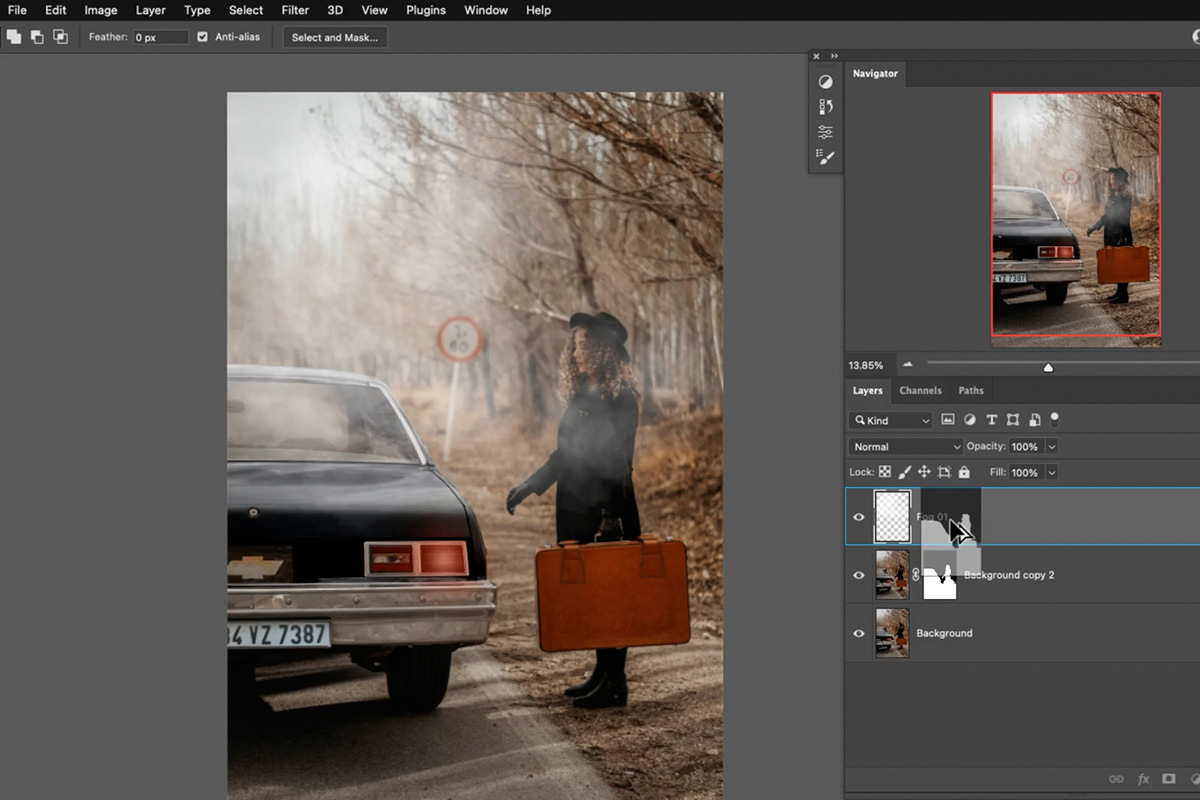
Click OK, then Alt/Option-click the new layer mask to check it. If Focus Area got part of it wrong (here, the top of the frame), draw around that area with the Lasso tool, press Shift + Delete (Shift + Backspace on Windows) and fill it with black.
-
Copy and Invert the Mask onto Your Fog Layer
Hold Alt on PC (Option on Mac) and drag the new layer mask onto your fog layer to copy it, then invert it with Ctrl/Cmd + I if the fog ends up in front of your subject instead of behind it.
-
Clean Up the Edge with a Regular Brush
Use a standard brush directly on the mask to smooth over any jagged spots the automatic selection missed, so the transition from fog to no-fog looks natural rather than cut out.
Why Depth Matters for Realistic Fog
Fog painted evenly across an entire photo reads as a flat filter laid over the image. Building it up specifically in the distance — and keeping your subject relatively clear — mimics how real atmospheric haze actually behaves, which is the single biggest factor in whether the effect looks believable.
Adding and Refining Light Rays Through the Fog
Fog alone sells the atmosphere; light rays passing through it sell the depth.
-
Create a Levels Layer and Paint Light Streaks on Its Mask
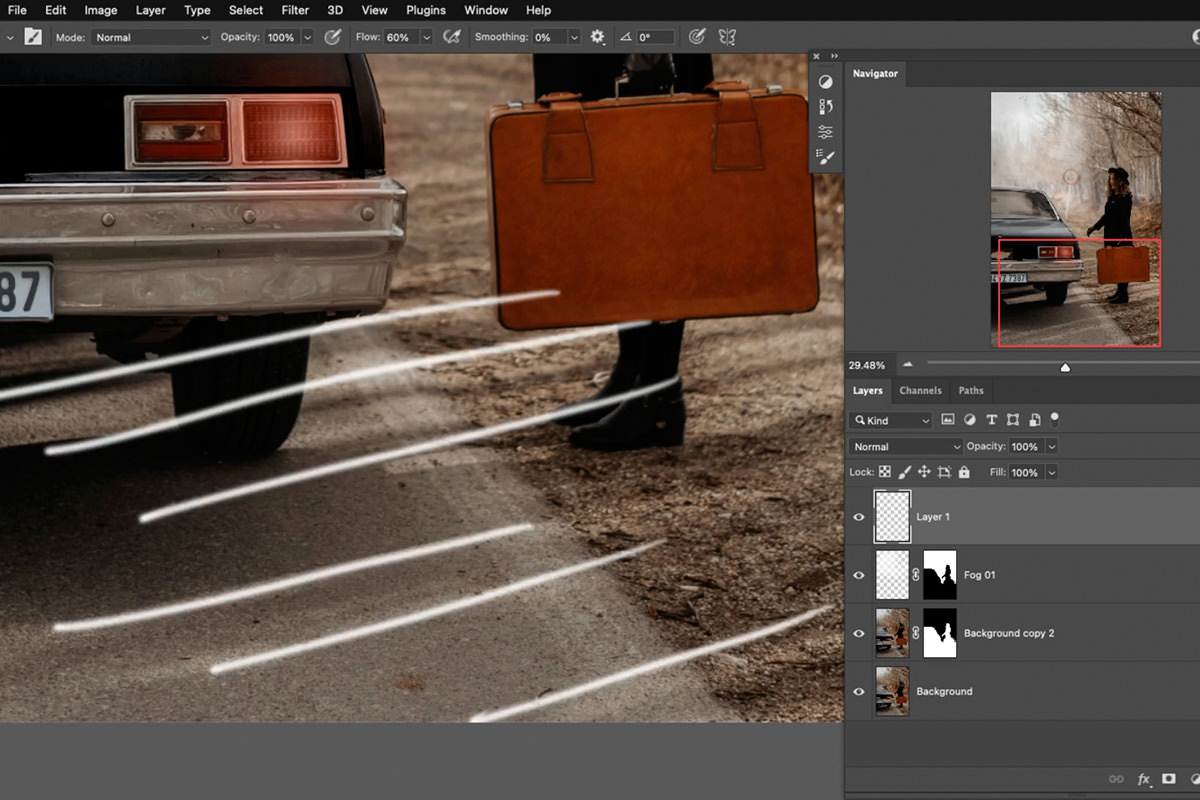
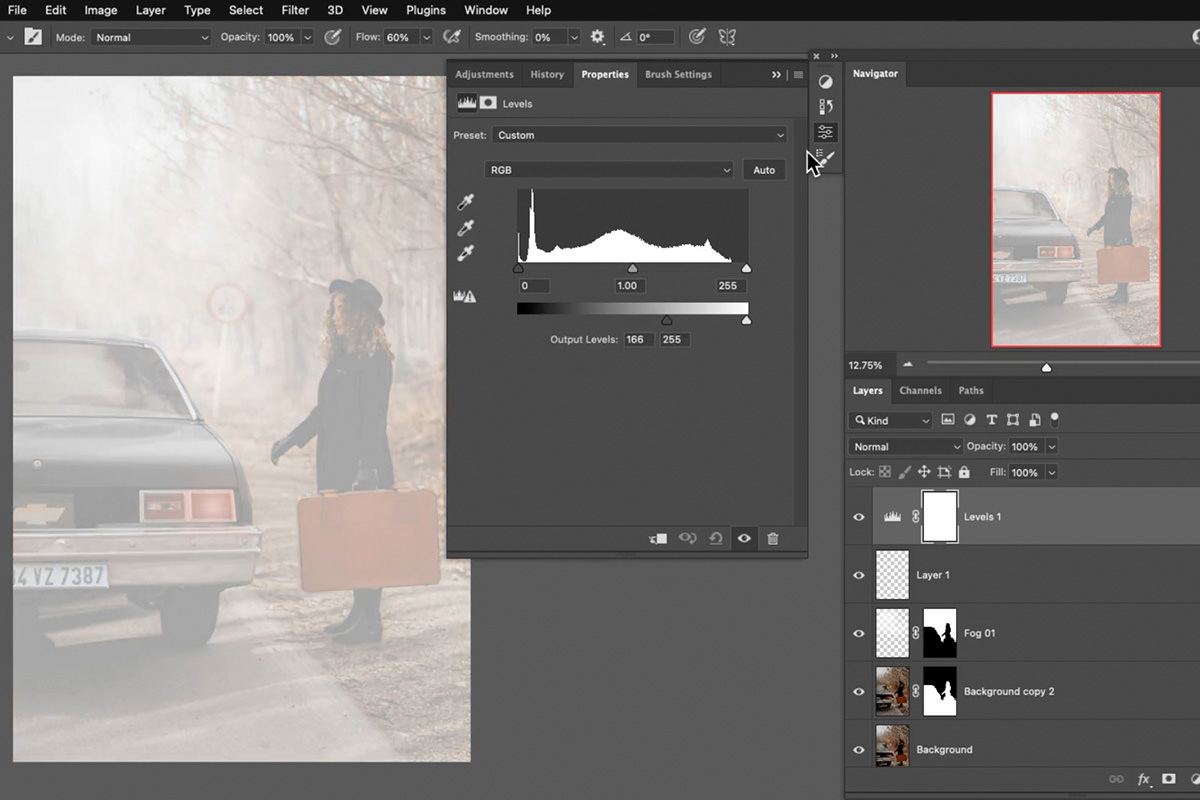
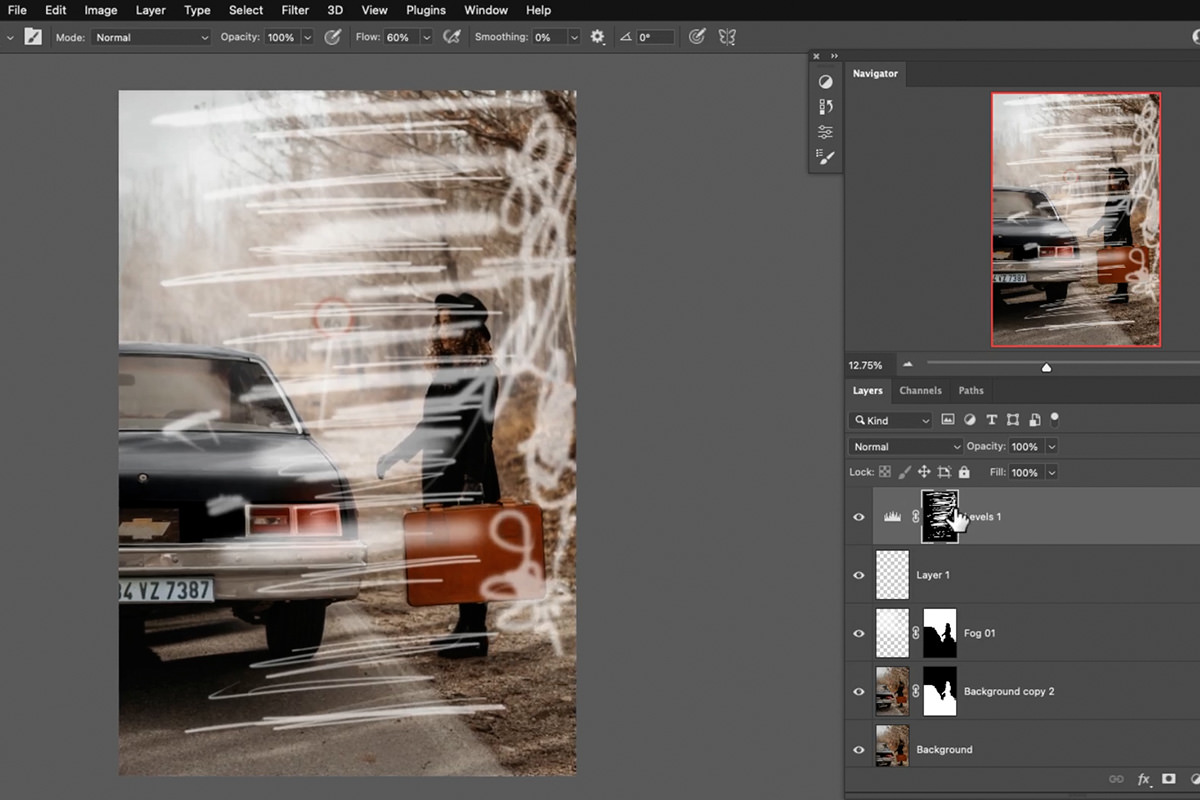
Add a Levels adjustment layer and pull the dark point up to brighten the image. Invert its layer mask to black, then paint several white streaks of varying width across it — this becomes the raw shape of your light rays.
-
Motion Blur the Streaks
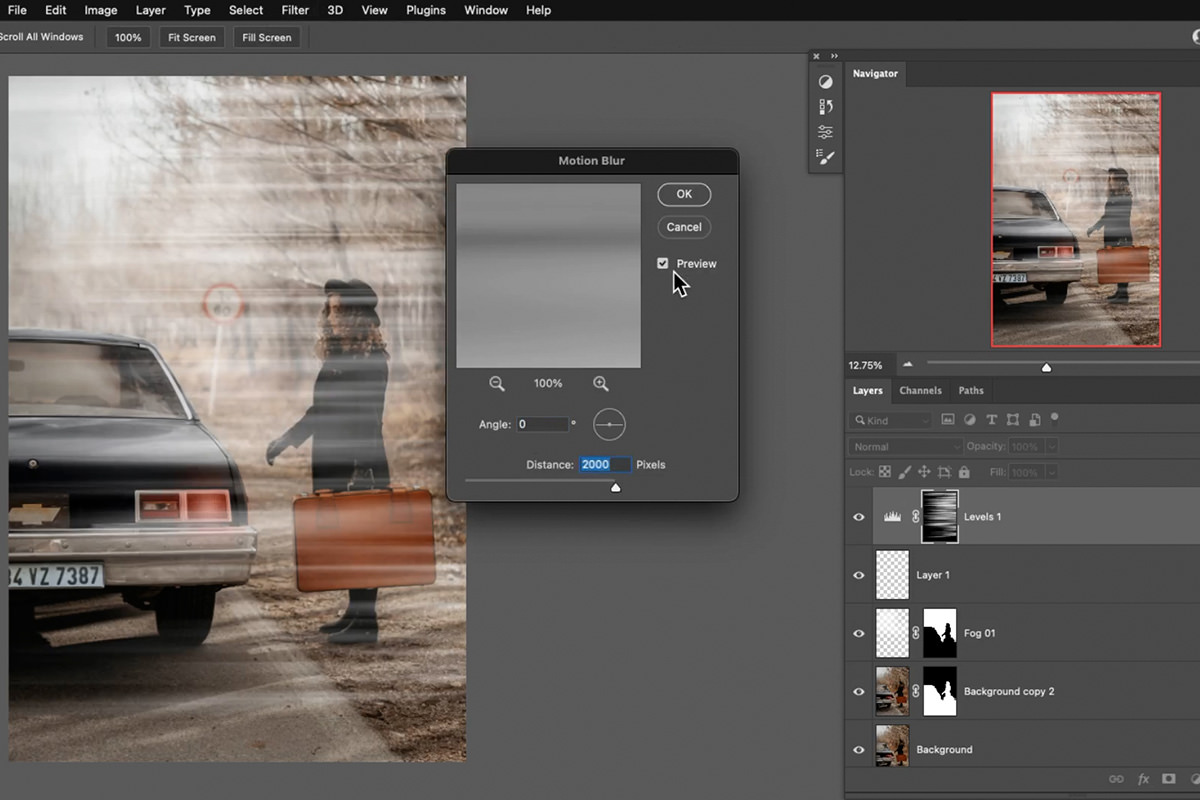
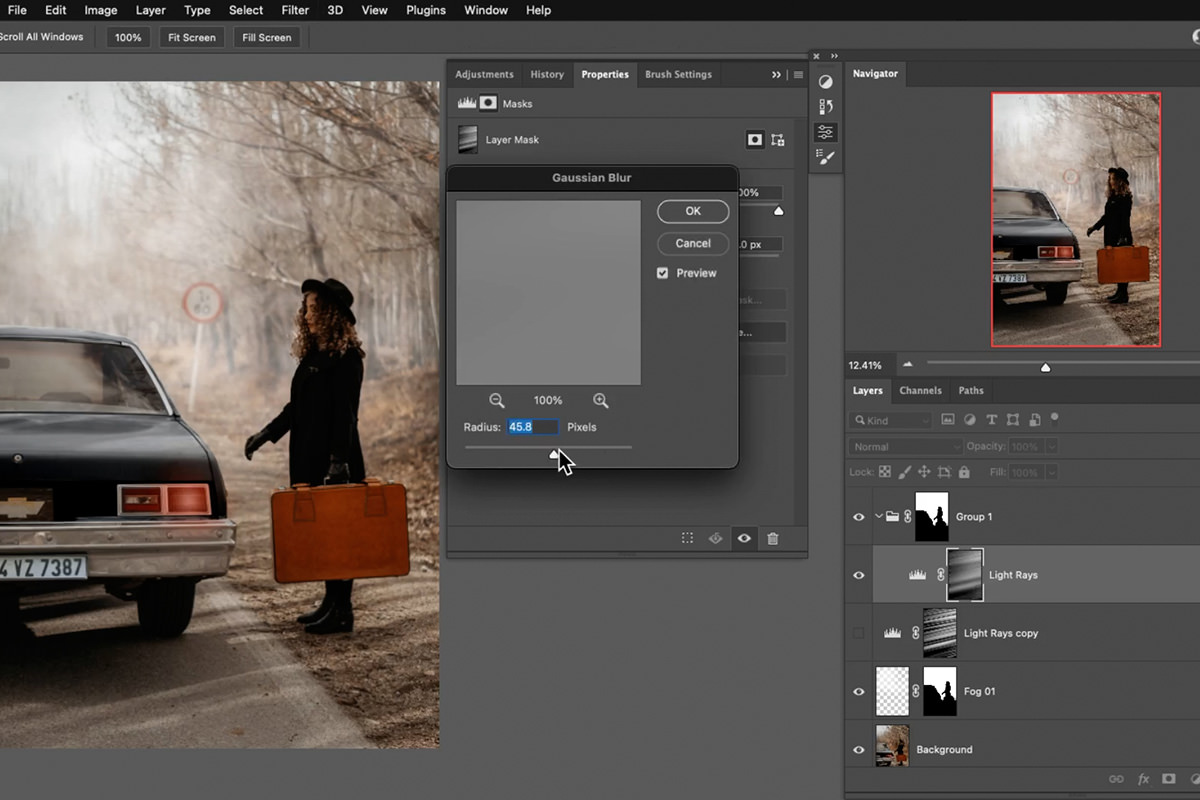
On that same layer mask, go to Filter > Blur > Motion Blur and apply a strong horizontal blur, starting around 2,000 pixels. This stretches the painted streaks into long, soft rays instead of blobs. Then paint a few more streaks with different brush sizes and run Motion Blur again at about 2,000 pixels; the second pass adds smaller, different rays.
-
Transform the Streaks to Match Your Light’s Angle
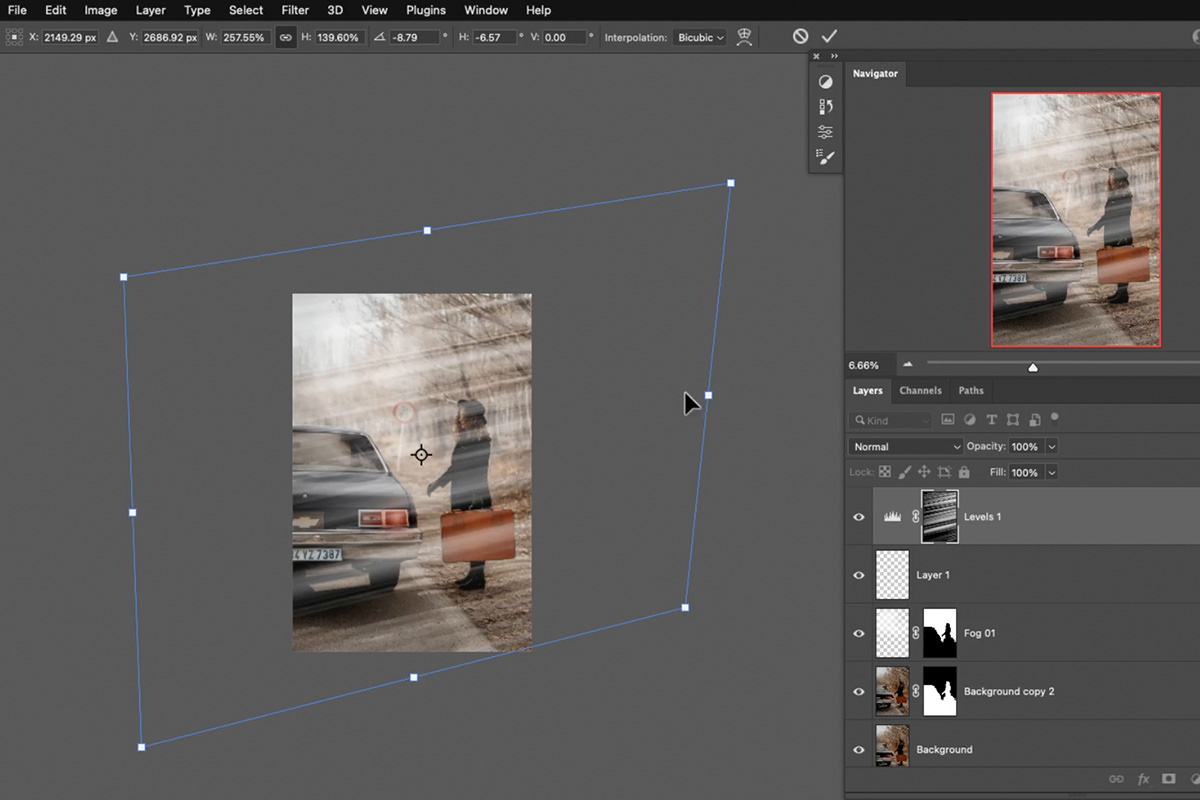
Press Ctrl/Cmd + T on the mask, then Ctrl/Cmd-drag the corner handles to angle the streaks so they match the direction of light or shadow already visible in your photo. Add a touch of Gaussian Blur afterward if the rays still look too crisp.
-
Duplicate, Blur, and Group the Light Ray Layers for Depth
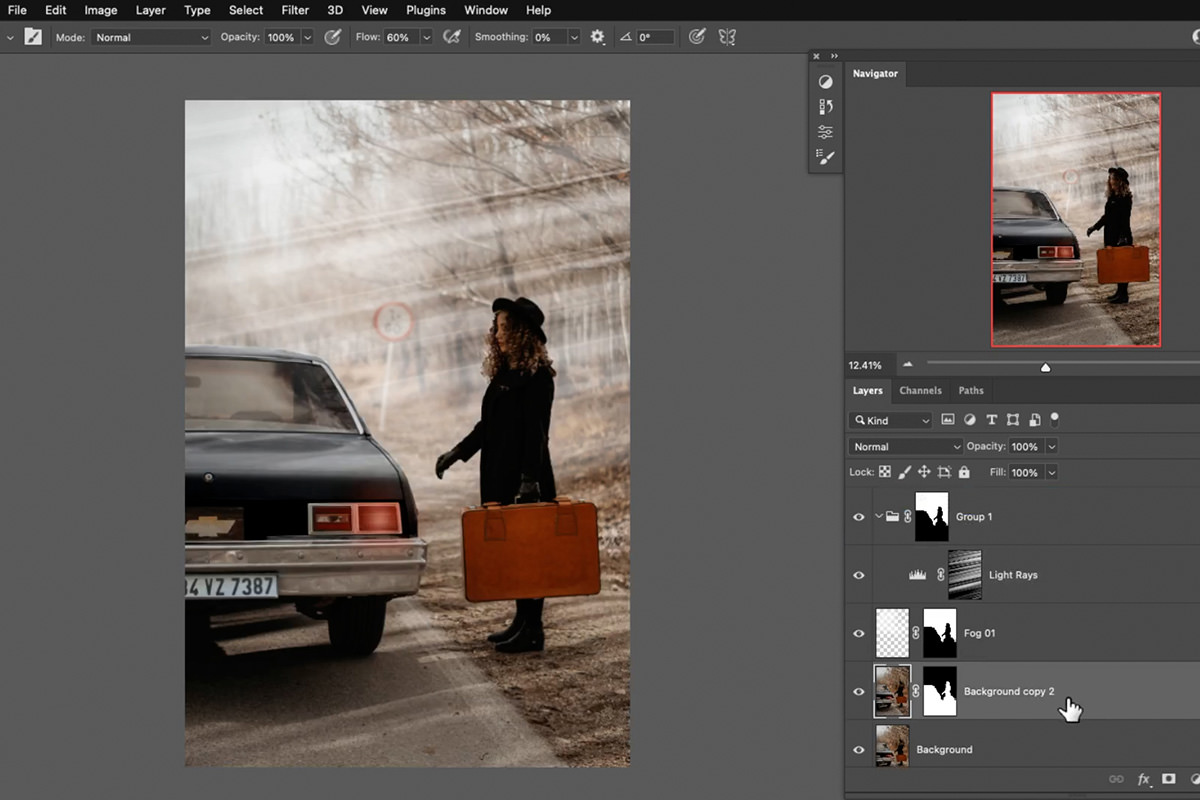
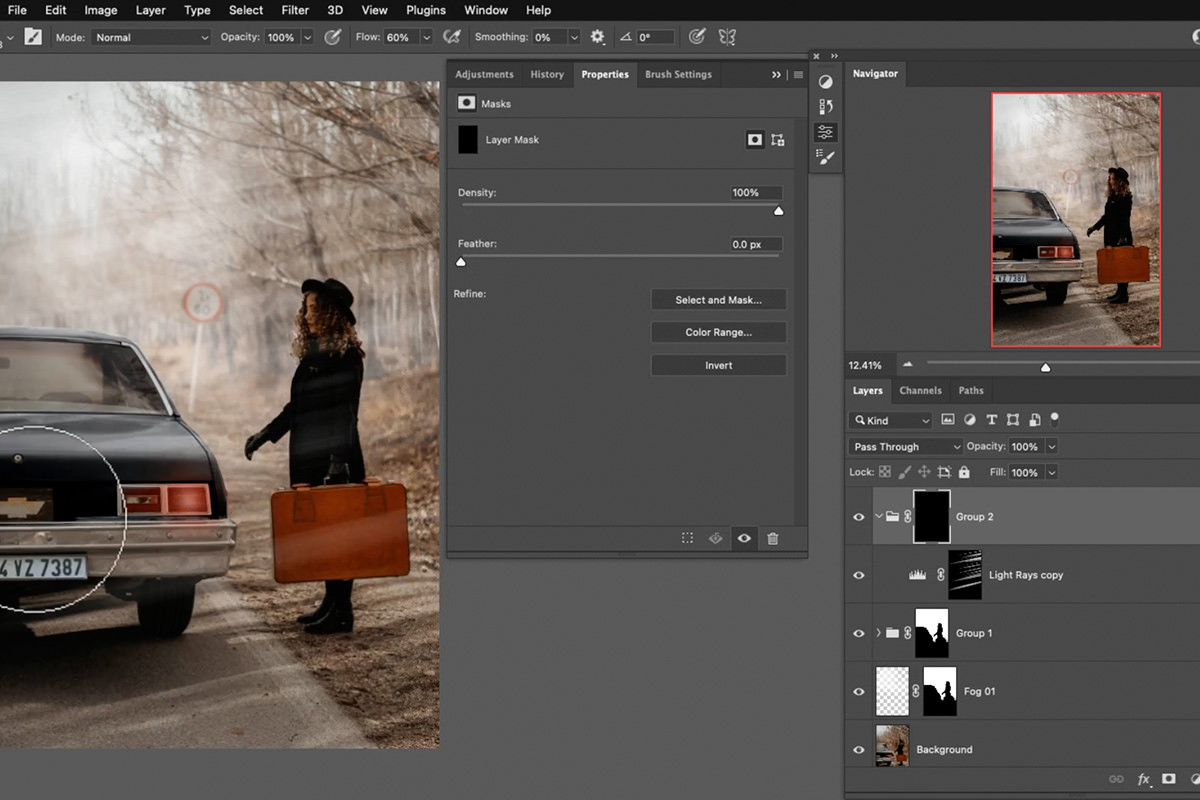
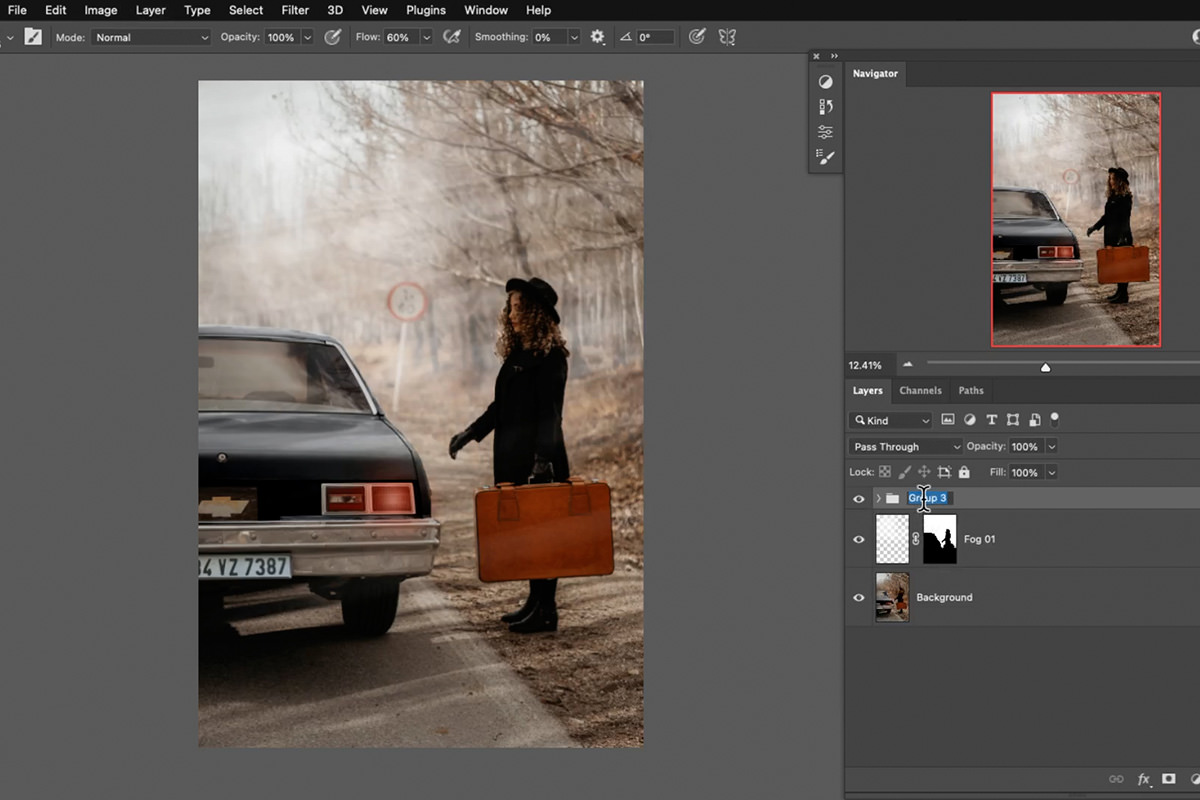
Group the Levels layer with itself, name the group Light Rays, and Alt/Option-drag the depth mask from the Focus Area layer onto the group so the rays sit behind your subject (that layer is no longer needed, so delete it). Give these rays more Gaussian Blur, since the background behind your subject is out of focus. For a second set in front, duplicate the Levels layer, run Levels on the copy’s mask to get fewer, sparser rays, and move it to the top of the stack. Group it, add a black mask to the group, paint white in just a couple of areas in front of your subject and lower the group’s opacity, so it looks like your subject is blocking some of the light.
Matching the Light Direction in Your Photo
Light rays that run in a different direction than the actual light or shadows in your photo will look obviously added. Take a moment before transforming to notice which way light is already falling in the scene, and angle your rays to match it.
Common Mistakes to Avoid
The most common issue is applying fog evenly across the whole image instead of masking it to build up with distance — that flatness is an instant giveaway. A close second is skipping the brush customization entirely, which leaves every stamp of fog looking identical and repetitive. And light rays angled independently of the photo’s actual light direction, rather than matched to it with Free Transform, tend to look pasted on no matter how well the rest of the effect is built.
Why This Effect Works
Fog is convincing when it respects three real-world properties of atmosphere at once: irregular texture, distance-based density, and light passing through it. The custom fog brush handles texture, so no two stamps of fog look identical. Depth-based masking, built here with Focus Area, handles density, keeping fog thin near the camera and thick in the distance rather than uniform across the frame. And the transformed, blurred light rays handle the third property, giving the eye a physical reason to believe there’s haze in the air at all. Any one of these on its own reads as a flat effect; together, they read as atmosphere.
Final Thoughts
The fog brush itself is reusable well beyond this one image — once you’ve built it from a cloud reference and dialed in Shape Dynamics, Scattering, and Transfer, it’s ready for any photo that needs atmosphere. What changes from image to image is the masking and the light direction, so spend your time there: use Photoshop’s selection tools to build an accurate depth mask, and always angle your light rays to match what’s already happening in the scene rather than dropping them in at a fixed angle.
Quick Reference: Keys, Menus and Settings
- Cloud shapeWindow > Channels, duplicate Red; Cmd/Ctrl + L, black point up; soft brush in Overlay
- Brush tipCmd/Ctrl-click the channel; Edit > Fill with black over white; Cmd/Ctrl + A, Edit > Define Brush Preset
- Brush settingsWindow > Brush Settings: Size and Angle Jitter up, Flip X and Y, more Spacing, Scattering on Both Axes, Transfer with Flow Jitter; Flow 5 to 10%
- Soften the fogFilter > Blur > Gaussian Blur, a little
- Depth maskSelect > Focus Area, Output To: New Layer with Layer Mask; Alt/Option-drag the mask to the fog, Cmd/Ctrl + I
- Light raysLevels, dark point up, invert the mask, white streaks; Filter > Blur > Motion Blur, 2000 pixels, twice
- Angle the raysCmd/Ctrl + T, then Cmd/Ctrl-drag the corners
No AI, no generative credits.
Free Downloads
Follow Along on the Same Photos
Get the photo and the cloud from the video, the 2 sample PSDs, the finished fog brush and the 5-page PDF guide. Free with a PHLEARN account.
Fog Brush and Fog Effect: Common Questions
How do I turn a photo of a cloud into a brush?
Duplicate the Red channel, press Cmd/Ctrl + L and bring up the black point, then paint black and white with a soft brush in Overlay mode. Cmd/Ctrl-click the channel, fill the selection with black on a new layer over a white fill layer, select all and choose Edit > Define Brush Preset.
Why use Channels to pull out the cloud?
The Red channel copy already holds the cloud’s soft gradient. Levels makes the cloud white and the sky black, and painting in Overlay cleans up the outline without flattening that soft edge.
Why does my new brush look fake?
A freshly defined brush stamps the same cloud every time. In Window > Brush Settings, turn Size Jitter and Angle Jitter all the way up, check Flip X and Flip Y Jitter, raise Spacing, and turn on Scattering (Both Axes) and Transfer.
Do I need a pressure-sensitive tablet?
No. Set the Flow Jitter Control to Off, still turn Flow Jitter up, and keep the brush Flow low. Aaron paints most of this tutorial with a mouse and it still looks like fog.
What Flow should the fog brush use?
Somewhere around 10%. Aaron uses 5%, so the fog builds up gradually as you paint over an area.
How do I save the brush with all its settings?
Open the Brush Settings panel menu, choose New Brush Preset, name it and keep Capture Brush Size checked. The jitter, scattering and transfer settings come back every time you pick it.
My fog looks too defined. What do I do?
Add a little Filter > Blur > Gaussian Blur. You want no sharp edges, but not a blob either; the fog should still have some volume and shape.
How do I keep the fog behind my subject?
Go to Select > Focus Area, output to a new layer with a layer mask and refine the edges in Select and Mask. Alt/Option-drag that mask onto the fog layer and press Cmd/Ctrl + I to invert it.
How do I make light rays through the fog?
Add a Levels layer with the dark point brought way up, invert its mask and paint white streaks. Run Filter > Blur > Motion Blur at 2000 pixels, then press Cmd/Ctrl + T and Cmd/Ctrl-drag the corners to match the light in the photo.
Are the sample files free?
Yes, with a free PHLEARN account. You get 2 sample images, 2 sample PSDs, 1 Photoshop brush and 1 PDF guide: the photo and the cloud, the PSDs, the finished fog brush and a 5-page guide.
New Free Tutorials View All »






Enjoying This Free Tutorial? Go Further with PRO.
200+ PRO courses. 1,000+ practice files. One membership.

Unlimited access to every PRO course
New PRO courses every month
Layered PSDs and RAW files to follow along
100+ Lightroom Presets, LUTs, Actions and Brushes
Stream in up to 4K, with captions and chapters
Watch on any device: desktop, tablet or phone
4.93 average from 3,900+ reviews · 2M+ students