
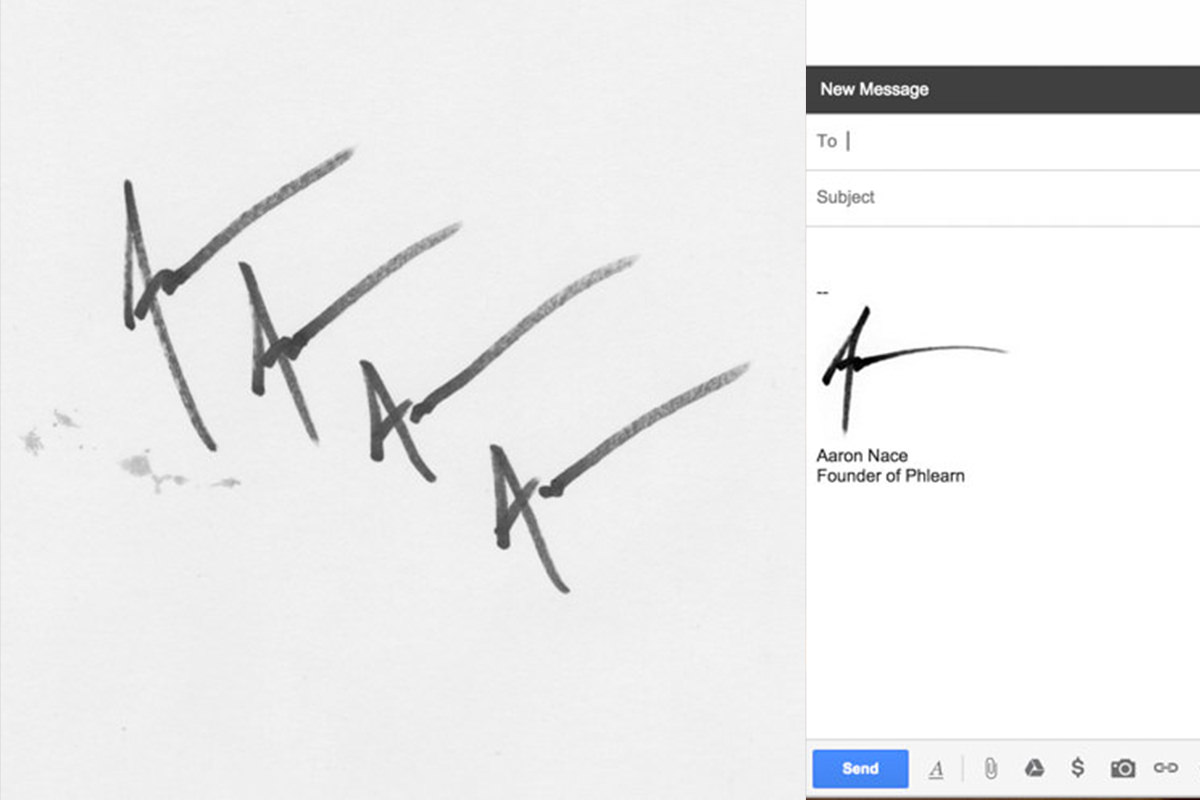

description
A handwritten signature, scanned in and cleaned up in Photoshop, turns an ordinary email into something a little more personal and professional. This tutorial covers cleaning up a scanned signature with the Levels eyedroppers, isolating and refining it with the Lasso and Warp tools, saving it at the right size and file format for the web, and loading it directly into Gmail’s signature settings.
Enjoying This Free Tutorial?
We publish a new free tutorial every week, each one with sample images and PSDs you can download and follow along with. Sign up and they land straight in your inbox, along with early word on sales, events and subscriber-only offers.

A handwritten signature, scanned in and cleaned up in Photoshop, turns an ordinary email into something a little more personal and professional. This tutorial covers cleaning up a scanned signature with Levels, isolating and refining it, saving it at the right size and file format for the web, and loading it directly into Gmail’s signature settings.
Scanning a Handwritten Signature
A signature written with an ordinary pen on plain paper, then scanned in, gives a more natural result than drawing one digitally.
-
Write the Signature on White Paper
Use any comfortable pen to write a signature or name on a plain white sheet of paper.
-
Scan the Signature Into the Computer
Scan the written signature and open the resulting file in Photoshop.
Why Pen and Paper Beats a Tablet for This
A pressure-sensitive tablet can produce a signature directly in Photoshop, but writing on real paper with a familiar pen tends to feel more natural and closer to an actual handwritten signature. Scanning that paper result in afterward gives up a small amount of convenience in exchange for a signature that looks genuinely like it was signed by hand.
Cleaning Up the Scan With Levels Eyedroppers
The Levels dialog’s black and white eyedroppers can turn a slightly gray scanned background pure white and the ink pure black in just two clicks.
-
Open Levels
Press Cmd/Ctrl+L to open the Levels dialog.
-
Set the White Point on the Background
Select the white point eyedropper and click on the paper background to make it pure white.
-
Set the Black Point on the Ink
Select the black point eyedropper and click on the signature’s ink to make it pure black.
Why the Levels Eyedroppers Beat Manual Sliders
Dragging the Levels sliders by eye to guess at the correct white and black points is slower and less precise than telling Photoshop exactly which pixel should be pure white or pure black. Clicking the eyedroppers directly on the background and the ink calibrates both points instantly and accurately in two clicks.
Isolating the Signature With the Lasso Tool
A Lasso selection around the chosen signature, duplicated to its own layer, separates it from the rest of the scanned page.
-
Select the Signature With the Lasso Tool
Press L for the Lasso tool and draw a selection around the preferred signature on the page.
-
Duplicate the Selection to a New Layer
Press Cmd/Ctrl+J to duplicate the selected signature onto its own layer.
-
Hide the Original Scan Layer
Turn off the original scanned layer’s visibility to work with just the isolated signature.
Rotating and Warping the Signature
Rotating a slightly crooked signature and using Warp to smooth its lines can make a handwritten result look even more polished.
-
Rotate the Signature
Press Cmd/Ctrl+T and rotate the signature layer to correct any unwanted tilt from writing at an angle.
-
Open Warp Mode
Press Cmd/Ctrl+T again, right-click, and choose Warp.
-
Adjust the Warp for Smoother Lines
Click and drag within the warp grid to smooth out and refine the shape of the written lines.
Adding a White Background Layer and Cropping
A solid white fill layer beneath the signature, followed by a tight crop, prepares the image for its final export.
-
Add a Solid White Fill Layer
Create a new layer beneath the signature and fill it with white, or add a Solid Color adjustment layer set to white.
-
Delete the Unneeded Original Scan Layer
Remove the original full scan layer once the isolated, cleaned-up signature is in place.
-
Crop Around the Signature
Press C for the Crop tool and crop tightly around the entire signature, making sure nothing is cut off.
Sizing and Choosing a File Format With Save for Web
The Save for Web dialog’s sizing and format options let the signature be shrunk down and compared across file formats to get the smallest usable file size.
-
Open Save for Web
Go to File > Save for Web.
-
Resize to a Web-Appropriate Width
Set the width to around 200 pixels, appropriate for an email signature.
-
Compare File Formats
Switch between GIF, JPEG, and PNG to compare file sizes, choosing whichever produces the smallest result.
Why JPEG Usually Wins for a Signature Like This
GIF and PNG both handle certain kinds of images well, but for a simple black-signature-on-white-background image, JPEG’s compression typically produces a noticeably smaller file size than either alternative. Since email signature images should load quickly and reliably, choosing whichever format actually comes out smallest, JPEG in most cases, keeps the signature lightweight.
Previewing and Fine-Tuning the File Size
The Preview button opens the exported image in a browser, showing its actual dimensions and file size so the width can be adjusted further if needed.
-
Preview in a Browser
Click Preview to open the current export settings in a browser window and see the actual pixel dimensions and file size.
-
Adjust the Width if Needed
Reduce the width further, such as from 200 to 150 pixels, if the signature looks too large for an email.
-
Save the Final File
Click Save, choose a location, and give the file a clear name.
Adding the Signature to Gmail
Gmail’s signature settings accept an uploaded image directly, which appears automatically at the bottom of every new email once saved.
-
Open Gmail Settings
Click the settings gear icon and go to See All Settings.
-
Scroll to the Signature Section
Scroll down to the Signature section under General settings.
-
Create or Select a Signature
Create a new signature or select an existing one to edit.
-
Insert the Signature Image
Click the Insert Image icon, upload the saved signature file from the computer, and let it load into the signature field.
-
Add Accompanying Text and Save
Type a name or title alongside the image, then click Save at the bottom of the settings page.
Why This Approach Works
Starting from a real pen-and-paper signature and cleaning it up with the Levels eyedroppers gives a more natural, personal result than trying to draw one digitally from scratch. Comparing file formats directly in Save for Web, rather than assuming one format is always best, ensures the signature loads quickly without sacrificing how it looks. Previewing the exported file in an actual browser before finalizing catches sizing issues that are easy to miss while still working inside Photoshop.
Final Thoughts
All it takes is a pen, some paper, a scanner, and a few minutes in Photoshop to turn ordinary handwriting into a polished email signature. The same process, scan, clean up, crop, and export, works for a logo doodle, a small illustration, or anything else drawn by hand that needs to end up as a clean, web-ready image.
Quick Reference: Keys, Menus and Settings
- Clean the scanCmd/Ctrl + L; white point eyedropper on the paper, black point on the ink
- IsolateL, Lasso around the signature, Cmd/Ctrl + J
- Straighten and smoothCmd/Ctrl + T to rotate; right-click > Warp
- Background and cropSolid Color layer (white) underneath; C, crop around the signature
- ExportFile > Save for Web: width 200 then 150 px, JPEG
- Check itPreview opens it in the browser with size and dimensions
- GmailSettings, General, Signature, Insert Image, Save
No AI, no generative credits.
Email Signatures in Photoshop: Common Questions
Do I need a drawing tablet to make a signature?
No. A pressure-sensitive tablet like a Wacom works, but Aaron prefers any pen you’re comfortable with on white paper, scanned in, because it looks more natural.
Why does my scanned paper look gray instead of white?
Scans usually come out a little off-gray. To compare, right-click the gray area around the canvas, choose Select Custom Color and pick white.
How do I make the paper pure white and the ink pure black?
Press Cmd/Ctrl + L for Levels. Click the white point eyedropper, then the paper; click the black point eyedropper, then the ink.
How do I put just one signature on its own layer?
Press L for the Lasso tool, draw around the signature you like best and press Cmd/Ctrl + J. Hide the original scan layer.
Can I smooth out my handwriting?
Yes. Press Cmd/Ctrl + T, right-click, choose Warp and drag inside the grid to clean up the lines. Rotate it first if you wrote on a slant.
What size should an email signature image be?
Small. In File > Save for Web the video sets the width to 200 pixels, previews it, then drops it to 150 pixels wide, which comes out at 150 by 105 and about 1.63K.
Which file format should I save it as?
Compare them in Save for Web. Here GIF was 6.8K, PNG 8.9K and JPEG 2.35K, so JPEG won, which Aaron says it will most of the time.
How do I check the size before saving?
Click Preview in Save for Web. It opens the image in your browser and shows its dimensions and file size.
How do I add the signature to Gmail?
Open Settings from the gear icon, scroll down the General tab to Signature, click Insert Image and upload the file. Type your name and title next to it and click Save at the bottom of the page.
From the Magazine View all
Stories, interviews and guides for photographers, new every week.
 EditingLightCraft vs Lightroom: I Edited the Same RAW Files in BothThe free clone on the same RAW files: what matches, what breaks and who should switch.
 InspirationRare Historical Photos: 13 of the Rarest Pictures Ever TakenFrom the earliest surviving picture of a person to the last passenger pigeon: who took each one and why it survives.
 EditingArtCraft: Photoshop Cloned by AI in Two Weeks. Is It Legal?ArtCraft cloned Photoshop and Lightroom with AI and gave them away. Any good? Legal? Safe?
Master Photoshop, Lightroom and Photography
Join PHLEARN PRO for $12.99 a month, or $99.99 a year (save 36%). Cancel anytime, with a 30-day money-back guarantee.





