

Download Assets
This tutorial includes 1 sample image, 1 sample PSD and 1 PDF guide. Downloads are free with a PHLEARN account.
- Download the sample images and PSDs from every free tutorial on PHLEARN
- New free tutorials published every week
- One free account — sign up once, then download anything
Free PDF Guide · 3 Pages
This Tutorial as a Step-by-Step PDF
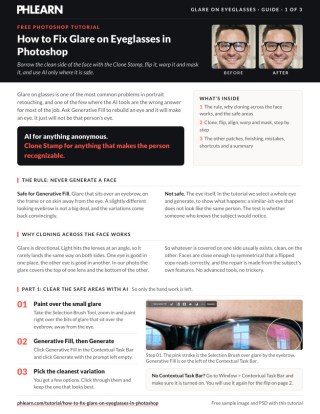
Every step from the video in order: Generative Fill for the small spots over the eyebrow, a new layer with the Clone Stamp sampling the clean eye, Flip Horizontal in the contextual taskbar, lowered opacity to line it up, Warp, the layer mask, and low-flow cloning to blend. Keep it next to your keyboard.
description
Glare on eyeglasses is not a cloning problem — it is a borrowing problem. In this tutorial we’ll show you how to use the Clone Stamp Tool to copy and warp facial features, ensuring realistic results without relying solely on AI.
Enjoying This Free Tutorial?
We publish a new free tutorial every week, each one with sample images and PSDs you can download and follow along with. Sign up and they land straight in your inbox, along with early word on sales, events and subscriber-only offers.


How to Fix Glare on Eyeglasses in Photoshop
Glare on glasses is one of the most common problems in portrait retouching, and it is one of the few where the modern AI tools are the wrong answer. Generative Fill asked to rebuild an eye will produce an eye — convincing, well-lit, and belonging to someone else.
The reliable method is older and better: copy the good side of the person’s face onto the bad side with the Clone Stamp, flip it, and blend. The result is made from the subject’s own features, because it literally is.
This tutorial uses both — AI where it is safe, cloning where it is not — and the rule for telling them apart is the important part.
The Rule: Never Generate a Face
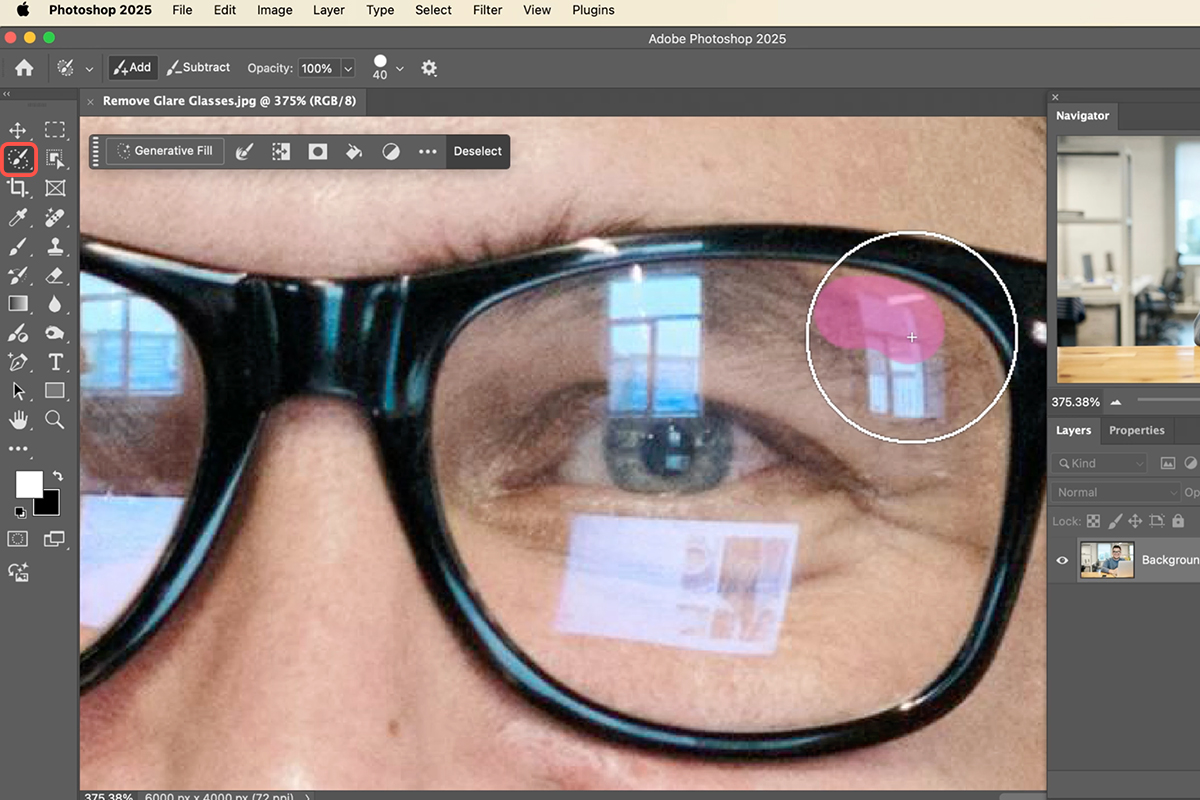
Generative Fill is fine on areas that carry no identity. A patch of glare over an eyebrow, a small reflection on the frame, a bright spot on the temple — regenerate those freely. Nobody can tell one eyebrow from another, and the variations come back convincingly.
Eyes are different. Select an eye, run Generative Fill, and you get a plausible eye that is not your subject’s. The retouch stops being a retouch and becomes a different person wearing their clothes.
So the test is simple: would a viewer who knows this person notice? Eyebrow texture, no. Eyes, immediately.
Start With the Safe Areas
Take the Selection Brush Tool, paint over the glare that sits away from the eyes, click Generative Fill and Generate with an empty prompt. Cycle the variations and pick the cleanest.
Clear those first so that what remains is only the work that needs doing by hand.
Why Cloning Across the Face Works
Glare is directional. Light strikes the lenses at an angle, so it rarely lands identically on both sides — one eye is usually obscured while the other is clean, or the glare covers the top of one lens and the bottom of the other.
That asymmetry is the opportunity. Whatever is damaged on one side generally exists intact on the other, and faces are close enough to symmetrical that a flipped copy reads correctly.
The Clone and Flip Technique
-
Create a new empty layer
A new layer for every repair. They stay independently adjustable, and you can discard one without losing the others.
-
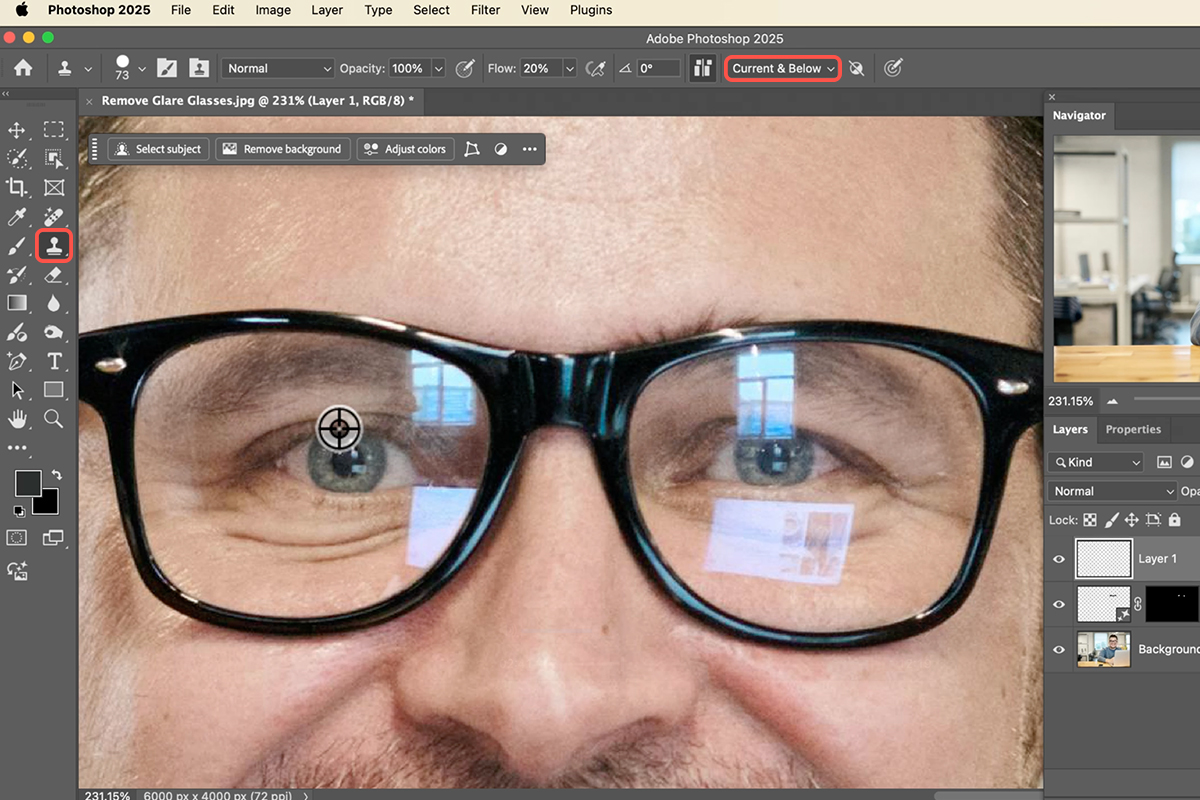
Press S for the Clone Stamp and set Sample to Current & Below
Essential. On its default setting the tool samples only the empty layer and does nothing.
-
Alt or Option click the good eye to set the source
A preview follows your cursor.
-
Paint a generous copy of it
Take more than you need — surrounding skin, part of the brow. Excess is removed with a mask later; missing material means starting again.
-
Press Ctrl+T or Cmd+T and flip horizontally
Use the flip control in the Contextual Task Bar, or right-click and choose Flip Horizontal. Without this the copied eye points the wrong way.
-
Position it with the Move Tool
Press V and line it up over the damaged eye.
Drop the Opacity to Align
Lower the layer opacity to around 50 percent so both versions are visible at once. Alignment becomes a matter of matching what you can see rather than guessing — the same trick that makes face swapping and any composite work. Return to 100 percent once it is placed.
Warp It to Fit
A flipped copy will not sit perfectly, because faces are only approximately symmetrical. Rather than accepting the mismatch, reshape it.
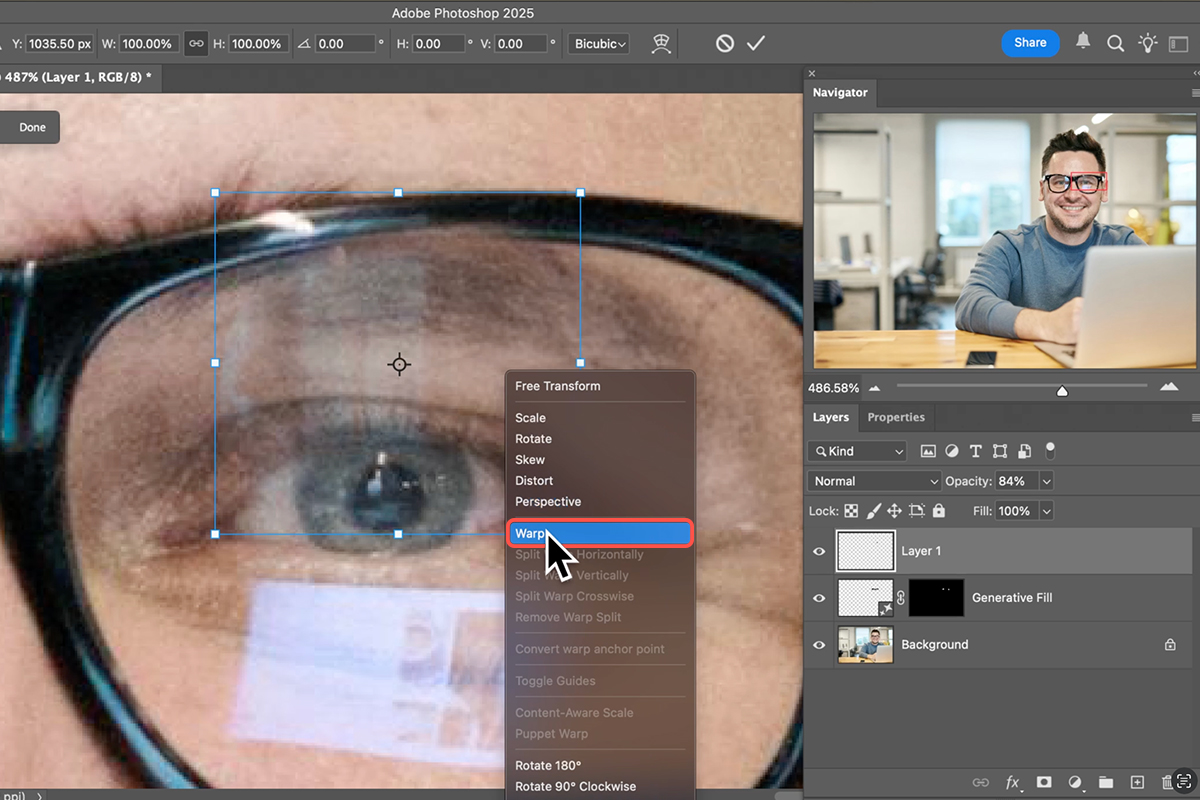
Press Ctrl/Cmd+T, then right-click and choose Warp, or click the warp icon in the options bar. Drag the control points to pull the copied feature into alignment with the surrounding face — bringing the lower edge down to meet the existing eye line, easing the brow to match.
Warp is what makes this look like retouching rather than a pasted patch, and it takes seconds.
Mask It Down to Only What You Need
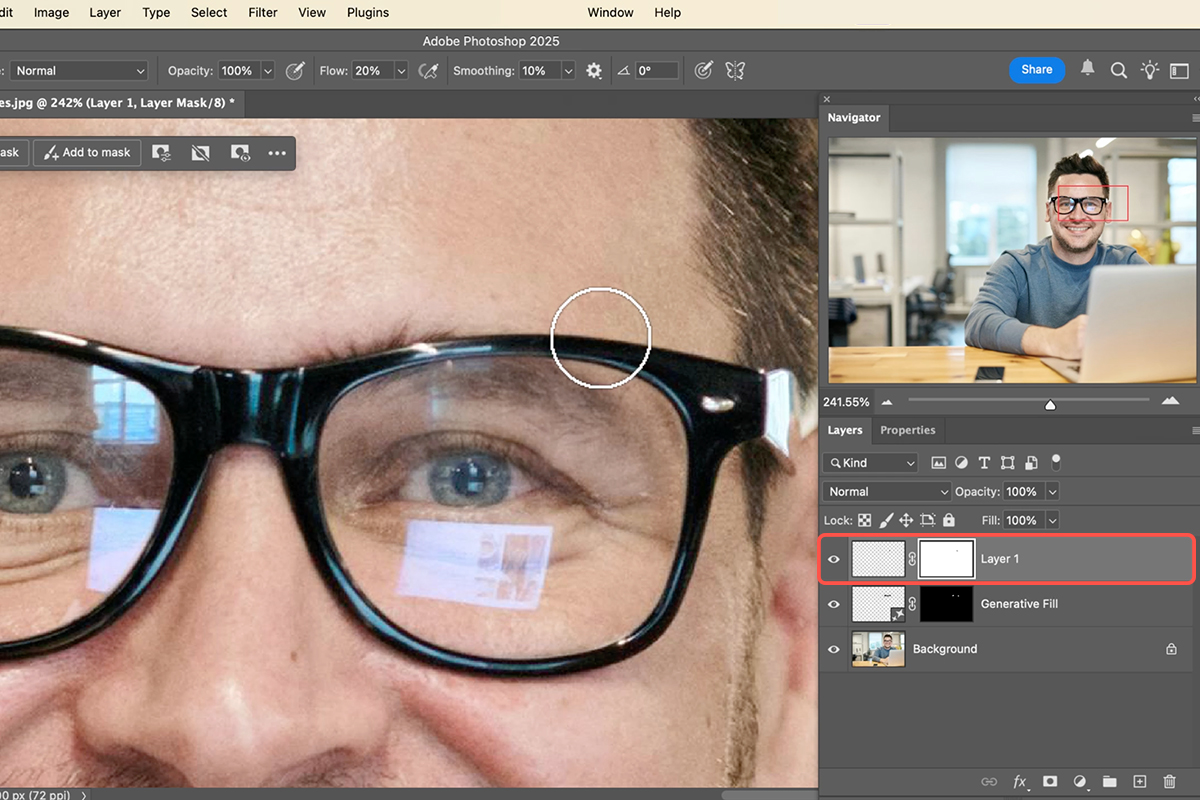
Add a layer mask and paint with a soft black brush to remove everything except the part that was actually repairing glare.
This is the step that decides the result. Keep the original eye. You are patching the lens glare, not replacing the eye — so mask away the copied pupil and iris and let the real ones show through wherever they were never obscured.
The less of the copy you keep, the more of the actual person survives, and the less there is to give the retouch away.
Alt-clicking the mask icon creates an inverted black mask instead, hiding the layer entirely so you can paint white to reveal only the small area you want. For a small patch that is often quicker than hiding a large one.
Repeat for Each Area
Work one region at a time, each on its own layer: the upper lens, the lower lens, the frame edge, the opposite side. Same sequence every time — new layer, clone, flip, position, warp, mask.
It builds up quickly, and because each repair is separate, a single one can be adjusted or thrown away later without touching the rest.
Finish With Low-Flow Cloning
For the last blending, set the Clone Stamp to a soft brush at around 10 to 20 percent flow and build up gradually. This is how you rebuild an eyebrow that got thinned during masking, or ease a transition that still reads as an edge.
Low flow means every stroke contributes a little, so the result accumulates smoothly instead of stamping visible patches.
Small Glare Inside the Eye
For tiny specular glare on the lens directly over the eye, use a very small hard Clone Stamp at 100 percent opacity and sample from clean adjacent area. At that scale cloning is precise enough and there is no reason to reach for anything more complicated.
Where AI Still Helps
Once the eyes are rebuilt by hand, small residual patches that will not blend are fair game for Generative Fill again — a stubborn area of skin, a bit of frame. Small, identity-free regions where the surrounding context does the work.
The two approaches are complementary. AI for anything anonymous, cloning for anything that makes the person recognizable.
Recap
Generative Fill for glare away from the eyes. Clone Stamp across the face for anything near them — new layer, Current & Below, Alt-click the good side, paint generously, flip horizontally, align at reduced opacity, warp to fit, mask back to only what is needed. Finish with low-flow cloning.
The whole point is that the repaired face is still your subject’s face. Every pixel came from them.
Quick Reference: Keys, Menus and Settings
- Small spots away from the eyeSelection Brush, paint the spot, Generative Fill > Generate, pick a variation
- Glare over the eyeNew layer, S, Sample: Current & Below, Alt/Option-click the clean eye, paint over the glare (a bit more than you need)
- Flip itCmd/Ctrl + T > Flip Horizontal in the contextual taskbar (or right-click), Enter
- Line it upLower the layer Opacity, V to move, Cmd/Ctrl + T to rotate; back to 100%
- Fit the shapeCmd/Ctrl + T > Warp, drag the edge into place
- Keep only the glare areaAdd Layer Mask and paint black over the rest, or Alt/Option-click the mask icon and paint white where you want it
- BlendClone Stamp at 10–20% Flow with a soft brush; tiny spots at 100%
- RepeatOne new layer per area, then group them
Only Generative Fill spends credits; the cloning doesn’t.
Free Downloads
Follow Along on the Same Photo
Get the portrait from the video, the PSD with every clone layer, flip and mask, and the PDF guide. Free with a PHLEARN account.
Eyeglass Glare: Common Questions
Why not just use Generative Fill on the whole lens?
Because it invents a new eye. The video tries it: the result is an eye, but not that person’s eye. Glare over an eye gets fixed with the real eye from the other side of the face.
When is Generative Fill okay?
Small spots away from the eye, like glare over an eyebrow, and tiny blend problems at the end. Paint them with the Selection Brush, generate, pick a variation.
How does the clone and flip work?
On a new layer, Clone Stamp the clean eye, flip the layer horizontally with Cmd/Ctrl+T, lower its opacity to line it up over the glare, bring opacity back and mask away everything except the glare area.
The flipped eye doesn’t quite fit. What then?
Warp it. Cmd/Ctrl+T, choose Warp and drag the edge until the lid or eyebrow follows the other side. Rotate a little if needed.
Why mask instead of cloning exactly?
Clone more than you need, then hide the extra with a layer mask. It’s easier to paint away the overlap than to stop the brush exactly at the glare.
How do I blend the edges?
Clone Stamp with a soft brush at 10 to 20 percent flow to feather the join and bring back some eyebrow. Small flecks inside the lens get a tiny brush at 100 percent.
Do I need a new layer every time?
Yes, one per area. The video ends with several clone layers grouped together, each one easy to adjust or hide.
Does this use generative credits?
Only the Generative Fill steps on the small spots. The cloning, flipping and masking don’t.
Are the sample files free?
Yes, with a free PHLEARN account. You get the portrait, the PSD with every clone layer and mask, and the PDF guide.
Master Photoshop, Lightroom and Photography
Join PHLEARN PRO for $12.99 a month or $99.99 a year. Cancel anytime, with a 100% money-back guarantee.





