

Download Assets
This tutorial includes 1 sample image, 1 sample PSD and 1 PDF guide. Downloads are free with a PHLEARN account.
- Download the sample images and PSDs from every free tutorial on PHLEARN
- New free tutorials published every week
- One free account — sign up once, then download anything
Free PDF Guide · 3 Pages
This Tutorial as a Step-by-Step PDF
Walks through AI Lens Blur in Photoshop: Convert to Smart Object, Filter > Camera Raw Filter, Lens Blur > Apply, the target icon dragged over the face, Blur Amount, bokeh and boost, Focus Range, the Refinement Blur and Focus brushes, then painting black on the smart filter mask at the hair. Keep it next to your keyboard.
description
The Lens Blur effect in Photoshop is an AI depth-of-field tool tucked inside the Camera Raw Filter, and it reads the depth of a scene for you. Convert your layer to a Smart Object first and the whole effect lands as an editable smart filter you can reopen at any time.
We’ll show you how to set the focal point by hand with the target icon rather than trusting subject detection, adjust blur amount and bokeh shape, and paint areas into or out of focus with the refinement brushes. The cleanup most people miss comes last: painting black along the hairline, where depth detection leaves a hard, cut-out edge.
Enjoying This Free Tutorial?
We publish a new free tutorial every week, each one with sample images and PSDs you can download and follow along with. Sign up and they land straight in your inbox, along with early word on sales, events and subscriber-only offers.
Image Source
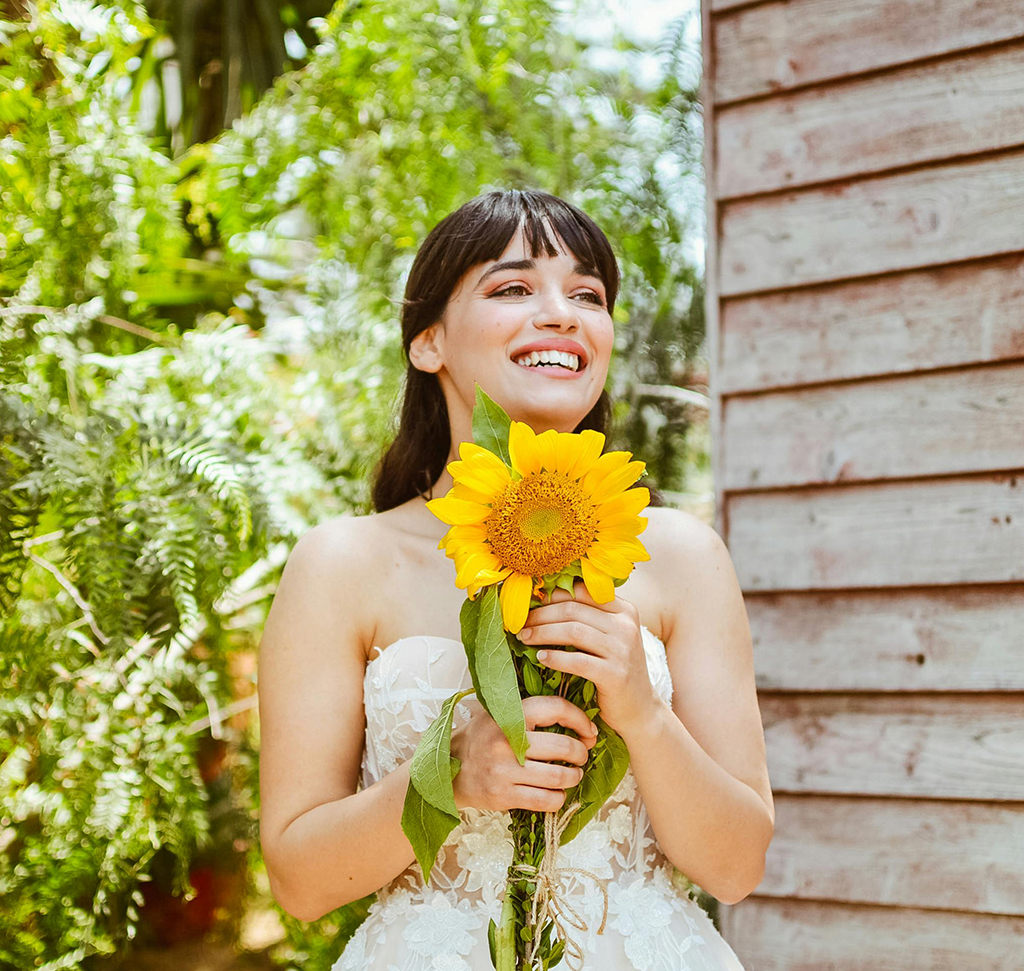

How to Use Lens Blur in Photoshop
Lens Blur arrived in Lightroom first, and the immediate question was whether Photoshop could do the same thing. It can — the same AI-powered tool lives inside the Camera Raw Filter, which means you can separate a subject from a busy background without leaving Photoshop or building a selection by hand. The trick is knowing where it hides, and knowing which of its defaults to override.
Why Set the Focal Point Yourself
Lens Blur runs subject detection by default, and it is genuinely good. It is still worth overriding. Next to the focal range controls there is a small target icon that lets you set the focal point manually, and dragging a box over your subject’s face gets a correct result every time rather than almost every time. It costs one extra drag and removes the guesswork about what Photoshop decided your subject was.
Convert Your Layer to a Smart Object
Why the Smart Object Comes First
Everything here runs through a filter, and a filter applied to an ordinary layer is baked in permanently. Convert to a Smart Object first and the same filter becomes a smart filter instead — toggled off and on from the Layers panel, and reopened later with every slider exactly where you left it. Doing this out of order is the one mistake that costs you the whole edit.
-
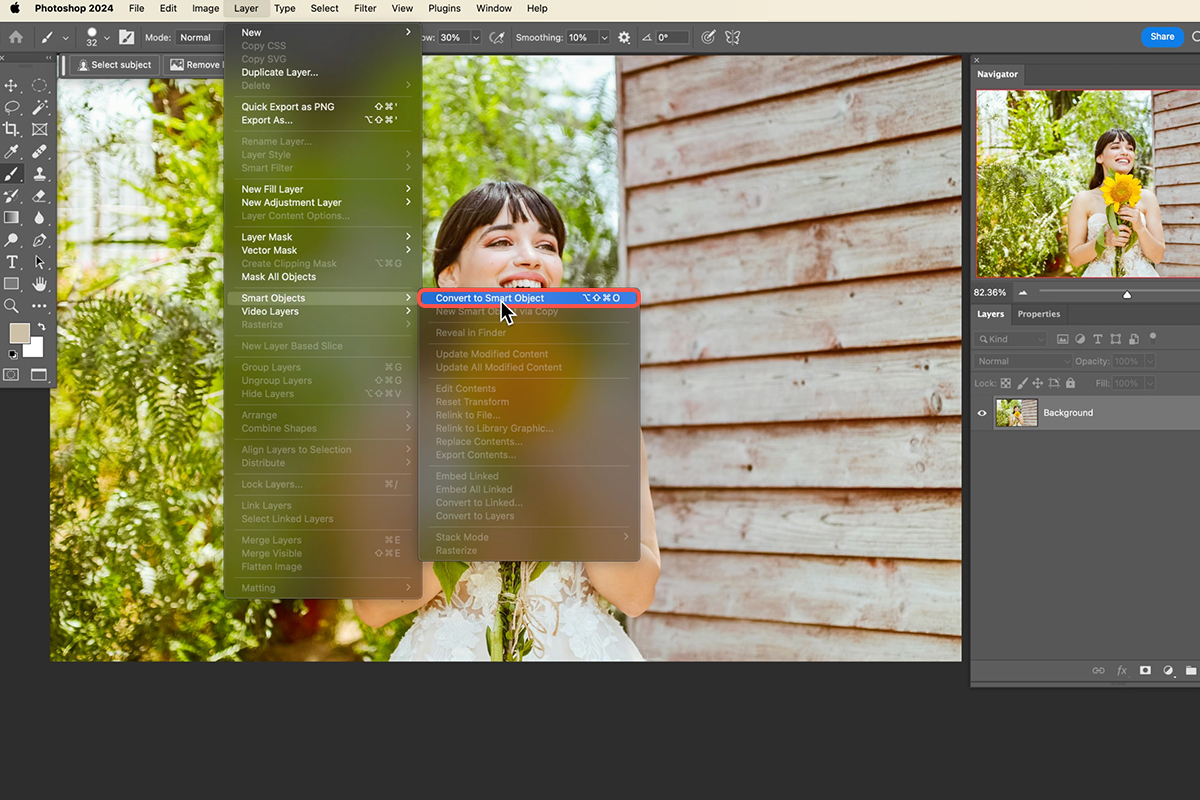
Convert the Background Layer to a Smart Object
Go to Layer > Smart Objects > Convert to Smart Object. You can also right-click the layer and choose the same command.
-
Check for the Smart Object Badge
A small icon appears in the corner of the layer thumbnail. That badge is your confirmation that the filter will land as an editable smart filter.
Find Lens Blur in the Camera Raw Filter
Camera Raw Is Lightroom Inside Photoshop
The Camera Raw Filter is close to a carbon copy of Lightroom, sitting inside Photoshop. Our PRO course on Adobe Camera Raw covers that panel in depth. Masking, the Remove tool, exposure, color grading — the panel you already know is all there. If you have been switching applications to reach a Lightroom tool, this is usually the shortcut.
-
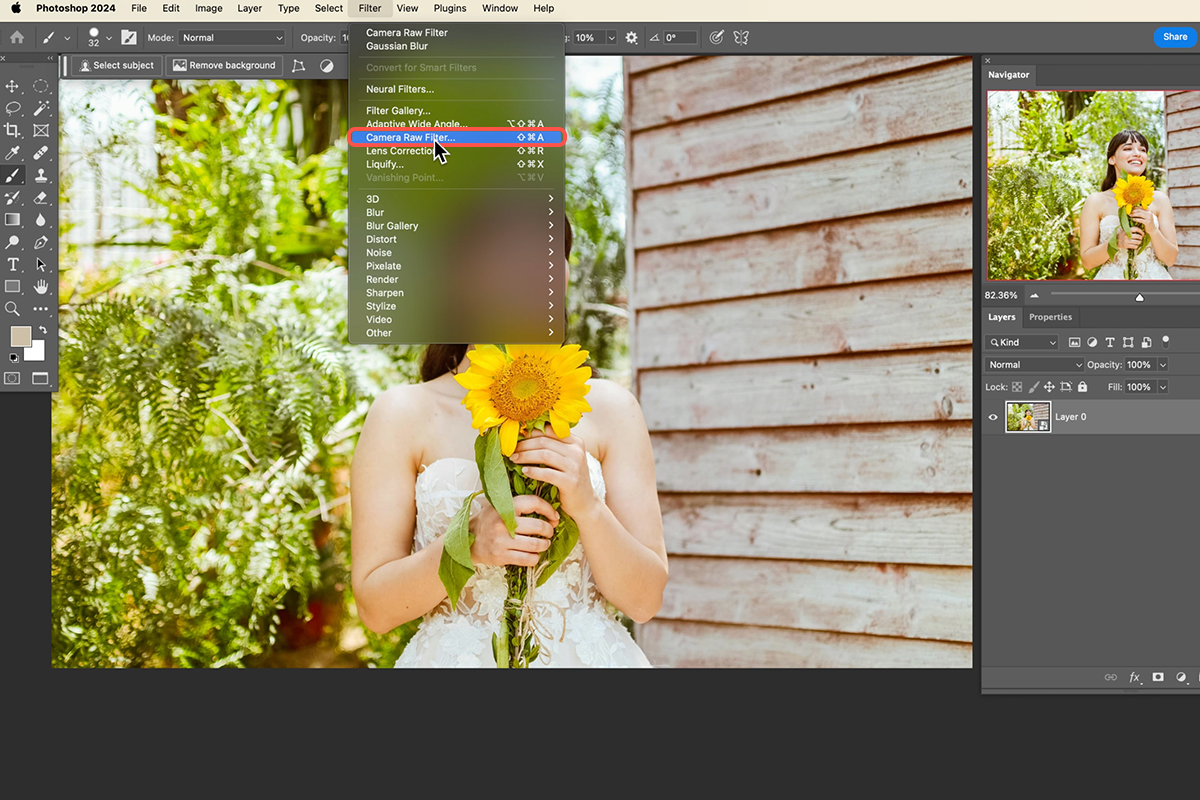
Open the Camera Raw Filter
Go to Filter > Camera Raw Filter. The full Camera Raw workspace opens over your image.
-
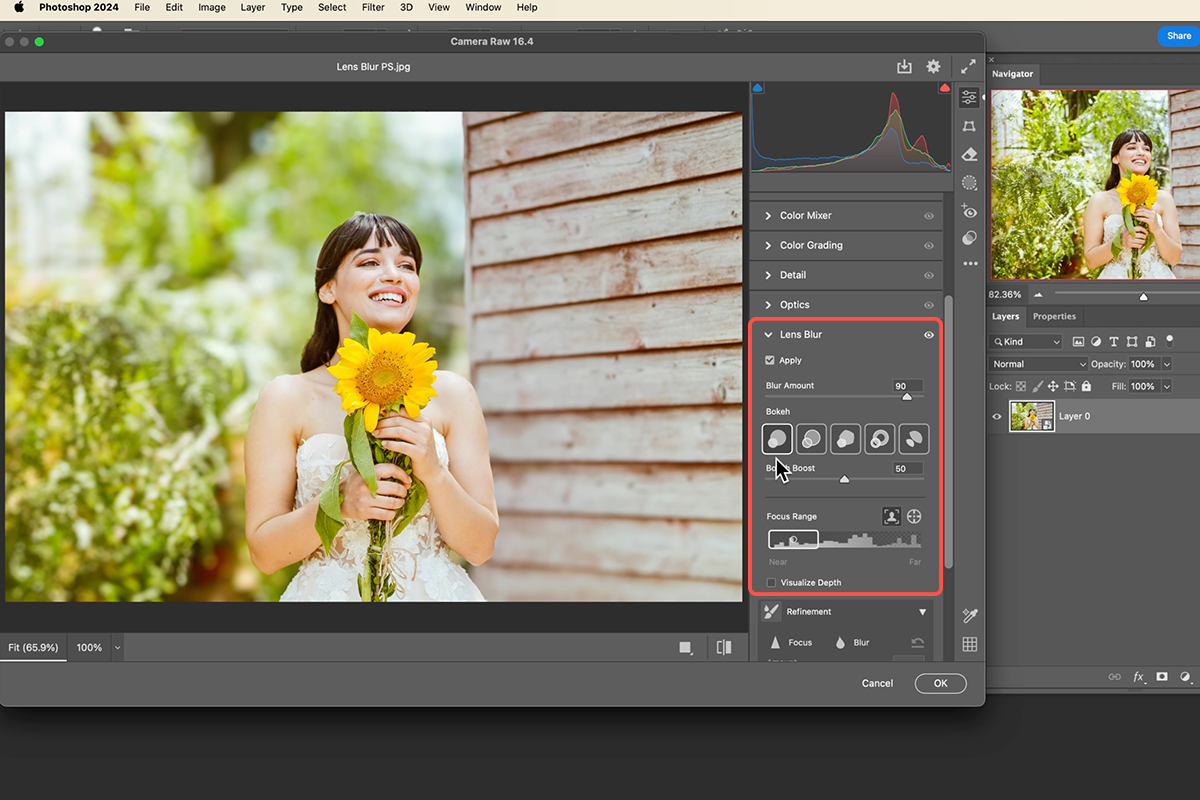
Open Lens Blur and Check Apply
Find Lens Blur in the Optics section, expand it, and tick the Apply checkbox. Photoshop generates a depth map and previews the blur straight away.
Set the Blur Amount and Focal Point
Choosing a Bokeh Style
Bokeh is the shape the out-of-focus highlights take, and Lens Blur offers several to pick from. Different shapes suit different backgrounds, and there is a boost control for pushing those highlights brighter when the background has points of light worth emphasizing. It is a look decision rather than a correctness one, so judge it against the photo.
-
Set the Focal Point Manually
Click the target icon, then click and drag a box over your subject’s face. Release and the focal point snaps into place automatically.
-
Adjust the Blur Amount
Raise or lower it while watching the background. This is the control that decides how much separation you get.
-
Pick a Bokeh Shape and Boost Highlights
Step through the bokeh options and, if the background has bright spots, raise the boost to let them bloom.
-
Adjust the Focus Range
Drag the focus range to extend what stays sharp or to make the depth of field shallower, so the plane of focus sits where you want it rather than where the depth map guessed.
Paint Where the Blur Lands
Depth detection gets most of an image right and some of it wrong. The refinement brushes are how you correct the difference by hand, and they work like any brush — paint to add, switch mode to take away.
-
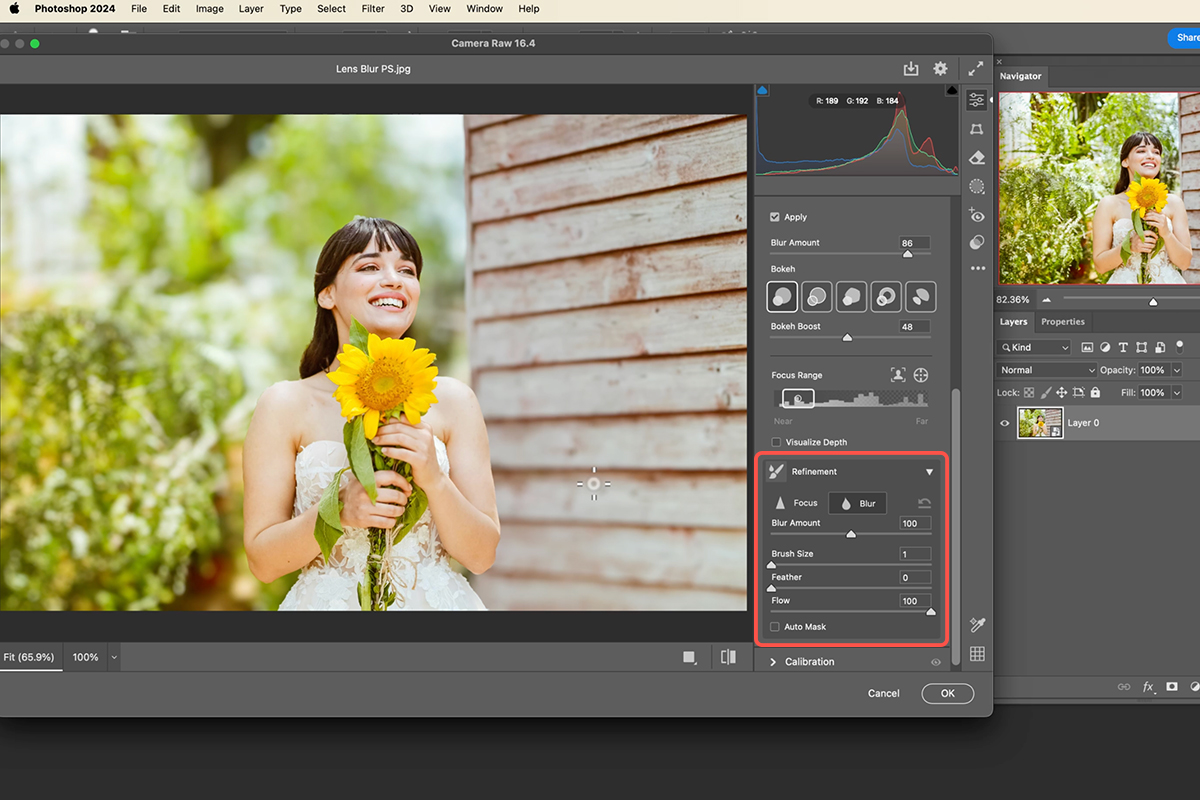
Open the Refinement Section
It is often collapsed by default. Expand it and you get two brush modes, Blur and Focus.
-
Paint With the Blur Brush
Choose Blur and paint over anything that should fall back — including parts of your subject, if the shot calls for it.
-
Switch to the Focus Brush
Choose Focus and paint over anything that should stay sharp. Hair is the usual candidate, since strands routinely get read as background.
Clean Up the Edge of the Hair
Where the AI Gets Confused
Hair is the hardest thing in the frame for a depth map to read. Strands sit at the boundary between subject and background, so the tool often draws a harder line there than reality would, leaving an edge that looks cut out rather than photographed. Softening that edge by hand is what sells the whole effect.
-
Click OK to Apply
The blur lands as a smart filter under your layer, and you can toggle it off and on from the Layers panel at any point.
-
Select the Smart Filter’s Layer Mask
Click the layer mask attached to the smart filter. Painting here controls where the filter is visible, without altering the settings inside it.
-
Paint Black Along the Hair Edge
Grab the Brush Tool (Keyboard Shortcut “B”), set the foreground color to black, zoom in, and paint gently along the hairline to pull the blur back where the edge reads too hard.
What Makes a Blur Look Fake
The most common error is simply too much of it. The slider goes far past anything a real lens would produce, and once it is cranked the image stops reading as a photograph and starts reading as a subject pasted onto a background. Aim for enough separation to draw the eye and no more. The second error is trusting the depth map at the edges — hairlines, glasses, and anything thin or translucent are exactly where it struggles, and exactly where a viewer looks.
What Makes This Look Real
A convincing blur is uneven. Real depth of field falls off gradually and gets interrupted by whatever sits between the lens and the subject, so the combination of a manually placed focal point, a hand-adjusted focus range and a few brushed corrections beats anything a single slider produces on its own.
Keep the Whole Thing Editable
Because the filter is a smart filter, none of this is final. Double-click Camera Raw Filter in the Layers panel and you are back in the same dialog with the blur amount, focus range and refinements exactly as you left them — adjust and click OK. If you want to build more of your editing to survive changes of mind like that, our PRO course on non-destructive editing covers the approach end to end.
Quick Reference: Keys, Menus and Settings
- Smart Object firstLayer > Smart Objects > Convert to Smart Object
- Open Lens BlurFilter > Camera Raw Filter (Shift + Cmd/Ctrl + A), then Lens Blur > Apply
- Set the focusTarget icon next to Focus Range, drag a box over the face
- Shape the blurBlur Amount (not all the way up), bokeh type, boost, Focus Range
- RefineRefinement > Blur or Focus, then paint
- Soften the hair edgeOK, select the smart filter mask, B and paint black at the edge
- Re-editDouble-click Camera Raw Filter in the Layers panel

Free Downloads
Follow Along on the Same Photo
Get the portrait, the finished PSD with the blur and hair cleanup, and the 3-page PDF guide, so you can set the same focal point and compare. Free with a PHLEARN account.
Lens Blur in Photoshop: Common Questions
Where is Lens Blur in Photoshop?
The AI Lens Blur is inside Filter > Camera Raw Filter, in its own Lens Blur panel on the right. Open it and check the Apply box.
Is it the same Lens Blur as in Lightroom?
Yes. The Camera Raw Filter is basically a carbon copy of Lightroom inside Photoshop, with masking, the Remove tool, exposure and Lens Blur, so you do not have to leave Photoshop.
Why convert to a Smart Object first?
A filter on an ordinary layer is baked in. Go to Layer > Smart Objects > Convert to Smart Object first and the blur becomes a smart filter you can turn off, on and reopen.
How do I set the focal point myself?
Lens Blur uses subject detection by default. Click the little target icon next to Focus Range, then click and drag a box over your subject’s face. When you let go, the focus adjusts automatically.
How much blur should I use?
Enough separation to draw the eye and no more. Do not crank Blur Amount all the way up; at the top of the slider the subject starts to look pasted onto the background.
Can I change the bokeh shape?
Yes. Choose between the bokeh types in the Lens Blur panel for the look you want, and raise the boost slider to push bright spots in the background brighter.
How do I fix areas that are blurred or sharp by mistake?
Open Refinement below Focus Range. Choose Blur and paint over anything that should fall back, or Focus and paint over anything that should stay sharp, like hair.
Why does the edge of the hair look too hard?
Right at the edge of hair the tool can get a little confused. After clicking OK, select the smart filter’s mask, press B for the Brush Tool and paint black along the hair edge.
Can I change the Lens Blur later?
Yes. Double-click Camera Raw Filter in the Layers panel and you are back in Camera Raw with the blur as you left it. Make changes, click OK and it updates.
Are the sample files free?
Yes, with a free PHLEARN account. You get 1 sample image, 1 sample PSD and 1 PDF guide: the portrait, the finished file with the blur and hair cleanup, and the step-by-step guide.
Master Photoshop, Lightroom and Photography
Join PHLEARN PRO for $12.99 a month or $99.99 a year. Cancel anytime, with a 100% money-back guarantee.





