


description
The Lighting Effects filter can make a flat, pasted-in image look like it’s genuinely being lit by the light sources already present in a photo. This tutorial places a painting onto a wall, then uses spotlights, a texture channel, and layer effects like Bevel and Emboss and a Drop Shadow to make it look like the room’s real lighting is falling directly on it.
Enjoying This Free Tutorial?
We publish a new free tutorial every week, each one with sample images and PSDs you can download and follow along with. Sign up and they land straight in your inbox, along with early word on sales, events and subscriber-only offers.
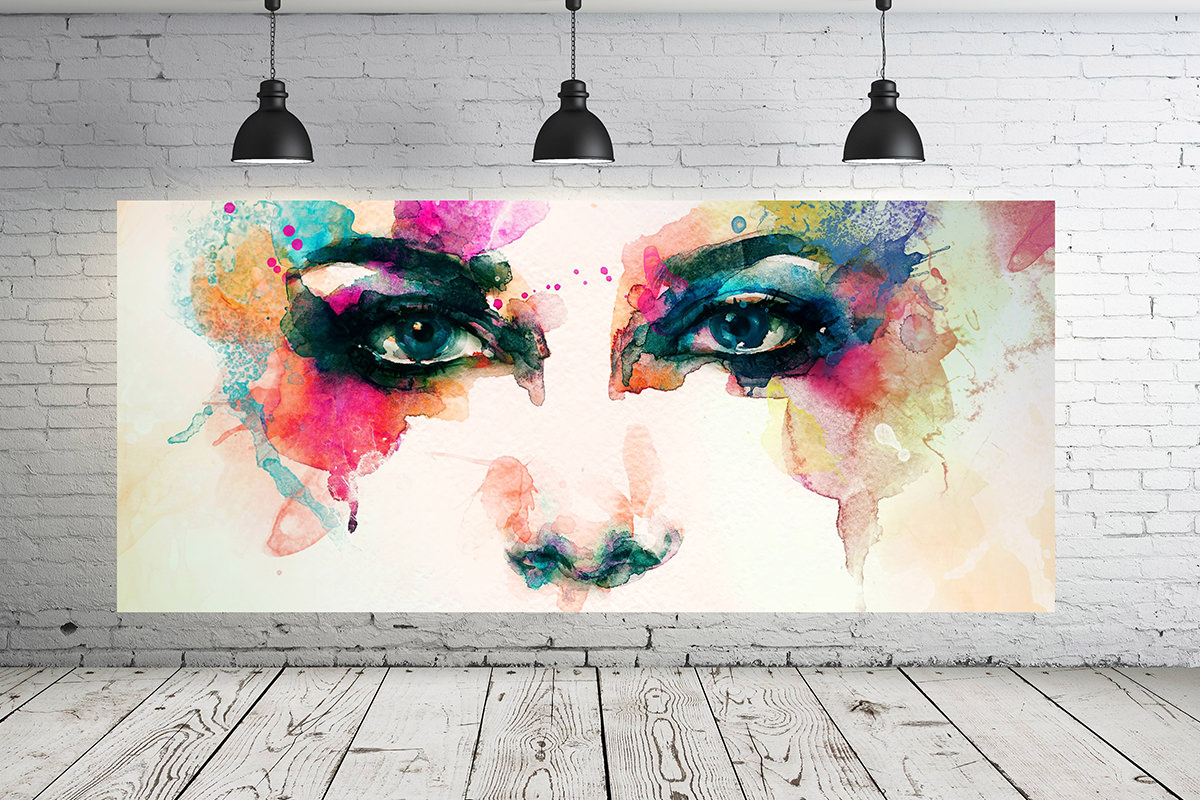

The Lighting Effects filter can make a flat, pasted-in image look like it’s genuinely being lit by the light sources already present in a photo. This tutorial places a painting onto a wall, then uses spotlights, texture, and layer effects like bevel and emboss and a drop shadow to make it look like the room’s real lighting is falling directly on it.
Placing the Painting on the Wall
A rectangular selection turned into a layer mask, then unlinked from its layer, makes it possible to crop and reposition the painting on the wall independently of its masked shape.
-
Combine the Two Images
Hold Shift and drag the painting image into the wall photo’s document with the Move tool.
-
Select the Area for the Painting
Use the Marquee tool to draw a rectangular selection on the wall where the painting should sit.
-
Turn the Selection Into a Layer Mask
With the painting layer selected, click the Add Layer Mask button to load the selection as a mask.
-
Unlink the Layer and Mask
Click the chain icon between the layer and mask thumbnails to unlink them.
-
Reposition and Resize the Painting
Use the Move tool and Cmd/Ctrl+T to reposition and resize the painting layer independently, deciding exactly how much of the artwork to show through the mask.
-
Relink the Layer and Mask
Click the chain icon again once the painting is positioned correctly, to relink the layer and its mask.
Why Unlinking the Layer From Its Mask Matters
With the layer and mask linked, moving or resizing the painting would drag the masked shape along with it, making it impossible to decide independently how much of the artwork should show through the selection. Unlinking them means the mask stays fixed on the wall while the painting underneath can be repositioned and cropped freely, choosing exactly which part of the artwork appears.
Choosing a Light Type
The Lighting Effects filter offers three distinct types of light, a point light, a spotlight, and an infinite light, each behaving differently depending on the surface being lit.
-
Open the Lighting Effects Filter
Go to Filter > Render > Lighting Effects.
-
Try a Point Light
Select Point light to see how it behaves like a flashlight, brightening an area with a soft fall-off around it.
-
Try a Spotlight
Select Spotlight to see its adjustable, elongated area of effect, closer to how a real ceiling spotlight behaves.
-
Try an Infinite Light
Select Infinite light to see a light that shines from one chosen direction; changing that direction only shows once a texture is turned on.
Matching the Light’s Type and Color to the Scene
Choosing a light type and color that mirror the actual light sources already visible in the photo is what sells the effect as real.
-
Match the Light Type to the Real Fixtures
Choose Spotlight if the room’s actual lights, such as ceiling fixtures, resemble spotlights more than a flat, infinite source.
-
Match the Light’s Color
Leave the light white if the room’s lighting is white, or color it to match if the original light has a noticeable tint, such as red or yellow.
Adjusting Intensity, Hotspot, and Exposure
Intensity, Hotspot, and Exposure together control how bright the light appears and how large its brightest point is, tuned to match the rest of the photo.
-
Set the Intensity
Adjust Intensity so the light’s overall brightness matches the rest of the image.
-
Set the Hotspot
Adjust Hotspot to control how wide and how bright the light’s brightest center point becomes.
-
Set the Exposure Without Blowing Out Detail
Adjust Exposure carefully, avoiding a setting so high that highlight detail is completely lost.
Setting Gloss, Metallic, and Ambience
Gloss, Metallic, and Ambient settings shape how shiny the surface appears and how bright the overall scene is outside the direct light.
-
Lower Gloss for a Matte Surface
Reduce the Gloss setting for a surface like canvas that shouldn’t have a shiny specular highlight.
-
Lower Metallic for a Non-Metallic Surface
Reduce the Metallic setting as well, since a painted canvas isn’t reflective the way metal would be.
-
Raise Ambient to Match the Room’s Overall Brightness
Raise the Ambient slider so the room’s general light level, not just the spotlight itself, is represented realistically.
Adding Texture With a Color Channel
Assigning a texture channel, based on the image’s red, green, or blue values, gives the light something to actually cast highlights and shadows onto.
-
Choose a Texture Channel
Change Texture from None to Red, Green, or Blue, comparing which channel gives the most convincing amount of surface detail.
-
Compare the Effect as the Light Moves
Move the light source around and confirm the texture’s highlights and shadows shift realistically along with it.
Why Texture Needs a Color Channel to Work
Without an assigned texture channel, an Infinite or Spotlight light source will change position and color but won’t actually create any visible highlight or shadow relief on the surface. Assigning a channel like Red gives the filter a data source to read as height information, which is what lets the chosen light source cast real-looking highlights and shadows across the painting.
Duplicating and Positioning Additional Lights
Duplicating a configured light and repositioning each copy recreates a scene with multiple real light sources, such as three ceiling spotlights.
-
Duplicate the Configured Light
Click the Spot light icon again to add another spotlight, which keeps all of the first light’s settings, including intensity, color, and texture channel.
-
Rotate and Reposition Each Copy
Rotate and move each duplicated light to match the position of an additional light source visible in the photo.
-
Fine-Tune Each Light’s Intensity Individually
Select each light individually and adjust its intensity slightly if needed, since real lights are rarely perfectly identical.
Adding Dimension With Bevel and Emboss
The Bevel and Emboss layer style adds a highlight and shadow along the painting’s edges, giving it a subtle three-dimensional presence on the wall.
-
Open Layer Styles
Double-click the painting layer to open the Layer Style dialog.
-
Enable Bevel and Emboss
Check Bevel and Emboss to turn it on.
-
Set the Style to Emboss
Choose Emboss as the style for a look closer to a painting’s texture.
-
Adjust Angle, Depth, and Size
Adjust the Angle to match the scene’s lighting direction, and raise Depth and Size until the effect reads clearly without looking exaggerated.
-
Soften the Shadow Level
Lower the Shadow slider if the resulting shadow looks too dark for the scene.
Adding a Drop Shadow
A Drop Shadow layer style, linked to the same global light angle as the bevel, makes the painting look like it’s actually resting against the wall.
-
Enable Drop Shadow
In the same Layer Style dialog, check Drop Shadow to turn it on.
-
Confirm Use Global Light Is Checked
Make sure Use Global Light is checked so the drop shadow’s angle automatically matches the Bevel and Emboss angle.
-
Lower the Opacity for a Bright Room
Reduce the shadow’s opacity so it doesn’t look too dark in a room with a lot of ambient light.
-
Adjust Distance, Size, and Spread
Adjust Distance, Size, and Spread to control how far the shadow falls and how soft or sharp its edge appears, based on how close and how soft the original light source is.
Why Global Light Keeps the Effects Consistent
A bevel and a drop shadow that used two independently set light angles would risk looking like they came from two different light sources instead of one. Linking both to the same Global Light setting guarantees they always share the same angle, so the highlight, shadow, and drop shadow all read as consistent with a single light source in the room.
Why This Approach Works
Matching the Lighting Effects filter’s light type, color, and intensity to the room’s real fixtures is what keeps a composited object from looking like it’s floating outside the scene’s actual lighting. Assigning a texture channel gives the filter real surface data to cast highlights and shadows from, turning a flat color effect into something that reads as genuine dimension. Linking the Bevel and Emboss and Drop Shadow layer styles to the same Global Light setting ties every added effect back to one consistent, believable light source.
Final Thoughts
Between the Lighting Effects filter’s spotlights and texture, and the Bevel and Emboss and Drop Shadow layer styles, a flat pasted-in image can be made to look like it’s genuinely sitting inside a photographed room. None of these settings have one universal correct value, since each depends entirely on the lighting and surface of the specific photo being worked on, but the same overall sequence applies to placing any object convincingly into any lit scene.
Quick Reference: Keys, Menus and Settings
- Mask the paintingMarquee selection, layer mask button, chain icon to unlink; Cmd/Ctrl + T to resize
- Open the filterFilter > Render > Lighting Effects
- Set the lightSpot, white; Intensity, Hotspot, Exposure without blowing out the highlights
- SurfaceGloss and Metallic down for canvas; Ambience up for a bright room
- TextureTexture: Red (or Green, Blue)
- More lightsSpot light icon again; rotate and move each, adjust each Intensity
- Layer stylesDouble-click the layer: Bevel and Emboss (Style: Emboss), Drop Shadow with Use Global Light
No AI, no generative credits.
Lighting Effects Filter: Common Questions
Where is the Lighting Effects filter?
Select the layer and go to Filter > Render > Lighting Effects.
What is the difference between Point, Spot and Infinite lights?
A Point light works like a flashlight, brightening wherever you move it with some fall-off. A Spot light has a stretched area of effect that falls off in one direction. An Infinite light shines from one direction, which only shows once texture is on.
Which light type should I use?
Imitate the lights in your photo. The room in the video has lights hanging from the ceiling that look like spotlights, so Spot is used, left white because the room’s light is white.
What do Intensity, Hotspot and Exposure control?
Intensity sets how bright the light is, and Hotspot sets how wide and how bright its brightest area gets. Raise Exposure carefully so the highlights don’t blow out to white.
What do Gloss, Metallic and Ambience do?
Gloss and Metallic change the shine of the surface; a canvas painting is neither glossy nor metallic, so both come down. Ambience is the room’s overall light: low for a dark room, higher for a bright one like this.
How do I make the light show texture in the painting?
Change Texture from None to Red, Green or Blue. The filter uses that color channel to make highlights and shadows that shift as you move the light. Red gave just enough texture here.
How do I add more than one light?
Once the first spotlight is set, click the Spot light icon again; the new light keeps the same settings. Rotate and move each one under a real light and adjust their intensities individually.
How do I make the painting look three-dimensional?
Double-click the layer to open Layer Style and turn on Bevel and Emboss. Set Style to Emboss, raise Depth and Size, set the angle and lower the Shadow slider if the shadow is too dark.
How do I add a shadow under the painting?
Turn on Drop Shadow in the same Layer Style dialog with Use Global Light checked, so it shares the bevel’s angle. Lower the opacity for a bright room, then set Distance, Size and Spread to suit the light.
Master Photoshop, Lightroom and Photography
Join PHLEARN PRO for $12.99 a month, or $99.99 a year (save 36%). Cancel anytime, with a 100% money-back guarantee.





