

Download Assets
This tutorial includes 1 sample image, 1 sample PSD and 1 PDF guide. Downloads are free with a PHLEARN account.
- Download the sample images and PSDs from every free tutorial on PHLEARN
- New free tutorials published every week
- One free account — sign up once, then download anything
Free PDF Guide · 3 Pages
This Tutorial as a Step-by-Step PDF
Every step from the video in order: Edit > Reflection Removal and its two options, the layers it creates, the black mask painted in over the face, and the Generative Fill cleanup with Firefly Fill and Expand. Keep it next to your keyboard.
description
Learn how to remove reflections from faces in Photoshop 2026. We test the new automatic Reflection Removal tool, then use layer masks and Generative Fill to fix the places it gets wrong.
Enjoying This Free Tutorial?
We publish a new free tutorial every week, each one with sample images and PSDs you can download and follow along with. Sign up and they land straight in your inbox, along with early word on sales, events and subscriber-only offers.
Image Source
Photo by Curated Lifestyle via Unsplash


Remove Reflections From Faces in One Pass
Glare on skin has always been one of the genuinely miserable retouching jobs. Window light across a forehead, a studio strobe caught on a cheekbone, reflections thrown up by glasses — fixing them by hand means cloning and healing while trying to preserve skin texture that’s already been blown out. It’s slow, and it usually still looks retouched.
Photoshop 2026’s Reflection Removal does the bulk of that automatically, on its own layer, using zero generative credits. It also occasionally removes an arm. The technique below uses the tool for what it’s good at and puts a mask in front of everything it gets wrong.
Why Glare Is So Hard to Fix Manually
The Texture Is Already Gone
A specular highlight on skin isn’t just bright — it’s clipped. There’s no pore detail left underneath to recover, which is why dodging and burning never quite fixes it and why cloning from elsewhere on the face rarely matches.
It Follows the Face’s Contours
Reflections wrap around a nose, a cheekbone, a brow ridge. Any patch you clone in has to follow that same three-dimensional form, which is what makes hand repairs take so long and read as flat when they’re rushed.
No Credits, Which Matters
Reflection Removal analyzes the image rather than generating new content, so it doesn’t touch your generative credit balance. You can run it on an entire shoot without thinking about cost.
Run the Automatic Removal
Two settings in the dialog matter, and both defaults are wrong for this workflow.
-
Select Your Image Layer
Click the main image layer in the Layers panel.
-
Open Edit > Reflection Removal
It’s in the top Edit menu, not in the contextual taskbar — which is why plenty of people haven’t found it yet.
-
Create a Separate Reflection Layer, Quality Best
Check the option to put the result on its own layer, and set the quality dropdown to Best. The separate layer is what makes the next section possible — without it, the removal is baked in and you can’t undo it selectively. Click OK and let Photoshop analyze the image.

Mask Back What It Got Wrong
The tool is aggressive. It regularly reads a bare arm, a light-coloured sleeve, or a bright patch of clothing as a reflection and removes it. Rather than fighting that, hide the whole thing and paint back only the face.
-
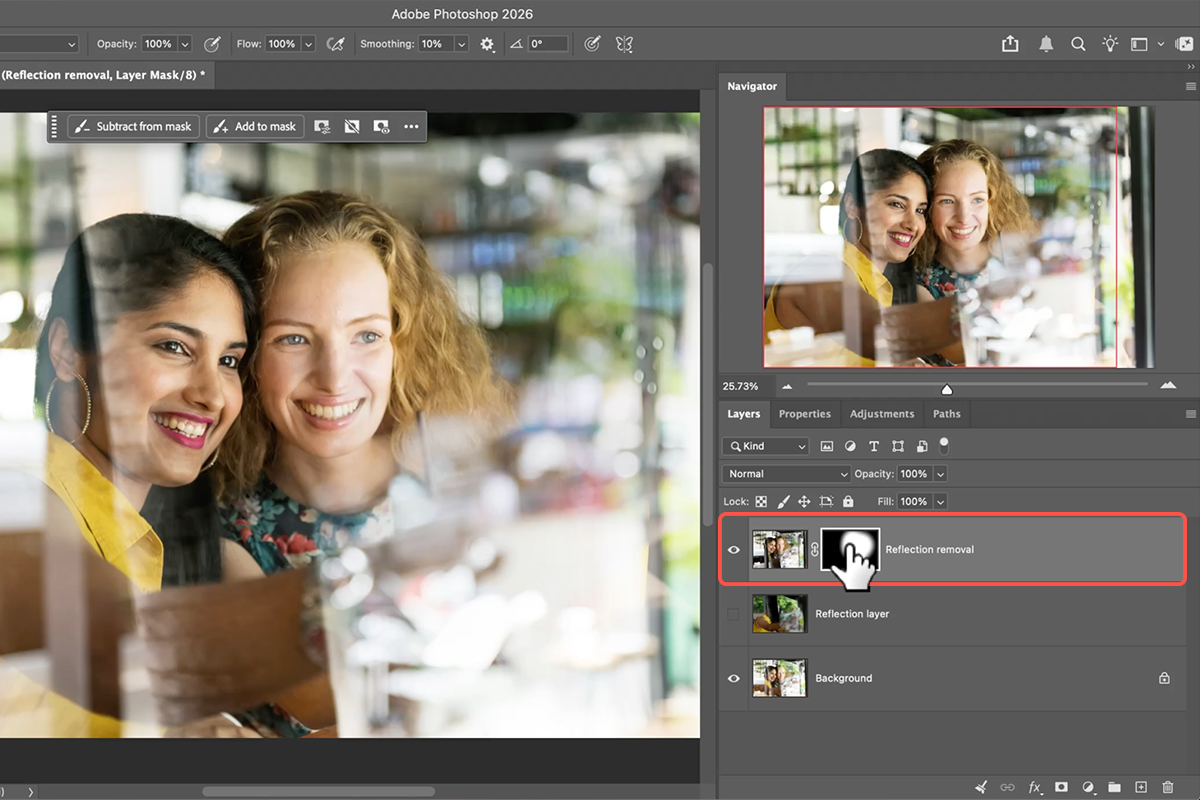
Add an Inverted (Black) Mask
Hold Alt/Option and click the Layer Mask icon at the bottom of the Layers panel. That creates a black mask, which hides the reflection-removal layer entirely and returns you to your original image.
-
Paint the Face Back In With White
Press B for the Brush Tool, set your foreground colour to white, and paint over the subject’s face. Only the areas you paint get the reflection-free version — everything else, including that arm it deleted, stays exactly as you shot it.
This “hide everything, reveal deliberately” pattern is worth internalising for any automatic tool. It’s faster than correcting an over-eager result and it makes every decision reversible. The same logic underpins our free guide to AI depth masking.
Clean Up What Survives
Stubborn glare tends to persist around the hairline and along the top of the cheekbones, where the reflection blends into genuinely bright areas.
-
Paint Over the Remaining Glare
Grab the Selection Brush Tool and paint over what’s left. Stay off the eyes — generative tools reconstruct irises and lashes badly, and it’s immediately obvious.
-
Generative Fill With Firefly Fill and Expand
Click Generative Fill in the contextual taskbar and choose the Firefly Fill and Expand model from the selector. Generate with no prompt. You get three skin variations — cycle all three, because one is usually noticeably better matched than the others.
Where This Goes Wrong
Skipping the Separate Layer
Run Reflection Removal without checking that box and the result is applied directly to your image. Every mistake it makes is now permanent, and the whole masking approach is unavailable.
Painting Over the Eyes
Generative Fill invents plausible-looking eyes, and plausible is not the same as the ones your subject has. Mask around them and fix any remaining catchlight issues by hand.
Accepting the First Variation
Three options come back for a reason. The difference between them is usually skin tone continuity at the edges of the fill, which is exactly what gives a retouch away.
Removing Every Highlight
Skin is supposed to have some specularity. Strip all of it and the face goes flat and matte, which reads as heavily edited even though technically nothing is wrong. Paint back only the glare that’s genuinely distracting.
What the Tool Changes About Retouching
The interesting shift isn’t that glare removal got faster — it’s that it moved from a repair job to a selection job. The hard part used to be reconstructing skin. Now the hard part is deciding which reflections should go and which are just how light behaves on a face.
That’s a better problem to have, and it’s a judgment call rather than a technical one. A portrait with zero specular highlight looks like a mannequin; a portrait with a window reflected across the forehead looks like a mistake. The right answer is somewhere in between and it moves depending on the shot.
Try It on a Difficult Frame
Edit > Reflection Removal with a separate layer at Best quality, Alt-click for a black mask, paint the face back in white, then Selection Brush plus Generative Fill on whatever’s left. Download the free sample image and PSD and run it through — then find a portrait you gave up on because of window glare, because that’s the shot this tool actually rescues. For a full portrait workflow around it, our PRO Natural Light Portrait Editing course covers the rest.
Quick Reference: Keys, Menus and Settings
- Run itClick the Background layer, Edit > Reflection Removal
- OptionsCreate separate reflection layer on, Quality: Best; no generative credits
- What you getA reflection layer (only the reflections) and a reflection removal layer above the original
- Show it only on the faceOn the removal layer, Option/Alt-click Add Layer Mask (black), then B and paint white over the face
- Check what it didShift-click the mask to toggle it
- Leftover glareSelection Brush over the spot (not the eyes), Generative Fill, model selector > Firefly Fill and Expand, Generate, pick a variation
- CreditsThe credits icon > Features shows what Generative Fill costs on your plan
Mac first, then Windows where they differ.

Free Downloads
Follow Along on the Same Photo
Get the sample image, the layered PSD with the reflection layers and the masked removal, and the PDF guide. Free with a PHLEARN account.
Reflection Removal: Common Questions
Where is Reflection Removal in Photoshop?
Click the Background layer and go to Edit > Reflection Removal. It’s new to the full build of Photoshop 2026; before this it only existed in Lightroom and Camera Raw.
Which options should I use?
There are only two. Turn on Create Separate Reflection Layer and set Quality to Best. It takes a minute or two to run.
Does it use generative credits?
No. It uses AI, but the removal itself doesn’t spend credits. The optional Generative Fill cleanup afterwards does, depending on the model and your plan.
What layers does it create?
A reflection layer that holds only the reflections it found, and a reflection removal layer with the cleaned result, both above the untouched original. That’s the advantage over Lightroom: you can mask each one.
It removed part of my subject. What now?
In the video it decided an arm was a reflection. Fix it with a mask: Option/Alt-click the Add Layer Mask icon on the removal layer to get a black mask, press B and paint white only over the face. The removal shows where you painted and the original shows everywhere else.
Some glare is still on the face. How do I finish it?
Use the Selection Brush over the leftover area, click Generative Fill, choose Firefly Fill and Expand in the model selector and generate. You get three variations; pick the one that fits. Keep it to the hairline and cheek; generating a whole new eye won’t look real.
Why do this in Photoshop instead of Lightroom or Camera Raw?
Those give you a slider for the amount and nothing else. Photoshop gives you layers, so you can keep the removal where it worked, mask it out where it didn’t, and clean up the rest with Generative Fill.
How good is it?
Very good where it works: the reflection right across the first subject’s face came off cleanly, which would be hard to do any other way. It isn’t perfect yet, so expect to mask and touch up.
Are the sample files free?
Yes, with a free PHLEARN account. You get the sample image, the layered PSD and the PDF guide.
Master Photoshop, Lightroom and Photography
Join PHLEARN PRO for $12.99 a month or $99.99 a year. Cancel anytime, with a 100% money-back guarantee.





