
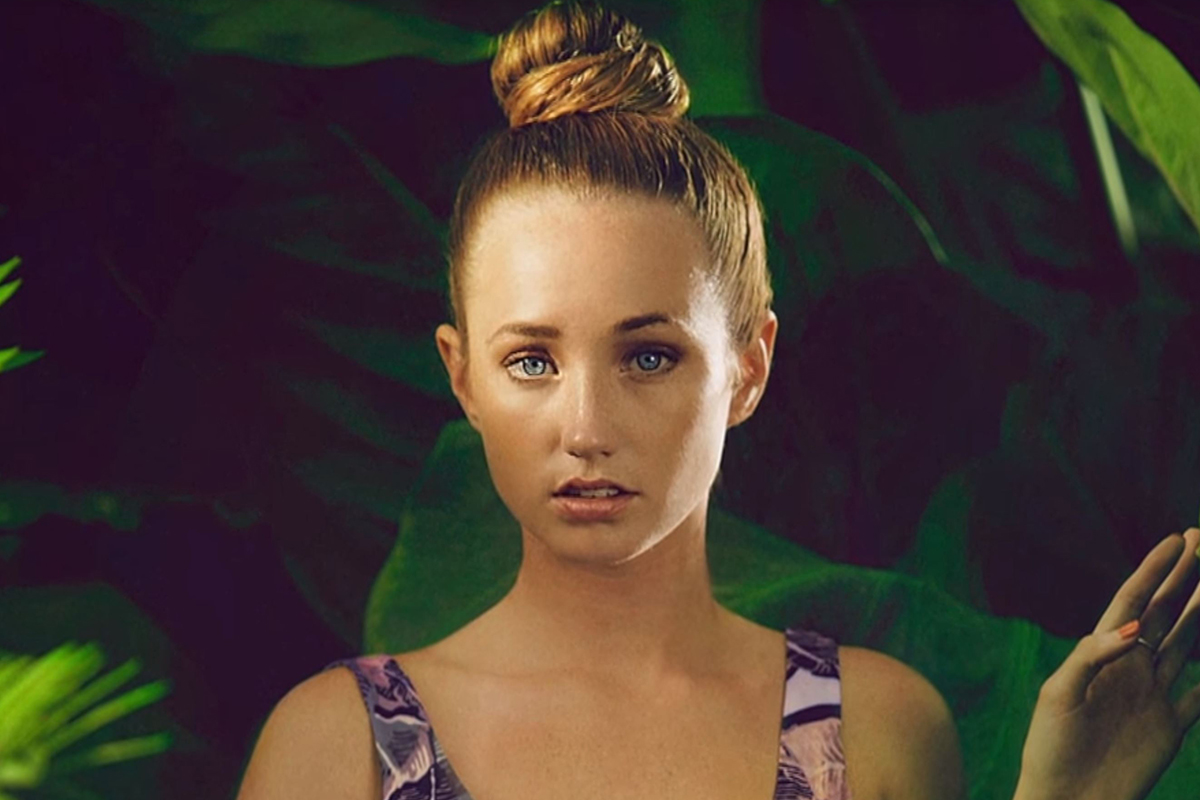

Shot inside a Chicago Botanical Gardens greenhouse, these images needed to read as an outdoor jungle. This behind-the-scenes photography breakdown shows how a wide aperture does that work in camera: choosing a fast lens, shooting wide open at f/2.8, moving the camera close to the subject while pushing the subject far from the background, then adding a rim light behind them so whatever detail the blur leaves is washed out by light.
We publish a new free tutorial every week, each one with sample images and PSDs you can download and follow along with. Sign up and they land straight in your inbox, along with early word on sales, events and subscriber-only offers.
Behind the Scenes: Use a Wide Aperture to Eliminate Distractions
Shooting in a Chicago Botanical Gardens greenhouse but wanting the final images to look like they were taken in a jungle outdoors, this behind-the-scenes setup relies on a shallow depth of field to obscure everything in the background that would otherwise give the location away.
Choosing a Wide-Aperture Lens
Getting a background this far out of focus starts with the right lens choice before anything else.
-
Shoot With a Fast, Wide-Aperture Lens
Use a lens capable of a wide maximum aperture, such as a 70-200mm f/2.8 zoom. If you don’t have access to something like that, a 50mm f/1.8 or 50mm f/1.4 lens, both relatively affordable options, will work just as well for this technique.
Why a Wide-Aperture Lens Is Worth the Investment
A wide maximum aperture is one of the most reliable ways to control how out of focus a background becomes, and lenses like a 50mm f/1.8 are inexpensive enough that this control is available even to photographers just starting to build a kit.
Setting a Low Aperture for a Shallow Depth of Field
Once you have a capable lens, the aperture setting itself is what actually creates the shallow depth of field.
-
Keep Your Aperture Low
Set your aperture as low as your lens allows — in this shoot, f/2.8 — to keep the background very out of focus while your subject in the foreground stays sharp.
Getting the Camera Close to Your Subject
The distance between camera and subject is the first of two distance relationships that determine how out of focus the background ends up.
-
Position the Camera Close to Your Subject
Move the camera as close to your subject as your lens’s focal length and framing allow, since a shorter camera-to-subject distance increases background blur at a given aperture.
Maximizing the Distance Between Subject and Background
The second distance relationship is just as important as the first, and in this shoot it’s what did most of the work hiding the greenhouse.
-
Keep the Subject Far From the Background
Position your subject as far from the background as the location allows. In this shoot, the photographer stood less than 10 feet from the subject, shooting at f/2.8 zoomed to 135mm, which pushed the background far enough out of focus that none of the greenhouse’s structure remained recognizable.
Why Distance Matters as Much as Aperture
A wide aperture on its own only goes so far if the subject is standing close to the background — the amount of background blur depends on the relationship between all three distances: camera to subject, and subject to background. Maximizing the gap between subject and background, while minimizing the gap between camera and subject, is what turns a wide aperture into a genuinely unrecognizable, out-of-focus background.
Using Backlighting to Further Obscure the Background
Beyond the optical blur from aperture and distance, lighting adds a second layer of concealment to the background.
-
Add a Light Behind Your Subject
Position a light source behind your subject, in addition to any ambient light such as sunlight coming from the front, to create a rim light effect around them.
Why a Rim Light Helps Hide Background Detail
A light placed behind the subject creates a bright rim and a wash of light in the background area behind them, which further obscures whatever detail the shallow depth of field hasn’t already blurred away. Instead of seeing distinguishable shapes in the background, the viewer sees mostly light, reinforcing the illusion that the shot was taken somewhere other than where it actually was.
Why This Approach Works
Disguising an unwanted location entirely in-camera comes down to combining three factors that all push in the same direction: a wide-aperture lens capable of shallow depth of field, camera and subject distances arranged to maximize that background blur, and a rim light that obscures whatever detail the blur alone doesn’t fully hide. None of these three tricks alone would have been enough to make a glass-walled greenhouse read as an outdoor jungle setting, but stacked together they eliminate the visual cues that would otherwise give the location away, without needing any correction after the fact.
Final Thoughts
This is a genuinely useful technique whenever you’re stuck shooting somewhere that doesn’t match the mood or setting you’re going for — a rained-out outdoor shoot forced indoors, an inconvenient location, or a background you simply can’t change. Pairing a fast lens and low aperture with deliberate distance choices, then reinforcing the effect with a background light, is a combination worth remembering any time the environment itself is working against the shot you actually want.
Quick Reference: Settings and Tips
- LensA fast lens: f/2.8 zoom in the video, or a 50mm f/1.8 or f/1.4
- ApertureAs low as the lens allows; f/2.8 here
- Camera to subjectAs close as possible; under 10 feet at 135mm in this shoot
- Subject to backgroundAs far as the location allows
- BacklightA light behind the subject for a rim and a wash of light over the background
Shallow Depth of Field: Common Questions
How can I hide a location that doesn’t fit the shot?
Throw the background out of focus with a shallow depth of field. In this shoot, a greenhouse at the Chicago Botanical Gardens ends up looking like an outdoor jungle because none of its structure stays recognizable.
What lens works best for a blurry background?
A lens with a wide maximum aperture. Aaron shoots this one with an f/2.8 zoom, and says a 50mm f/1.8 or a 50mm f/1.4 works great too.
Is there an affordable lens for this?
Yes. A 50mm f/1.8 costs a couple hundred dollars, according to the video, and gives you the wide aperture this technique needs.
What aperture should I use?
Keep it as low as your lens allows. Here that is f/2.8, which keeps the subject sharp while the background goes very out of focus.
Does distance change how blurry the background is?
Yes, as much as the aperture does. Get the camera as close to your subject as you can, and keep the subject as far from the background as the location allows.
What settings were used in this shoot?
Aaron stands less than 10 feet from the model, shooting at f/2.8 zoomed in to 135mm. The greenhouse is far behind her, so it all goes soft.
Why put a light behind the subject?
It creates a rim of light around the subject and fills the background with light, so you see a glow instead of detail. That hides the location even more.
What lights the subject from the front?
A little sunlight coming into the greenhouse. The added light is the one behind the subject, working with that ambient light.
When is this technique most useful?
Any time the location works against the look you want. This shoot moved into the greenhouse after getting rained out, and the shallow focus kept it looking like an outdoor scene.
From the Magazine View all
Stories, interviews and guides for photographers, new every week.
 EditingLightCraft vs Lightroom: I Edited the Same RAW Files in BothThe free clone on the same RAW files: what matches, what breaks and who should switch.
 InspirationRare Historical Photos: 13 of the Rarest Pictures Ever TakenFrom the earliest surviving picture of a person to the last passenger pigeon: who took each one and why it survives.
 EditingArtCraft: Photoshop Cloned by AI in Two Weeks. Is It Legal?ArtCraft cloned Photoshop and Lightroom with AI and gave them away. Any good? Legal? Safe?
Master Photoshop, Lightroom and Photography
Join PHLEARN PRO for $12.99 a month, or $99.99 a year (save 36%). Cancel anytime, with a 100% money-back guarantee.





