
Download Assets
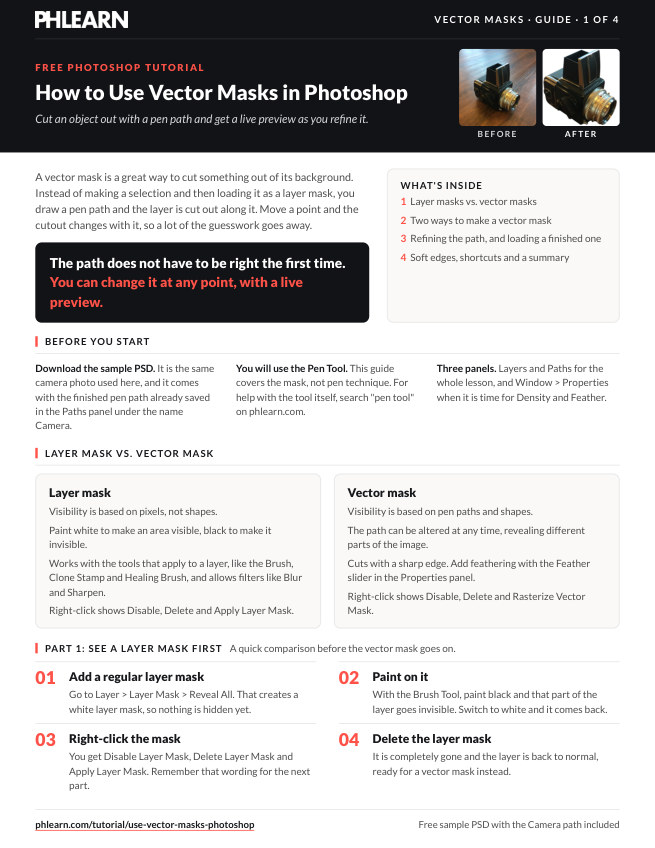
This tutorial includes 1 sample PSD and 1 PDF guide. Downloads are free with a PHLEARN account.
- Download the sample images and PSDs from every free tutorial on PHLEARN
- New free tutorials published every week
- One free account — sign up once, then download anything
Free PDF Guide · 4 Pages
This Tutorial as a Step-by-Step PDF
The guide walks through tracing a new path in the Paths panel and applying Layer > Vector Mask > Current Path, moving points with Ctrl/Command, turning points into curves with Alt/Option, lowering Density in Window > Properties, and softening the edge with Feather or Rasterize Vector Mask. Keep it next to your keyboard.
description
A vector mask is defined by a pen path rather than painted pixels, which means two things a layer mask cannot offer: a perfectly crisp edge, and a cutout that updates live as you drag points around. Rough the path in, then refine it — Ctrl/Cmd to move a point, Alt/Option-drag to turn a corner into a curve. Feather it in the Properties panel, or rasterize it to a layer mask when you want to blur or paint on it.
Enjoying This Free Tutorial?
We publish a new free tutorial every week, each one with sample images and PSDs you can download and follow along with. Sign up and they land straight in your inbox, along with early word on sales, events and subscriber-only offers.
How to Use Vector Masks in Photoshop
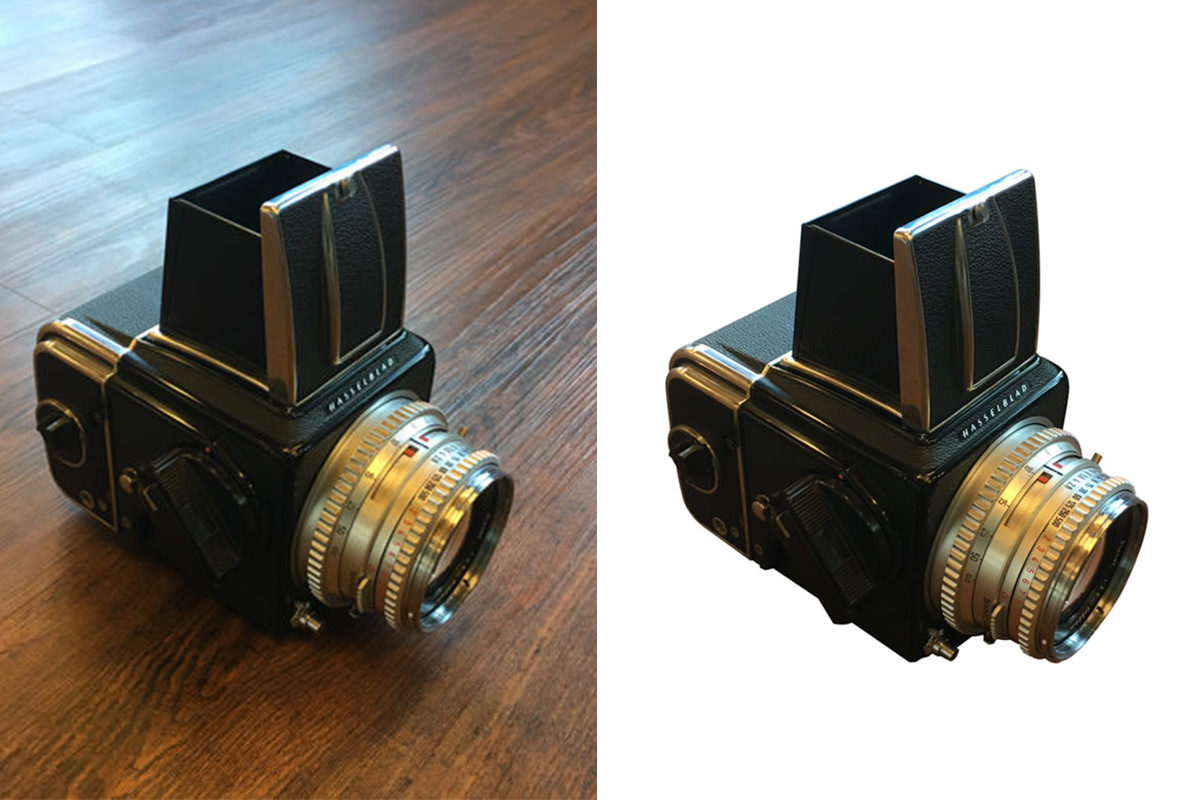
Vector masks offer a different way to cut an object out of its background: instead of painting a selection by hand, you draw a pen path and get a live preview of the cutout as you refine it. In this tutorial we’ll compare vector masks to regular layer masks, cut out an object with the Pen Tool, edit the path after the fact, and soften the edge with Feather, or convert the finished vector mask into a regular layer mask when you want to blur or paint on it.
Vector Mask vs. Layer Mask
A regular layer mask, added through Layer > Layer Mask > Reveal All, is controlled by painting black or white directly onto it with tools like the Brush Tool, Clone Stamp, or Healing Brush, black hides, white reveals. A vector mask, added through Layer > Vector Mask > Reveal All, works differently: it’s controlled entirely by a pen path rather than painted pixels. Right-clicking either type of mask in the Layers panel shows options like Disable, Delete, and either Apply Layer Mask or Rasterize Vector Mask, confirming which type you’re working with.
Adding a Vector Mask
To see the idea quickly, select your layer and go to Layer > Vector Mask > Reveal All to add an empty vector mask, then click on the mask thumbnail to make sure it’s active. Select the Pen Tool (P) and begin clicking around your object to build a path. As you add points, Photoshop shows you a live preview of exactly what the path is cutting out, letting you see your result take shape in real time rather than guessing until you’re done.
Cutting Out an Object with the Pen Tool
That rough pass is only a demo, so drag that practice mask to the trash. For the real cutout, open the Paths panel, create a new path and trace the object with the Pen Tool. Click to place straight points around simple, angular edges, or click and drag to pull out curved handles when tracing a rounded edge. Work your way fully around the object until the path connects back to its starting point, then, with the layer selected, go to Layer > Vector Mask > Current Path, and Photoshop will cut out whatever falls inside the path.
Editing Points After the Path Is Created
One of the biggest advantages of a vector mask is that the path never has to be perfect on the first attempt. Hold Ctrl (Cmd on Mac) to get the direct selection arrow, then click and drag any existing point to reposition it, watching the cutout update live as you adjust. This means you can rough out a path quickly and refine it afterward, rather than needing to trace perfectly the first time through.
Getting a Live Preview of Your Cutout
Because the mask updates instantly as you edit the path, you can drop in a placeholder layer, like a solid color adjustment layer, behind your object to see exactly how the edge reads against a new background while you’re still refining the path itself.
Adjusting Mask Density to See Through It
If you want to check what’s hidden behind the mask without deleting any of your work, go to Window > Properties while your vector mask is selected. Lower the Density slider to see partially through the mask, which is useful for confirming your path lines up correctly with the edge of your object underneath. Bring Density back up to 100% once you’re done checking, since the change isn’t permanent and doesn’t affect your actual path.
Turning Straight Points into Curves
If part of your path came out too angular where the actual object has a smooth curve, hold Alt (Option on Mac), then click and drag out from that point to convert it into a curve with adjustable handles. Repeat this along any edge that needs smoothing, checking the live cutout preview as you go until the curve matches the object’s actual shape.
Loading a Pre-Made Path
If you’ve already built a clean path in the Paths panel, perhaps from a previous session spent carefully tracing an object, you don’t need to redraw it. Select your layer, go to Layer > Vector Mask > Current Path, and Photoshop applies whichever path is currently active in the Paths panel as the new vector mask, immediately cutting out the object along that path, gears, fine edges, and all.
Converting a Vector Mask to a Layer Mask
A vector mask produces perfectly crisp, hard edges by nature, which is exactly what a path-based cutout gives you. Sometimes, though, a slightly softer edge helps an object blend more naturally into a new background. You can add a little Feather to the vector mask itself in the Properties panel. For more control, right-click the vector mask and choose Rasterize Vector Mask to convert it into a standard, paintable layer mask.
Feathering the Edge
Once rasterized, you can feather the edge directly from the Properties panel’s Feather slider, or apply a filter like Gaussian Blur (Filter > Blur > Gaussian Blur) directly to the mask for a stronger, more diffused softening. After rasterizing, you can also paint directly on the mask with black or white using the Brush Tool for further manual touch-ups. If you ever want to undo a mistake and return to a perfectly crisp cutout, delete the rasterized layer mask and reapply your original path with Layer > Vector Mask > Current Path, since the path itself remains intact in the Paths panel even after rasterizing a copy of it.
Why This Approach Works
Vector masks work well for precise cutouts because the mask is defined mathematically by the path rather than by individually painted pixels, which is what makes the edge perfectly crisp and infinitely editable. Since the path stays a live, adjustable object rather than a committed brush stroke, you can rough out a rough shape quickly and refine individual points and curves later without redoing your work from scratch, something a painted layer mask can’t offer in the same way. Feathering in Properties, and rasterizing only when you want to blur or paint on the mask, keeps that flexibility intact for as long as possible, since converting to a layer mask trades away the ability to keep editing the path afterward.
Final Thoughts
Vector masks are a genuinely useful alternative to painted layer masks whenever you need a precise, editable cutout with a live preview as you work. Draw a rough path first, refine individual points and curves with the direct selection arrow, then feather it in Properties, or rasterize to a regular layer mask when you want to blur or paint on it. Once you get comfortable moving points and converting corners to curves, it becomes one of the fastest ways to cut a clean object out of its background.
Quick Reference: Keys, Menus and Settings
- Add a vector maskLayer > Vector Mask > Reveal All, click the mask, Pen tool (P)
- Move a pointHold Cmd/Ctrl and drag the point
- Corner to curveHold Alt/Option and drag out from the point
- See through the maskWindow > Properties: lower Density, then back to 100%
- Use a saved pathClick the path in the Paths panel, then Layer > Vector Mask > Current Path
- Soften the edgeProperties: Feather, or right-click > Rasterize Vector Mask, then Filter > Blur > Gaussian Blur
No AI, no generative credits.
Free Downloads
Follow Along on the Same Photo
Get the PSD of Aaron’s Hasselblad film camera with the finished camera path already saved, plus the PDF guide. Free with a PHLEARN account.
Vector Masks in Photoshop: Common Questions
What’s the difference between a vector mask and a layer mask?
You paint a layer mask black or white with tools like the Brush. A vector mask is shaped by a pen path, and you edit it by moving the path’s points.
How do I add a vector mask?
Go to Layer > Vector Mask > Reveal All, click the mask thumbnail, then draw around the object with the Pen tool (P). The cutout previews live as you add points.
How can I tell which kind of mask I have?
Right-click the mask thumbnail. A vector mask offers Disable Vector Mask and Rasterize Vector Mask; a layer mask offers Disable Layer Mask and Apply Layer Mask.
How do I fix a point in the wrong place?
Hold Cmd/Ctrl to get the white arrow, then click and drag the point. The cutout updates as you move it.
How do I turn a sharp corner into a curve?
Hold Alt/Option and drag out from the point to pull out curve handles, then shape the curve until it follows the edge.
How do I see what the mask is hiding?
Select the mask and open Window > Properties, then lower Density to see through it. Bring Density back up to 100% when you’re done; it isn’t permanent.
Can I use a path I already drew?
Yes. Click the path in the Paths panel, select the layer and go to Layer > Vector Mask > Current Path.
How do I soften the edge of a vector mask?
Add Feather in the mask’s Properties. For more control, right-click and choose Rasterize Vector Mask, then blur it with Filter > Blur > Gaussian Blur or paint on it like any layer mask.
I messed up the rasterized mask. Can I get the clean cutout back?
Delete the mask, click your path in the Paths panel again and go to Layer > Vector Mask > Current Path. The path is still there.
Are the sample files free?
Yes, with a free PHLEARN account. You get 1 sample PSD and 1 PDF guide: the camera photo with Aaron’s camera path saved in it.
From the Magazine View all
Stories, interviews and guides for photographers, new every week.
 EditingLightCraft vs Lightroom: I Edited the Same RAW Files in BothThe free clone on the same RAW files: what matches, what breaks and who should switch.
 InspirationRare Historical Photos: 13 of the Rarest Pictures Ever TakenFrom the earliest surviving picture of a person to the last passenger pigeon: who took each one and why it survives.
 EditingArtCraft: Photoshop Cloned by AI in Two Weeks. Is It Legal?ArtCraft cloned Photoshop and Lightroom with AI and gave them away. Any good? Legal? Safe?
Master Photoshop, Lightroom and Photography
Join PHLEARN PRO for $12.99 a month, or $99.99 a year (save 36%). Cancel anytime, with a 30-day money-back guarantee.