How to Know Which Aspect Ratio to Use in Your Photography
What is an aspect ratio, and how is it different from your image resolution? There’s so many different ratios to calculate, so how do you know which one is best for your photography? In this guide, we’ll show you the most common aspect ratios in Photography and break down the rules on when to use each aspect ratio.
Most photographers have a general idea of what we’re talking about when we discuss “aspect ratio,” but would be hard-put to define it in their own words. “It’s to do with the size of the image,” is what most people finally settle on. Well today we’re going to go in-depth about this term, so the next time you hear aspect ratio being discussed you can jump right in! (Hint: it’s not so much about size as it is about shape.)
What Exactly Is It, Though?
For any given photo, aspect ratio describes the proportional relationship between your image’s width and height. You can find aspect ratios that are commonly used in photography and film in many of the objects in the world around you. In fact, you needn’t look further than your TV screen (or computer) to find examples:
- Your old-school TV/computer display has a 1.33:1 aspect ratio (almost a square).
- A ratio like this means the image on the screen may be smaller than it was originally, or the edges have been cut off so the image can fit onto your screen.
- Your TV (for example, those equipped with HDTV) has an aspect ratio of 16:9 (this is a widescreen format, where the width is just about twice as long as the height).
- This type of ratio captures the effects of high definition technology to their fullest.
- Your local in-theater or home movie theaters typically have an aspect ratio of 2.35:1 (widescreen CinemaScope format).
- This ratio is specially designed to help you become immersed in the show.
As you read through these examples, you may have realized that ratios can completely transform the viewing experience of your photos. So you can probably see why it’s talked about so often, because it’s important stuff for you to understand! Now that you know what a few ratios look like (keep them filed away as reference points for when you do your own shooting), let’s talk more about what you need to know to make use of them as a photographer.
Let’s Write Ratios!
You’ll want to know the correct way to write an aspect ratio, since putting even one number in the wrong place can really bungle things up. First of all, an aspect ratio starts with the number associated with the width, separated by a colon from the number associated with the height, like so:
x:y (the width always comes first)
The x:y is an expression of a ratio, so you will encounter different sizes of photographs that use the same ratio. For instance, if you shoot a 6 x 4″ photo, you’ve just captured an image with a ratio of 3:2. If you shoot an image of roughly 8 x 5.3″, you’ve still captured an image with the same ratio of 3:2.
So when it comes down to it, aspect ratio doesn’t really have that much to do with the size of your image at all.
The ratio is directly determined by the size of your camera sensor, but most of the newer DSLRs allow you to change the aspect ratio. The following graphic illustrates how you can change the aspect ratio within the limited size of a particular sensor below:
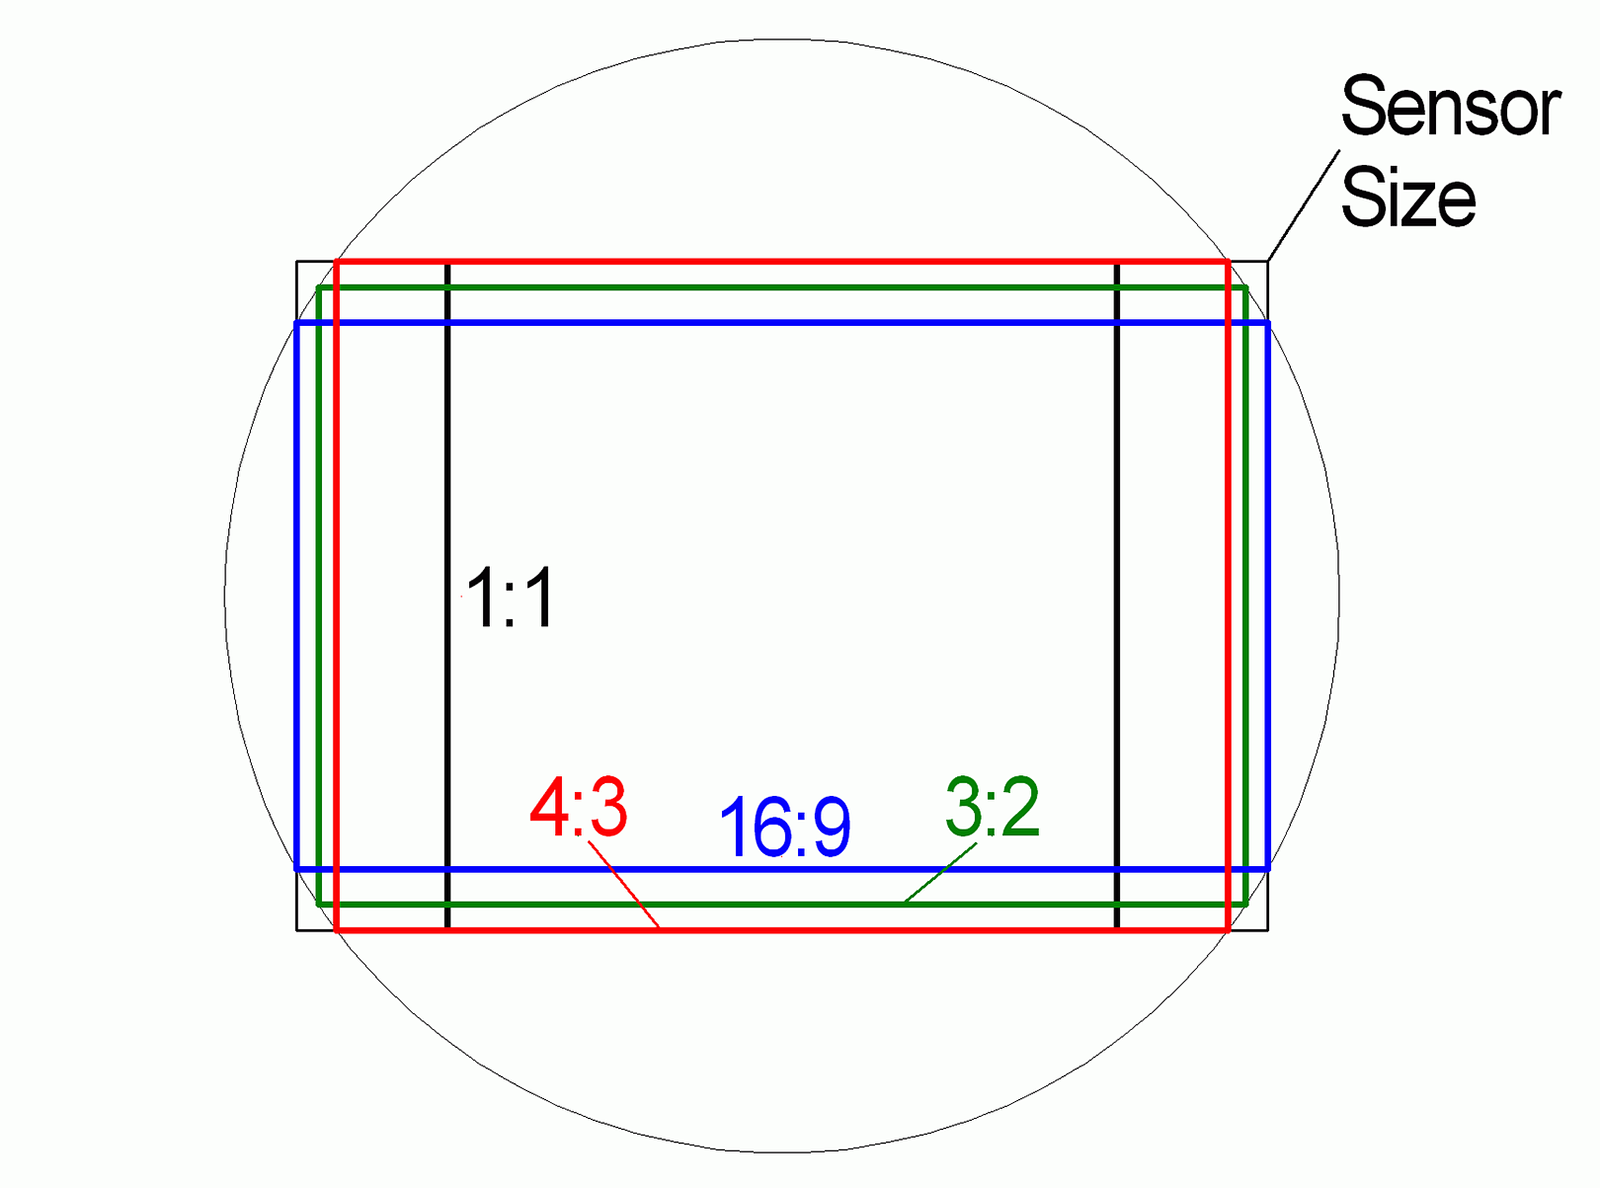
Image by WikimediaImages from Pixabay
Why Is Aspect Ratio Important?
1. For Technical Reasons
You’re going to need to understand aspect ratios when you’re posting your photographs online.
For instance, the aspect ratio of your Facebook profile pic will be different when you’re viewing it on a medium like your phone, as opposed to viewing it on your laptop. Because of this, the various social networking platforms or website builders will force you to fit your photos within standard aspect ratios. If you don’t want your profile pic distorted, stretched, or cut off, you’re going to want to match the ratio of your profile pic to their standard aspect ratio (see our section on social media below for a list of aspect ratios a few social networking sites prefer).
The same idea applies if you’re going to be printing your photos. If your aspect ratio doesn’t match the size of your print, you may end up with a cropped or stretched photo.
Pro Tip
If you’re planning on printing your photos, you’ll need to know which ratios are required for common print sizes:
- 6 x 4” = 1.5:1 ratio
- 7 x 5” = 1.4:1 ratio
- 10 x 8” = 1.25:1 ratio
- 11 x 8.5” = 1.29:1 ratio
2. For Aesthetic Reasons
- Changing the ratio will impact where your subject is positioned in relation to the sides of the frame. If you have an important feature positioned near an edge, you could lose it altogether with the wrong ratio.
- Your aspect ratio can be used to convey emotion. For example, a ratio of 2:35 allows for negative space within a photograph. You can use this space to create an expansive quality in your landscape or evoke feelings of loneliness and isolation in your portrait.
- Changing your aspect ratio may also help if you feel you have some extra “room” in your photo (this often applies more to vertical images). A vertical image may be too roomy at a ratio of 2:3, while a ratio of 4:5 could give the photo a snugger frame, resulting in a more appealing composition.
Ratio Problems to Avoid
- If you shot according to the rule of thirds using a 4:3 ratio, and then needed to create prints with a 3:2 ratio, the composition of the shot may not adhere to the rule of thirds anymore.
- You may see a large dip in quality when attempting to shoot a ratio that’s larger than the ratio of your camera’s sensor:
- If your sensor’s ratio is 4:3 (a micro four-thirds camera), your best bet is to shoot in 4:3 or 1:1. If you try to shoot in 3:2 or 16:9 with this sensor, you may end up having to crop your photo substantially (which will mean a drop in image quality).
- To avoid this issue, you may want to consider purchasing a camera with a larger sensor size. Buying a camera with a larger sensor will not only give you more options for ratios but comes with other benefits as well (including better low-light photos, increased dynamic range, and more background blur).
In the next few sections, we’ll dig deeper into aspect ratios and discuss:
- Whether you should make ratio adjustments before you shoot – or shoot first, then adjust your ratio later
- How the ratios available on your camera will impact your shots
- Common and not-so-common ratios and where you might use them
- Which ratios to use for social networking apps and websites
- The Golden Ratio (another composition method to put in your toolbox)
- Film preferences (because cinematographers also keep a keen eye on their aspect ratios)
- Perfecting proportion in your post-processing (tips and tricks to keep your image high quality)
![]()
Photo by rawpixel on Unsplash
Deciding on the Aspect Ratio Before Shooting vs. Cropping in Photoshop
There was a time when DSLRs weren’t even capable of allowing users to change aspect ratios while shooting. Back then, the dimensions of your camera’s sensor (or the film type, along with the camera’s design) would dictate the ratio. For example, a sensor that’s 1.5 times as wide as it is high produces a ratio of 3:2. A 35mm crop sensor, full-frame SLRs, and most 35mm film cameras produce this ratio.
Now, thankfully, you can choose whether to change the ratio while out in the field or crop your photos in post-processing.
If you choose your ratio before shooting, you will have the advantage of being able to literally visualize what your image will look like after it’s been cropped. You will be able to see the cropped image either on an electronic viewfinder or on your camera’s LCD screen in Live View mode.
There is one drawback to choosing the ratio while shooting: if you choose to shoot your photos in JPEG, your camera will crop your image. There is no way to retrieve the parts of the photo that were cropped. (Psst… you can solve this problem by shooting in RAW mode.)
If you can’t change your camera’s aspect ratio, post-production may be the only way you can crop your photos. And even if your camera does have that capability, many find cropping to just be easier. It also allows for more flexibility, as you can create multiple versions of an image from a more generous starting point without “losing” the information for good.
Pro Tip
It’s easy to change the aspect ratio on your smartphone, too. The iPhone is capable of taking photos in 1:1 (square), 16:9 (panoramic, which is best for video), and the default mode, 4:3.
In the Photos app, you can also crop your image anywhere from 1:1 to 9:16 (remember that the ratio is always width:height, so some of these will work best in portrait mode and others in landscape).
To find the aspect ratio options on an iPhone image, you simply:
- Select your photo.
- Click on Edit in the top right corner.
- Select the Crop button (to the right of Cancel).
- Then, hit the Ratio button (above Done).
- Select a ratio from the menu, and the new ratio will be applied.
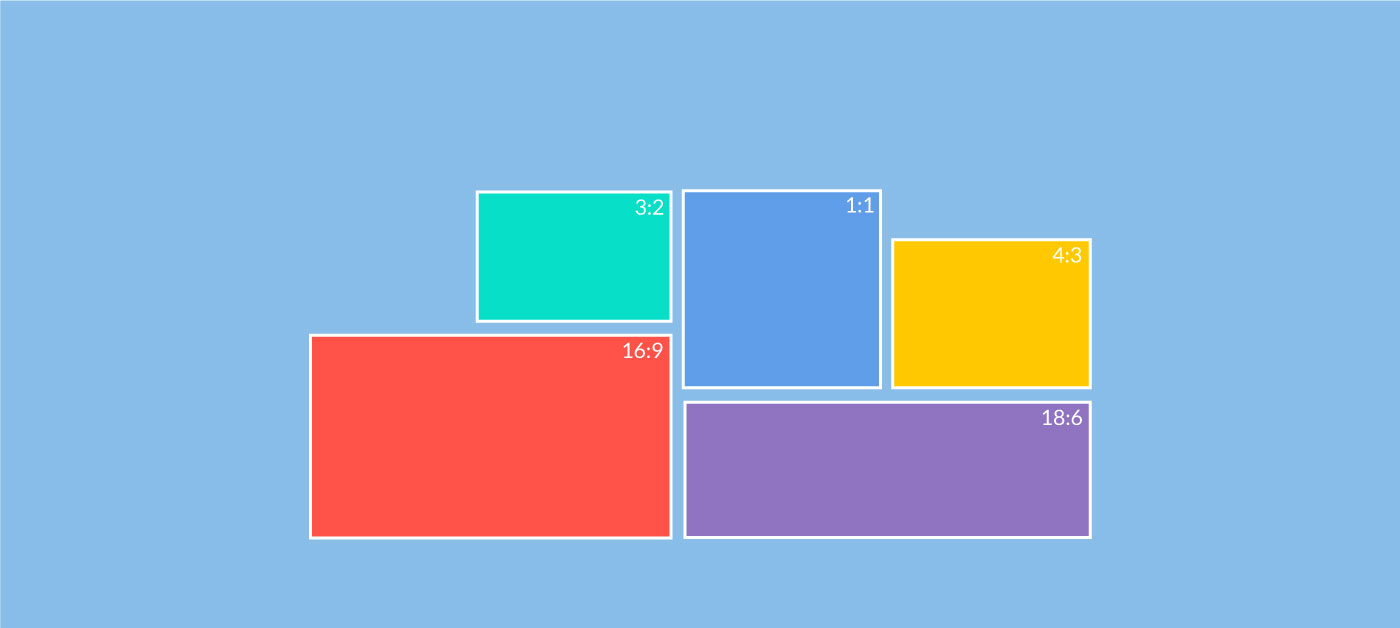
Examples of Aspect Ratios
There are a handful of standard ratios that will be more widely accepted. When you’re sharing your work across lots of platforms, it’s sometimes helpful to know exactly what your image is going to do when it’s viewed by your audience, so that’s a point in favor of “tried and true” ratios.
However, it’s entirely too easy to get stuck in a rut and use the same aspect ratio for everything. Choosing the safest bet every time will seriously cut down on your potential for variety, and it’s not so great for creativity as well. Photographers, as artists, should spend a lot of time thinking outside the box… no matter what shape it is.
Here are some examples of what you can do with different ratios:
4:3
A 4:3 ratio is compatible with printed 5 x 7” or 8 x 10” photos. Landscape photography often works well in this type of format, since it’s wider than it is tall. As you can see below, your eye has a lot of room to travel across the scenery.

Photo by Tom Grimbert (@tomgrimbert) on Unsplash
3:2
The 3:2 ratio corresponds to the classic 4 x 6” photo (the default ratio for 35mm cameras) and is slightly wider than a 4:3. This photographer used the extra space to give the subject a little breathing room, keeping the negative space interesting with the lines running behind her.
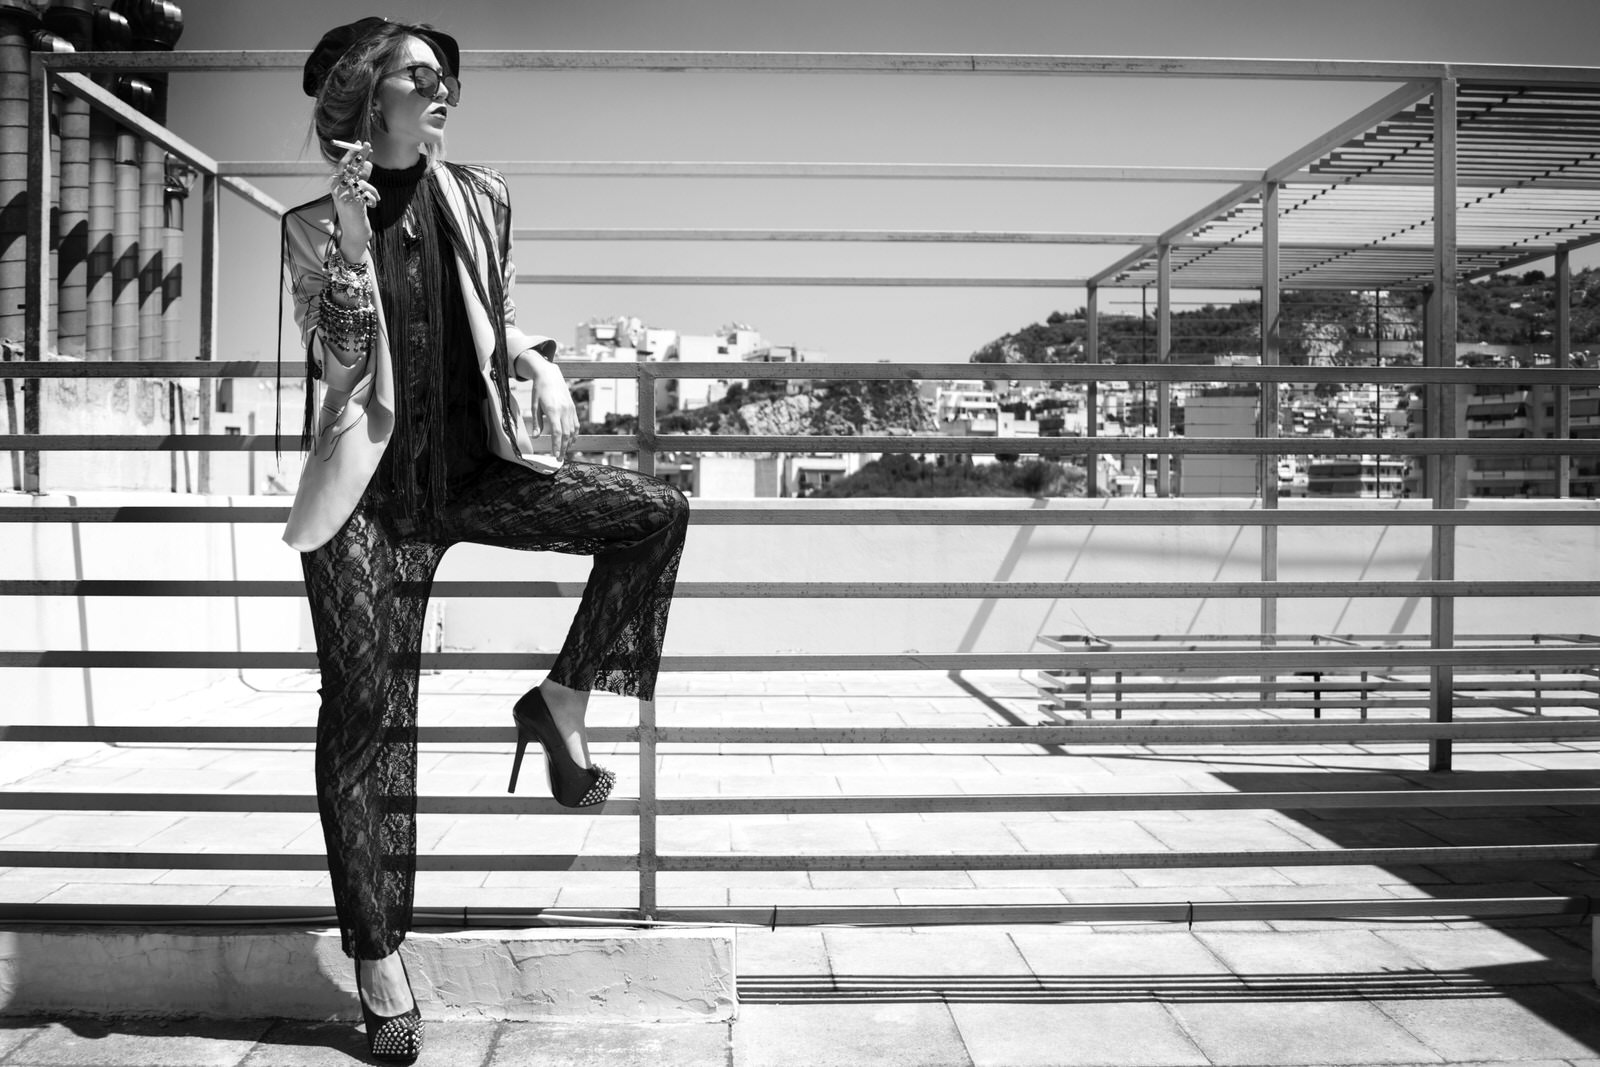
Photo by Jacob Nizierski on Unsplash
16:9
This looks like part of a story to us. The 16:9 ratio is commonly used as part of cinematography for just that reason. This size is also considered panoramic. In the late 2000s, this ratio became more popular than the 4:3 style for movie-watching. These days, it’s also the norm for online videos.
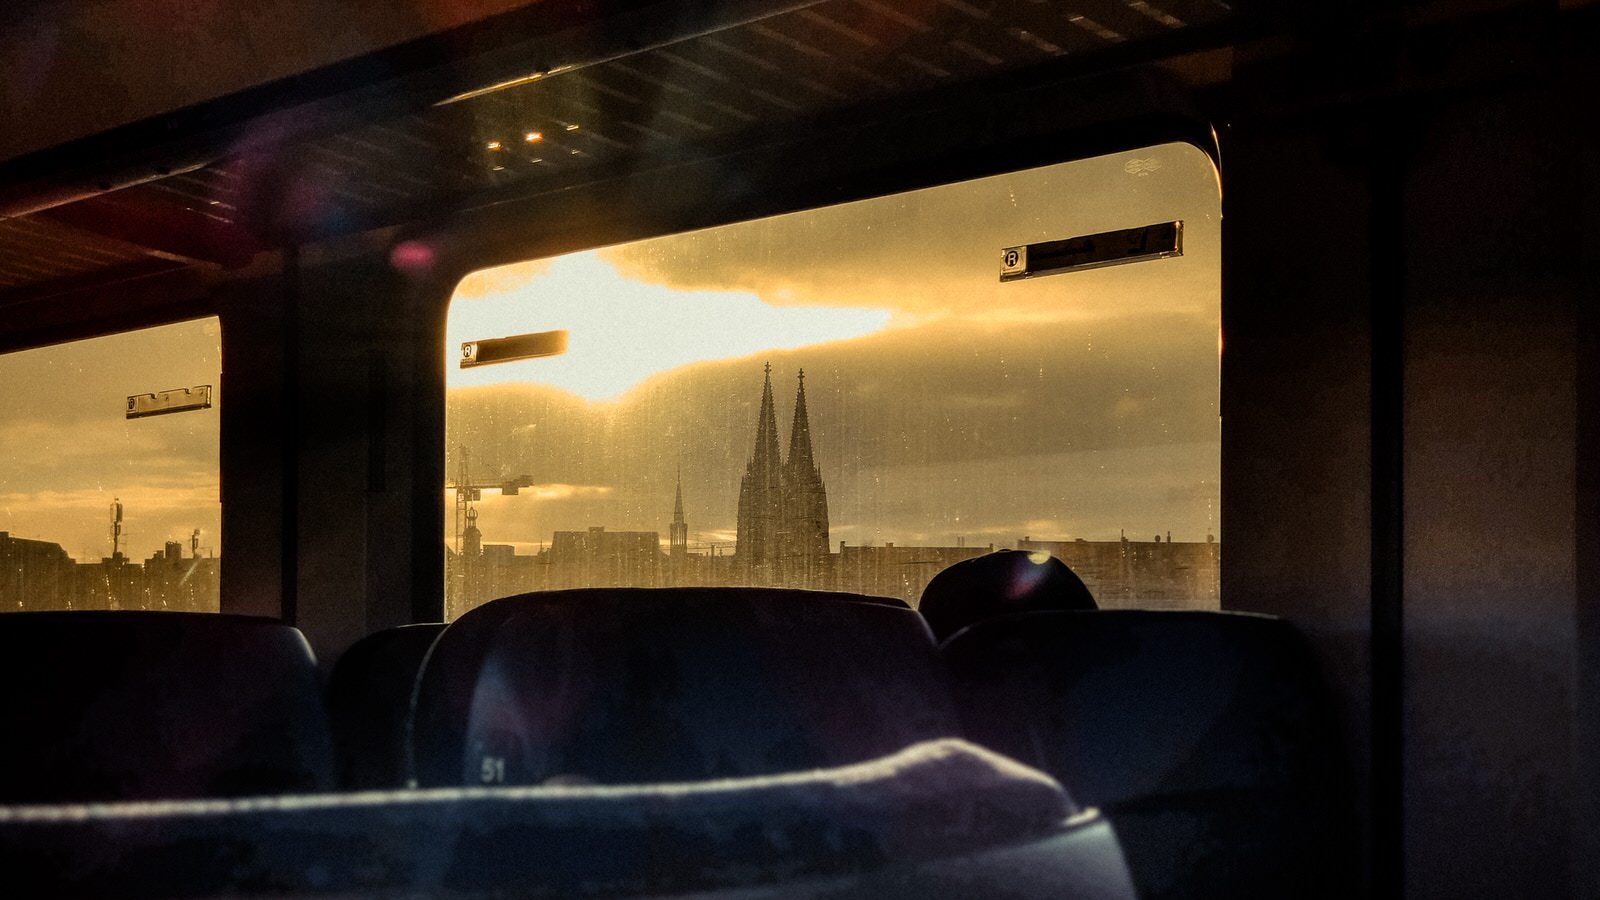
Photo by Mika Baumeister on Unsplash
Lesser-Used Ratios
1:1
The photographer below has created a stunning visual effect by capturing a square within a square shot. Since your eye isn’t pinging around from side to side or top to bottom, you really feel like you’re going through the photo to see what’s beyond that window.
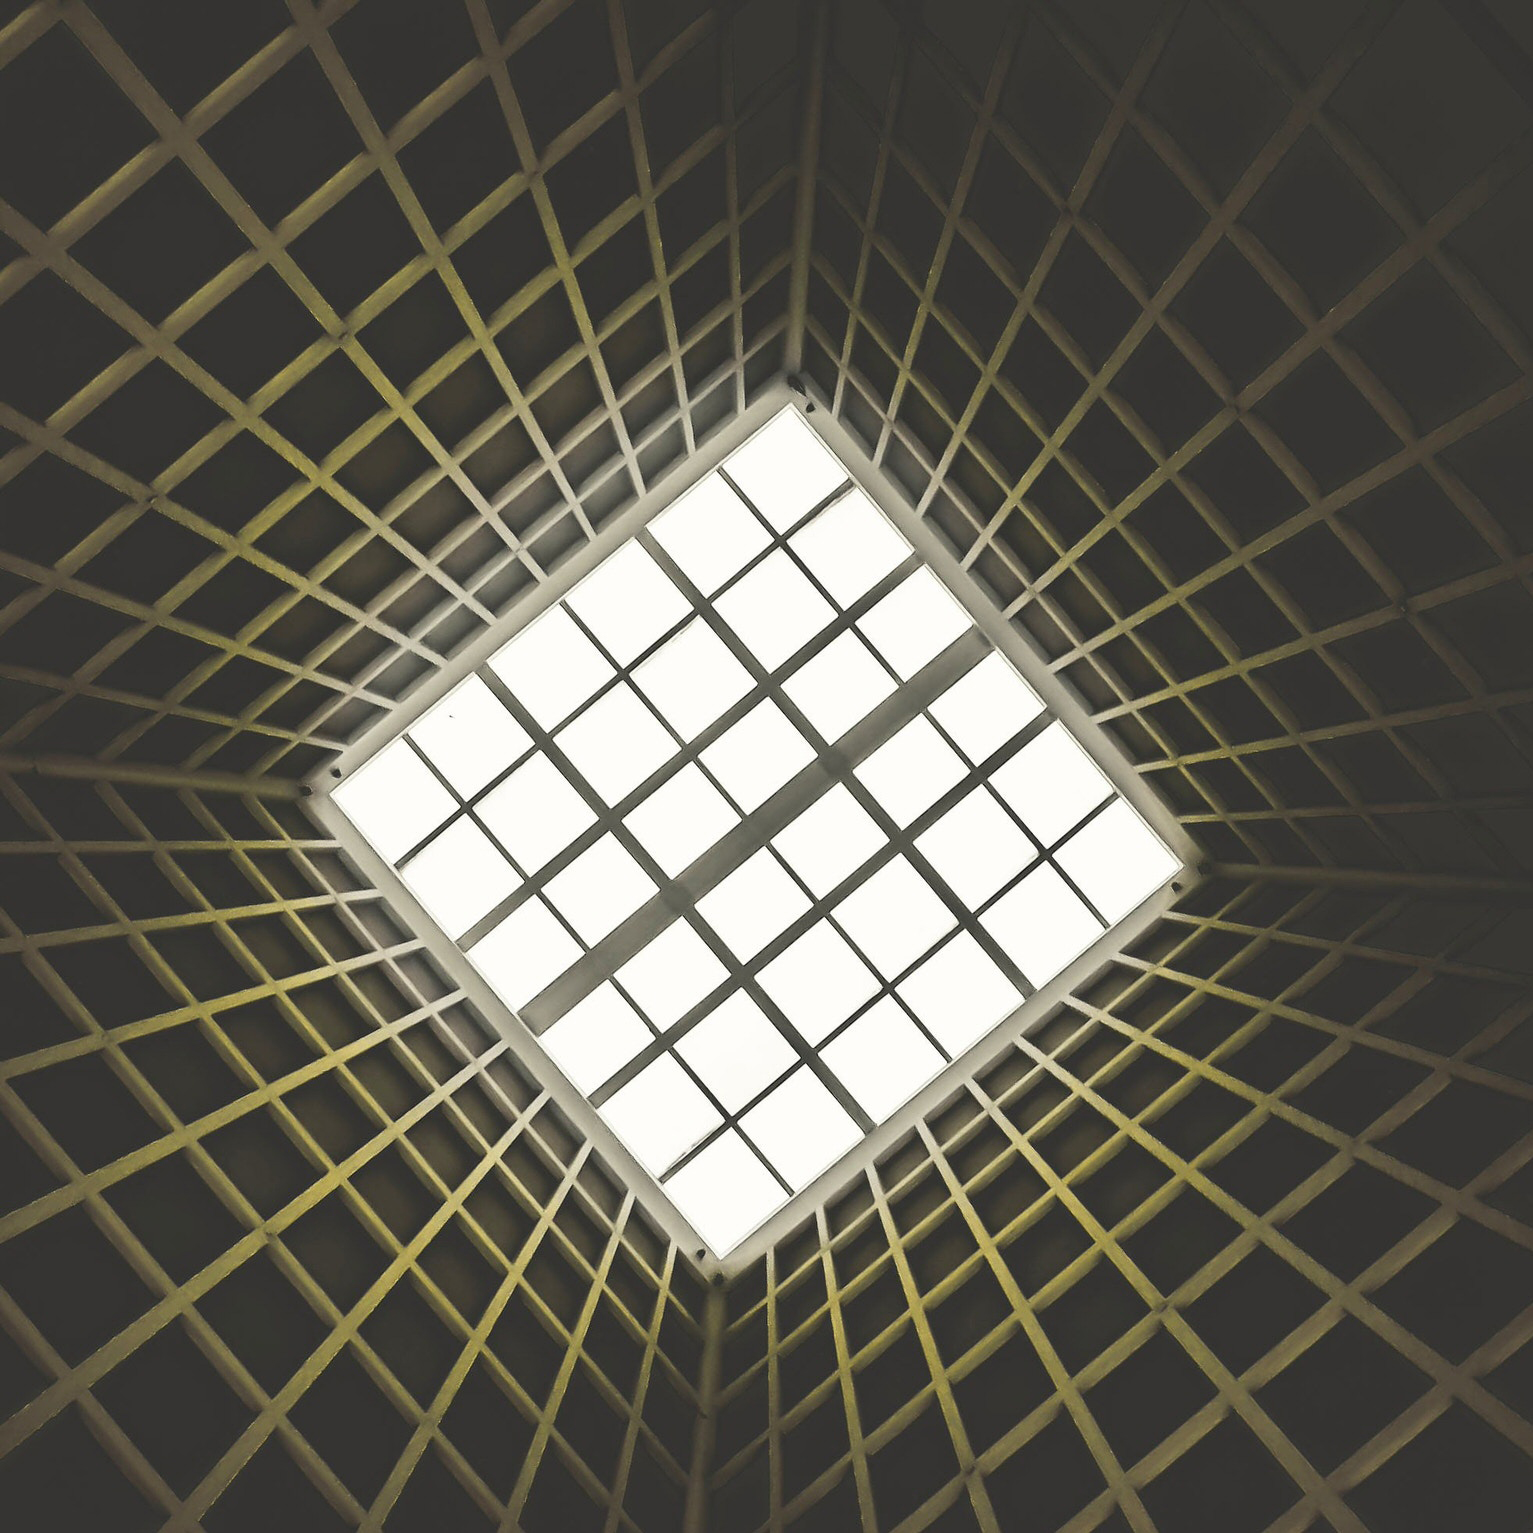
Photo by Dhruv Deshmukh on Unsplash
A 1:1 ratio can also be applied to simplify an image. Many photographers stick to a minimalistic theme in the scenes they shoot square, exemplified in the simple, but powerful image seen here:
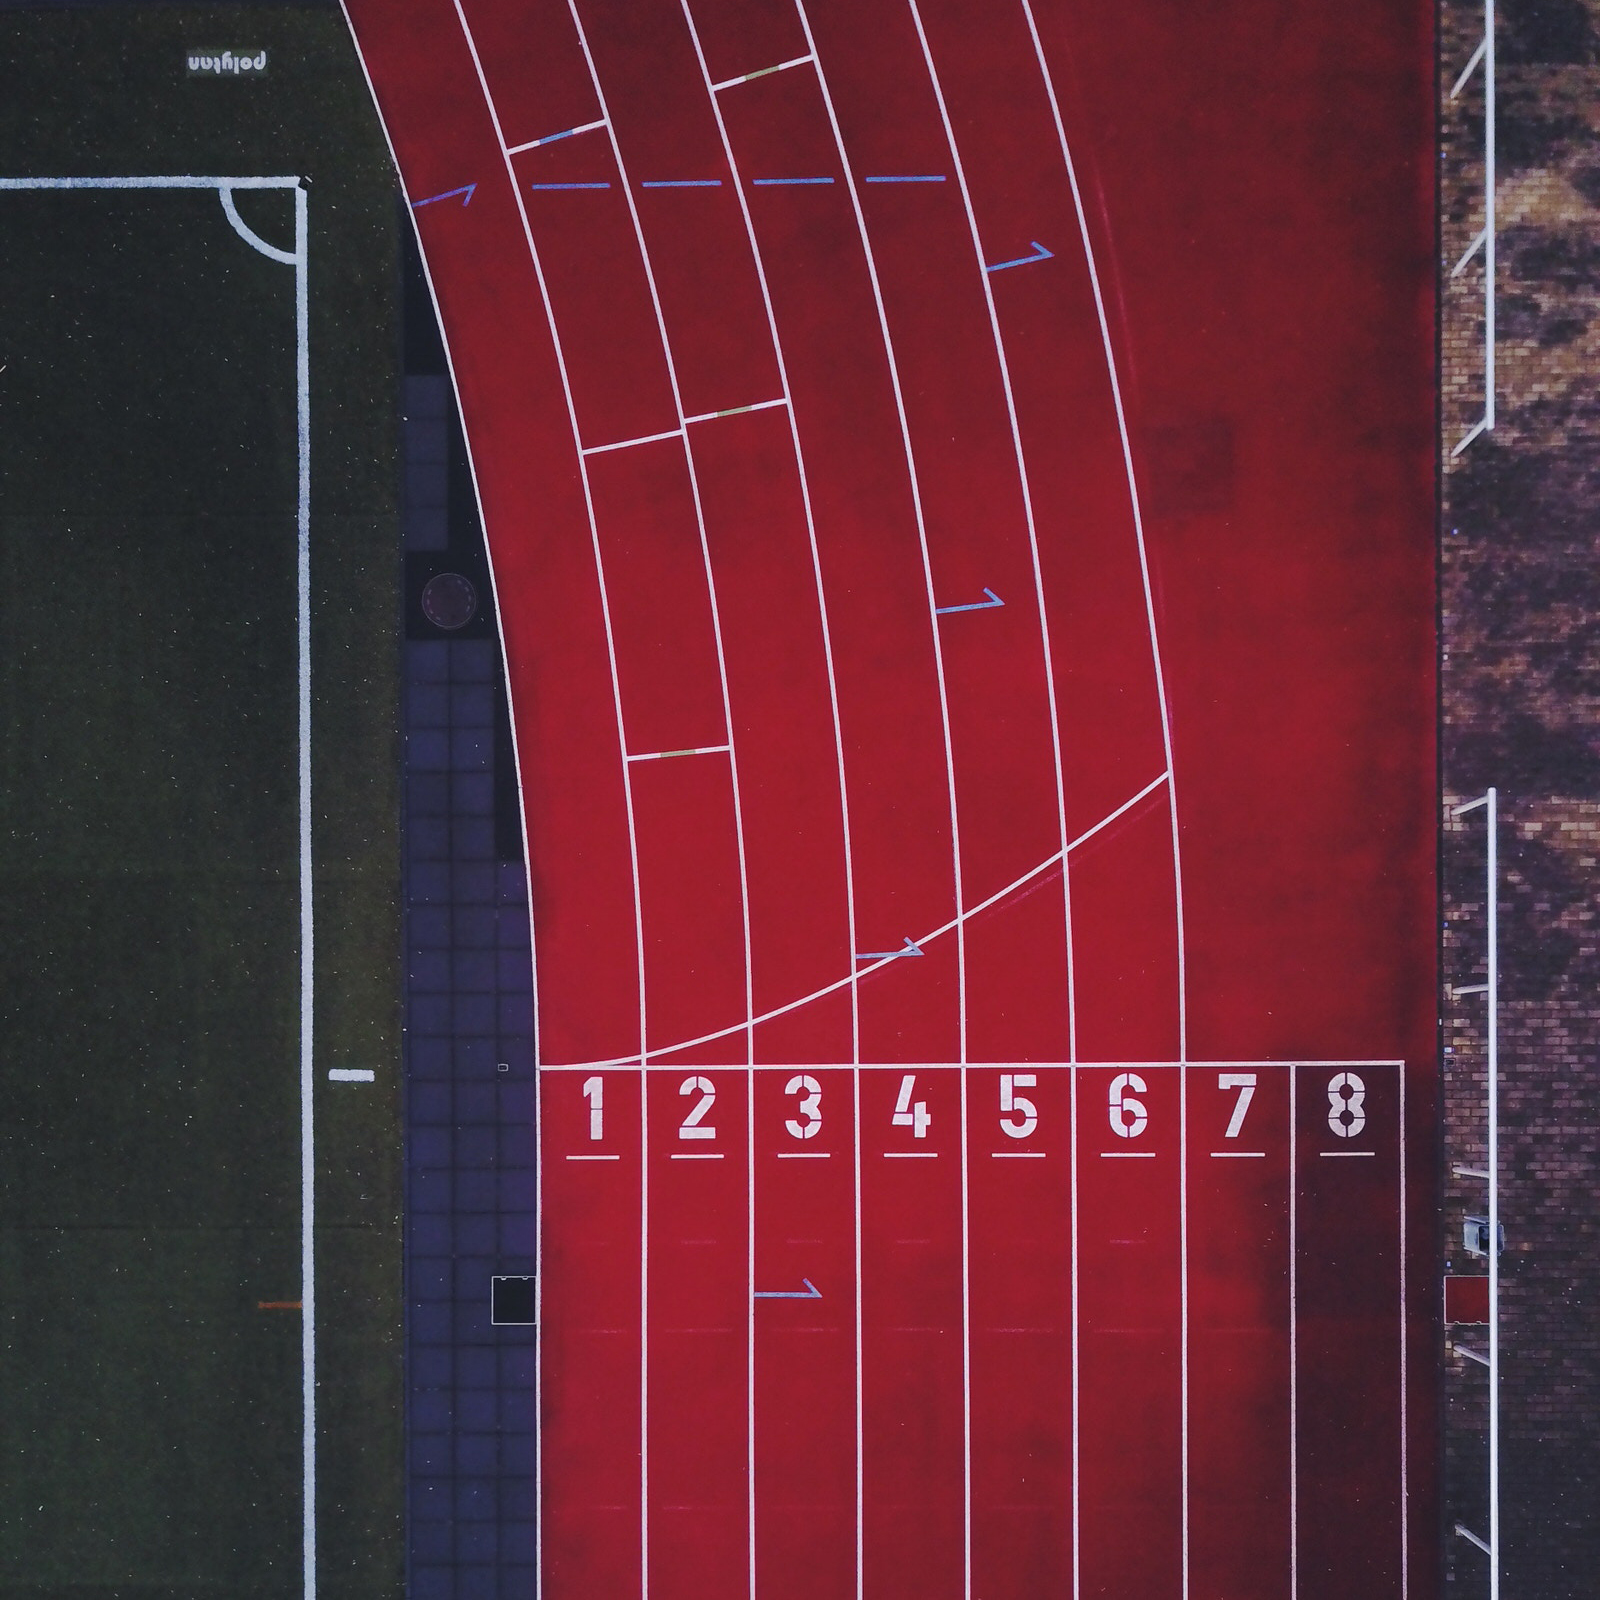
Photo by Marvin Ronsdorf on Unsplash
18:6
Of course, long panoramic shots like this one of Phi Phi Island in Thailand are perfect for sweeping shots of landscapes. You get a feel for the surroundings in this image, not just what’s directly in front of you.

Photo by David Klaasen on Unsplash
Pro Tip
Commonly-Used Aspect Ratios
Cameras often come equipped with ratios of 3:2, 4:3, 16:9, and 1:1. 16:9 tends to be the default mode for shooting videos, while 1:1 is perfect for capturing square photos for Instagram.
Best Ratios for Online & Social Media Viewing
Social media has its own set of rules – and each platform will have its own criteria. If you mismatch the aspect ratio of your photo to the one your social networking platform specifies, your image may end up stretched, distorted or cut off. For an idea of what different platforms require, see the figures below (as of 2019).
- Profile Pic: 180 x 180px (1:1 ratio)
- Cover Image: 820 x 312px (2.63:1 ratio)
- Shared Link: 1200 x 628px (1.9:1 ratio)
- Profile Pic: 400 x 400px (1:1 ratio)
- Header Photo: 1500 x 500px (3:1 ratio)
- Profile Pic: 110 x 110px (1:1 ratio)
- Photo Size (what the user sees when scrolling through their feed): 1080 x 1080px (1:1 ratio)
Pro Tip
Every photo is made up of pixels. They are the smallest unit in your photos, can be round or square, and each one of them contains a color. The greater the number of pixels, the more detailed – and more true-to-life – your photo will be.
The number of pixels is referred to by some as the resolution. The number of pixels can also be used to express the width and height of your photo. For instance, in a resolution of 2400 x 3000, there are 2400 pixels from the left to right (ie. width) and 3000 pixels from top to bottom (ie. height).
The Golden Ratio
We’ve already discussed how changing your ratio will have an impact on your composition. The golden ratio is also a tool used to help with composition (like the rule of thirds).
Leonardo Fibonacci was the first to note the power of the golden ratio in 1200 AD. Fibonacci saw the golden ratio appear again and again in nature, and he noticed how attracted the human eye was to it. This ubiquitous ratio is 1:1.618.
You could make use of this ratio by constructing a grid as you do when using the rule of thirds. However, with this type of grid, the ratio from the top of your picture to the first line will be 1, the ratio from that first line to the second line will be 1.618, and the ratio from that second line to the bottom of your photo will be 1.
Or you could use the golden ratio using curved lines that also follow the ratio of 1:1.618, like the following:
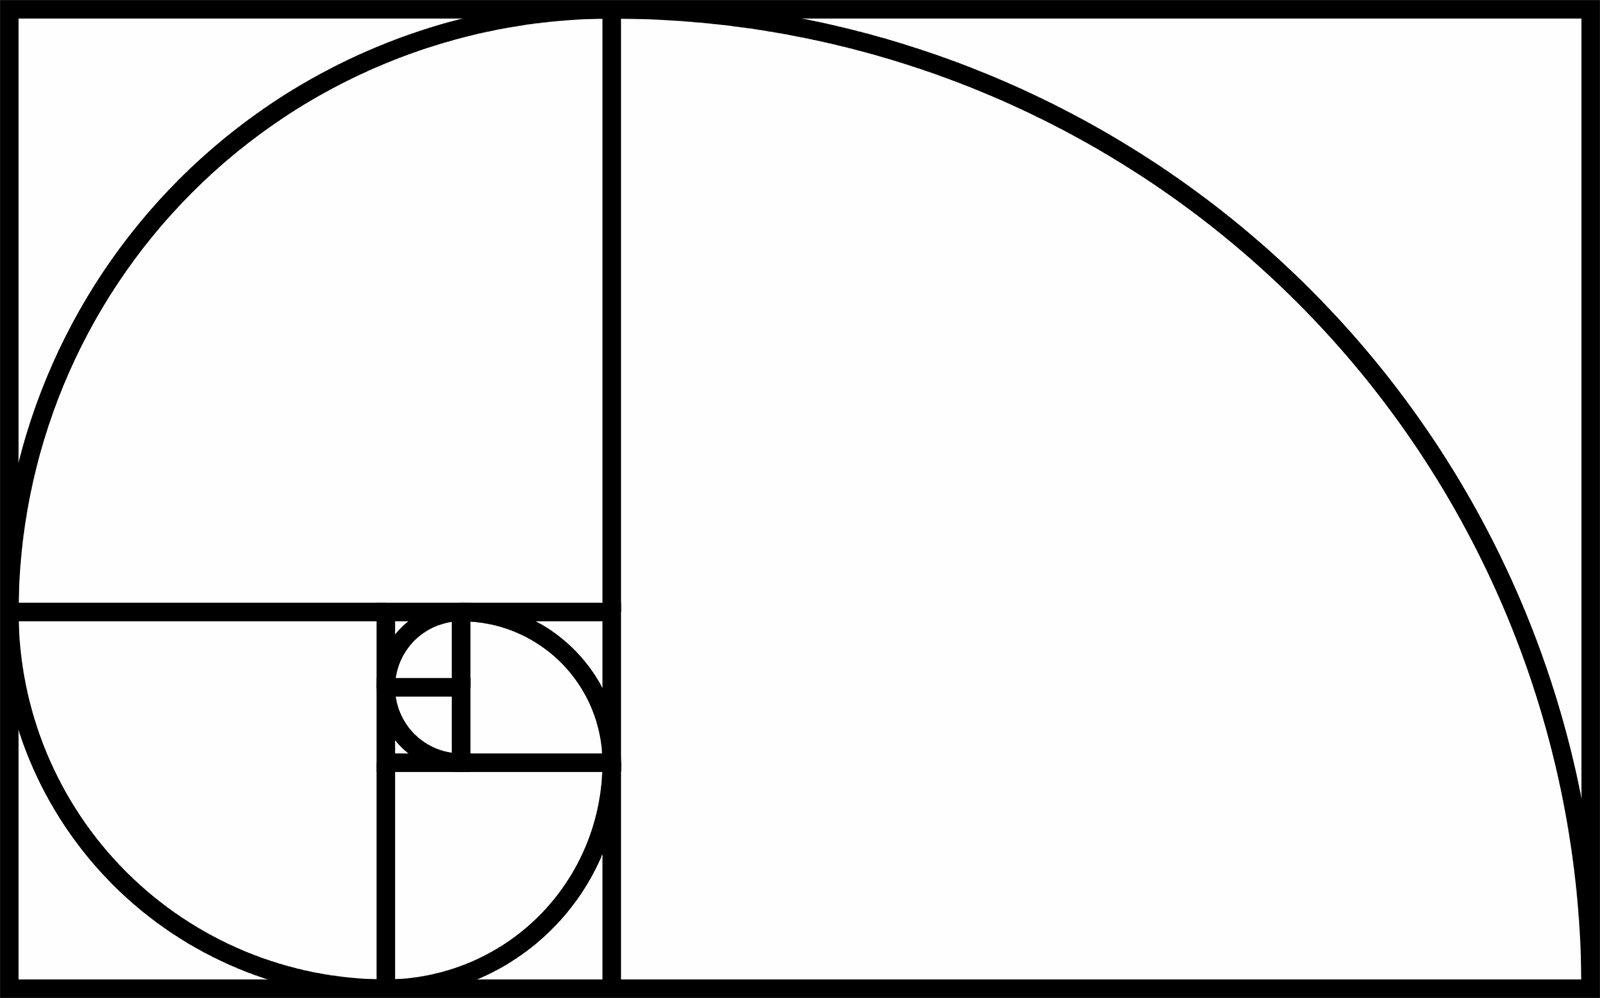
Using the golden ratio, you can place parts of your image on a curved line, leading the viewer of your image to the part of your overlay that looks like a coil, where you have placed your point of interest, as in this example:
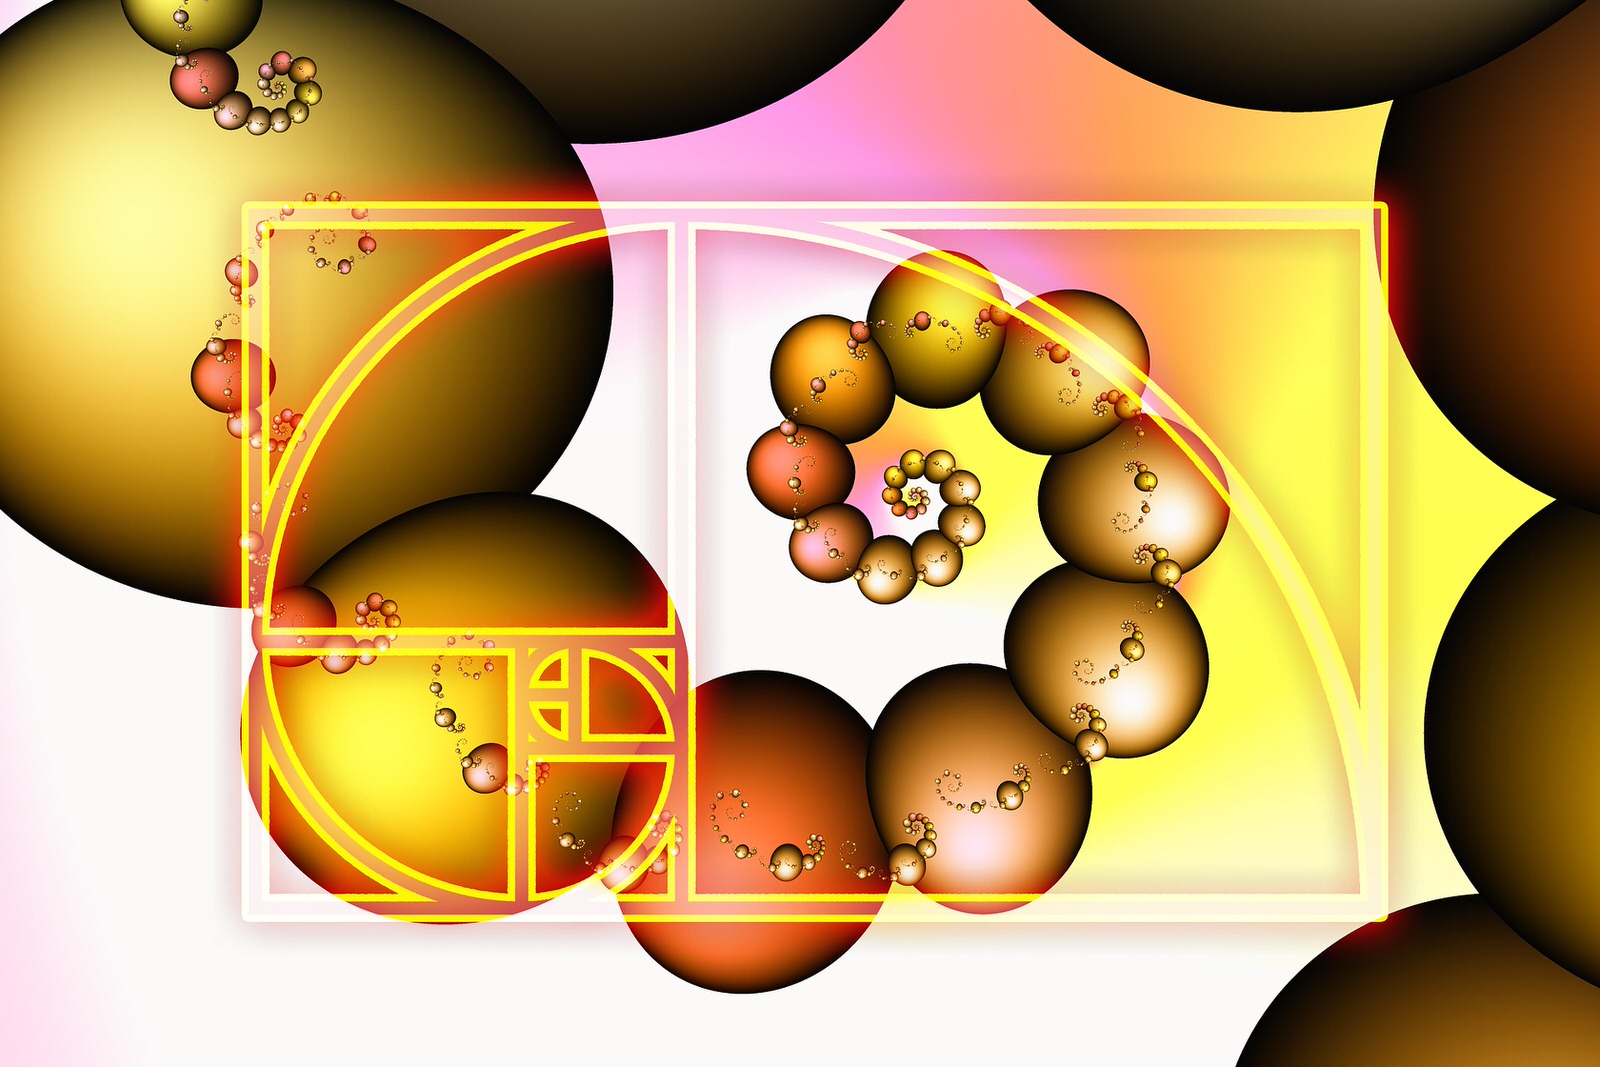
Image by Gerd Altmann from Pixabay
Film Preferences
Cinematographers are no strangers to aspect ratios.
When films were first projected using a perforated film strip, the ratio on the screen was 4:3 (or 1.33:1). When producers started to add sound to movies, the film strip grew a bit too large to accommodate for this audio information, and the ratio became 1.37:1. After this ratio gained approval from the Academy of Motion Picture Arts and Science in 1932, it became the “Academy Ratio.”
In the 1950s, TV was becoming popular, and it was starting to look like it might compete with movie theaters for viewers. This prompted the theaters to introduce films with a 2.59:1 ratio. Notably, MGM pulled off a ratio of 2.76:1 (which you may have seen in Ben-Hur).
Ratios like these posed a problem when viewers tried to watch films like Ben-Hur on their home TV screens. The ratios didn’t fit the typical 4:3 ratio of a home television, so viewers had to contend with viewing their favorite movies with imposing black bars at the top and bottom of their screens (ie. letterboxing). Here’s a clip so you can see what we mean.
Today, most films are seen in 1.85:1 and 2.39:1. In some cases, filmmakers have changed ratios mid-movie. For instance, in The Grand Budapest Hotel, the prologue and epilogue are shot in 1.85:1, in 2.35:1 for the 1960s portions, and in the 1.37:1 ratio for the main sections of the film.
Pro Tip
Interested in creating images that harken back to the days of watching Ben-Hur on a home television set? Check out this two-minute video from PHLEARN to find out how to give your image a cinematic look, complete with black cinematic bars, which will reduce your aspect ratio to 16:9.
Post-Production
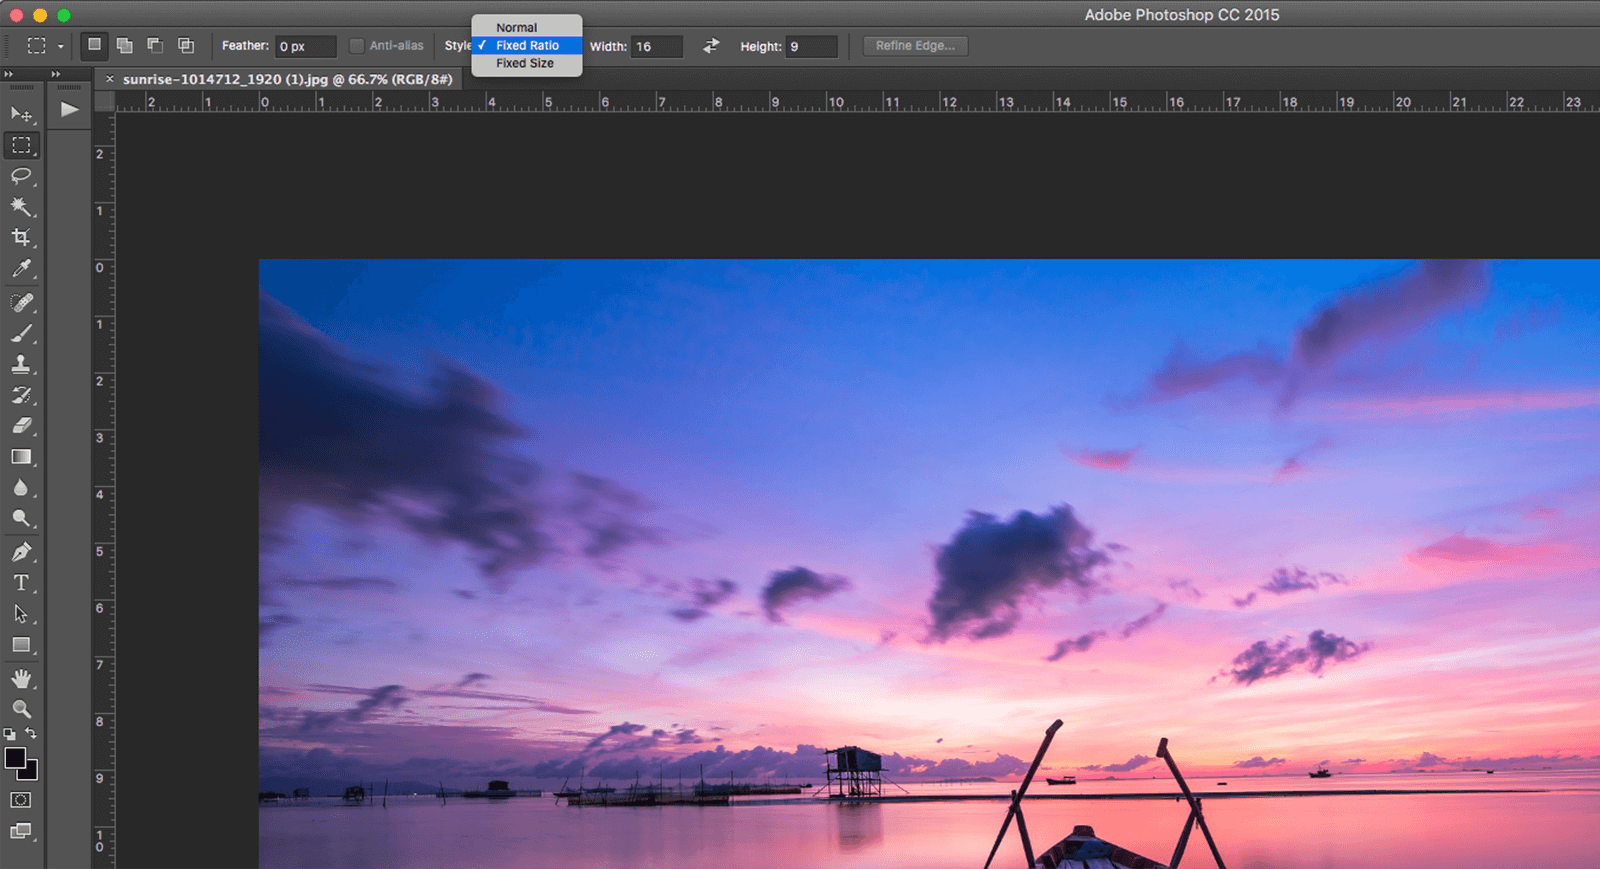
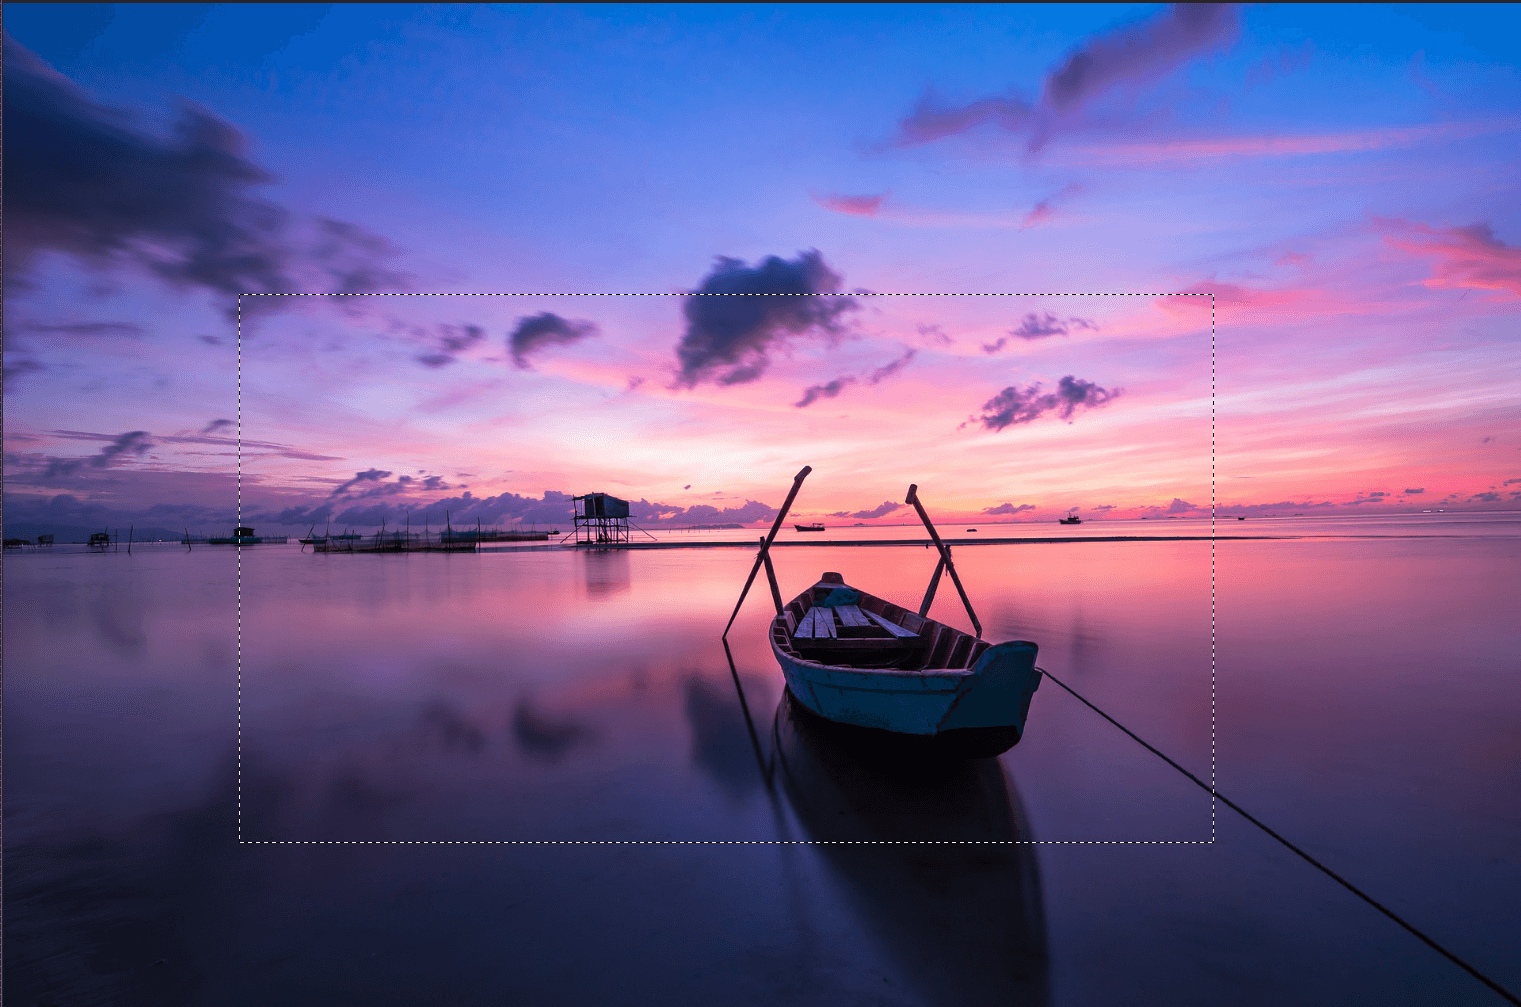
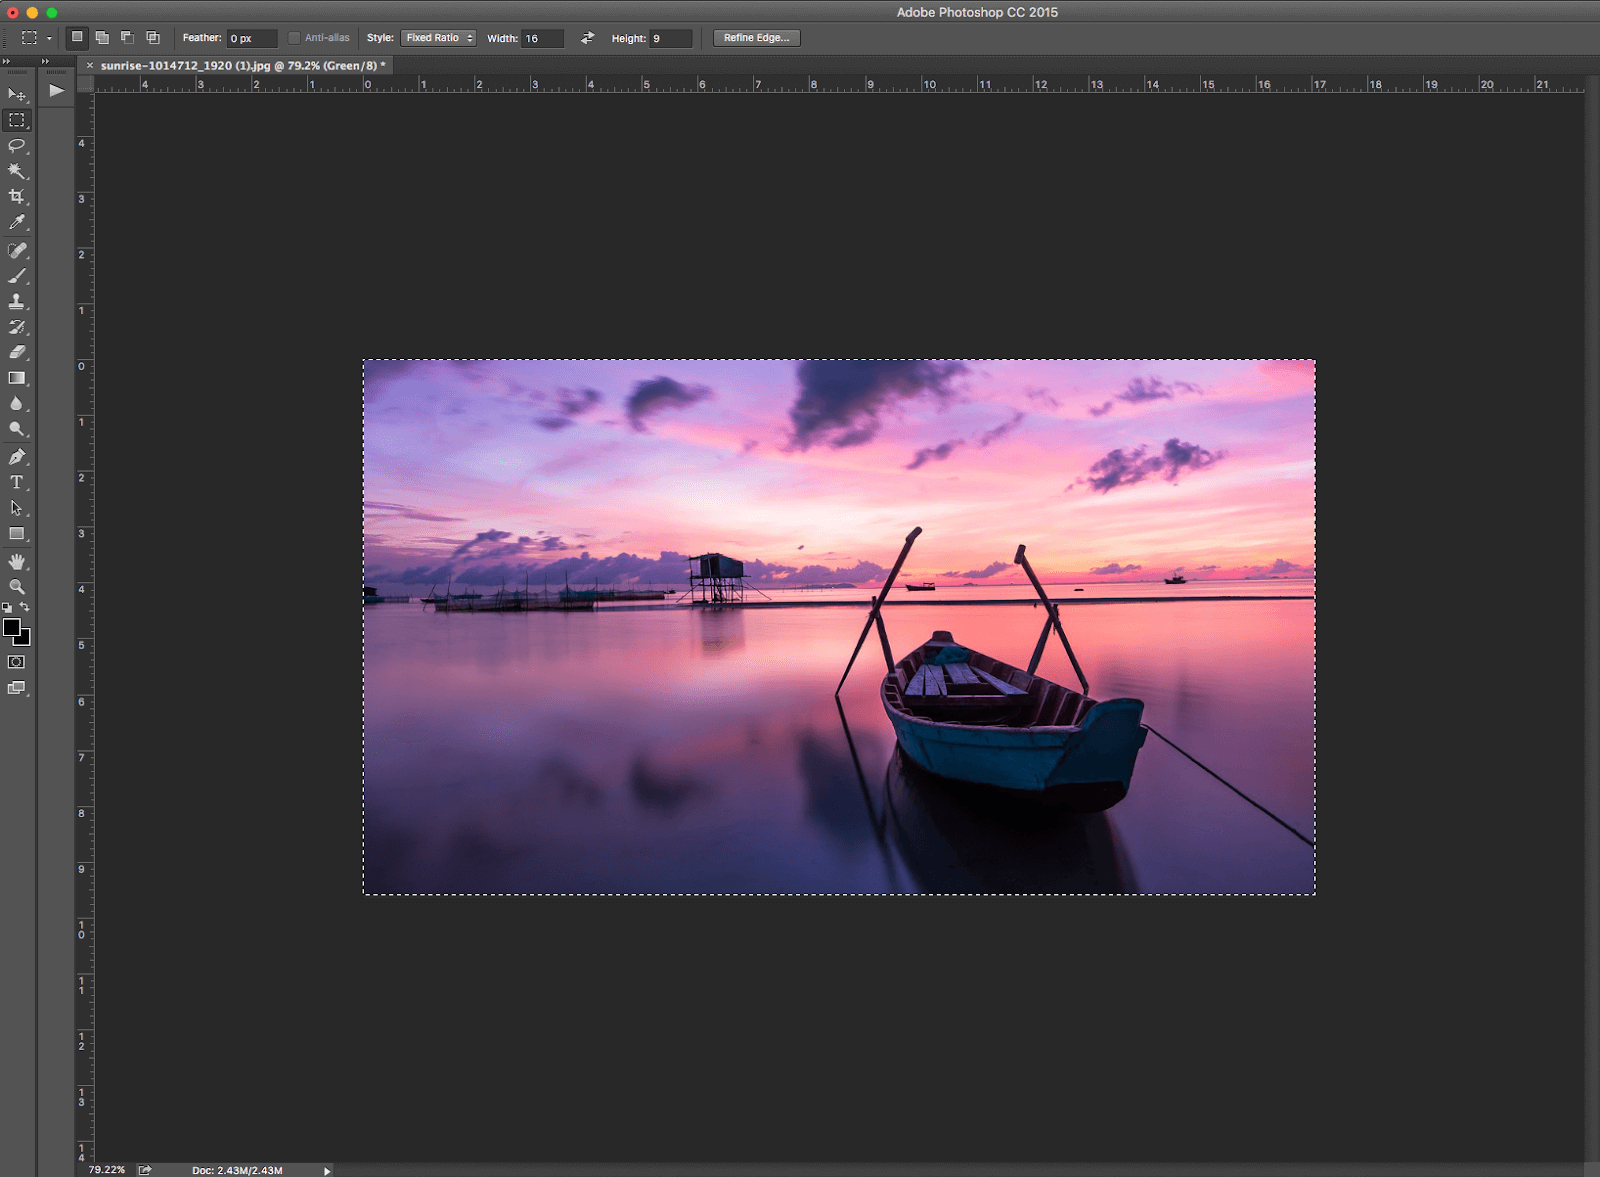
Steps for changing the aspect ratio in Photoshop (Example image by quangle on Pixabay):
-
- Choose the Rectangular Marquee tool (top left).
- Select Fixed Ratio from the Style list.
-
- Set the width and height of your desired ratio (but don’t choose measurements).
- Choose the portion of the image you want to keep.
-
- Click on Image in the dropdown menu, and then select Crop.
If you only have the width and height in pixels, an aspect ratio calculator will come in handy.
Pro Tip
Need to crop to a certain paper size in Photoshop?
Just enter the size of your print as the ratio in the width and height boxes, just as you did in the example above (for example, 8.5:11).
The Current State of the Aspect Ratio
Even now, when so many decisions can be made for us with a click of a button on the DSLR, aspect ratios are not something to take for granted. Consider the impact social media has had on the aspect ratio:
Catering to smartphone users, Instagram popularized the square format. Although a 1:1 ratio would cut details out of, say, a 16:9 ratio substantially, a 1:1 photo or video can look a lot more attractive when framed by your cell phone.
This 1:1 ratio has also appeared on Facebook. More than 90 percent of Facebook’s monthly users (1.74 billion people) look at Facebook on their mobile phone. And 60 percent of those users only access their accounts from their phones. So as you can see, our increasingly mobile lifestyles dictate a lot about aspect ratio use on the internet.
What does this mean for you?
First, you should continue to pay attention to the ratios online technology requires. Second, you shouldn’t be afraid to experiment with uncommon aspect ratios. If those sound contradictory, welcome to aspect ratios! To get the best results without confining yourself to one or two ultra-basic choices, remember:
- Preview images before publishing whenever possible.
- Keep a copy of the original aspect ratio and save cropped versions separately.
- For cover images and profile photos, look for the option to shift your image around or zoom in and out. You might not have to go back to the drawing board if it doesn’t look exactly right.
Most of all, have fun with it. Aspect ratios offer a lot of potential for creativity now that you understand them. Go out and try something new today!