Rule of Thirds: How to Use It in Your Photography
What is The Rule of Thirds in Photography?
If you’re new to Photography, you may be trying to understand the Rule of Thirds. If you’re a veteran, it might be time to up your photography composition. In this complete guide, you’ll learn how to see your scene in thirds before you compose the shot. We’ll teach you how to apply this rule in camera, how to correct any mistakes while post-processing in Photoshop, and our 4 best tips on how to visualize The Rule of thirds!
Composition is the backbone of good photography. Every object in your shot contributes somehow to the overall balance in your image and, when presented with a “good” composition side-by-side with a poor one, most of us can easily identify which is which. But when it comes to real-life shooting, new photographers routinely struggle with finding a unique, dynamic composition on their own.
Fortunately, there are some guidelines to follow that will help you train your photographic eye. The rule of thirds is where most photographers start, and it’s a great way to start honing in on well-balanced imagery during your shoots. It can also save awkward shots in post-processing with the help of a good cropping tool.
By the end of this guide, you’ll know the rule of thirds like the back of your hand! We’ll also talk about when to throw this rule out the window. As with most rules, it’s not meant to apply in every single situation. Let’s jump in with a little history, and see exactly how “tried and true” the rule of thirds is.
What Exactly Is the Rule of Thirds?

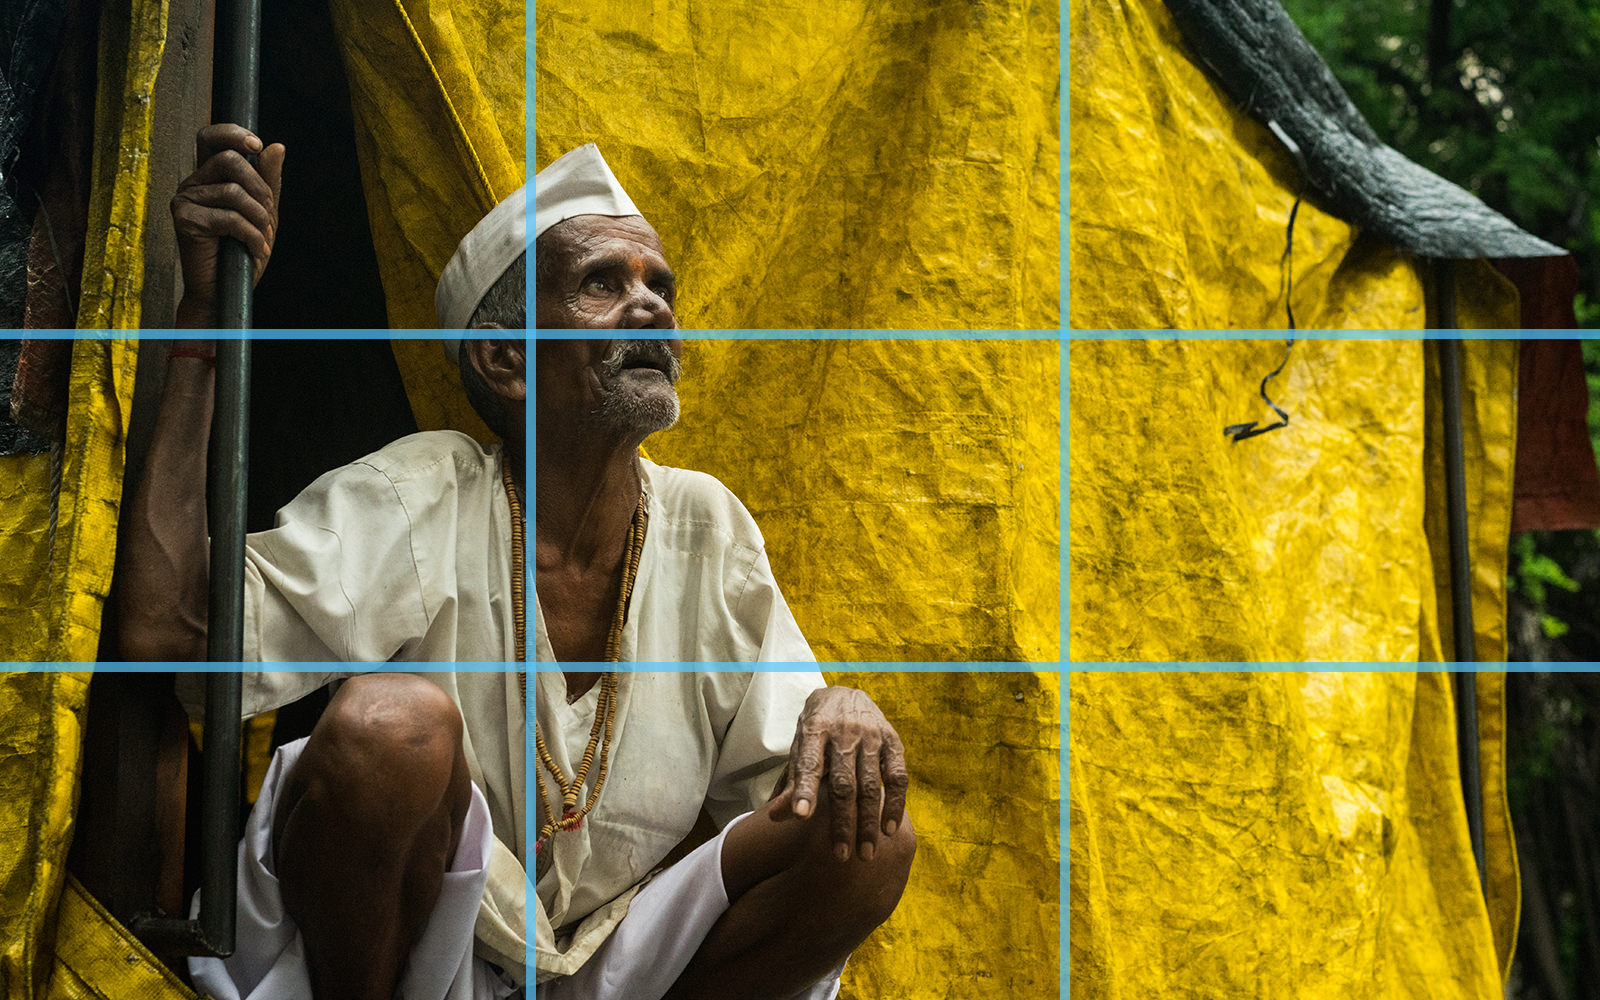
This is a very visual rule, so let’s show before telling. We’ll start by dividing this photo into nine smaller parts, using two horizontal and two vertical lines spaced evenly across your photograph. Notice how the main subject, that bunch of interesting rocks in the foreground, is lined up with one of the four points where our evenly spaced lines intersect. Now your eye goes to those rocks and follows the water line back to other points of interest in this image. Imagine if that bunch of rocks was smack dab in the middle. We’d see them and then we’d be pretty done with this image, missing out on quite a lot.
By now you’re probably starting to see where the “thirds” part of this rule comes into play. By using your inner eye to divide your images into thirds vertically and horizontally before shooting, you can place the heaviest visual elements in your shot where they will work together with other elements in your composition, not overshadow them. You’ll see this a lot with horizon lines. A landscape that follows the rule of thirds will place the horizon along the top or bottom third of the image, not the middle.
Once you start to recognize this rule in action, it’s hard to unsee it. Rule of thirds photography is everywhere, because it’s a foolproof formula for a dynamic composition. The subject (or subjects) of the photo draw the eye by creating a visual focus, and the negative space perfectly offsets that focus. It’s a tried-and-true method that’s been around a lot longer than photography.
How and Why the Rule of Thirds Came About
Renaissance painters started using the rule of thirds when they realized that our eyes can easily stray from the center of an image. They implemented a way to make accomodations for our drifting eyes by purposely putting the subject of the photo off-center. That’s lucky for the rest of us, since looking only at dead-center compositions for the several intervening centuries would have gotten really old, really fast. Imagine how boring your Instagram feed would be.
In 1797, John Thomas Smith declared the rule was the best way to compose paintings of rural scenery. Since that time, we’ve been using this rule as one of the most basic and rudimentary ways to learn photographic composition. In today’s world, you don’t have to look too far to see the rule of thirds applied! It’s widely used in every branch of the visual arts, from video production to graphic design to modern painting.
Tip
Your subjects don’t have to match the lines or intersecting points perfectly. Just position them close to the guide points or lines laid out by the rule.
Here’s a prime example of how using the rule of thirds results in an interesting and eye-catching image:

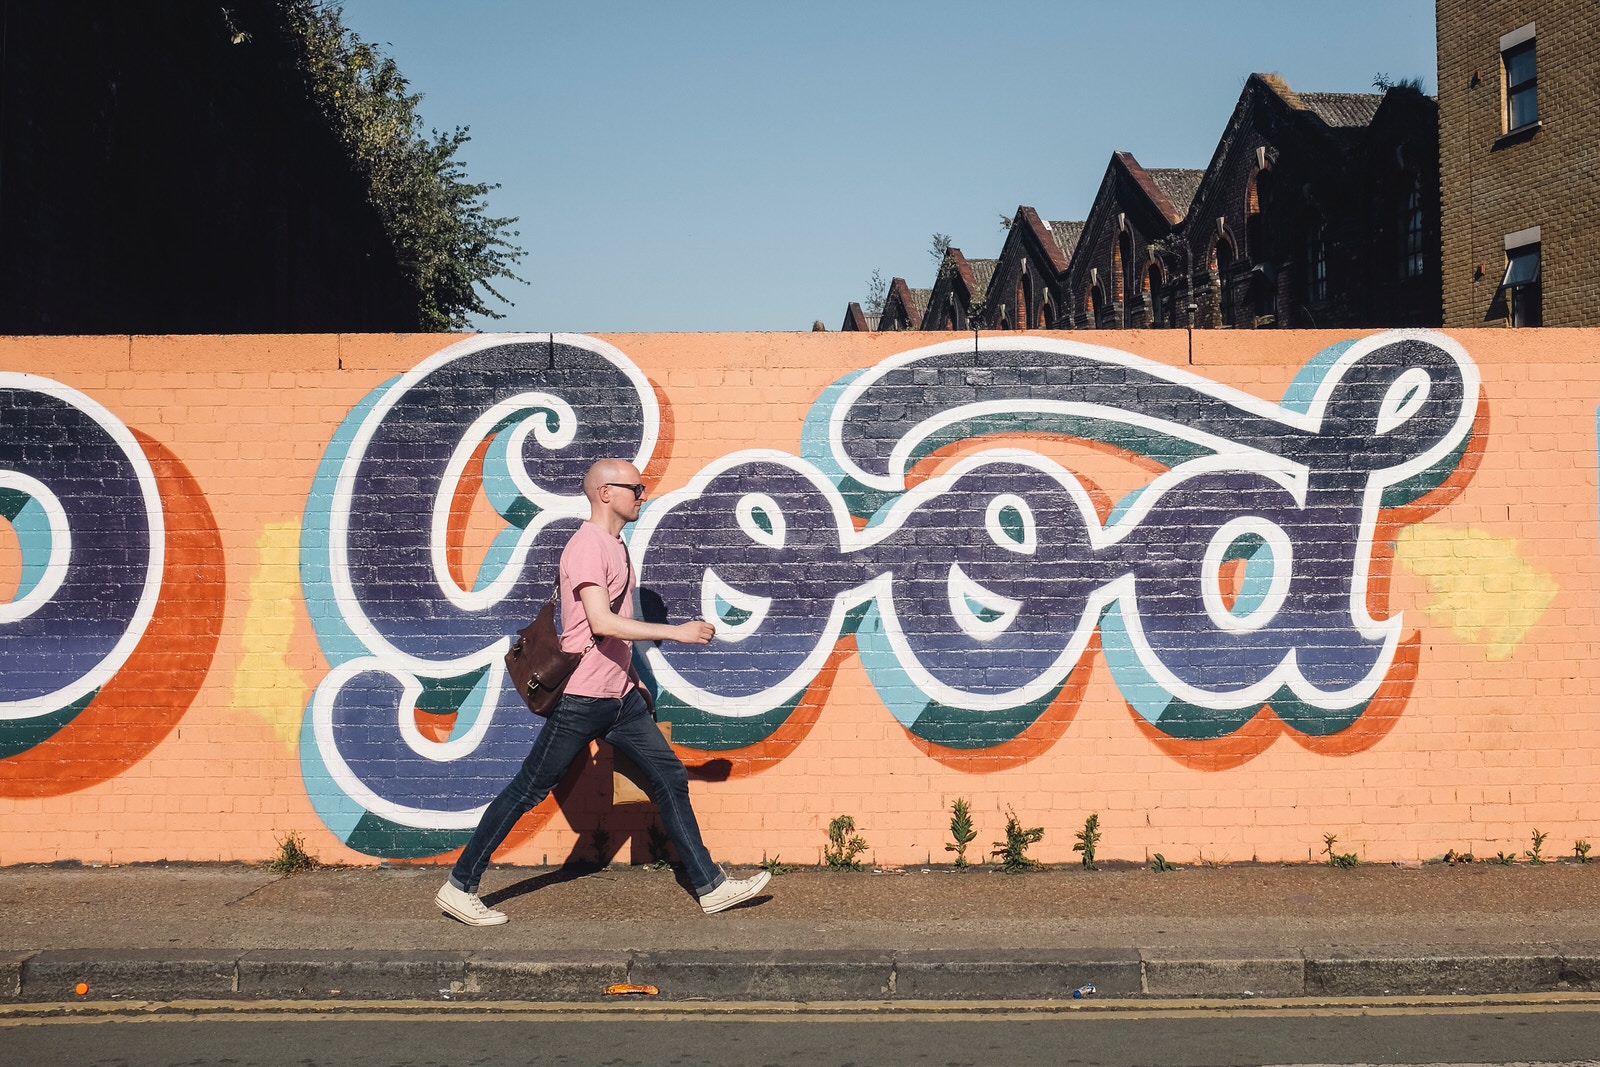
In this case, the photographer has positioned his subject in the bottom third and a hanging lamp in the top third. This gives our eyes a nice diagonal line to travel. It’s also a nice way to balance the two bright hues that dominate the color scheme. That pop of yellow on the subject’s shirt could have been distracting against the blue of her surroundings at a different angle, but now all of that line-related interest in the top two thirds balances it out pretty nicely.
Tip
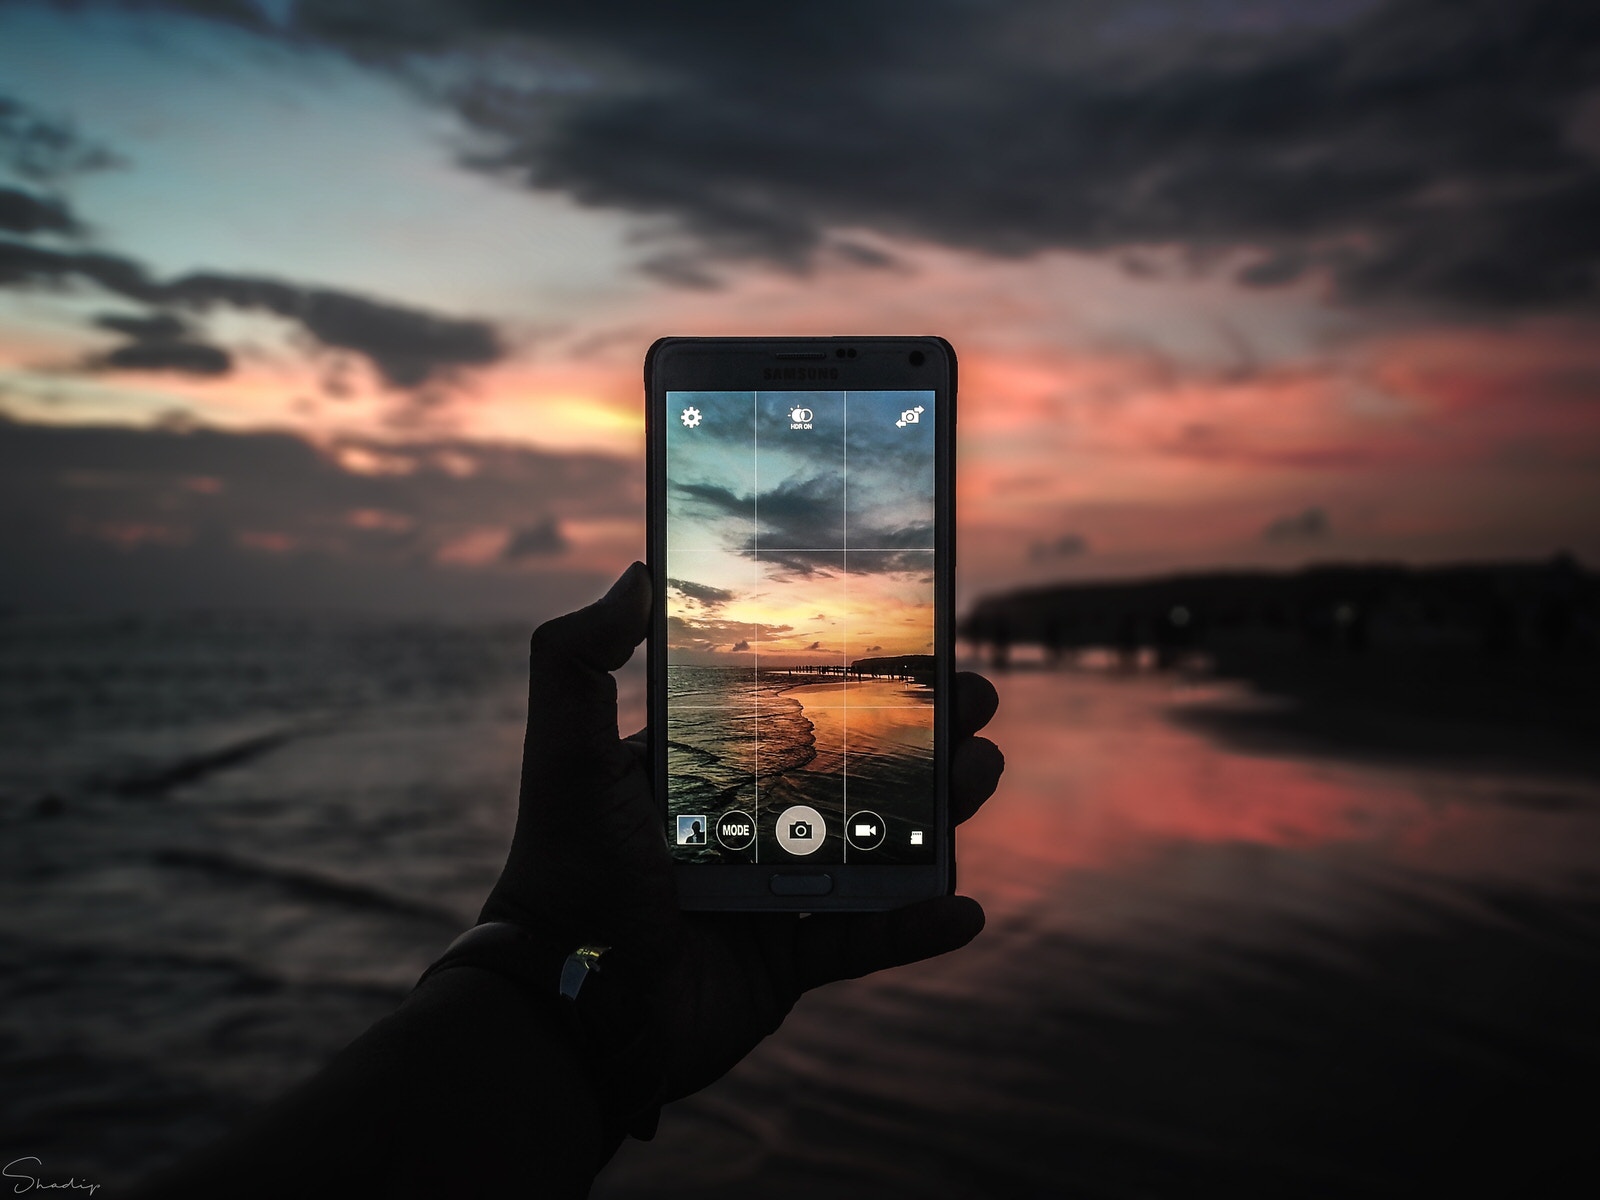
Even your iPhone has “thought” about the rule of thirds. You can turn on a rule of thirds photography grid by going to Settings > Photos & Camera > Grid. Now, lines will be superimposed across your image to help guide you when you take a photo.
Identifying the Rule of Thirds
Let’s work on identifying rule of thirds compositions using a few examples. As you look through the images below, imagine those invisible lines laid out across the photos and try to pinpoint where the subject falls.
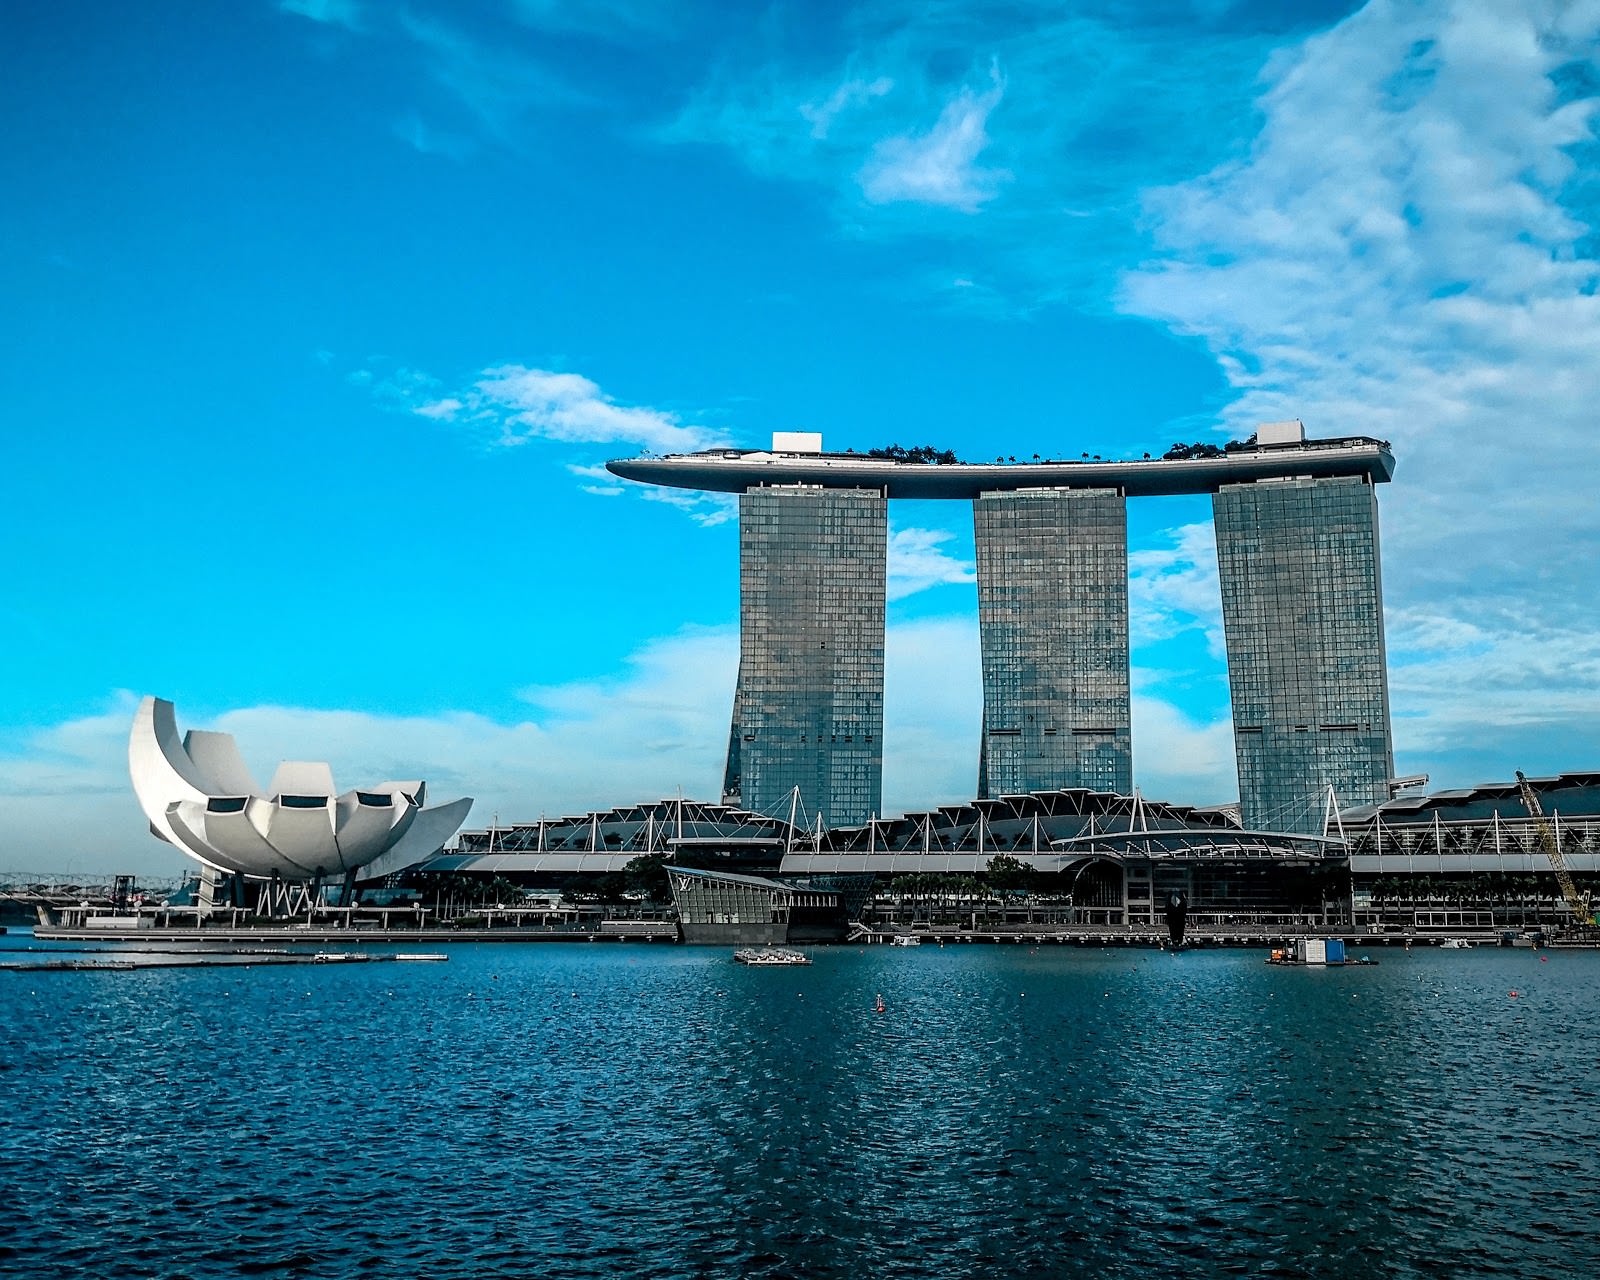
This composition of Marina Bay in Singapore uses the top and bottom horizontal lines of the grid to frame the structures, creating a much more interesting image than if the photographer had placed the horizon line in the center of the photo.

Here, the photographer has used the rule by placing the walkway, the Toronto sign, and its reflection in the lower third of the shot. This helps to create interest in an image where the building has been placed in the center of the frame, horizontally.
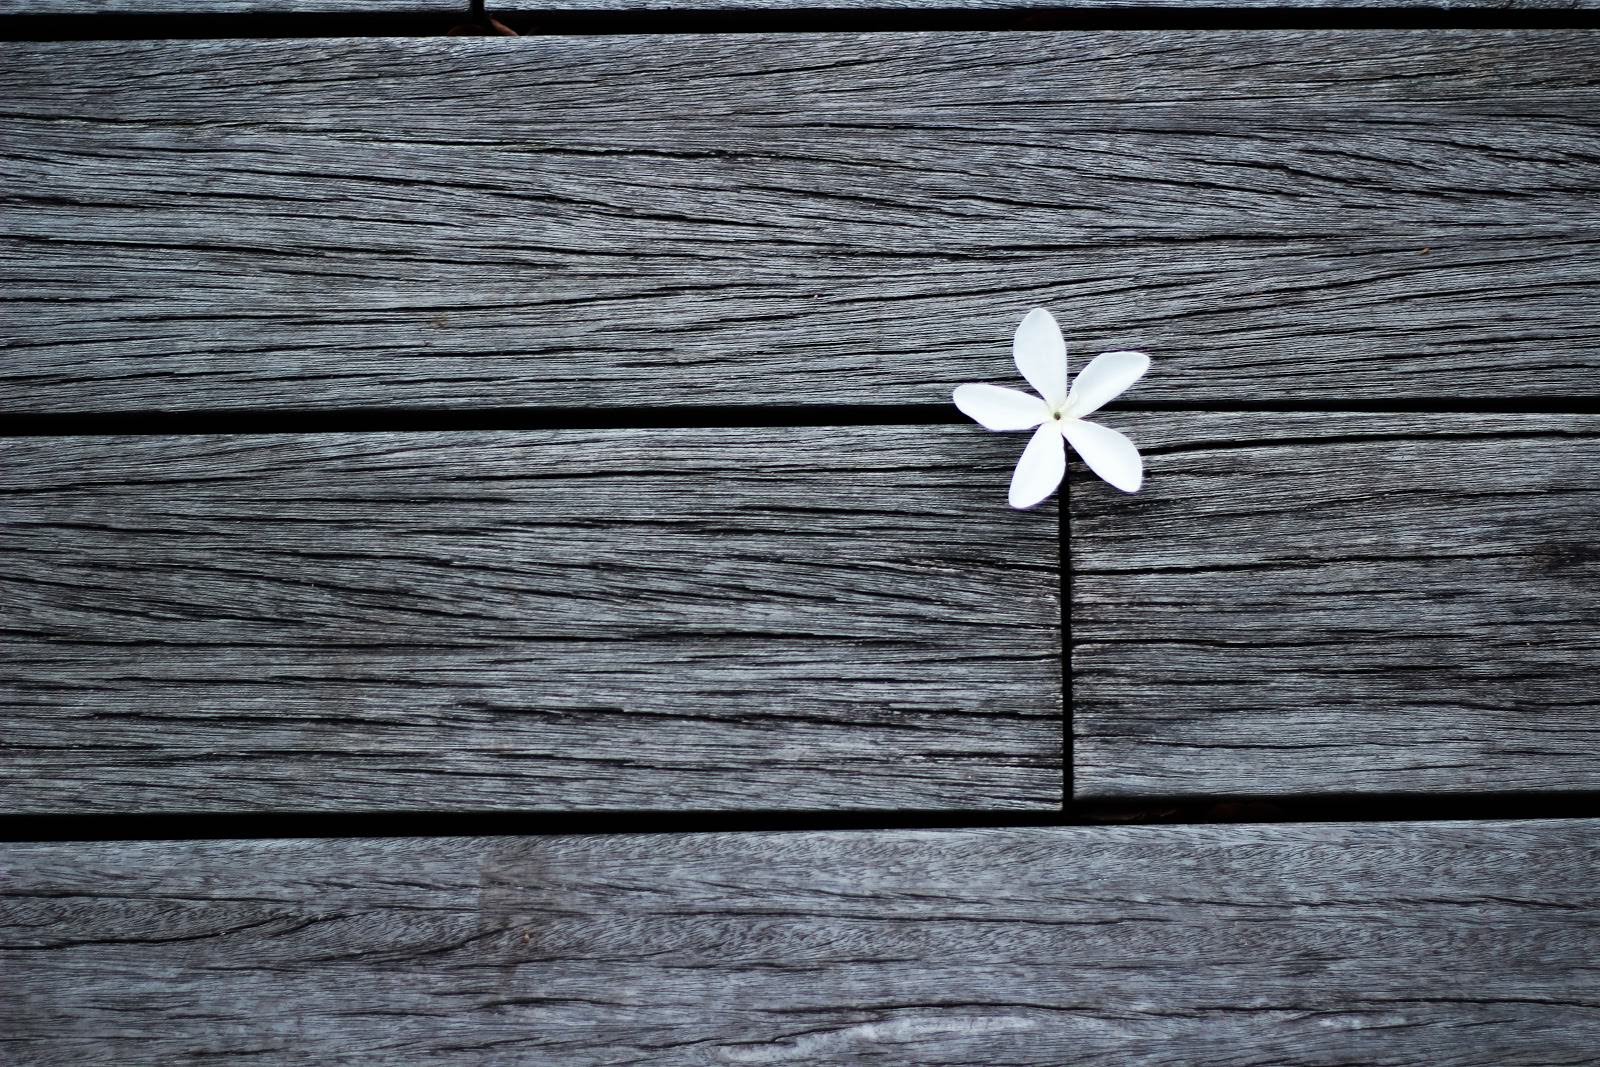
In this photo, you can see how the flower marks a point where the top and right lines intersect. Visually this is a very simple image, so having the flower off-center keeps the composition from getting too static.
Visualizing the Rule of Thirds
Your camera may already be equipped with a rule of thirds grid. Turn on this feature and you’ll be able to see an overlay of the grid lines in your viewfinder or live view monitor. If your camera doesn’t offer this, you can still learn to visualize the grid while you shoot.
Here are a few tips to help you along as you practice:
- Start top to bottom. Move your camera slowly up and down to see which third of your image you want to place the heaviest visual elements. Once you’ve placed them, move your camera from side to side to find the right thirds in that direction.
- When you’re shooting a scene or portrait, think about which aspects of your photo you’re attempting to highlight.
- Look at photographs by other artists to see how they used the rule of thirds. Each time you see a photo online, in a magazine, or on a bus stop ad, visualize a grid across the photo and think of how the photographer placed their subjects to incorporate the rule.
- Think of the rule of thirds grid as you encounter various scenes throughout your day. For instance, you can think about how to apply the grid in your mind’s eye when you’re stopped at a red light on your way home from work. Or even at home, you can visualize the rule by thinking about the grid covering scenes like your child playing, a fruit bowl placed on your counter, or what you can see from your front porch.
Tip
Remember, sometimes the subject or point of view you’re looking for may not be right in front of you. You may have to move around to find that perfect composition!
A Note on Composition
Using this basic composition rule can be as simple as choosing what you’d like to highlight, and proceeding from there. Here are two general rules to keep in mind:
- If you place your subject on the bottom, horizontal line of your composition, it will stand out more than the other features of your photograph.
- Since most of your viewers are likely accustomed to reading from left to right, their eyes will naturally try to “read” an image the same way. Placing the subject in the bottom right corner will sometimes help to stop the viewer’s eye and retain visual interest in the composition.
Once you have a handle on these basic techniques, you can move on to some more advanced ways to integrate this rule into your photography.
Advanced Composition and the Rule of Thirds
While placing your subject based on a grid will take your images up a notch, it will only take you part of the way to transforming your photography. You can partner the rule of thirds with other compositional tools to use it to its full potential, and those tools will also help you determine where to place certain elements of your image into the grid. Here are three examples:
Negative Space
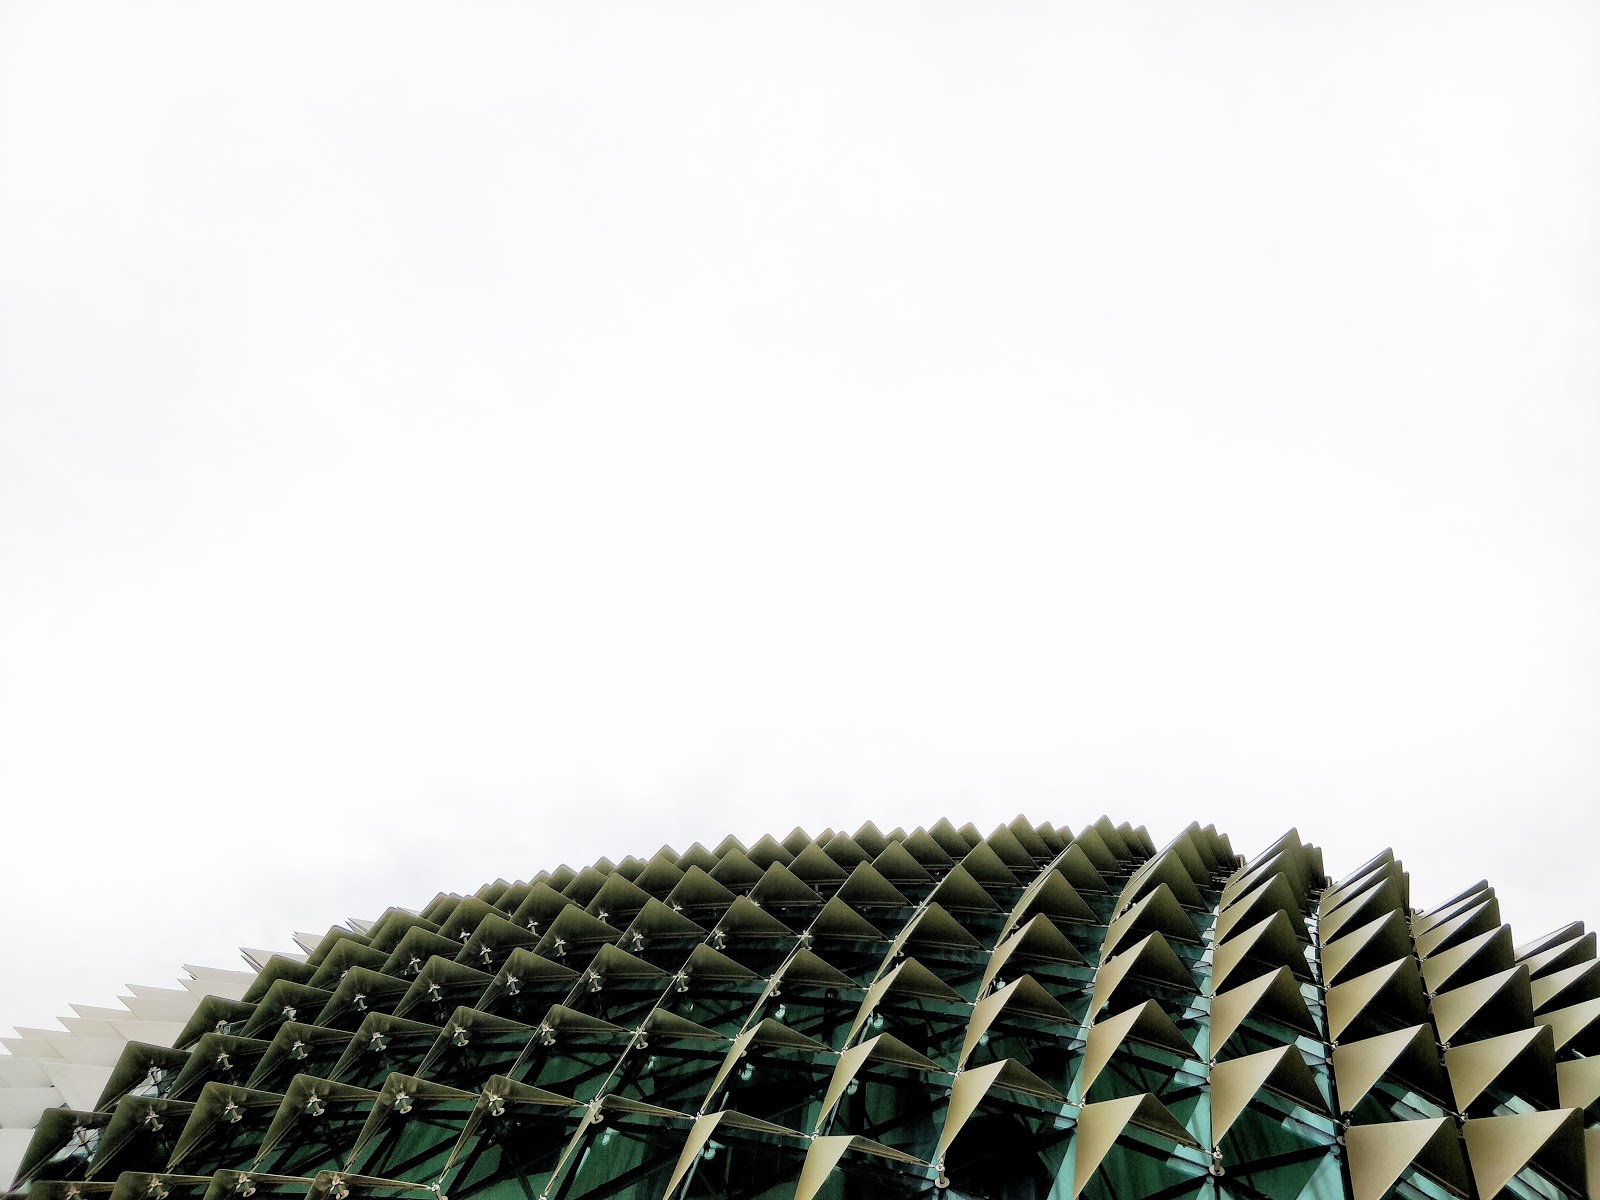
We’ve used the term already, and this image is a prime example of it. When you have a texture or pattern with a lot of repetition, confining it to one or two thirds of the image can keep it from overpowering itself. In a situation like this, the remainder of the image becomes our negative space. Negative space is not dead space, in fact it’s providing a very important service – supporting and balancing the subject.

Photo by Dmitrij Paskevic on Unsplash
Implied Line
Lines add direction to your image, leading your viewer’s eye where (hopefully) you want it to go. Implied lines occur when different elements in your image connect in your viewer’s mind to lead their gaze in a certain direction, the way a direct line would. The ladder rungs on the left third lead your eye in an implied line up and down the frame, balancing the lines created by the stacked books in the right two thirds, which lead your gaze from side to side.
Photo by Olya /Voloshka on Unsplash
Contrast
When your image has a sharp transition in value or color, you’ve got a recipe for a power struggle in your photo. Confining the starkest point of contrast to a third of your image gives it room to “breathe,” and it’s also a good way to create some functional negative space.
Portraits and the Rule of Thirds
What if your subject is on the move? Using the rule of thirds when you’re photographing people is a whole different animal from still life shoots and landscapes. Here are some things to keep in mind as you shoot a living subject:
- It’s all about the eyes! Since viewers usually gravitate to the eyes in a photo, positioning that captivating feature in one of the off-center intersecting lines will make your image even more dynamic.
- Make individual portraits stand out. By positioning your model creatively, you can use negative space to make creative shapes or convey a mood. Practice facing your model in different directions or have them look in a different direction than their body is facing.
- Make your duos dynamic. In cases where you’re taking a close-up of two people, putting their faces in different thirds (for example, each person sitting on a different step of a staircase) adds a lot more visual interest than lining your subjects up in a single row.
- Get creative with group shots. When you are photographing several people at once, you can place some of your subjects on horizontal and vertical lines and then scatter one or more of your subjects at intersecting points, as opposed to grouping them in one giant block of bodies. This will allow the viewer’s eye to move around the image.
- Capture the journey. When you’re capturing a moving subject, be aware of where you position it. You can convey that they are leaving the image or entering it, depending on which third you place them in and which direction they are facing. You can see an example of this in the image below.
The Rule of Thirds in Post-Processing
As with any photographic technique, post-processing is a solid backup plan. If you still struggle with envisioning the rule of thirds grid on the spot (or forgot to apply it in the first place), you can save a lackluster composition easily in Photoshop with a little strategic cropping. See below:
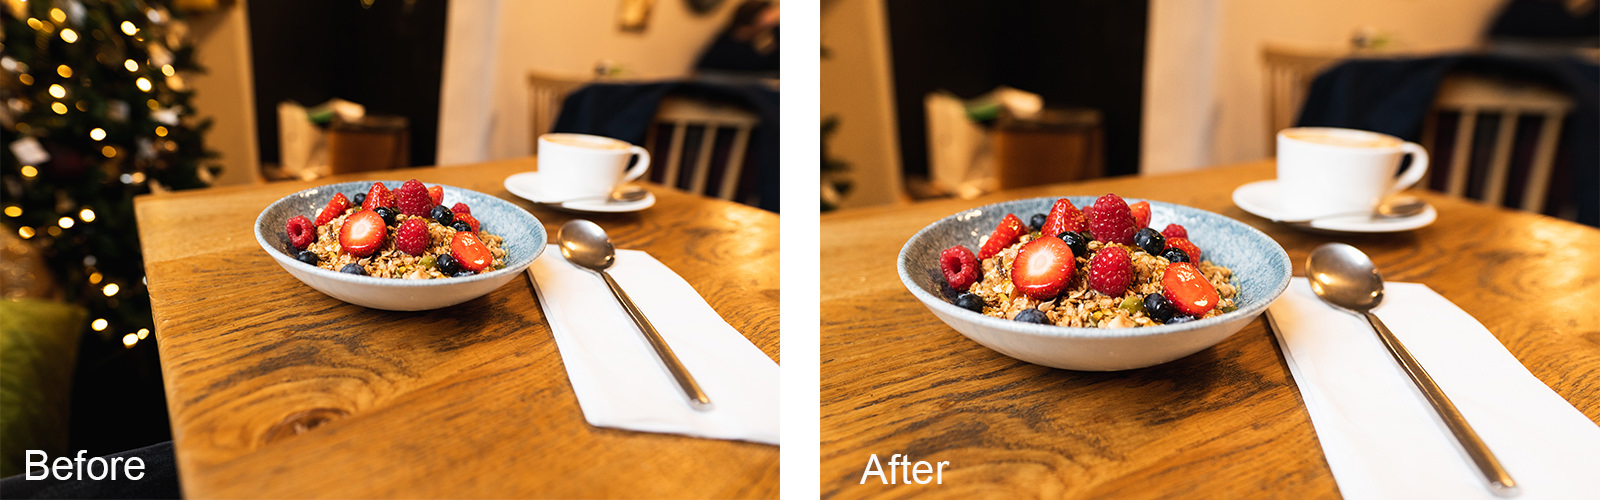
Before & After (and Header Image) by Douglas Turner
Notice in the original image on the left, the tree in the background gets almost an entire third. But the tree isn’t really important to the shot and it takes away from what we’re really supposed to see: the food. On the right, the tree has been cropped out completely and the left two thirds of the image belong to the main subject. Now that extra third on the right is dedicated to negative space that works with the composition instead of distracting from it.
There is more than one way to crop an image to comply with the rule of thirds. Once you select the Crop Tool in Photoshop, a grid will pop up over your image, showing you the lines breaking the photo up into thirds. You can just drag the edges or corners of the image to resize the photo however you like, but, for the sake of cropping to a clear and defined aspect ratio using the rule of thirds grid, here’s a simple step-by-step method:
- Select the Crop Tool.
- You’ll see a grid pop up over the image.
- Click on the Ratio dropdown menu at the top of the screen and choose the size of the photo you’d like to end up with.
- A box representing your newly set crop area and containing the rule of thirds grid will appear over the photo.
- Now, when you click on and drag an edge or a corner, the aspect ratio will remain the same.
- If needed, you can change the grid’s orientation by clicking on the ‘Swap height and width’ arrows button in the top options bar. Or, just grab one of the grid’s corners and move up for a portrait layout, or sideways for a landscape layout.
- Move the box so that your subjects are in line with the horizontal or vertical grid lines, or on the intersecting points.
- Uncheck ‘Delete Cropped Pixels’ in the Crop Tool options bar – that way you can get your original image back if you decide to rearrange the crop later.
- When you’re satisfied with your new image, click on the check mark icon to commit to the crop.
Remember, this is only one version of how you can crop your photos to conform to the rule of thirds. See PHLEARN’s own guide to Photoshop cropping for more information on improving your composition in post-processing.
Tip
Post-processing won’t solve every problem. For example, there may not be enough room around your subject to crop properly. Always try to apply your technique in-camera and use Photoshop as your secret weapon.
Breaking the Rule
Breaking the rule of thirds is a lot like breaking rules in any artistic discipline – you must know the rule first in order to be able to break it properly. In fact, some go so far as to say that the rule is only helpful to photographers in the learning stages. As photographers grow in skill, they argue, they can think less about whether they’re conforming to a rule or breaking it.
In truth, it’s a matter of developing good photographic instincts and going with your gut. There’s no definitive sign that the rule of thirds is unnecessary, but there are a few occasions where we can easily identify when it might work in our favor to break the rule:
1. When you’re capturing symmetry:
We talked a lot in this guide about finding asymmetrical balance, but traditional symmetry still has a place in photography. If you’re working on an image that embraces symmetry, the rule of thirds will likely only get in your way.
2. When your subject is already intriguing enough on its own:
Feel free to abandon the rule if using it would detract from your subject. For example, a portrait of a person with an interesting expression or facial features may be more engaging and dramatic when placed in the center of your frame.
3. When you want to produce a calming effect:
Using the rule can create tension between your subject and the negative space in your photo. If you don’t want that tension for a particular image, skip the rule until next time.
Tip
You can also construct a very attractive photograph when you extend an image (or a part of the image) as far as you can, such as an image that reveals mainly sky, and a bit of the earth, like this example:

Now It’s Your Turn
The thing to keep in mind as you contemplate this question and practice this technique in your photography is that the rule is a great starting point, but every shoot is different. If using the rule of thirds results in an awkward image or just doesn’t showcase your subject as you’d envisioned, don’t overthink it. Use your successes and failures with the rule as ways to deepen your knowledge for future photo shoots.
WIth experimentation and practice, you will become familiar with when to use or break the “rule.” If you’re feeling confident enough to both use the rule of thirds and ignore it, and are asking yourself, “What’s next?” why not wade into the wide world of other composition techniques?
What are you waiting for? Get started with a couple of PHLEARN resources:
3 Guides for Great Composition in Your Photos
25 Tips for Perfect Photography Composition