

Watch the Full Series
description
Lightroom and Photoshop were built to hand work back and forth, but the handoff has options most photographers never open — and picking the wrong one quietly costs you your layers.
On Day 23 of 30 Days of Lightroom Classic we send a photo across with Edit In, compare a Smart Object against a flattened copy, mask a subject and unlink the mask chain in Photoshop, then watch the finished TIFF land back in the catalog stacked beside the original.
This is Day 23 of our 30 Days of Lightroom Classic series. Follow along with all 30 episodes as we explore the magic of Lightroom together!
Continue Watching 30 Days of Lightroom Classic
JOIN 30 DAYS OF LIGHTROOM (FOR FREE!)
Ready to jump in? Sign up and we’ll email you a printable calendar and daily class schedule so you can get started right away!
Image Source


AFTER
BEFORE
The Power of Combining Apps
Lightroom Classic is an excellent editor and a poor compositor. The moment a job needs layers, text or anything assembled from multiple pieces, you need Photoshop.
The good news is that the handover is built in and largely automatic — and if you use the right menu item, you keep full RAW editing on the other side. Day 23 builds a small advertisement to demonstrate the round trip, and covers the file management Lightroom quietly does for you.
Always Open as a Smart Object
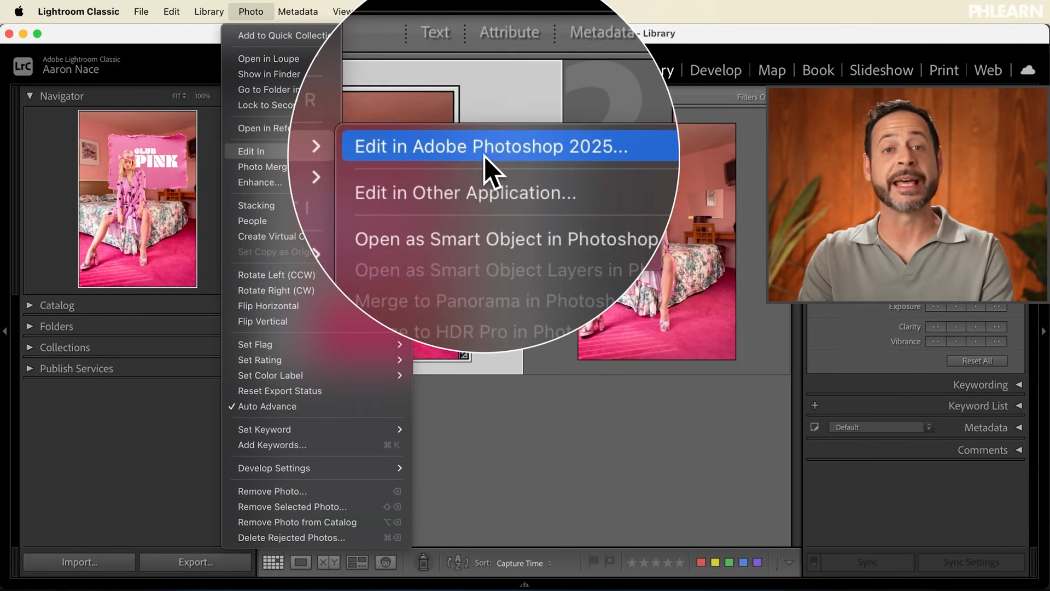
Right-click a photo (or use the Photo menu) and choose Edit In. There are several options, and the top one is not the one you want.
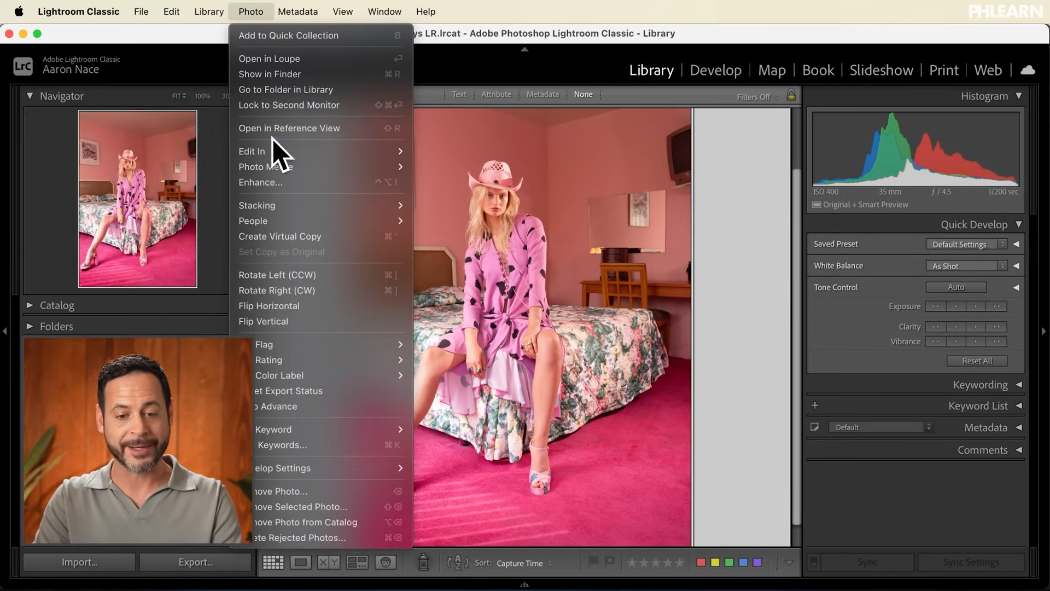
Plain “Edit in Photoshop” hands over a flattened, rendered image. Open as Smart Object in Photoshop embeds the RAW file inside the Photoshop document instead.
The difference matters. Double-click the smart object thumbnail in the Layers panel and Adobe Camera Raw opens — the same engine as the Lightroom Develop module, with Auto, exposure, white balance and everything else, on a full 16-bit file. Click OK and the change flows back into the Photoshop document.
You are working in Photoshop with Lightroom-grade RAW control still available. There is no reason to use the flattened option.
A Few Photoshop Techniques Worth Knowing
The example places a torn-paper graphic and a text layer behind the subject. Three things make that quick.
Select subject, then invert the mask
With the photo layer active, use Select Subject in the contextual task bar, then click the layer mask icon on the graphic layer. The mask will be the wrong way round — press Ctrl or Cmd + I, or use Invert Mask, and the graphic sits behind your subject.
Unlink the mask to move the layer
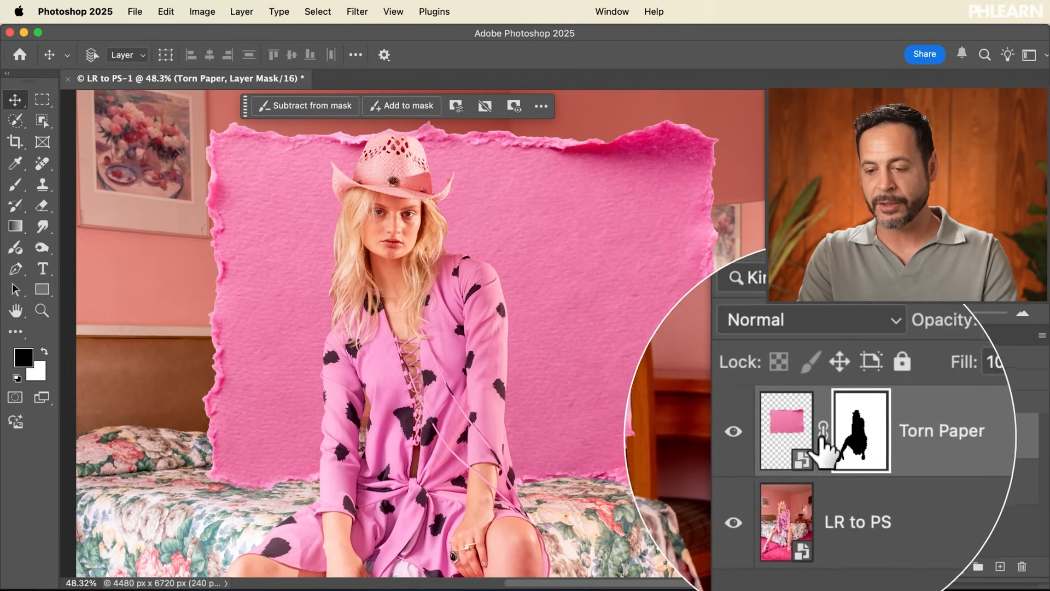
Layers and masks are linked by default, so dragging the graphic drags the mask with it and the effect collapses. Click the small chain icon between the thumbnails to unlink them, and the layer moves freely while the mask stays put.
This is one of those small Photoshop details that saves a great deal of frustration once you know it exists.
Put the mask on a group
With two elements needing the same mask, you could Alt or Option-drag the mask from one layer to the other. Better: select both layers, press Ctrl or Cmd + G to group them, and drag the mask onto the group.
Everything inside the group is now masked identically, and you can reposition each element independently without touching the mask. Adding a third element later means dropping it into the group.
Saving Sends It Straight Back
Press Ctrl or Cmd + S. That is the entire return trip.
Switch back to Lightroom and the edited version is already there, stacked with the original. No importing, no locating files. Expand the stack and you have your RAW file and the layered version side by side.
On disk, Lightroom has written a TIFF into the same folder as the original — the layered file, saved where it belongs, named to match. The organisation you set up on Day 2 is maintained without you thinking about it.
Going Back In Later
Close the document in Photoshop and the layered TIFF is still in your catalog. Select it, choose Edit In > Photoshop again, and Lightroom asks how to proceed:
Edit Original — reopens the file with all layers intact. This is what you want when returning to a layered document.
Edit a Copy — a new flattened duplicate, leaving the layered version alone.
Edit a Copy with Lightroom Adjustments — a flattened copy including any Lightroom edits made since. Useful when you have graded the TIFF in Lightroom and want that baked in.
Choose Edit Original, make a change, save, and Lightroom updates again. The loop is as tight as it looks.
When to Make the Trip
Photoshop earns the round trip for layers and compositing, text and graphics, heavy retouching like frequency separation or dodge and burn on separate layers, and generative work such as Generative Expand.
Stay in Lightroom for everything else. Exposure, colour, masking and removal are all faster there, and they stay non-destructive — a TIFF is a real file that takes real disk space, so there is no reason to create one for an edit Lightroom could do.
For a full professional workflow across both applications, our PRO course on the Lightroom Classic and Photoshop workflow goes considerably deeper.
Where This Usually Goes Wrong
Using plain Edit in Photoshop. You give up RAW editing for nothing. Always open as a smart object.
Fighting a linked mask. If moving a layer drags its mask along, click the chain icon.
Masking each layer separately. Group them and mask the group once.
Choosing Edit a Copy when returning. It flattens your layers. Edit Original is almost always correct.
Round-tripping for things Lightroom does well. Every trip creates a large TIFF. Save it for work that genuinely needs Photoshop.
Keep Exploring Lightroom
More free tutorials that span both applications:
- Adobe Camera Raw Explained
The Lightroom controls you keep access to inside Photoshop. - Lightroom vs Photoshop Editing
Which application should own which part of a job. - The Ultimate Guide to Generative Credits
What the AI features cost across both apps. - Free Lightroom Presets and Photoshop Actions
Assets for both ends of the workflow.
Take It From Here
The handover is one menu item and a keyboard shortcut, and Lightroom handles the filing at both ends. Once the round trip is automatic you stop thinking of them as two programs and start using whichever one is better at the task in front of you.
Tomorrow we widen the view: an overview of all the Lightroom apps and which one you should actually be using.







Enjoying This Free Tutorial? Go Further with PRO.
Unlock Full Sample Files, PSDs, and Hundreds of Masterclasses!

Download full project assets, original PSDs, and RAW images for every lesson
Unlimited access to our complete library of PRO Photoshop & Lightroom courses
Instant 4K Ultra HD streaming on all devices, anytime, anywhere
Full access to our entire library of Photoshop Actions, Presets, and LUTs
Flexible monthly and annual membership plans
Cancel anytime with zero hassle or commitments