

Download Assets
Download Assets
This tutorial includes 6 sample images. Downloads are free with a PHLEARN account.
- Free sample files with every tutorial on PHLEARN
- New tutorials published every week
- Unlimited downloads with your free PHLEARN account
Watch the Full Series
description
Virtual copies cost nothing on disk, and clients rarely want one version. Producing a color edit and a black and white by duplicating files would double your storage and leave you managing two copies of everything.
On Day 20 of 30 Days of Lightroom Classic we build three complete versions of a shoot with virtual copies, keep them straight with color labels, and export each set to its own folder.
This is Day 20 of our 30 Days of Lightroom Classic series. Follow along with all 30 episodes as we explore the magic of Lightroom together!
Continue Watching 30 Days of Lightroom Classic
JOIN 30 DAYS OF LIGHTROOM (FOR FREE!)
Ready to jump in? Sign up and we’ll email you a printable calendar and daily class schedule so you can get started right away!
Image Source


Virtual Copies Cost Nothing and Solve the Client Problem
Clients rarely want one version. They want to see the color edit and the black and white, and they will usually pick the one you did not expect. Producing both by duplicating files would double your storage and leave you managing two copies of everything.
Virtual copies solve this. They are additional versions of a photograph that exist only inside your catalog — no new file on disk, no extra gigabytes. Day 20 builds three complete versions of a six-image shoot and delivers each as its own folder.
What a Virtual Copy Actually Is
Right-click any image and choose Create Virtual Copy, or use Photo > Create Virtual Copy.
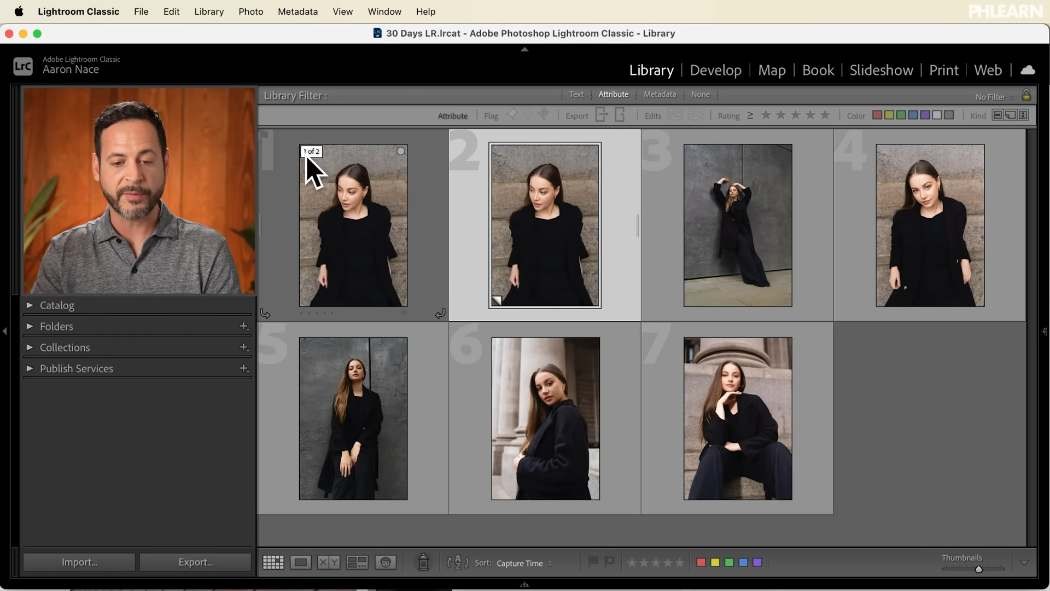
A second thumbnail appears, and both are labelled 1 of 2 and 2 of 2 — Lightroom automatically stacks them together. Click the stack number to collapse them into a single thumbnail with a badge, and click again to expand.
Nothing has been written to your hard drive. A virtual copy is a second set of instructions pointing at the same file, so you can edit it however you like with no cost beyond a catalog entry. This is the same non-destructive principle behind everything Lightroom does, taken one step further.
Filtering Originals from Copies
Two virtual copies of six images gives eighteen thumbnails, and the grid gets confusing quickly. The filter bar is what keeps it workable.
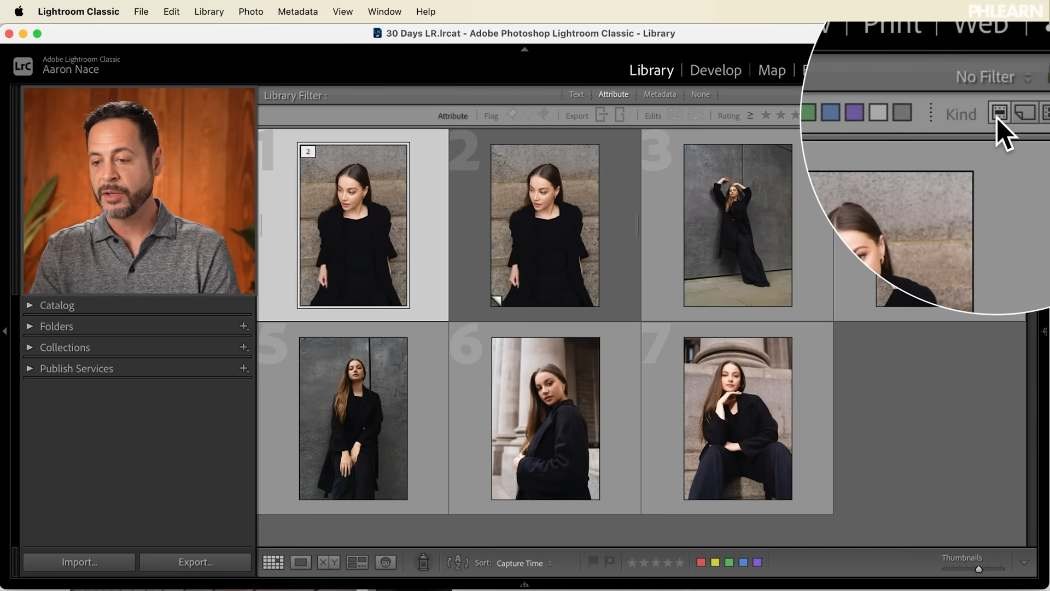
Press backslash to show the Library Filter (or View > Show Filter Bar), click Attribute, and look to the far right for Kind. Two icons: original photos, and virtual copies. Toggle either to see only that kind, or both for everything.
The same options live under Library > Filter by Kind if you prefer menus.
Color Labels to Separate Multiple Sets
Filtering by Kind separates originals from copies, but it cannot tell one set of copies from another. Once you have a black and white set and a color-graded set, they are all just “virtual copies”.
Color labels solve it, and the trick is timing:
-
Create the whole set of virtual copies at once
Select all your originals, then Photo > Create Virtual Copies.
-
Label them immediately
The new copies are still selected the moment they are created. Press 6 for red, 7 for yellow, 8 for green or 9 for blue before clicking anywhere else.
-
Repeat with a different color for the next set
Second batch of copies, second color.
Now the grid reads at a glance: unlabelled thumbnails are originals, red are one treatment, yellow another. The Attribute filter can show you any set instantly.
Editing Each Set
Edit one copy from a set properly, then push it across the rest with Sync Settings.
For the black and white set, that means the Black and White Mix and a contrast adjustment, then Check All and synchronize.
For the color-graded set, blue in the shadows and warmth in the highlights — and here Check None, then tick only Color Grading. Syncing everything would overwrite the tonal work already sitting on those copies. Sync only what the treatment is actually about.
Exporting Each Version to Its Own Folder
The delivery is where the whole system pays off.
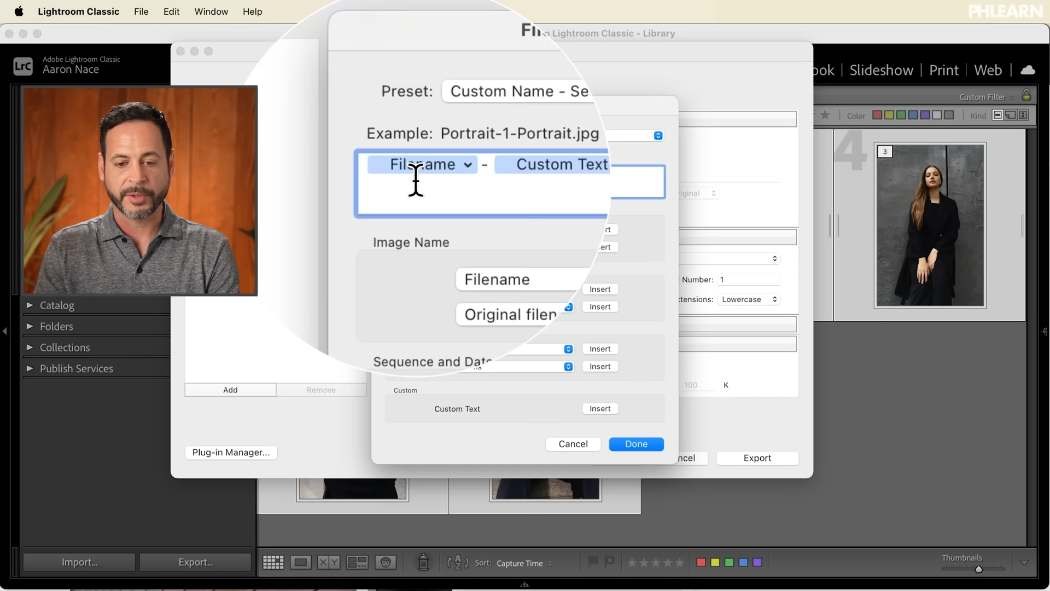
Filter to one set — say the red labels — select all, and choose File > Export. In File Naming, click Edit and build a template of Filename + hyphen + Custom Text. Set the custom text to describe the treatment, so portrait-1 exports as portrait-1-BW.
Choose your export folder and create a subfolder named for the treatment. Repeat for each set.
You end up with three folders — original color, black and white, color graded — each holding the full shoot, each file named so the version is obvious even outside Lightroom. Export settings get their own day later in the series.
Tidying Up Afterwards
Photo > Stacking > Collapse All Stacks folds every virtual copy back under its original. The grid looks exactly as it did before you started, with a small badge showing how many versions each thumbnail hides.
All the work is still there. It is simply out of the way until you want it.
Where This Usually Goes Wrong
Not labeling copies at creation time. They are selected for exactly one moment. Miss it and you are re-selecting eighteen thumbnails by hand.
Working without the filter bar. Three versions of a shoot is genuinely confusing in a flat grid. Backslash, Attribute, Kind.
Check All when syncing a second treatment. It undoes the edits already on those copies. Check None and tick deliberately.
Exporting without custom text in the filename. Three folders of identically named files is a support request waiting to happen.
Duplicating actual files instead. Virtual copies cost nothing on disk. There is no reason to copy a RAW file to try a second look.
Take It From Here
Virtual copies turn “which version do you prefer?” from a day of work into about ten minutes. Build the alternate treatments once, label them so you can find them, sync them across the set, and deliver each in its own folder — the client sees three complete galleries and you edited two extra photographs.
Tomorrow we go deep on one tool: the Lens Blur tool in Lightroom Classic.
Quick Reference: Keys, Menus and Settings
- Create a copyRight-click > Create Virtual Copy, or Photo > Create Virtual Copies for a selection
- Filter copies\ for the Library Filter > Attribute > Kind; or Library > Filter by Kind
- Select and deselectCmd/Ctrl + A to select all, Cmd/Ctrl + D to deselect
- Sync a setSync Settings: Check All for the black and white set; Check None plus Color Grading for the graded set
- Label a setWhile the new copies are selected: 6 red, 7 yellow, 8 green, 9 blue
- Export each versionFile > Export, File Naming > Edit: Filename, hyphen, Custom Text; a new subfolder per version
- Tidy upPhoto > Stacking > Collapse All Stacks
Virtual copies add no files to your hard drive, only versions in the catalog.
Free Downloads
Follow Along on the Same Photos
Get the 6 JPEG photos from the tutorial to build black and white and color-graded virtual copies, then export all three versions. Free with a PHLEARN account.
Virtual Copies in Lightroom: Common Questions
What is a virtual copy in Lightroom Classic?
It is an extra version of a photo that lives only in your catalog. No new file is written to your hard drive, and you can edit it completely differently from the original.
How do I create a virtual copy?
Right-click the photo and choose Create Virtual Copy, or use Photo > Create Virtual Copy. Select several photos first and the menu makes a copy of each.
Why do my photos say 1 of 2 and 2 of 2?
Lightroom stacks a virtual copy with its original automatically. Click the stack number to collapse them into one thumbnail, and click again to expand them.
How do I show only the virtual copies?
Press the backslash key to show the Library Filter, click Attribute and use the Kind icons on the far right for original photos or virtual copies. Library > Filter by Kind does the same.
How do I keep different sets of virtual copies apart?
Give each set a color label right after you create it, while the new copies are still selected. Press 6 for red, 7 for yellow, 8 for green or 9 for blue, then filter by that color.
How do I give a whole set of copies the same edit?
Edit one copy, Shift-click the rest of the set and click Sync Settings. The black and white set uses Check All; the color-graded set uses Check None with only Color Grading ticked.
How do I export each version with its own name?
In File > Export, edit the File Naming template to Filename, a hyphen and Custom Text, then type the version, such as B and W. Export each set into its own new folder.
How do I tidy up all the copies afterwards?
Choose Photo > Stacking > Collapse All Stacks. Every copy folds back under its original, and you can open a stack whenever you need it.
Why use virtual copies for client work?
You can deliver the same shoot in several looks, like original color, black and white and color graded, in separate folders without duplicating any files.
Are the sample files free?
Yes, with a free PHLEARN account. You get 6 sample images: the JPEG series used in the tutorial.
Master Photoshop, Lightroom and Photography
Join PHLEARN PRO for $12.99 a month or $99.99 a year. Cancel anytime, with a 100% money-back guarantee.





