
Download Sample Images
Watch the Full Series
Description
2020 Edition
This lesson is from the original 30 Days of Photoshop. Photoshop has changed a great deal since — there is an updated version of this lesson in the 2025 Edition: A Complete Tour of the Photoshop Interface, Day 1.
Opening Photoshop for the very first time can be overwhelming. Even if you’ve used the software before, there are likely some tools and features you’re yet to discover because they’re buried in a menu somewhere.
In our first day of 30 Days of Photoshop we take you on a tour of Adobe’s flagship software, explaining every major tool, menu, and option!
This is Day 1 of our 30 Days of Photoshop series. Follow along with all 30 episodes as we explore the the magic of Photoshop together!
Continue Watching 30 Days of Photoshop
JOIN 30 DAYS OF PHOTOSHOP (FOR FREE!)

Sign up to receive email updates to keep you going, sample images to follow along, and a printable calendar to keep track of your progress!

The Tour Begins Here
Open Photoshop for the first time and the screen is covered in panels, icons and menus, almost none of which announce what they do. That is the real barrier on day one — not difficulty, just unfamiliarity. Nothing here is complicated once you know which part of the window is responsible for what.
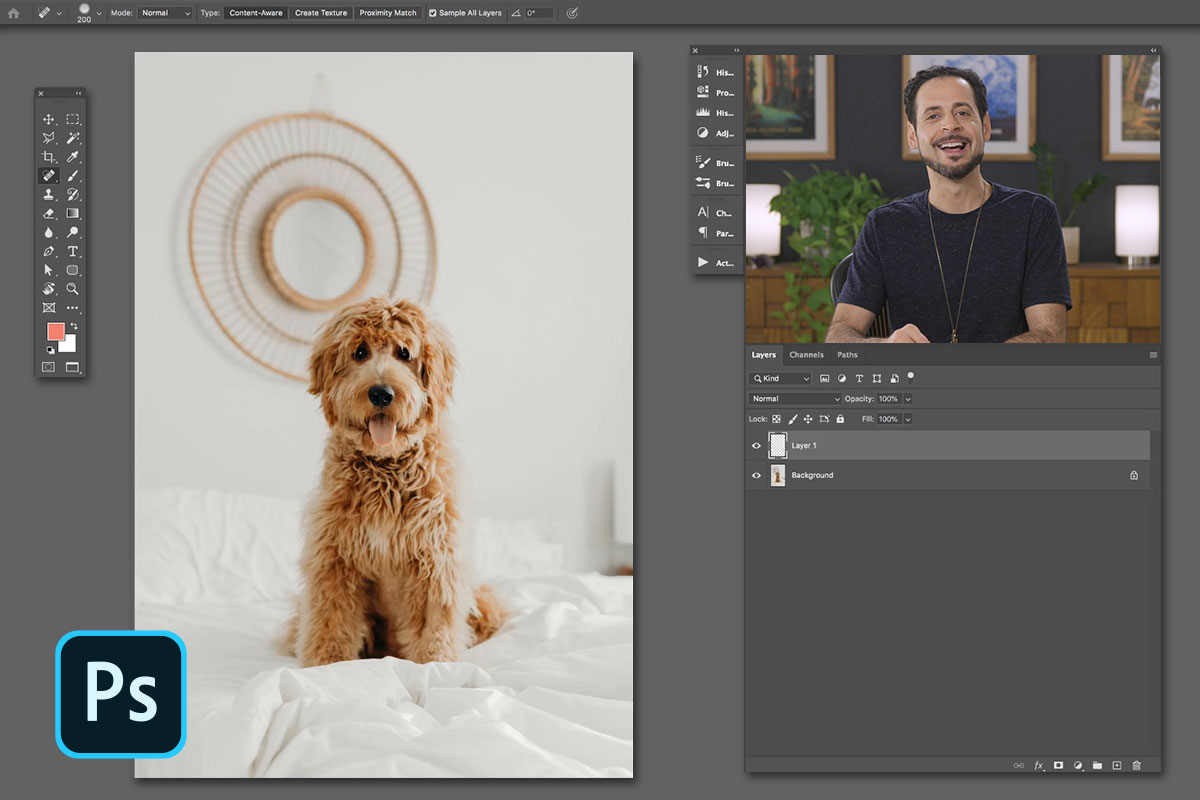
This is a full tour of the program: the four areas the interface divides into, the tools you will actually reach for, how the options bar changes under you, how to arrange panels into a workspace of your own, and a pass through every top menu. Download the sample image and follow along — the file used here is a portrait of a very fluffy dog, and it is the same one used for the demonstration below.
What Photoshop Is, and When Lightroom Is Enough
Photoshop is the most comprehensive photo editor available. It handles everything from basic adjustments through to advanced compositing and retouching, and that range is the point — there is essentially no limit on what you can do to an image inside it.
That range is also the honest argument against it. If all you need is to correct white balance and exposure across a shoot, a simpler program like Lightroom is designed for exactly that and will be faster. Photoshop can do everything Lightroom does and a great deal more, so the question is not which is better but how far past a basic correction you intend to go.
Past that line is where it earns its place: removing every wrinkle from a piece of clothing, smoothing the highlights and shadows on a person’s skin, building illusions like double exposures and dispersion effects, or constructing whole scenes of alien worlds and mysterious beings.
The Four Areas of the Interface
Everything on screen belongs to one of four regions, and the whole layout stops being intimidating the moment you can name them.
The toolbar down the left holds every tool you can pick up. The options bar across the top holds the settings for whichever tool is currently active. The panels on the right give you information about the image and control over it. And the menus along the very top hold file management and the more advanced commands.
The order matters more than the names: you pick a tool, you configure it in the options bar, you perform an action, and the panels show you what you built. That loop is most of Photoshop. Press F to cycle into full-screen mode any time you want the interface out of the way and just the image on screen.
The Tools You Will Actually Reach For
The toolbar looks crowded, but a working photographer uses a fraction of it. These are the ones that come up again and again.
Moving and Selecting
The Move tool repositions the contents of a layer. Below it sit the selection tools, and these matter more than they look: once an area is selected, every edit you make lands only inside it. Selections get a lesson of their own later in the series.
Cropping and Sampling
The Crop tool changes the size and framing of the image. The Eyedropper samples a colour straight out of the photo so you can paint or fill with it.
Removing and Painting
The Spot Healing Brush and the Clone Stamp remove objects and blemishes. The Brush paints on the image and, just as importantly, on layer masks. The Gradient tool fills with a blend, and Dodge, Burn and Blur lighten, darken and soften specific areas.
Shapes, Paths and Navigation
The Pen tool makes precise, hand-drawn selections and paths. The Shape tools create editable vector shapes. Below those sit canvas rotation and zoom, and at the very bottom of the bar are the foreground and background colour swatches — click either one to open the colour picker.
The Options Bar Changes Under You
The strip along the top is not fixed. It rewrites itself completely every time you pick up a different tool, which is why a setting you remember seeing can seem to vanish.
Choose a selection tool and it offers the selection mode, a feather amount and a style. Choose Crop and it offers the aspect ratio, a straightening control, whether to delete the cropped pixels, and a content-aware option. Choose the Brush and it offers opacity and flow. If a tool is not behaving the way you expect, this strip is almost always where the setting lives.
Panels Hold the Information and the Control
The panels on the right are where Photoshop tells you about your image and where you adjust it. Your arrangement will not match anyone else’s, and that is fine — they are meant to be moved.
Finding a Panel You Cannot See
Every panel in the program lives under the Window menu, whether or not it is currently on screen. If a tutorial mentions something you cannot find, open Window and it will be in that list. Open the Histogram that way and you get a readout of the light in the photo: a spike on the right means most of the image is bright, a spike on the left means most of it is dark.
Docking, Floating and Grouping
Click a panel’s tab and drag to pull it out of the dock into a floating window. Drag one tab onto another and the two group together in the same box, sharing tabs. Click the double arrow to collapse a group down, and again to expand it. Nothing you do here is permanent and nothing is ever lost — a closed panel is always one trip to the Window menu away.
Build a Workspace and Save It
Once you have the panels where you want them, that arrangement can be saved and recalled by name. It is worth doing for each kind of work you take on.
-
Arrange the Panels for One Kind of Work
For type-heavy work, pull Character and Paragraph out so they stay visible while you use the Type tool. For photo editing, keep History, Properties, Histogram and Adjustments to hand.
-
Go to Window > Workspace > New Workspace
Give it a name that describes the job — “Graphics and Text”, say. Photoshop offers to save your keyboard shortcuts, menus and toolbar along with the panel layout; tick those only if you have customised them.
-
Save, Then Wreck the Layout on Purpose
Move things around, close panels, make a mess. This is the part that makes the feature safe to rely on.
-
Recall It From Window > Workspace
Pick your saved workspace by name and every panel returns exactly where you left it. You can keep several and switch between them as the work changes.
The advice worth taking from this: once you have finished the thirty days, notice which tools and panels you genuinely use, keep those visible, and hide the rest.
Layers Are the Cornerstone
Layers, Channels and Paths are usually grouped together in one panel. Layers is the one that matters most, and it is what separates Photoshop from a simple photo editor.
Here is the demonstration in miniature. Click the plus icon at the bottom of the Layers panel to create a new empty layer. Pick up the Spot Healing Brush, and paint over a distracting post in the background — it disappears in a stroke. Because that repair landed on its own layer rather than on the photo, you can switch it off and on at will, and the original pixels are untouched.
That is the whole idea behind non-destructive editing, and it is the habit this series is built around. Save the document with its layers intact and you can come back months later and change your mind. Classic Day 3 covers layers properly.
A Pass Through the Menus
The menus hold file management and the more advanced controls. On a PC the arrangement differs slightly from a Mac, but everything is present on both.
Photoshop (or Edit on Windows) holds Preferences — interface, export and performance settings. File covers opening, closing, saving and exporting. Edit holds undo and redo, and at the bottom the keyboard shortcut editor. Image changes the file itself: auto tone and colour, image size, measurement and scale.
Layer is the menu you will live in — new layers, layer styles such as bevel and emboss or a pattern overlay, layer masks, Smart Objects and merging. Type collects the text controls. Select is the menu version of the selection tools: select all, deselect, Color Range, Select Subject, and saving and loading selections. Filter holds blur, sharpen, distortion and the painterly effects. 3D covers basic modelling and rendering. View handles zoom, guides and rulers, and Window arranges documents and panels.
The Help Menu Is the Shortcut Nobody Uses
The Help menu has a search box, and it does something better than open a web page. Type a feature name — “gradients”, say — and it lists every place in Photoshop that feature appears, from the Gradients panel to the Gradient Overlay layer style. In a program this large it is the fastest way to find something you half-remember from an earlier lesson.
Set Yourself Up Before Day 2
Download the sample image, open it, and spend ten minutes doing three things: press F to see the image on its own, open a panel you have never used from the Window menu, and save one workspace of your own. Then try the Spot Healing Brush on a new layer and toggle it off and on. That single move is the habit the rest of the series is built on.
Tomorrow, Classic Day 2 covers opening, editing and saving — the full round trip on one file. If you would rather see how the interface looks in the current version of Photoshop, with the contextual task bar and the AI tools that have arrived since, that is Day 1 of the 2025 Edition.







Enjoying This Free Tutorial? Go Further with PRO.
Unlock Full Sample Files, PSDs, and Hundreds of Masterclasses!

Download full project assets, original PSDs, and RAW images for every lesson
Unlimited access to our complete library of PRO Photoshop & Lightroom courses
Instant 4K Ultra HD streaming on all devices, anytime, anywhere
Full access to our entire library of Photoshop Actions, Presets, and LUTs
Flexible monthly and annual membership plans
Cancel anytime with zero hassle or commitments