
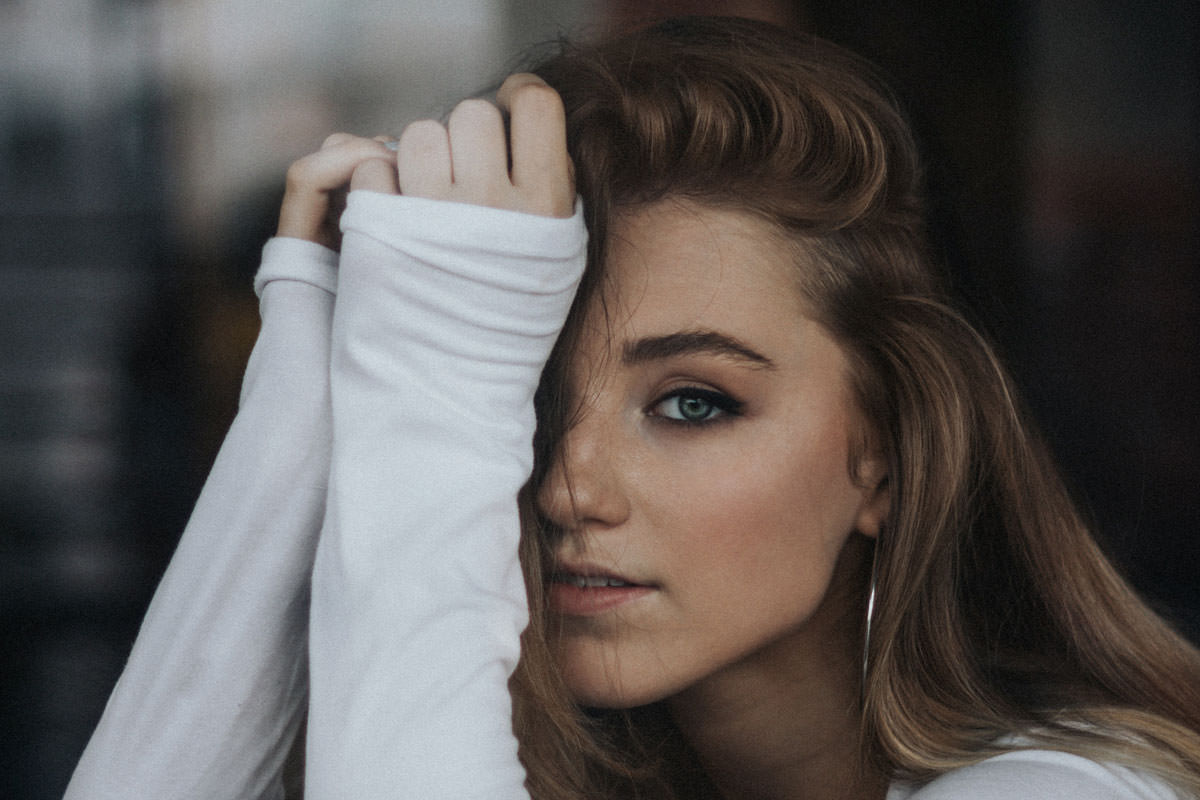

Download Assets
This tutorial includes 1 sample image and 1 PDF guide. Downloads are free with a PHLEARN account.
- Download the sample images and PSDs from every free tutorial on PHLEARN
- New free tutorials published every week
- One free account — sign up once, then download anything
Free PDF Guide · 4 Pages
This Tutorial as a Step-by-Step PDF
The 4-page guide walks through the brush-only retouch: sampling skin colors with Alt/Option at about 60% Flow to repaint blemishes, dodging and burning with white and black on a Soft Light layer at 5% Flow, canceling the green cast with a low-saturation magenta from Window > Color, then muted color for the eyes and hair. Keep it next to your keyboard.
description
Photoshop has a dedicated tool for nearly every retouching job, which is exactly why it is worth seeing how far a single one can go. This tutorial takes on a full portrait retouch using nothing but the Brush tool: hand-painting skin texture over blemishes with sampled point colors, dodging and burning with low-flow white and black on a Soft Light layer, cancelling a green color cast with its complementary magenta, and adding subtle color and detail to the eyes and hair.
Enjoying This Free Tutorial?
We publish a new free tutorial every week, each one with sample images and PSDs you can download and follow along with. Sign up and they land straight in your inbox, along with early word on sales, events and subscriber-only offers.


Download Sample Images
Click the link below to download the sample images and follow along with this tutorial.
DownloadRetouch a Portrait with Just the Brush Tool
Stripping Photoshop down to a single tool is a great way to see what’s actually possible with the basics, especially for anyone who finds the program’s full toolset overwhelming when they’re first getting started. This tutorial takes on a full portrait retouch, blemish removal, dodging and burning, and color correction, using nothing but the Brush tool from start to finish, with no Spot Healing Brush, Clone Stamp, or Fill command allowed.
The Challenge: Retouch a Portrait Using Only the Brush Tool
The starting image has a handful of typical problems: small blemishes, an uneven highlight, a slight overall green color cast, a neck that reads a bit dark and desaturated, and eyes and hair that could use some attention. The eyebrows are on the first list too, but in the end they stay as they are, natural to match the hair. Every one of these gets addressed using only the Brush tool (B), a soft or slightly hard round brush, and layer blend modes, rather than any of Photoshop’s dedicated retouching tools.
Remove Blemishes by Hand-Painting Skin Texture
Simply painting a single flat color over a blemish would erase it, but it would also destroy the skin’s natural texture in the process, so the actual strategy is to zoom in extremely close and hand-paint replacement texture pixel by pixel.
Sampling Point Colors at Low Flow for Natural Variation
Holding Alt/Option samples a tiny point color directly next to a blemish, and painting that color over the dark spot at a relatively low flow, around 60 percent, lets some of the underlying texture show through rather than flattening it out completely. The real key is never reusing the exact same sampled color twice in a row: constantly re-sampling slightly different nearby colors, and occasionally sampling a nearby highlight to dot in a few lighter specks, keeps the painted-in area looking like genuine skin texture rather than an obvious smooth patch.
Dodge and Burn with Low-Flow White and Black on Soft Light
A new layer, set to the Soft Light blend mode, becomes the canvas for dodging and burning: painting white over an area lightens it, painting black darkens it, and Soft Light keeps both effects gentle and photographic rather than harsh.
Balancing Dodging and Burning Without Overdoing It
Brush flow starts at 10 percent, then drops even lower: pressing Shift + 0 and then 5 sets it to 5 percent, so each individual brush stroke only nudges brightness a tiny amount, letting an area be built up gradually to exactly the right amount of light or dark by painting over it several times rather than committing to one strong stroke. Any spot with a harsh, abrupt transition from light to dark is the natural place to focus, painting white into small dark patches and a little black into small light patches to even out those transitions specifically. In practice the balance tends to run roughly 70 percent dodging to 30 percent burning, and it’s easy to overdo the effect and start distorting the actual shape of a feature, which is exactly why such a low flow setting matters: it keeps mistakes small and easy to undo before they become obvious.
Add Detail and Brightness to the Eyes
Zooming into the eye itself, small strokes of white painted carefully add both brightness and a bit of extra shape definition where detail is otherwise lacking, and a bright, contrasty highlight dot painted directly into the eye draws a viewer’s attention right to that spot, since the human eye naturally goes toward areas of strong contrast.
Correct a Color Cast with the Complementary Color
A slight green color cast across the image gets fixed using basic color theory: green’s complementary color is magenta, so painting a subtle magenta over the affected areas neutralizes the cast and helps restore a more accurate overall color balance.
Building Up Color Gradually with a Soft Light Layer
Using the Color panel (Window > Color) to pick a magenta on a new layer set to Soft Light, then painting with a large, hard-edged brush directly over the subject, applies the correction broadly. Finding the right magenta takes some trial and error on the Soft Light layer itself, turning it off and on: the first pick is far too strong, so it goes less saturated and a little darker until the change is subtle. The layer is switched to Normal only so you can see what you are covering while the giant brush paints the whole image, then set back to Soft Light; a magenta that’s too saturated or too light needs to be dialed back and repainted with the giant brush again until the color cast cancels out cleanly without introducing an obvious tint of its own.
Add Subtle Color to the Eyes for Depth
A very light, low-saturation green-to-blue tone, again on a Soft Light layer, painted carefully into the iris adds a bit of natural color depth, and a second Normal-mode layer with a few tiny painted highlights adds small convincing details that make the eye read as more alive and detailed overall.
Keeping Saturation Low for a Natural Look
Every color addition in this retouch, the eye color, the hair highlights, and the color-cast correction alike, works best pushed toward a lower saturation than feels intuitive at first; an oversaturated color reads as an obvious paint stroke, while the same hue at a much lower saturation blends convincingly into the photo.
Add Warm Highlights to the Hair
Switching a new layer to Soft Light and painting brown tones into the hair adds subtle highlight color; starting with a color that’s too yellow, shifting it toward red and then pulling the saturation down produces a far more natural-looking result than the first attempt usually does. On this same first brown layer, a little paint also goes down onto the neck, which could use a tiny bit more color. A second, brighter Soft Light layer, painted more precisely over just the brightest highlight areas of the hair, adds a further bit of dimension on top of the broader color pass.
Why Extreme Constraints Teach Real Retouching Skills
Stripping away every specialized retouching tool and relying purely on the Brush tool and blend modes forces a much closer look at the basics underneath them. Aaron is clear that brush-only is not always the best way: in a real retouch he would use the Spot Healing Brush, the Clone Stamp or the Healing Brush for blemishes, and the Fill command to cover the color layer. The ideas carry over, though: low flow, variation and low saturation. Working this way surfaces lessons that don’t always come through clearly otherwise, most notably just how little saturation most convincing color work actually needs.
Final Thoughts
A full portrait retouch, blemishes, dodging and burning, color correction, and even some added hair and eye detail, turned out to be entirely achievable using nothing but the Brush tool, a few blend modes, and a lot of patience with low flow settings. The biggest surprise of the whole challenge was how consistently low saturation, not high, produced the most convincing, natural-looking results across every single technique tried.
Quick Reference: Keys, Menus and Settings
- Brush ToolB, then right-click for a regular round soft-edged brush
- Repaint blemishesNew layer, zoomed in to the pixels; Alt/Option-click to sample, Flow about 60%
- Dodge and burnNew layer set to Soft Light; paint white to lighten, black to darken
- Flow to 5%Shift + 0, then 5
- UndoCmd/Ctrl + Z
- Pick colorsWindow > Color; choose a low saturation
- Fix the color castMagenta on a Soft Light layer; switch to Normal to paint it everywhere with a giant hard brush, then back to Soft Light
No AI, no generative credits. Just the Brush Tool and blend modes.

Free Downloads
Follow Along on the Same Photo
Get the close-up portrait Aaron retouches with only the Brush Tool and the 4-page PDF guide to every pass. Free with a PHLEARN account.
Brush Tool Retouching: Common Questions
Can you really retouch a portrait with only the Brush Tool?
Yes. Blemishes, dodging and burning, the color cast, the eyes and the hair are all done with the Brush Tool and a few blend modes. Aaron calls it a challenge, not always the best way to do each job, but the result surprised him.
How do you remove a blemish without losing skin texture?
On a new layer, zoom in until you see the pixels. Hold Alt/Option and click the skin right beside the spot, then paint it in at about 60% Flow. Keep re-sampling slightly different colors and dot in a few highlight colors so it reads as texture.
Why does my painted patch look flat?
You probably reused one sampled color. A patch of a single tone looks painted. Keep sampling new colors around the spot; the variation is the texture.
How do you dodge and burn with the Brush Tool?
Create a new layer and set its blend mode to Soft Light. On that layer white paint lightens and black paint darkens, so those are the only two colors you need.
What Flow should I use for dodging and burning?
Very low. Aaron starts at 10%, then presses Shift + 0 and 5 for a Flow of 5%. Each stroke adds a tiny amount, and you paint over an area again to build it up.
How do I keep dodging and burning from looking fake?
Work on the sharp light-to-dark transitions only, stay zoomed out and keep a finger on Cmd/Ctrl + Z. Aaron ends up at about 70% dodging and 30% burning; going too strong changes the shape of the face.
How do you fix a green color cast with a brush?
Open Window > Color and pick magenta, the complementary color of green, at a low saturation. Test it on a new Soft Light layer, switch to Normal to see what you cover while painting the whole image with a giant hard brush, then set the layer back to Soft Light.
Why did every color I added look too strong?
Every first pick in this retouch was too saturated, including the magenta, the eye color and the hair brown. Pull the saturation down much further than feels right and the color blends in.
How do you add color to the eyes and hair?
Each gets a new Soft Light layer: a muted green moved toward blue for the eye, a muted brown for the hair. A Normal layer with tiny, slightly brighter marks adds eye detail, and a second, lighter Soft Light layer goes only on the hair highlights.
Is the sample file free?
Yes, with a free PHLEARN account. You get 1 sample image and 1 PDF guide: the close-up portrait from the video and a 4-page walk-through of every pass.
From the Magazine View all
Stories, interviews and guides for photographers, new every week.
 EditingLightCraft vs Lightroom: I Edited the Same RAW Files in BothThe free clone on the same RAW files: what matches, what breaks and who should switch.
 InspirationRare Historical Photos: 13 of the Rarest Pictures Ever TakenFrom the earliest surviving picture of a person to the last passenger pigeon: who took each one and why it survives.
 EditingArtCraft: Photoshop Cloned by AI in Two Weeks. Is It Legal?ArtCraft cloned Photoshop and Lightroom with AI and gave them away. Any good? Legal? Safe?
Master Photoshop, Lightroom and Photography
Join PHLEARN PRO for $12.99 a month, or $99.99 a year (save 36%). Cancel anytime, with a 100% money-back guarantee.





