
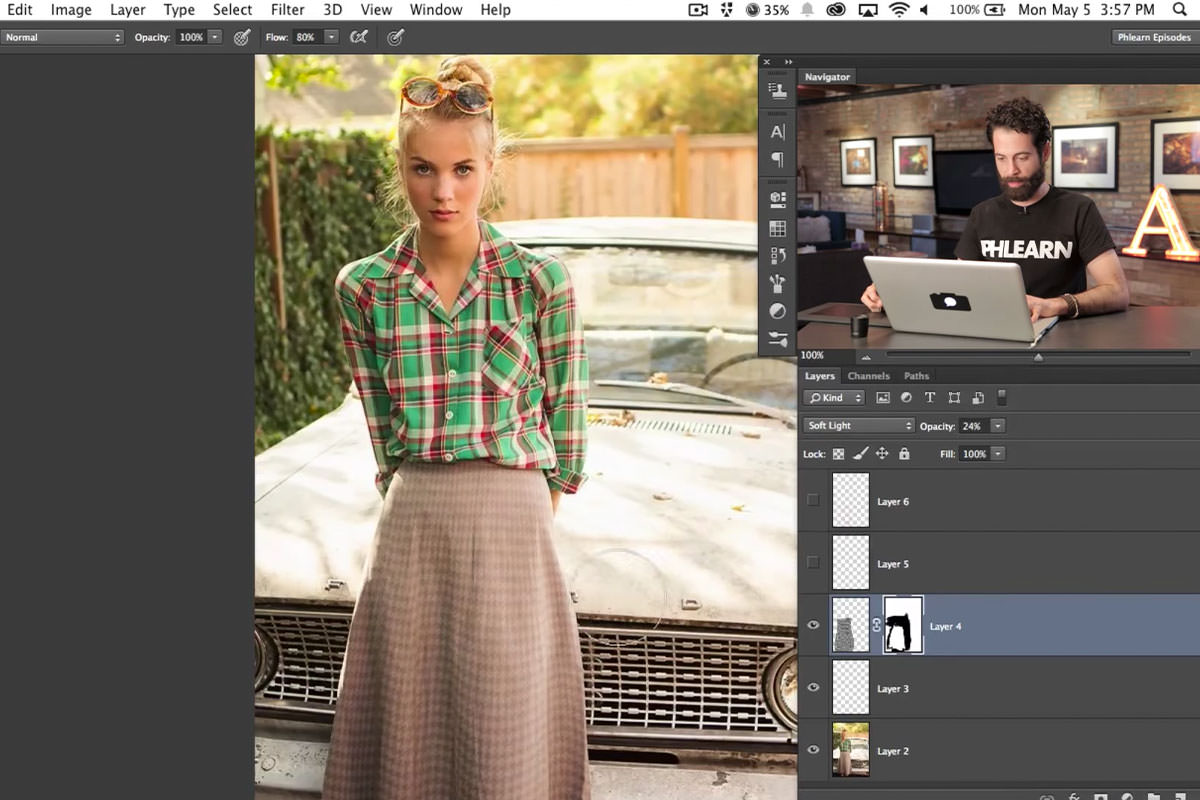

description
Learn how to create patterns on clothing in Photoshop so the print looks woven into the fabric rather than pasted on top. Define a seamless tile with Define Pattern, fill an oversized canvas so there is plenty of detail to scale down from, then drop it onto the garment and set it to Soft Light. From there the Pen tool traces each fold in turn and Warp bends the pattern to follow it, with a mask and Blend If finishing the highlights.
Enjoying This Free Tutorial?
We publish a new free tutorial every week, each one with sample images and PSDs you can download and follow along with. Sign up and they land straight in your inbox, along with early word on sales, events and subscriber-only offers.

Creating Patterns On Clothing in Photoshop
Adding a completely new pattern to a piece of clothing starts with sourcing or building a seamless, repeatable pattern, then follows through with warping and blending that makes it look like it was actually printed on the fabric. This tutorial builds a houndstooth pattern into a workable Photoshop pattern, scales and positions it onto a dress, and uses the Pen tool and Warp to follow every fold in the fabric.
Sourcing and Defining a Seamless Pattern
A seamless, repeatable pattern found online can be copied directly into Photoshop and saved as a reusable pattern preset.
-
Search for a Seamless Pattern
Search for a pattern using terms like seamless or repeatable, which ensures the tile lines up correctly when it repeats. This example uses a Free Seamless Vector Houndstooth Pattern from Christina Jewels Graphic Design.
-
Copy the Pattern Image
Right-click the pattern image and choose Copy Image, crediting the original source.
-
Paste It Into a New Document
Press Cmd/Ctrl+N to create a new document, which will size itself to match the copied image, then press Cmd/Ctrl+V to paste it in.
-
Define It as a Pattern
Go to Edit > Define Pattern and name the new pattern so it’s saved permanently in Photoshop’s pattern library.
Building a Larger Pattern Source Canvas
Filling an oversized new document with the pattern, rather than scaling down a small original, avoids running out of usable pattern before it’s small enough.
-
Create a Large New Document
Press Cmd/Ctrl+N and create a new document at a large size, such as 5,000 by 5,000 pixels.
-
Fill It With the Defined Pattern
Press Shift+Delete, choose Pattern as the fill source, and select the newly defined pattern.
Why an Oversized Fill Canvas Avoids Losing Pattern Detail
Scaling down a small pattern layer directly can shrink it past the point where enough of the design remains visible to look convincing. Filling a much larger canvas with the same pattern first provides plenty of extra material to scale down from, so the finished pattern still holds its detail at whatever final size is needed.
Moving and Scaling the Pattern Onto the Clothing
Dragging the filled pattern layer directly into the portrait document, then scaling it down to size, gets the pattern roughly positioned on the clothing.
-
Drag the Pattern Into the Portrait Document
Select the Move tool, hold Shift, and click and drag the pattern layer from the large document into the portrait document.
-
Lower the Opacity Temporarily
Lower the pattern layer’s opacity temporarily to see the clothing underneath more clearly while positioning it.
-
Scale the Pattern Down to Size
Press Cmd/Ctrl+T, link the width and height together, and scale the pattern down until it’s an appropriate size for the piece of clothing.
Blending the Pattern With Soft Light
Changing the pattern layer’s blend mode to Soft Light lets it interact with the clothing’s existing shading rather than sitting on top as a flat, obviously pasted-in graphic.
-
Return Opacity to 100%
Set the pattern layer’s opacity back to 100%.
-
Change the Blend Mode to Soft Light
Change the layer’s blend mode from Normal to Soft Light, which blends the pattern with the underlying image realistically.
Warping the Pattern to Roughly Match the Fabric
An initial, rough Warp gives the flat, square pattern some basic shape before the more detailed fold-by-fold warping begins.
-
Open the Warp Tool
Press Cmd/Ctrl+T on the pattern layer, right-click, and choose Warp.
-
Apply a General Shape Adjustment
Push and pull the warp handles to squeeze the sides in and give the flat pattern an initial sense of shape and dimension.
Selecting Fold Areas With the Pen Tool
Tracing the actual curves of the fabric’s folds with the Pen tool creates selections that match exactly where the pattern needs to bend and follow the clothing.
-
Identify the Fabric’s Folds
Look closely at the clothing to identify each individual fold and which direction it curves.
-
Trace a Fold With the Pen Tool
Press P for the Pen tool and click along the edge of one fold, dragging to create curves that follow its actual shape.
-
Turn the Path Into a Selection
Right-click the finished path and choose Make Selection, applying a very slight feather such as 0.1 pixels.
Warping Each Selected Area to Follow the Fabric
Warping the pattern within each individual fold selection, one at a time, is what actually makes the pattern follow the fabric’s real shape.
-
Open Warp on the Selection
Press Cmd/Ctrl+T, right-click, and choose Warp while the fold selection is active.
-
Hide the Selection and Dialogue While Warping
Press Cmd/Ctrl+H to hide the selection edges and warp overlay so the fabric itself is easier to judge.
-
Push and Pull to Match the Fold’s Direction
Push or pull the pattern within that selection to follow the direction the fold curves, then press Enter to confirm.
-
Deselect and Repeat for Each Fold
Press Cmd/Ctrl+D to deselect, then repeat the same pen selection and warp process for every remaining fold in the clothing.
Why Hiding the Selection Makes Warping Easier
The selection marching ants and the warp grid overlay can make it hard to judge exactly how the pattern is lining up with the fabric underneath. Pressing Cmd/Ctrl+H hides that visual clutter without canceling the active warp, making it much easier to see and judge the actual result while adjusting it.
Masking the Pattern to the Clothing
A layer mask confines the fully warped pattern to just the clothing, removing any overlap onto skin or the background.
-
Add a Layer Mask
Add a layer mask to the pattern layer.
-
Paint Black Outside the Clothing
Paint black on the mask over any area outside the clothing, such as skin or background that the pattern spilled onto.
Why Soft Light Forgives an Imprecise Mask
Because Soft Light blend mode already interacts with the underlying image’s tones rather than sitting as a flat, opaque layer, small overlaps left by an imprecise mask tend to blend in rather than stand out. A heavier, more solid pattern would need a much more careful mask, but a subtle blend mode like this one allows for a faster, less exacting masking pass.
Blending With Highlights Using Blend If
Restricting the pattern’s visibility in the brightest highlight areas with Blend If makes it look like sunlight is naturally washing the pattern out in those spots.
-
Open Blending Options
Double-click the pattern layer to open its Blending Options.
-
Restrict the Pattern in Bright Areas
Hold Option/Alt and drag the underlying layer’s lighter-area slider from right to left, making the pattern less visible wherever the underlying fabric is lighter.
-
Adjust Opacity for the Final Look
Adjust the pattern layer’s opacity as needed to fine-tune how strong or subtle the finished effect looks.
Why This Approach Works
Building the pattern on an oversized canvas before scaling it down is what keeps the final design detailed rather than running out of usable pattern too early. Using the Pen tool to trace each individual fold, then warping just that selection, is what makes the finished pattern actually follow the real shape of the fabric instead of sitting flat across it. Restricting the pattern’s visibility in the highlights with Blend If is a small final touch that makes it look like real light interacting with real fabric rather than a flat graphic pasted on top.
Final Thoughts
This example used a relatively simple pencil skirt and a houndstooth pattern, but the exact same steps, sourcing or building a pattern, warping it fold by fold, and blending it in, work on any garment and any pattern. It takes patience to work through every fold individually, but the payoff is a pattern that looks like it was actually printed on the fabric rather than added afterward.
Quick Reference: Keys, Menus and Settings
- Define the patternCmd/Ctrl + N, Cmd/Ctrl + V, Edit > Define Pattern
- Big pattern source5,000 x 5,000 px document, Shift + Delete, Contents: Pattern
- Place and scaleV, Shift-drag into the photo; Cmd/Ctrl + T with width and height linked
- BlendSoft Light at 100% Opacity
- WarpCmd/Ctrl + T, right-click > Warp; Cmd/Ctrl + H hides the grid
- Each foldP, trace the fold, right-click > Make Selection, Feather 0.1 px; warp, Enter, Cmd/Ctrl + D
- FinishLayer mask, paint black off the dress; Blend If: Alt/Option-drag the Underlying Layer white slider left
No AI, no generative credits.
Patterns on Clothing: Common Questions
Where do I find a pattern that repeats cleanly?
Search for the pattern you want with the words seamless or repeatable, so each tile lines up with the next. Credit the maker if they ask; this houndstooth came from Christina Jewels Graphic Design.
How do I turn an image into a Photoshop pattern?
Copy the image, press Cmd/Ctrl + N for a new document sized to the clipboard and paste with Cmd/Ctrl + V. Then go to Edit > Define Pattern and name it.
Why does my pattern run out when I scale it down?
A pattern filled into the photo’s own size leaves too little to shrink. Make a 5,000 by 5,000 pixel document, press Shift + Delete and fill it with your pattern, then Shift-drag that layer into the photo with the Move tool.
Which blend mode makes the pattern look printed on?
Soft Light, which blends the pattern with the dress’s own shading; Overlay works too. Multiply would drop the whites and Screen the darks.
How do I make the pattern follow the folds of the fabric?
Start with a rough Warp (Cmd/Ctrl + T, right-click > Warp) to squeeze in the sides. Then trace each fold with the Pen tool, right-click > Make Selection with a 0.1 pixel feather, and Warp just that area before pressing Enter and Cmd/Ctrl + D.
Do I have to close the Pen tool path?
No. Right-click and choose Make Selection, and Photoshop closes the path for you. Hold Cmd/Ctrl to move a point while you draw.
The selection and warp grid are in the way. Can I hide them?
Press Cmd/Ctrl + H. The marching ants and warp grid disappear while the warp stays active, so you can judge the fabric.
How careful does the mask need to be?
Add a layer mask and paint black wherever the pattern spills onto the legs or background. With a simple pattern on Soft Light, small overlaps blend in; a heavier pattern needs a cleaner mask.
How do I make the pattern fade where the light hits?
Double-click the layer, hold Alt/Option and drag the Underlying Layer’s white slider from right to left. The pattern shows less on lighter fabric, like sunlight washing it out; adjust the layer’s opacity to taste.
From the Magazine View all
Stories, interviews and guides for photographers, new every week.
 BusinessHow to Compete With AI: Give Your Clients MoreEveryone has the same tools now, and your clients know it. The way to compete is to give them more.
 EditingLightCraft vs Lightroom: Is the Free Clone Any Good?The free clone on the same RAW files: what matches, what breaks and who should switch.
 EditingHow to Tell If a Photo Is AI, and Prove Yours Is RealThe tells that still work in 2026, why detectors disagree, and how to prove your own photos.
Master Photoshop, Lightroom and Photography
Join PHLEARN PRO for $12.99 a month, or $99.99 a year (save 36%). Cancel anytime, with a 100% money-back guarantee.





