

Download Assets
This tutorial includes 2 sample images, 1 sample PSD and 1 PDF guide. Downloads are free with a PHLEARN account.
- Download the sample images and PSDs from every free tutorial on PHLEARN
- New free tutorials published every week
- One free account — sign up once, then download anything
Free PDF Guide · 4 Pages
This Tutorial as a Step-by-Step PDF
Every step from the video in order: Find Distractions and Wires and Cables, Generative Expand with the Crop tool, the sky swap, and the Camera Raw finish with grain, a vignette, a radial mask and Lens Blur. Keep it next to your keyboard.
description
Clean up your photos with Photoshop’s latest tools: remove background clutter, expand tight framing, replace skies, and use Camera Raw to seamlessly blend your final portrait edit.
Enjoying This Free Tutorial?
We publish a new free tutorial every week, each one with sample images and PSDs you can download and follow along with. Sign up and they land straight in your inbox, along with early word on sales, events and subscriber-only offers.
Image Source
Photos by Fellipe Ditadi and Omar Ramadan via Unsplash
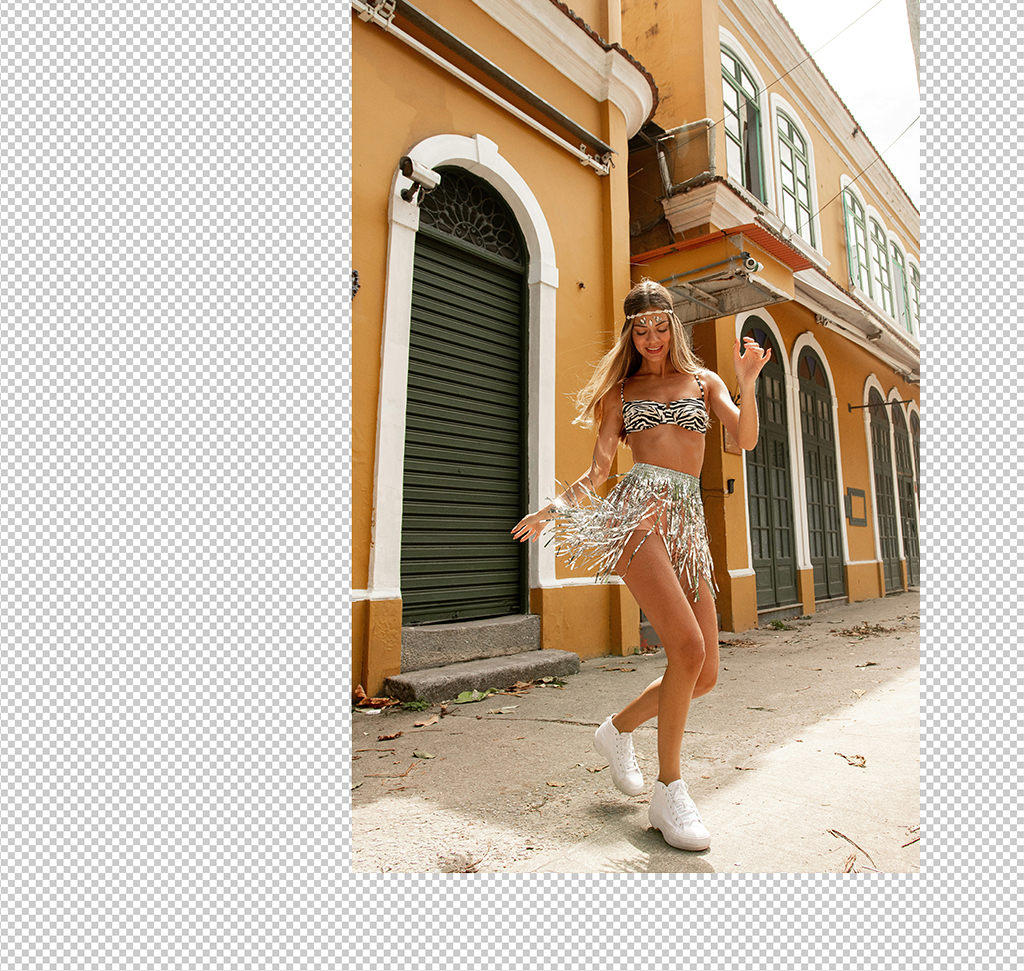

Clean Up and Polish Your Photos in Photoshop
Most portraits don’t fail because of the subject — they fail because of everything around the subject. A signpost behind someone’s head, a power line across the sky, a crop that presses the shoulder against the frame edge. Individually none of it seems like much; together it’s what separates a snapshot from a finished photograph.
This is a four-stage cleanup pass: strip the clutter, fix the framing, replace the flat sky, and blend the whole thing so none of the repairs announce themselves. Everything stays non-destructive, so you can revisit any decision later.
Why Cleanup Comes Before Color
Distractions Steal Attention Silently
Viewers rarely notice clutter consciously — their eye just drifts. Removing it doesn’t add anything to the frame; it stops the frame competing with itself, which is why the improvement often feels bigger than the edit.
Composition Is Easier to Fix Than You’d Think
A subject jammed against the edge used to mean a reshoot or a bad crop. Generative Expand builds new frame instead, which means you can compose after the fact and place your subject on a rule-of-thirds line rather than wherever the original framing left them.
Clean Up the Clutter First
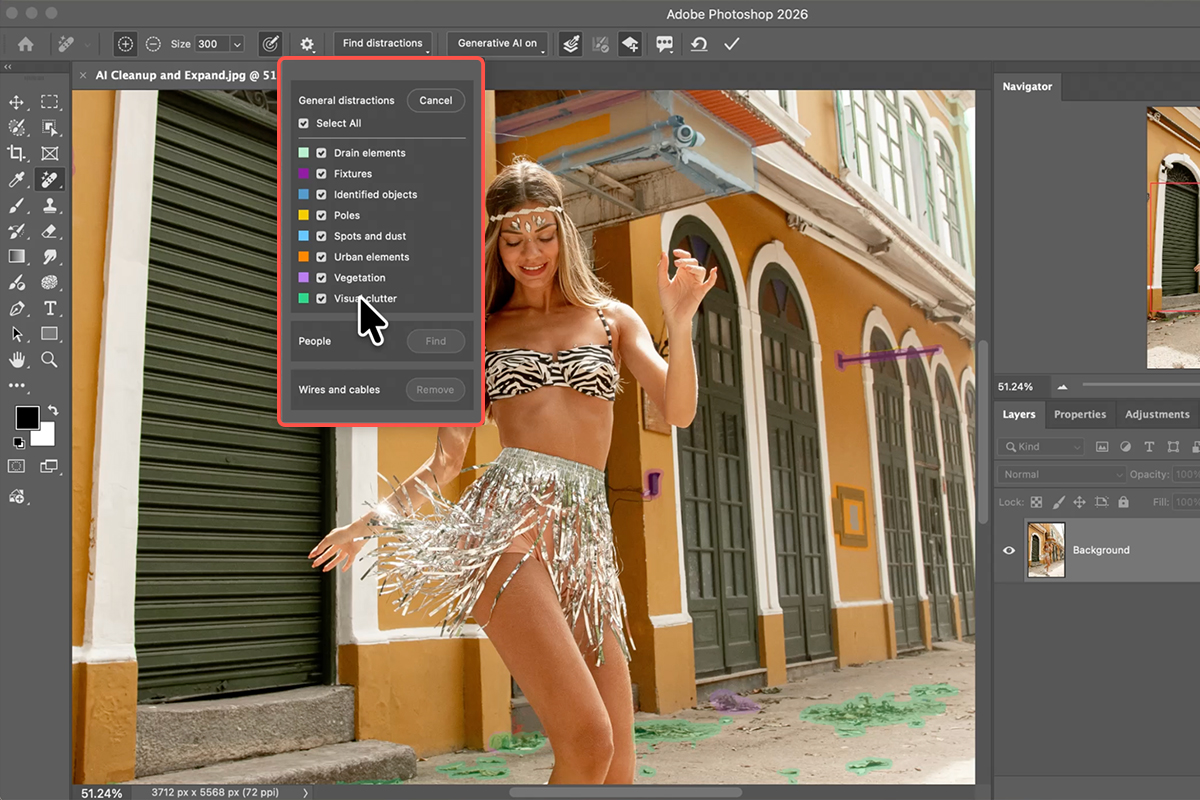
The Remove Tool’s Find Distractions mode scans the whole image and offers up what it thinks doesn’t belong, which is much faster than hunting for things yourself.
-
Grab the Remove Tool
Select it from the toolbar or press J.
-
Run Find Distractions
In the options bar, click Find Distractions. Photoshop scans the background, color-codes what it finds, and groups it by type — wires, people, objects — so you can accept or reject whole categories at once.
-
Correct the Selection
It will occasionally flag something you want to keep. Hold Alt/Option and paint over that area to subtract it, or brush over anything it missed. Treat its suggestion as a starting point rather than a verdict.
-
Check Generative AI and Sample All Layers, Then Commit
Both boxes matter: Generative AI gives you a proper fill rather than a smear, and Sample All Layers keeps the work on a clean separate layer instead of burning it into your original. Click the checkmark to run it. Our free guide to the latest Remove Tool update covers what changed in the 2026 build.
Rebuild the Framing
With the background clean, the composition problems become obvious. This is the point to fix them.
-
Open the Crop Tool
Press C. Rather than cropping in, you’re going to crop outward.
-
Drag the Boundary Beyond the Image
Pull an edge of the bounding box outside the existing canvas. Use the grid intersections to place your subject on a rule-of-thirds line — that’s the whole point of the extra room.
-
Generate Without a Prompt
In the contextual taskbar, set the fill option to Generative Expand and click Generate with the prompt box empty. Leaving it blank tells Photoshop to continue what’s already in the frame rather than invent something new, which is exactly what you want here. Our free Generative Expand walkthrough goes further into when to prompt and when not to.
Swap a Flat Sky
A blown-out white sky flattens everything below it. Replacing it is straightforward; making it look like it was always there takes one extra adjustment that most people skip.
-
Merge a Snapshot and Select the Sky
Create a merged copy of everything visible on a new layer, then go to Select > Sky. Photoshop finds the sky edge including gaps through hair and branches.
-
Drop the New Sky In
Drag your replacement sky image into the document, press Enter to place it, and click the Layer Mask icon with the selection still active. The new sky lands behind everything in one move.
-
Desaturate and Lighten It to Match
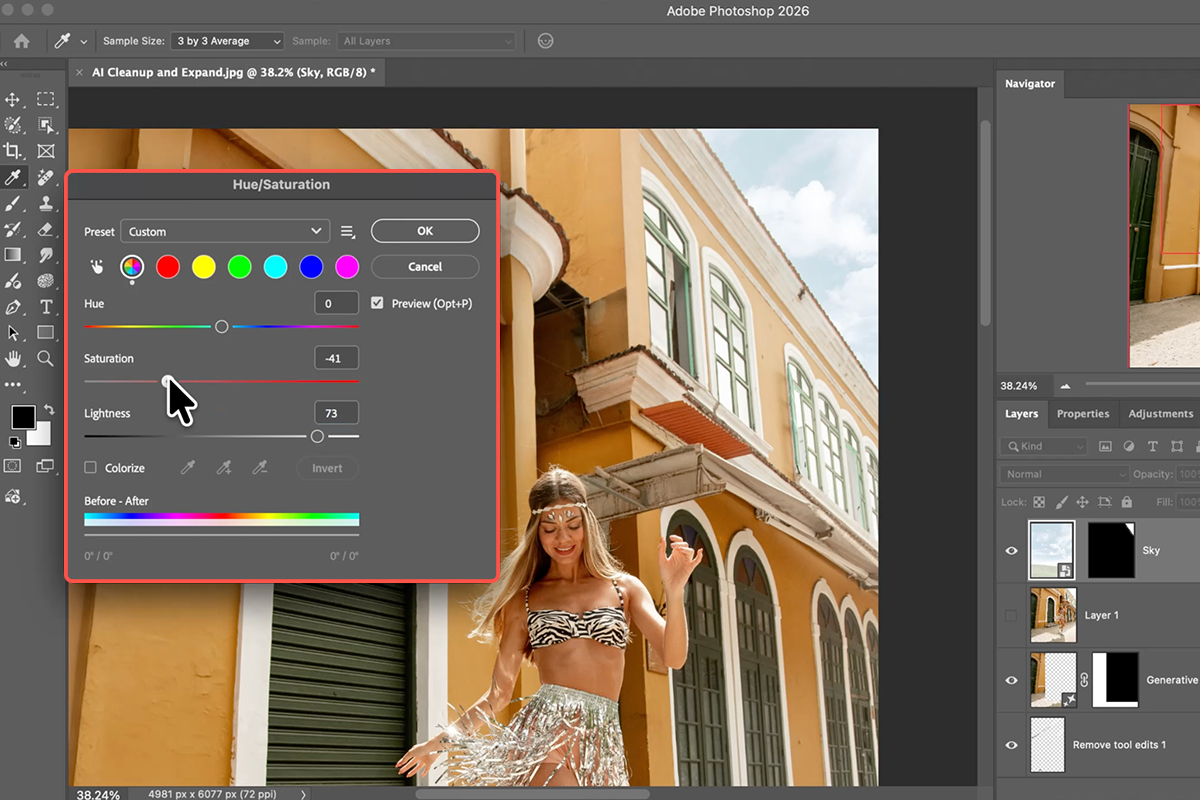
This is the step that sells it. Open Image > Adjustments > Hue/Saturation, lower the saturation and raise the lightness until the new sky sits in the same ambient light as the original photo. A dramatic sky pasted over a soft, bright portrait always looks pasted — matching the light beats picking a better sky.

Blend Everything Together
At this point the image is fixed but not finished. Generated areas are smoother than photographed ones, and the eye picks that up even when it can’t say why.
-
Merge and Convert to a Smart Object
Make one final merged snapshot layer, right-click it, and choose Convert for Smart Filters. Everything from here stays editable.
-
Add Grain in Camera Raw
Go to Filter > Camera Raw Filter and open the Effects panel. A small amount of Grain gives the AI-generated regions the same texture as the photographed ones. It’s a tiny move that does a disproportionate amount of the blending work.
-
Vignette, Radial Mask, Lens Blur
Under Optics, pull in a gentle Vignette. Add a Radial Mask over your subject and lift the exposure inside it while protecting the highlights. Finish with a light Lens Blur so the background falls slightly out of focus. Together these push attention exactly where you want it.
The Order Is the Technique
Clutter, then framing, then sky, then blend. Each stage depends on the one before it: you can’t judge composition until the distractions are gone, the sky selection needs the expanded canvas to work with, and the grain pass only makes sense once every generated region exists.
Do it out of order and you’ll redo work — expand the canvas after replacing the sky and you have a sky that stops partway across the frame.
What Usually Goes Wrong
Trusting Find Distractions Completely
It’s good at wires and litter, less good at knowing which person in the background is part of the story. Always review before committing.
Typing a Prompt Into Generative Expand
Prompting when you just want more of the same scene invites Photoshop to add things. Leave it empty and it extends what’s there.
Skipping the Grain
Generated pixels are noticeably cleaner than camera pixels. Without a unifying grain pass, the repaired areas read as smooth patches even when the content is perfect.
Why Restraint Wins When You Clean Up
Every tool in this workflow can be pushed much harder than it should be. A heavy vignette, a dramatic sky, an aggressive blur — each is one slider away, and each makes the image look processed rather than photographed.
The version people react well to is almost always the one where they can’t identify what was done. If a viewer notices the sky, the sky is too much. If they notice the vignette, it’s too dark. The whole point of a cleanup pass is that the result looks like the photograph you thought you took.
Run It on Your Own Work
Remove Tool with Find Distractions, Crop plus Generative Expand, Select Sky and match the light, then Camera Raw for grain, vignette and a radial mask. Download the free sample images and PSD and follow the exact edit — then dig out a portrait you’ve written off for a cluttered background and see how much of it comes back. For the deeper color side of finishing an image, our PRO masking and coloring course picks up where this leaves off.
Quick Reference: Keys, Menus and Settings
- Remove toolJ; Find Distractions > General Distractions, then Wires and Cables
- Keep something it flaggedOption/Alt-paint over it; paint normally to add more
- Remove tool settingsGenerative AI on, Sample All Layers, Create New Layer, then the checkmark
- More roomC for Crop, drag the edge out, Generative Expand > Generate
- Snapshot of everythingNew layer, then Image > Apply Image
- Swap the skySelect > Sky, place the new sky, add a layer mask; Image > Adjustments > Hue/Saturation to lighten and desaturate it
- Finish in Camera RawFilter > Convert for Smart Filters, Filter > Camera Raw Filter: Grain, Vignette, a Radial Gradient mask on the subject, Lens Blur > Apply
- Before and afterShift-click the layers, group them, toggle the group
Mac first, then Windows where they differ.

Free Downloads
Follow Along on the Same Photos
Get both sample images (the photo and the sky), the layered PSD and the PDF guide, and run the same cleanup. Free with a PHLEARN account.
Photo Cleanup: Common Questions
What does Find Distractions do?
With the Remove tool (J), click Find and choose General Distractions. Photoshop finds the visual clutter across the whole photo, color-codes it, and removes it all when you click the checkmark. It’s a newer option alongside People and Wires and Cables.
What if it misses something, or flags something I want to keep?
Paint over anything it missed and it’s added. Hold Option/Alt and paint over anything you want to keep and it’s left alone. Click Find Distractions again to bring the list back.
It didn’t remove the wires. Why?
Wires and cables are a separate option. Go to Find Distractions > Wires and Cables and run it again. In the video the two passes together did what used to take hours.
Which Remove tool settings should be on?
Generative AI on, Sample All Layers, and Create New Layer, so the removal lands on its own layer and you can toggle it to compare.
How do I add space to the bottom of a photo?
Press C for the Crop tool, drag the bottom edge down (the video uses the rule of thirds to place the subject), then click Generative Expand and Generate without typing a prompt. Pick a variation in Properties.
How is the sky replaced?
Make a new layer and run Image > Apply Image so it holds everything you see, go to Select > Sky, drag in the new sky and click the layer mask icon. Then use Image > Adjustments > Hue/Saturation to lighten it and drop the saturation so it matches the original light. Unlink the mask to move the clouds.
What does the Camera Raw finish do?
On a fresh Apply Image layer converted for Smart Filters: a little Grain (it makes AI expansions and removals look more natural), a Vignette in Optics, a Radial Gradient mask on the subject with Exposure up while protecting the highlights and saturation down slightly, then Lens Blur > Apply with the amount lowered.
Does this use generative credits?
Generative Expand does. The Remove tool with Generative AI, Select Sky and the Camera Raw steps are shown in the video without any mention of credits; check your balance in Photoshop if you’re unsure.
Are the sample files free?
Yes, with a free PHLEARN account. You get the photo, the sky, the layered PSD and the PDF guide.
Master Photoshop, Lightroom and Photography
Join PHLEARN PRO for $12.99 a month or $99.99 a year. Cancel anytime, with a 100% money-back guarantee.





