
Download Sample Images
description
You made it, the final step! Your images look beautiful and you’re ready to export from Lightroom Classic. In this tutorial, we’re going to show you how to do it.
First, we’ll go through Lightroom Classic’s export dialog, explaining all of the settings there. Then we’ll cover creating export presets for faster exporting. We’ll even show you how to add watermarks to your images and how to stay organized when exporting dozens at a time.
If you’re ready to take a deep-dive into everything Lightroom Classic has to offer, try our PRO tutorial The Beginner’s Guide to Lightroom Classic!
Free Lightroom Preset Sample 10 Pack
Lightroom Presets are a great way to quickly add style and charm to your photos. Try our custom-made PHLEARN Lightroom Presets with our free sample 10 pack of some our favorite bright and beautiful looks!
Watch Next
This episode is part of our FREE Intro to Lightroom Classic series.
Share
SHARE YOUR WORK
Export for the Web
The Final Step
You’ve applied your presets, you’ve finished your edits, you’ve made different versions, and now you’re ready to get your images out of Lightroom Classic and send them to your client or upload them to your online portfolio. If you’ve never exported from Lightroom Classic it can be a bit daunting. Selecting your photos, then clicking File and then Export gives you quite a bit of options to get lost in, and you’re probably thinking “Why can’t I export to my desktop in a few clicks?” Don’t worry, we’re here to guide you through it.
The Export Window
Once you’ve selected your images and clicked File and then Export, you’ll see a window pop up: a list of presets on the left and a lot of settings on the right. Each setting drop-down in this window is important and we’ll cover each in detail. Don’t worry though, once you have your export settings how you want them you can create Export Presets to speed up this process in the future, and we’ll show you how to do that too.
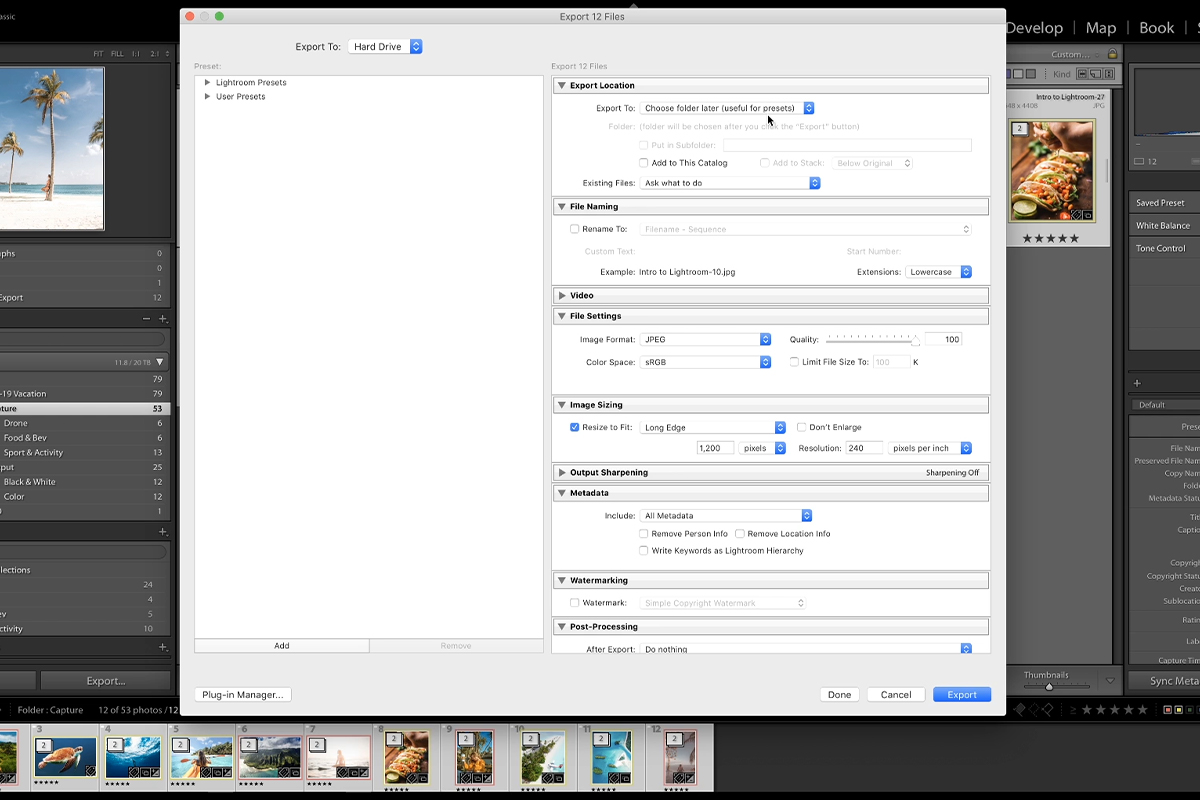
Export Location
You have several options when choosing where to export your files, such as your desktop, a specific folder, or in the same location as the originals. We recommend selecting Choose Folder Later. It’s essentially the same as selecting a specific folder, but it will make turning your export settings into a preset much easier. We also recommend selecting Add to Catalog. This will re-import your exports into Lightroom, which helps keep everything in the same place. The last option here is what to do if the file already exists in the target destination: Ask what to do gives us the most flexibility.
File Naming
Lightroom Classic can automatically rename your exports, and these settings are actually quite robust. We love to rename our exports, especially when making multiple versions. Toggle Rename To: and then you can select a preset, or click Edit to fully customize the naming.
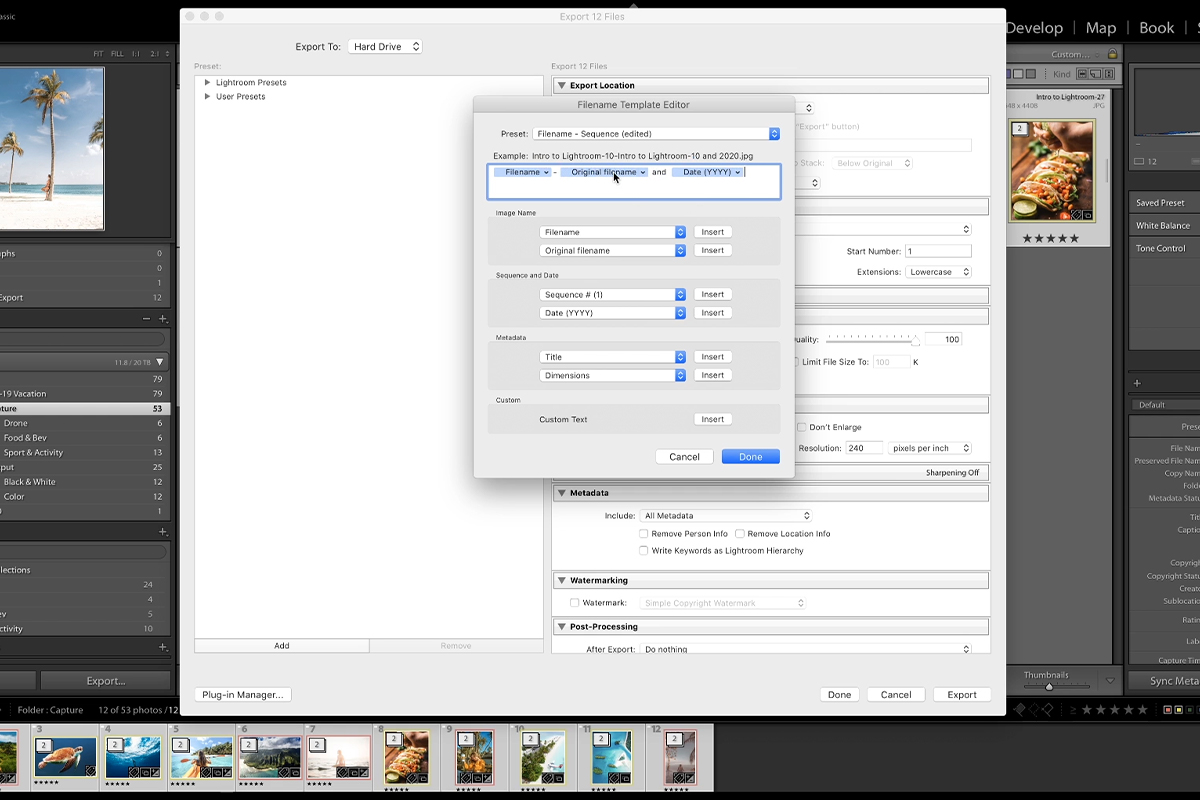
By writing into the text field you can edit the file name directly, and the insertable metadata features offer you a ton of intuitive options. You can insert file name, original filename, date it was shot, and so much more. Feel free to play around, an example is displayed near the top to help you see what you’re doing.
File Settings
This step is where we select the file type for export. You can select image types like DNG, TIFF, or Original, but most of the time you’ll want to export JPEG. These are great for sending to clients or uploading to the web. You can adjust your quality slider if you need to save some image size, but 100 is still a relatively small file and will give you the best resolution possible. For Color Space we want to select sRGB: the color space used on the internet. If you don’t know a ton about color space, we recommend you check out our free tutorial Color Space Explained to learn more.
Image Sizing
If you don’t want your images to be resized upon export you’ll want to make sure this option is unchecked. When we create our full size exports we uncheck this option. But if you are saving out smaller images, perhaps to upload to your website, Lightroom can take care of that for you in this step. Select the resolution you want, the pixels-per-inch and you’re good to go. We recommend choosing Long Edge and entering something like 1,200 pixels. This will make sure your vertical and horizontal images have a maximum size of 1,200 pixels, which is a good size for most applications online.
Output Sharpening
We recommend doing some amount of output sharpening IF you are downsizing your images. If you wish to keep your images at full size you should skip this step, but a little bit of sharpening can help smaller images retain some of their eye-catching detail. When we create our smaller images, we sharpen for Screen and set our amount to Low.
Metadata
In the first episode of this series we showed you how to add your metadata to your images. Now if you wish to keep that metadata with your exports, you’ll want to select Include All Metadata in this step. This will keep your copyright information attached to all the images you post online, protecting you and your hard work.
Watermarking
Protecting your images is a huge deal for any photographer, from amateur to professional. You may want to place a watermark on your images that declares your copyright, but we highly suggest including a watermark when sending in-progress work to clients. It’s important to show your clients how the images look before getting feedback, but the last thing you want is your drafts being taken by the client before the job is done. A watermark across the front of your image protects them from ever being used, but still allows people to see what they look like, and adding a custom watermark is super easy to do.
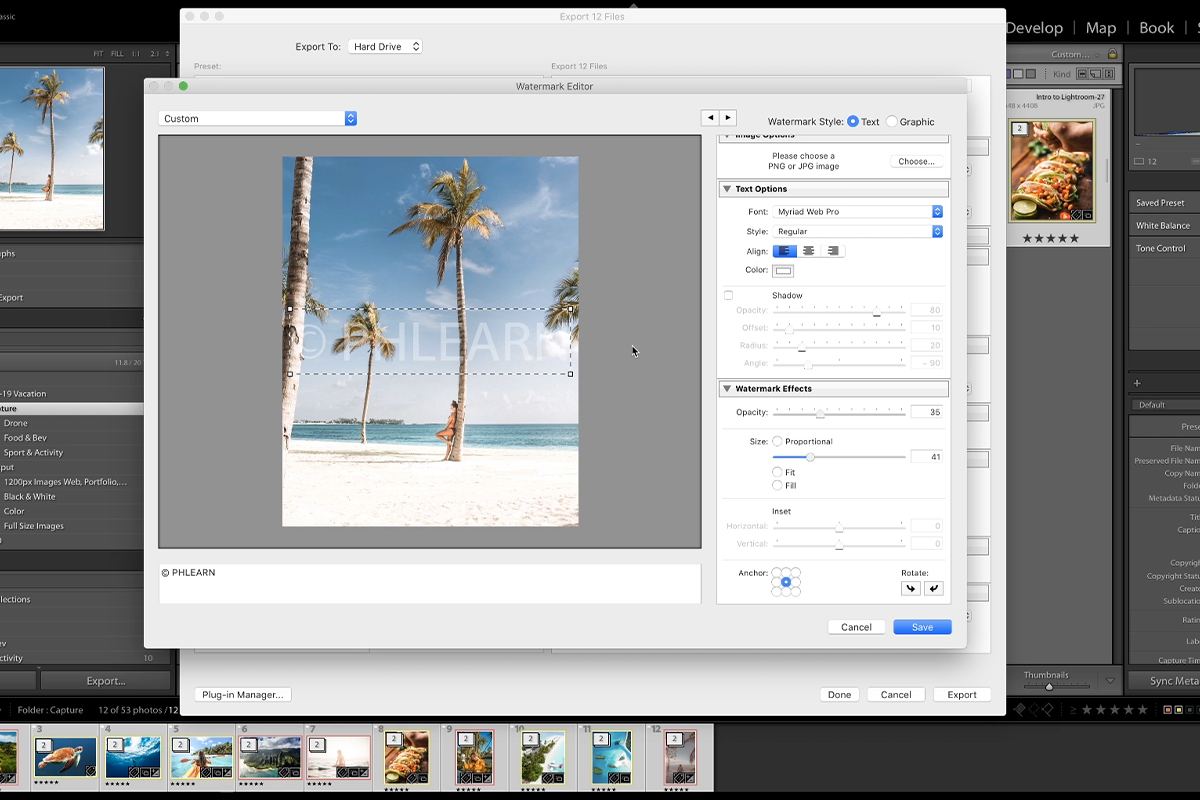
You’ll want to start by clicking the Edit button in the drop down menu, which will take you to the Watermark Editor. Enter the text you would like to include in your watermark beneath the example image, then adjust things like font, alignment, color, drop shadow, size, and opacity. You can also select an image from your computer to use instead of text, perhaps a logo or text graphic. When sending images to clients for review, we recommend writing your name in large letters in the middle, at a decreased opacity.
Creating a Preset
Now you have your settings exactly how you want them, and it’s pretty likely that you’ll use them again in the future. You can simply click the Add button in the bottom left of the export menu to save your current settings as an export preset. Name your preset, assign it to a folder, and you’re done! In the future you can navigate to your preset in the export window and all your settings will be imputed for you.
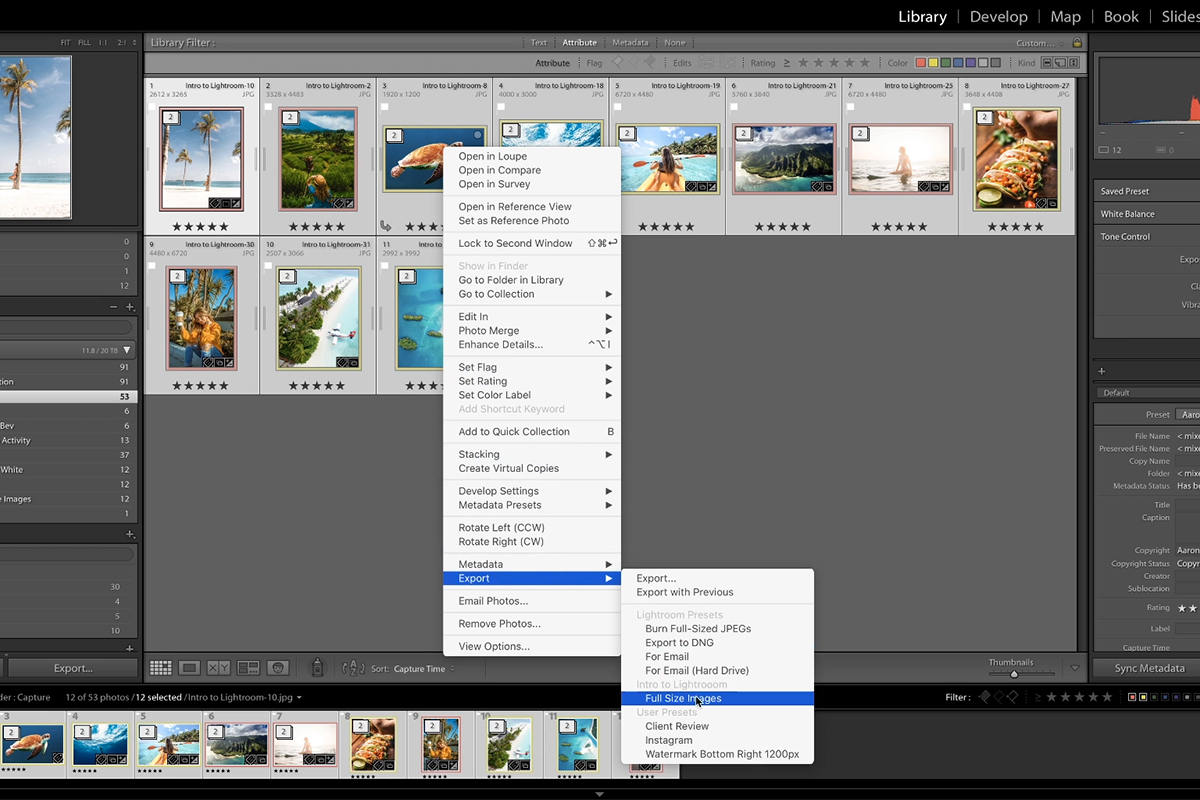
Even faster than that, you can export with a preset without ever having to enter the export dialog! Instead of clicking File and Export, right click on your selected images and mouse down to Export. From there you can select your preset and Lightroom will take care of the rest. We know it’s a bit of added work to set up export presets, but once you know your settings are how you want them, exporting really does become a two-click process.
It All Starts with Your Folder Structure
If you’ve been around PHLEARN long enough you know how much we love organized and non-destructive workflows. These are great techniques to save you time and effort, and it’s something we try to practice on all of our photo projects, Lightroom or Photoshop. Now we covered our folder structure for this project way back in the
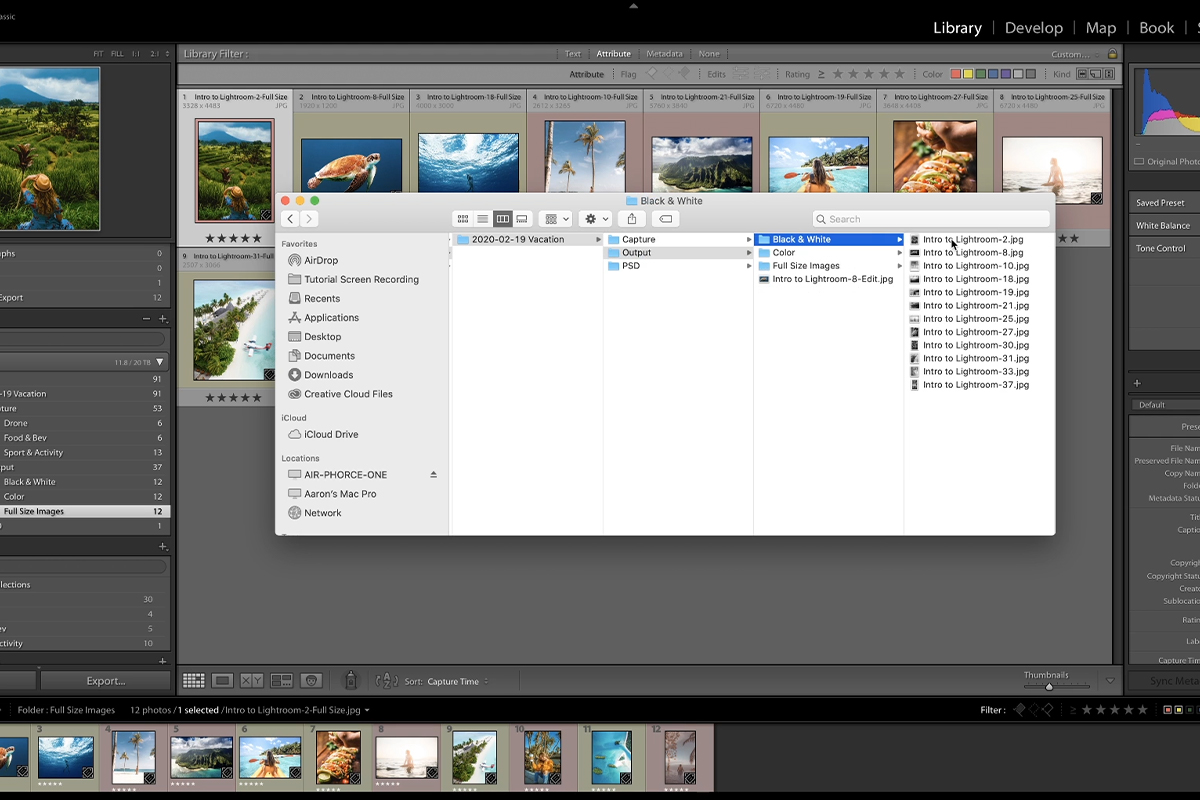
We first recommend that every project receive a date, in order to help sort all the work we photographers do throughout the year in an easy-to-find order. For this project we called it 2020-02-19 Vacation. In that folder are three subfolders: Capture, which is our RAW images straight-out-of-camera, Output – our exported images that we edited in Lightroom – and PSD, where we keep any Photoshop Documents we make. Output contains several named folders for each of the different types of exports we made, such as Black & White, Client Proofs, and Full Size Images. If we have to come back to this project years from now we’ll have no confusion at all!


