
Download Sample Images
description
Lightroom Classic is an essential tool for photographers and image makers. In the first episode of our series, we take you on a tour of this powerful software that can help you take your photos to new heights.
Follow along as we take you on a tour of Lightroom Classic! Learn about how the program is structured, how to import and protect your photos, and how to stay organized both within Lightroom and on your computer.
If you’re ready to take a deep-dive into everything Lightroom Classic has to offer, try our PRO tutorial The Beginner’s Guide to Lightroom Classic!
Free Lightroom Preset Sample 10 Pack
Lightroom Presets are a great way to quickly add style and charm to your photos. Try our custom-made PHLEARN Lightroom Presets with our free sample 10 pack of some of our favorite bright and beautiful looks!
Watch Next
This episode is part of our FREE Intro to Lightroom Classic series.
Share

LEARN TO USE LIGHTROOM CLASSIC
Protect. Organize. Create.
Your First Steps in Lightroom Classic
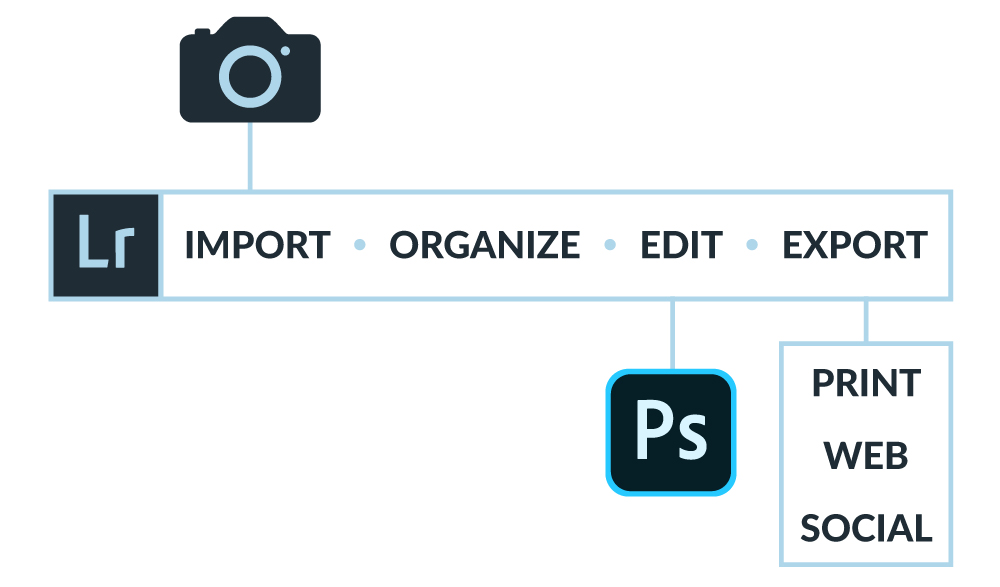
Before we get started in Lightroom Classic, we need to talk about what it’s used for. If you know PHLEARN from our Photoshop tutorials, you might wonder why we even use Lightroom at all. While it may seem like photographer’s should use one or the other, both Lightroom and Photoshop are important components of the same workflow.
Photoshop is, first and foremost, a photo editor. From basic photo editing, to high-end retouching, to unreal compositing, Photoshop is able to do some extraordinary things.
While Lightroom Classic can certainly be used to edit photos, it has some limitations in that area. Equipped with Adobe Camera RAW (Photoshop has this as well), Lightroom excels at working with RAW images. Ideal for exposure adjustments, coloring, and correcting common issues like lens distortion or chromatic aberration, Lightroom Classic has most everything you’ll need for every day photo editing. It even has tools for removing small blemishes and distractions! But, when it comes down to it, Photoshop just does it better and offers more advanced photo editing tools.
So what do we need Lightroom for?
Great question!
The Power of Lightroom Classic
Lightroom Classic is designed to guide your workflow, from the moment your photos leave the memory card, to when they’re exported to share on the web, social media, and in your portfolio.
To better understand how to take advantage of Lightroom Classic, let’s take a look at the process of importing and organizing a bunch of vacation photos within the software.
Importing & Protecting Your Photos
Let’s say you’ve just come back from vacation with hundreds of photos waiting for you to sift through and share. This can feel overwhelming for a lot of people! How do you get your photos off of the memory card, get them organized, find the best ones, edit them, and then get them uploaded to your social media profile, travel blog, or website?
You guessed it. Lightroom Classic!
Lightroom is there for you from step one.
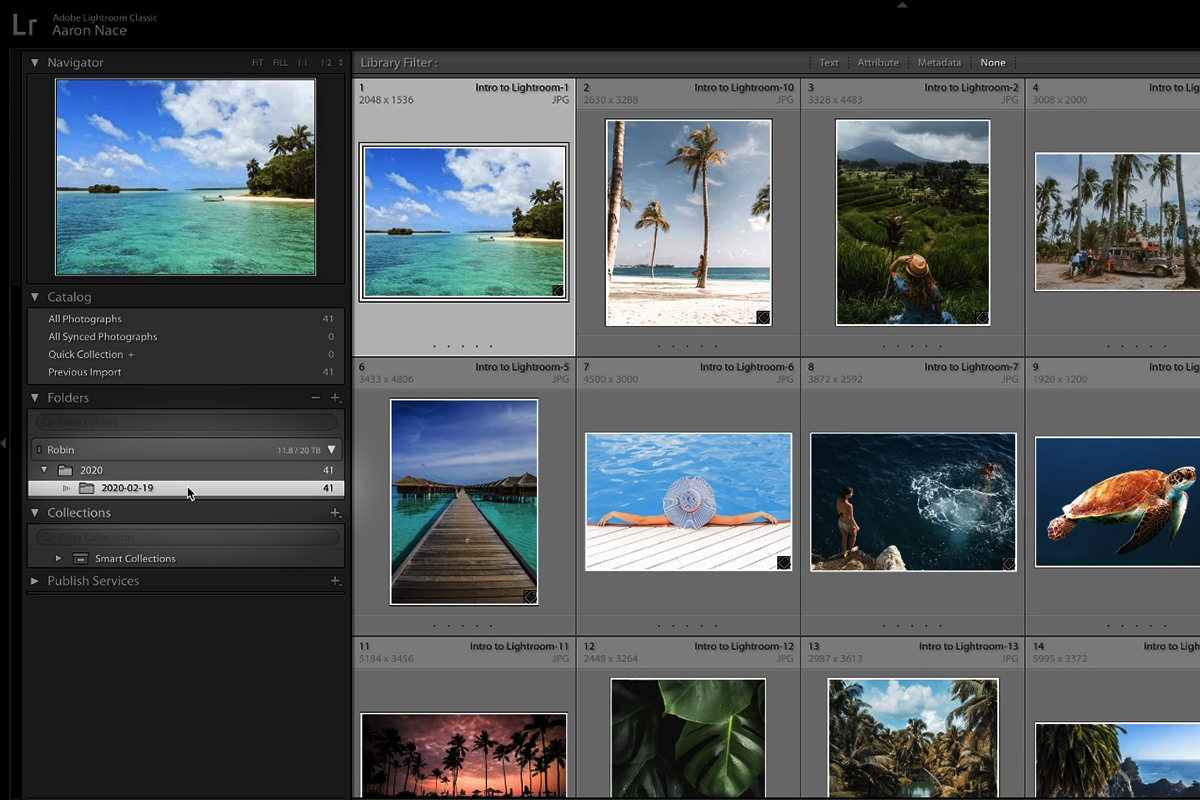
The Library Module
The journey of your photos begins in the Library Module. This menu will help you take your photos from a memory card or the computer and then import them into Lightroom. Even better, Lightroom also helps you to create new folders on your computer, allowing you to create a consistent and organized system for storing all of your images.
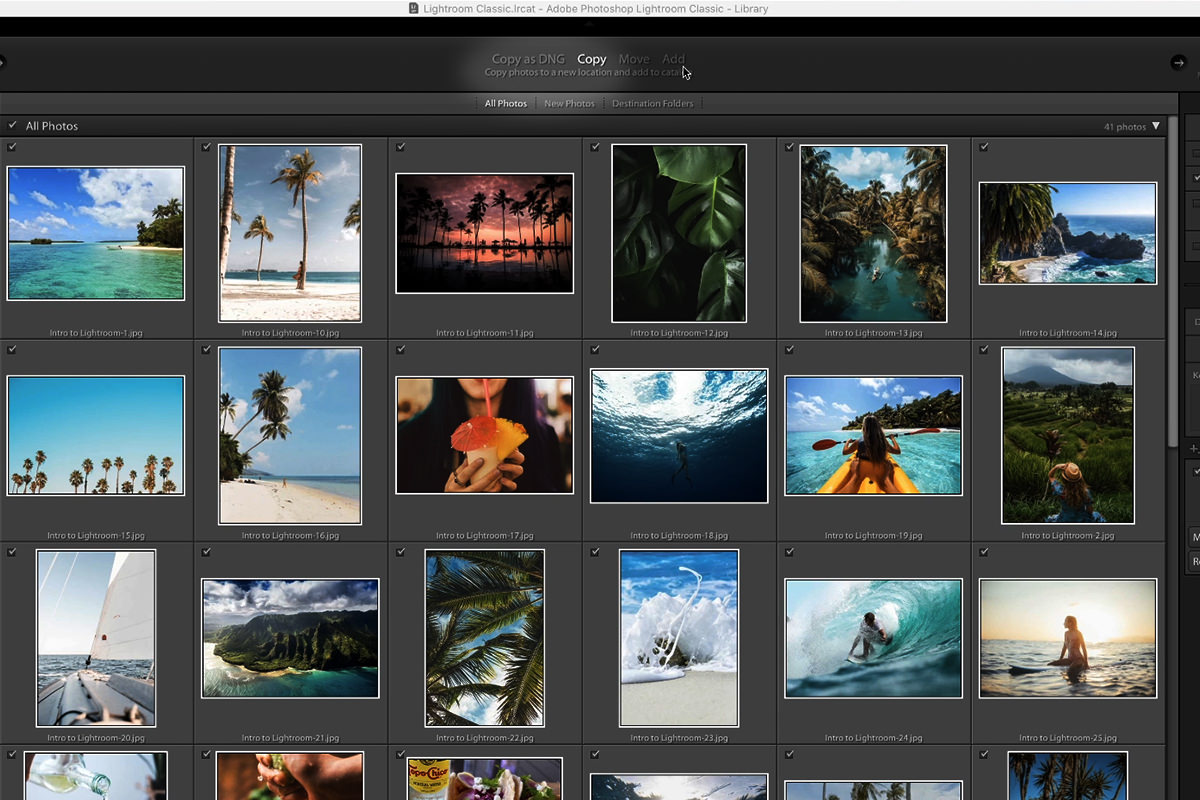
The key to importing in the most organized way possible, is using either the Copy or the Copy as DNG (if you’re using RAW images) options at the top of the Library Module.
The two Copy options do just what their names imply; they copy your images from their original location into a new location of your choosing. The sidebar on the right has a few different options for customizing where and how Lightroom Classic imports your images. Let’s take a look at those menus!
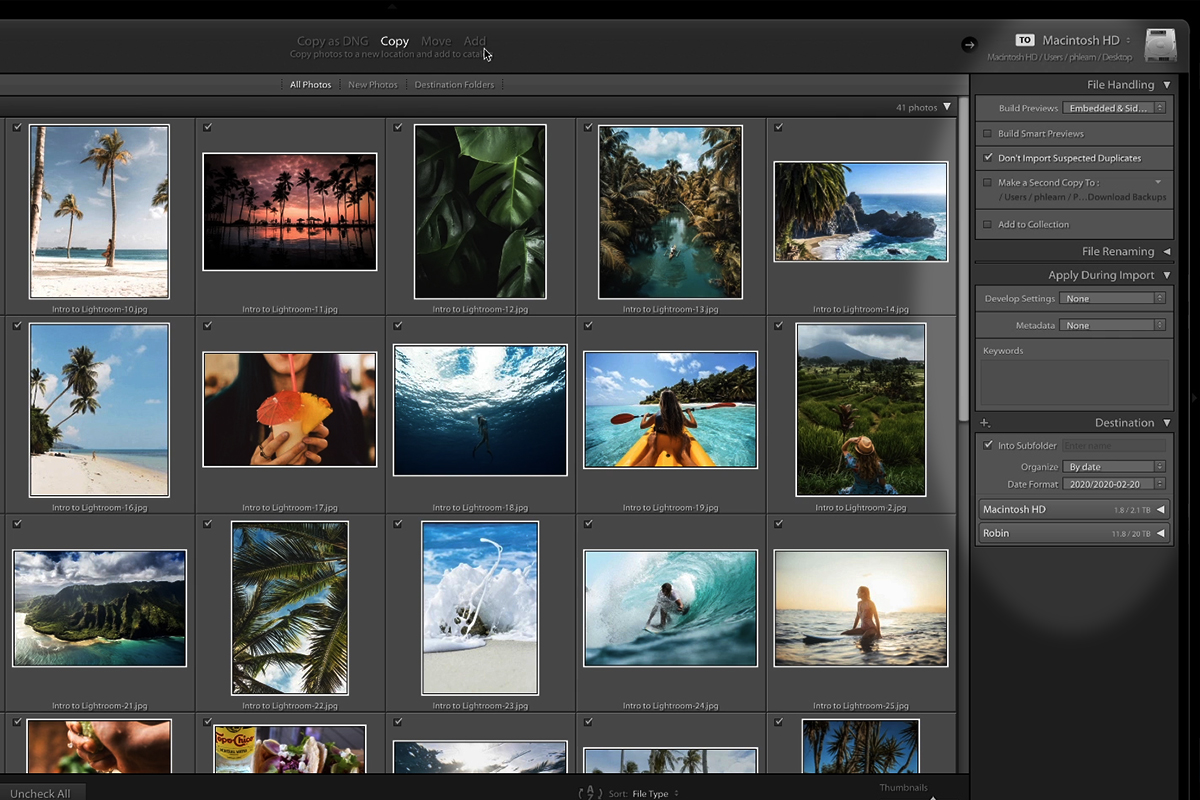
- File Handling: Gives you options to help images load faster using Smart Previews, to reduce clutter by eliminating duplicates, and immediately adding photos into a Lightroom Collection (which we’ll cover later).
- File Renaming: Most of the time your images will have the filenames that were automatically generated by your camera. This menu allows you to create a new naming convention for the photos you’re importing.
- Apply During Import: Get a head start on the editing process by applying adjustment and color presets right away. More importantly, this menu allows you to embed your copyright information into the metadata of every image. We recommend always doing this as it helps prevent dishonest folks from taking credit for your work!
- Destination: This is where you start the process of organizing your photos. You can create new folders on your computer, and then have Lightroom copy all of the selected image files into that directory.
Alright, so that’s a lot to take in. Let’s break down the most important parts!
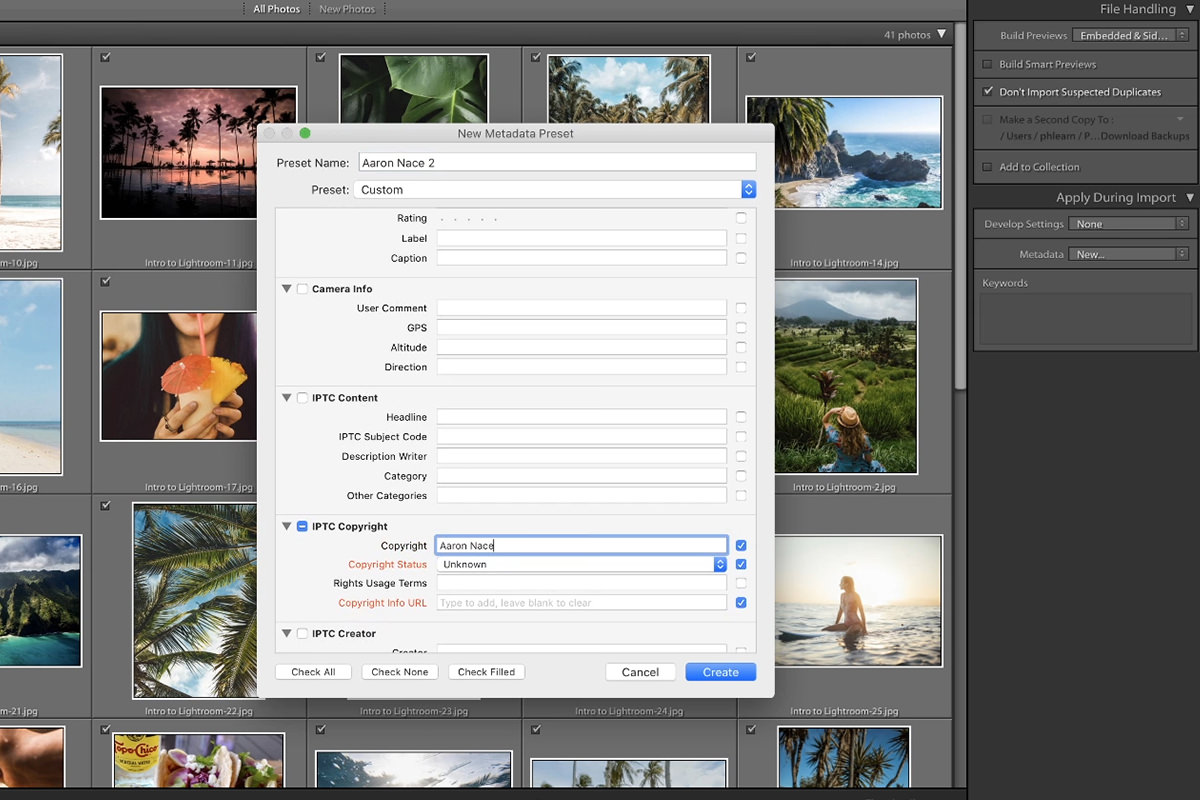
First, always add your copyright information in the metadata of each photo. Even if it’s just your name and a date, that goes a long way to making sure that nobody can take credit for your work.
Next, coming up with a system and folder structure when copying photos to your computer will save you a ton of time and frustration down the road. The more organized and consistent you are with how and where you save your images, the easier it will be to find your work several years later.
We recommend using a date-based system for your photo folder structure. For example, let’s say that you’re importing your first photos of 2020 from a recent vacation. You would have a 2020 folder on your computer that will eventually hold every batch of photos that you take throughout the year. Then within that folder, each photoshoot would have it’s own folder, again organized by the date.
Once you’ve got the Destination folders set, it’s time to Import. Simply click on the Import button at the bottom right of the screen. We’re almost finished, but we’ve got a little more organizing to do!
Let’s Get Specific
With our images on our computer in a folder labeled with the appropriate date, we’re off to a great start! But we can still make it a little easier on ourselves if we have to come back a year from now to find these images.

In addition to the date, we recommend adding a more descriptive label to each folder. After you’ve imported, you’ll be taken back to the main menu of the Library Module. You’ll see your newly-created date folders listed under the Folders drop-down in the left sidebar. You can continue to make changes to the folders and folder structure here, and Lightroom will apply those changes to the folders on your computer.
In the Folders menu there should be a main folder with the year (in this case 2020), and within that, the folder named with the more specific date that contains all of the imported images. Let’s add to that folder name to make it a little more descriptive. Right-click on the folder and add some additional words that will help you identify the contents of the folder later. In this example, we simply added “Vacation” after the date.
Now we can easily find the photos from our vacation in 2020!
Adding More Folders
Now that our main folder has been created, we’ll want to add a few others that will allow us to save our work and our final exports. We use a three folder structure:
- Capture: Contains the original, unedited photos.
- PSD: Contains any PSDs created from sending photos to Photoshop for more editing.
- Output: Contains our final, edited photos.
You can create new folders by right-clicking on the root folder (in our example, the one with the date and “Vacation” title), and clicking “Create Folder Inside…”. Add three folders, and give them the names listed above. Then click on the root folder again, and drag-and-drop all of the images into the newly-created Capture folder.
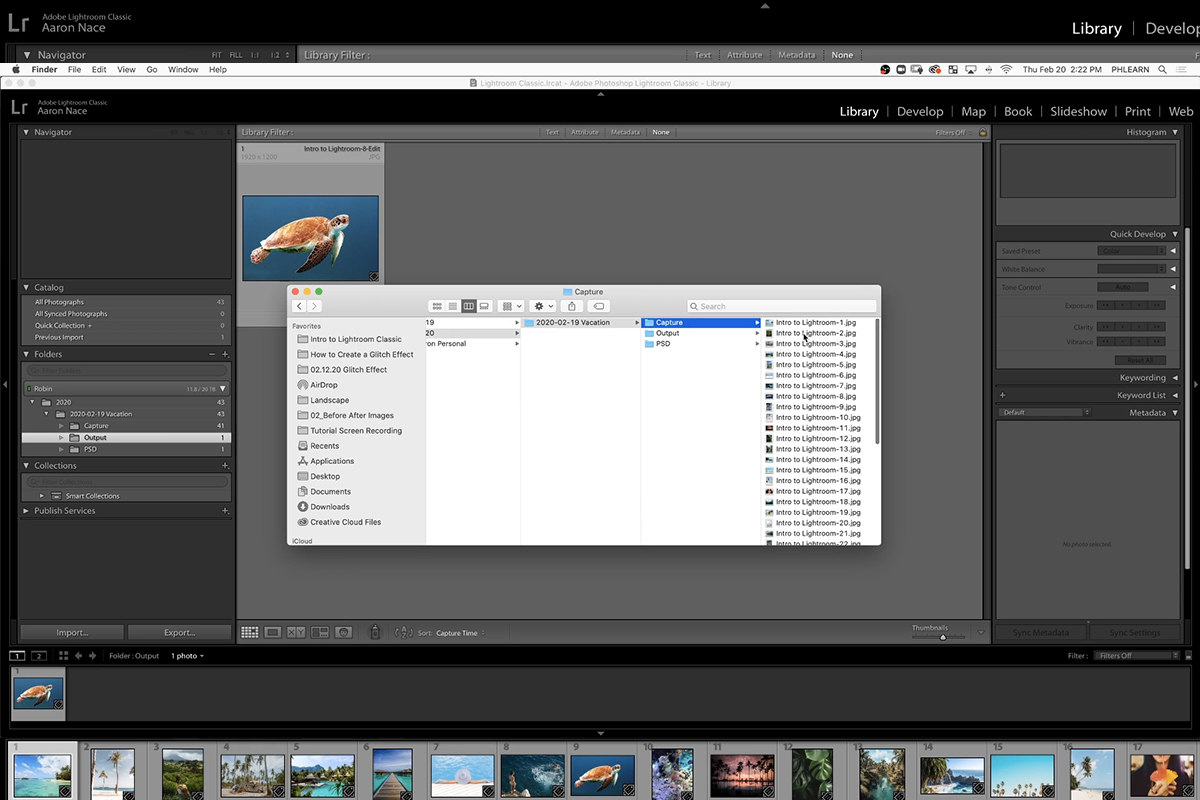
Here you can see our new folder structure, both in Lightroom Classic and reflected on the computer’s hard drive.
Creating Collections
We’re done with our folders, but there are even more options for organizing and categorizing our photos. Since we’re coming back from a tropical excursion, we have a wide variety of pictures. We have photos of fun adventures, some epic drone shots, and photos of all of the delicious meals and drinks.
Is it possible to sort these? You betcha!
Collections are another great way to stay organized and sort different categories of images within a Lightroom Catalog. Creating a collection will not create a new folder on your computer though. It’s simply a way of tidying things up a little more within the software.

We created three collections; one for drone shots, one for food and beverage photos, and one to document all of the events and activities we participated in. Once you’re done creating the collections, simply drag and drop all of the related photos into their respective collection.
Now I know we said that we were done with folders, but sometimes it’s good to take a step further. Since we sorted our photos by collection, it’s always a good idea to reflect those categories in our computer folder structure. Just create a new folder inside the Capture folder for each collection. Then drag-and-drop the photos from each collection into the folder of the same name. Done!

Here you can see our final set of collections and folders! The folders reflect how the images are organized on the computer, and the collections reflect the organization within Lightroom.
Finders, Keepers
You might be thinking that that was an awful lot of work just to get photos from the memory card/computer into Lightroom Classic. It does take a little getting used to, but spending the time will certainly pay off in the future. Maintaining this system for all of your photos and importing will make it significantly easier to find any image, whenever you need it.
Let’s say that 10 years from now we want to find that sea turtle photo from our 2020 vacation. We know to go to the Pictures folder, then the 2020 folder, then to the Vacation folder, then to the Sport & Activity Folder. We found the big guy!


