

Download Assets
This tutorial includes 1 Photoshop brush. Downloads are free with a PHLEARN account.
- Download the sample files from every free tutorial on PHLEARN
- New free tutorials published every week
- One free account: sign up once, then download anything
description
With the sky, city, and snow already built in part one, this second half brings the subject into the composite: a Color Range cutout off a green backdrop, green fringing stripped with a targeted Hue/Saturation layer, wardrobe desaturated and the prop cleaned up, the rim light boosted into a painted glow, drifting foreground clouds made from the sky itself, and hand-styled comic text finished with a drop shadow.
Enjoying This Free Tutorial?
We publish a new free tutorial every week, each one with sample images and PSDs you can download and follow along with. Sign up and they land straight in your inbox, along with early word on sales, events and subscriber-only offers.
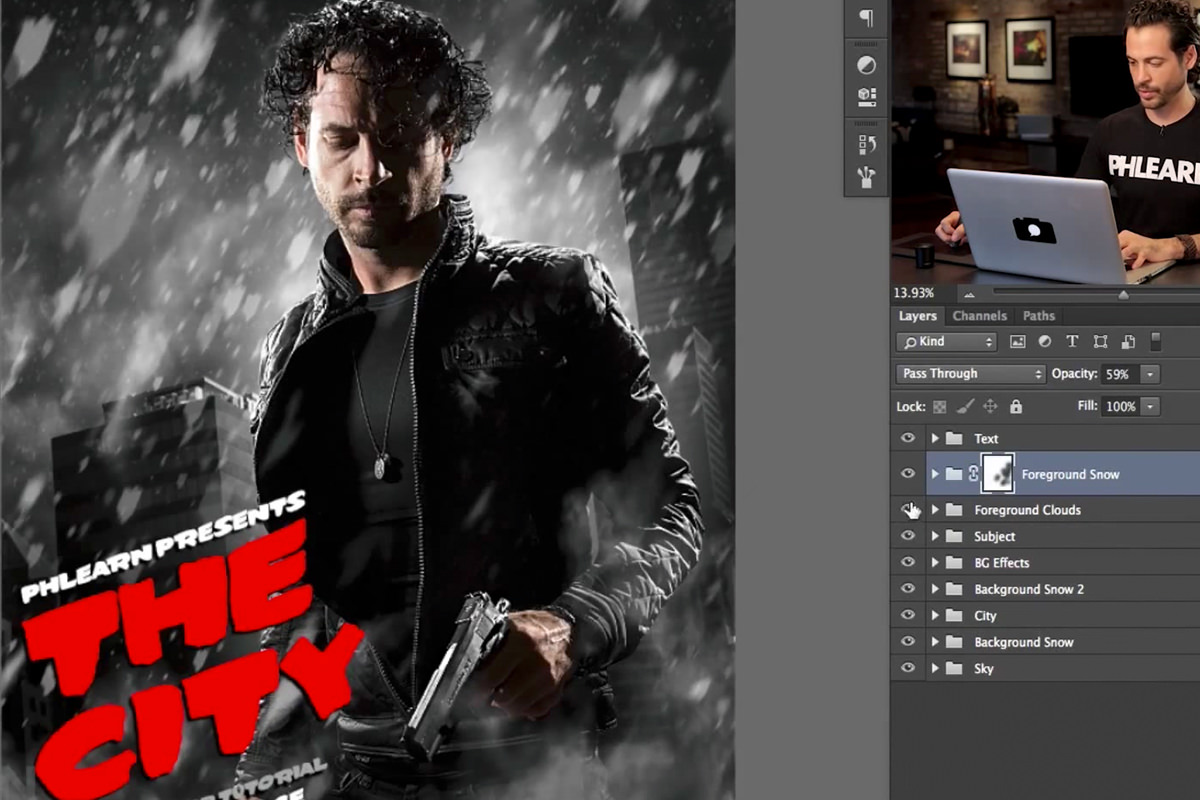
How to Make a Sin City Portrait in Photoshop, Part 2
With the sky, city, and snow already built in part one, this second half brings the subject into the composite and finishes the noir-comic style with color cleanup, a stronger rim light, drifting foreground clouds, and hand-styled text finished off with a drop shadow.
Cutting Out the Subject With Color Range on a Green Backdrop
A subject photographed on an evenly lit green backdrop can be isolated quickly using Color Range instead of a more manual selection method.
-
Open Color Range on the Subject Layer
Go to Select > Color Range and click on the green backdrop with the eyedropper.
-
Add Any Missed Background Areas
Choose the plus eyedropper (Add to Sample) and click any remaining background areas of a slightly different shade, such as a lighter patch near the floor.
-
Lower Fuzziness to the Minimum That Still Works
Bring the Fuzziness slider down as low as possible while the selection still covers the majority of the background.
-
Load the Selection as a Layer Mask
Click OK to turn the Color Range result into a selection, then hold Shift and click the layer mask button to load it directly as a mask.
-
Move the Cutout Subject Into the Composite
Hold Shift and drag the finished cutout from its own document into the main composite, then group it and name the group Subject.
Removing Green Fringing With a Clipped Hue/Saturation Layer
Shooting on a green backdrop often leaves a thin edge of green fringing around fine detail like hair, which a targeted Hue/Saturation adjustment removes cleanly.
-
Add a Clipped Hue/Saturation Layer
Add a new Hue/Saturation adjustment layer above the subject and press Option/Alt+Cmd/Ctrl+G to clip it.
-
Isolate the Green Color Range
Change the target from Master to Greens in the Hue/Saturation panel.
-
Widen the Range With Saturation Raised Temporarily
Push saturation all the way up to see exactly which greens are affected, then drag the range slider wider until it catches the fringing without spilling into skin tones or other colors.
-
Desaturate the Isolated Greens
Bring the saturation back down to negative 100 to remove the green fringing entirely once the correct range is targeted.
Why Clipping Masks Make This Kind of Multi-Layer Edit Manageable
Every adjustment on the subject in this tutorial, from removing fringing to enhancing the rim light, uses the same clipped layer mask rather than a brand new mask each time. Reusing one existing mask across multiple clipped adjustment layers means the careful cutout work only has to happen once, no matter how many separate color and light adjustments follow.
Painting Layered Foreground Snow
Adding snow directly in front of the subject, on top of the background snow from part one, builds up the same sense of depth using the custom snow brush.
-
Group and Paint a Foreground Snow Layer
Create a new group named Foreground Snow, select the custom snow brush from part one, and paint snow directly over the subject.
-
Add a Second Layer With a Larger Brush
Create another layer and increase the brush size significantly to add a few larger, closer-looking snowflakes.
-
Erase Snow That Distracts From the Subject
Use the Eraser tool to remove any snow that ends up covering an area that should stay visible, such as a piece landing directly over the face.
The same custom snow brush built in part one is in the Download Assets card on this page.
Desaturating Wardrobe and Cleaning Up the Prop Gun
A few targeted, masked adjustments strip color from wardrobe and turn an obviously fake prop gun into something more convincing.
-
Desaturate Wardrobe With a Masked Hue/Saturation Layer
Add a clipped Hue/Saturation layer, bring saturation all the way down, then paint black on its mask over the skin so only wardrobe like the jacket and jeans loses color.
-
Darken Wardrobe With a Clipped Curves Layer
Add a clipped Curves adjustment layer to darken areas like the jeans for more contrast.
-
Paint Out the Prop’s Orange Safety Tip
Hold Alt/Option to sample a nearby color with the Brush tool, then paint directly over the orange safety tip to hide it.
-
Rebuild the Tip With the Clone Stamp Tool
Press S for the Clone Stamp tool, hold Alt/Option to sample a matching area, and paint over the remaining tip to blend it into the rest of the prop.
-
Brighten and Add Contrast to the Prop
Add a clipped Curves layer, raise the white point and the black point, and mask it to just the prop so it reads clearly against a mostly dark, black-and-white image.
Why Desaturating the Colors First Makes Fixing the Prop Easier
Working in black and white removes the added difficulty of matching a specific color when sampling and cloning over a small detail like a safety tip. With everything already reduced to shades of gray, a sampled brush color or a cloned patch blends in far more easily than it would if the surrounding wardrobe and prop still carried their original color.
Enhancing the Rim Light and Building a Glow Around the Subject
Boosting the rim light captured on set, then adding a soft painted glow on top of it, helps the subject separate cleanly from the background behind them.
-
Brighten the Rim Light With a Clipped Curves Layer
Add a clipped Curves adjustment layer, drag the white point up moderately, invert the mask with Cmd/Ctrl+I, and paint white only along the rim light itself.
-
Add a Painted Glow Layer
The glow is built in the Background Effects group below the subject (next section): add a Curves layer, drag its midpoint up to lighten broadly, invert its mask with Cmd/Ctrl+I, and paint white around the subject’s edge to add a soft glow.
-
Build a Second, Softer Glow Layer
Add another layer in that group and paint white at a low opacity, around 10 to 20 percent, to reinforce the glow without making it too strong.
Adding Background Effects to Draw Attention to the Subject
A dedicated Background Effects group, built with painted layers and Curves adjustments, darkens distracting areas and brightens others to guide the eye toward the subject.
-
Group a New Background Effects Layer
Create a new layer, group it, and name the group Background Effects.
-
Paint Black to Darken Distracting Areas
Use a regular brush to paint black over parts of the background, including some of the snow, that shouldn’t draw attention away from the subject.
-
Brighten Selected Areas With an Inverted Curves Mask
Add a Curves layer, raise the midpoint, invert the mask, and paint white where extra brightness should show through to help separate the subject.
Adding Foreground Clouds With the Screen Blend Mode
Duplicating the existing sky and repositioning it in front of the subject, with its blend mode switched to Screen, creates drifting clouds without bringing in any new imagery.
-
Duplicate the Sky Layer
Press Cmd/Ctrl+J on the sky layer to duplicate it, then move the duplicate in front of the subject and group it as Foreground Clouds.
-
Desaturate and Change the Blend Mode to Screen
Press Shift+Cmd/Ctrl+U to desaturate the duplicate, then change its blend mode to Screen so only the lighter areas show through.
-
Reduce Visibility With Levels
Press Cmd/Ctrl+L to open Levels and darken the shadows, which makes the screened layer’s darks invisible while keeping the lighter cloud-like areas.
Adding and Styling the Title Text
A distinctive comic-style font, warped and finished with a drop shadow, ties the finished image back to its noir-comic inspiration.
-
Choose a Matching Comic-Style Font
Find and install a heavy, comic-style display font to use for the main title text.
-
Duplicate Text Layers for Additional Lines
Press Cmd/Ctrl+J to duplicate an existing text layer for each additional line, such as a presenter credit or tutorial title, adjusting size and color rather than typing new text from scratch.
-
Add a Drop Shadow to the Main Title
Double-click the text layer, add a Drop Shadow, and adjust its angle, distance, and opacity so the text stands out from the background.
-
Copy the Layer Style to Other Text Layers
Hold Alt/Option and drag the FX icon from one layer to another to copy the same drop shadow onto every text layer.
-
Warp the Whole Text Group for a Comic-Book Angle
Select the text group, press Cmd/Ctrl+T, hold Cmd/Ctrl, and drag a corner to warp the group into an angled, comic-book-style perspective.
Sharpening the Subject With a Stamp Visible Layer
A stamp visible layer captures everything currently seen in the image onto a single flattened layer, ready for a high pass sharpening pass focused only on the subject.
-
Isolate the Subject by Hiding Other Layers
Temporarily turn off every layer except the subject so only it is visible.
-
Create a Stamp Visible Layer
Press Shift+Option/Alt+Cmd/Ctrl+E to merge everything currently visible into one new layer.
-
Desaturate Before Sharpening
Press Shift+Cmd/Ctrl+U to desaturate the stamped layer, since sharpening in color can distort colors unpredictably.
-
Apply High Pass on a Linear Light Layer
Change the layer’s blend mode to Linear Light, then go to Filter > Other > High Pass and raise the radius higher than usual to match the image’s gritty style.
-
Clip the Sharpening to the Subject
Clip the finished high pass layer to the subject so the extra sharpening only affects the subject and not the rest of the composite.
Why a Stamp Visible Layer Is Used for Sharpening
Sharpening a single original layer would miss all the color and light adjustments stacked on top of it, while sharpening the whole composite at once would sharpen the background and snow along with the subject. A stamp visible layer captures exactly what the subject looks like at that point in the edit, all its adjustments included, as one flattened layer that can be sharpened and clipped on its own.
Why This Approach Works
Clipping every adjustment to the same subject mask, rather than building a new mask for each edit, is what makes a composite with this many separate color and light adjustments manageable rather than overwhelming. Desaturating the subject before touching up the prop removes the added difficulty of color-matching a sample or clone, which is why that cleanup happens early rather than after color returns to the image. Building the glow, rim light, and background effects as their own separate, clipped or masked layers keeps every part of the look adjustable independently, all the way through to a final composite that can still be rearranged or restyled at any point.
Final Thoughts
Between the color cleanup, the rim light boost, the drifting foreground clouds, and the hand-styled comic text, this second half is what actually turns a rough composite into a finished image. Every element built across both parts, from the sky and city down to the smallest snow layer, stays organized in its own group, so any piece of it can still be adjusted, replaced, or removed entirely without starting over.
Quick Reference: Keys, Menus and Settings
- Cut out the subjectSelect > Color Range, plus eyedropper, low Fuzziness; load as a layer mask; Move tool, Shift-drag into the composite
- Remove green fringeHue/Saturation clipped with Cmd/Ctrl + Alt/Option + G; Greens, widen the range, Saturation -100
- Clean up the propAlt/Option-click to sample with the Brush; S for Clone Stamp; clipped Curves for contrast
- Rim light and glowClipped Curves, white point in, Cmd/Ctrl + I, paint white; background glow at 10 to 20%
- Foreground cloudsCmd/Ctrl + J the sky, Shift + Cmd/Ctrl + U, Screen, Cmd/Ctrl + L to darken the shadows
- Title textDrop Shadow; Alt/Option-drag fx to copy; Cmd/Ctrl + T, Cmd/Ctrl-drag a corner
- SharpenSubject only visible, Shift + Alt/Option + Cmd/Ctrl + E; desaturate, Linear Light, Filter > Other > High Pass; clip to the subject
No AI, no generative credits.

Free Downloads
Paint With the Same Snow Brush
Get the snow brush built in part one, ready to paint the large foreground flakes in front of your subject. Free with a PHLEARN account.
Noir Comic Subject and Text: Common Questions
How do I cut someone out of a green screen in Photoshop?
Go to Select > Color Range and click the green. Use the plus eyedropper on any patches of a different shade, then lower Fuzziness as far as you can while most of the background stays selected. Click OK and load the selection as a layer mask.
How do I get rid of green fringing in the hair?
Add a Hue/Saturation layer clipped to the subject with Cmd/Ctrl + Alt/Option + G and switch from Master to Greens. Raise Saturation to see the range, widen it until it covers the fringe but not the skin, then set Saturation to -100.
Do I need a new mask for every adjustment on the subject?
No. Clip each adjustment layer to the masked subject. The one cutout mask then limits every Hue/Saturation and Curves layer above it.
How do I add snow in front of the subject?
In a new Foreground Snow group, right-click to choose the snow brush from part one and paint over the subject. Add a layer with a much larger brush for close flakes, and erase or mask any snow covering the face.
How do I keep color only in the skin?
Add a clipped Hue/Saturation layer with Saturation all the way down, then paint black on its mask over the face and hands. The jacket and jeans go gray and the skin keeps its color.
How do I hide the orange tip on a prop gun?
Alt/Option-click with the Brush tool to sample a nearby color and paint over the tip, then blend it with the Clone Stamp (S). Working in black and white makes the match easy. A clipped Curves layer adds contrast so the gun doesn’t get lost.
How do I make the rim light stronger?
Add a clipped Curves layer and drag the white point from right to left. Press Cmd/Ctrl + I to invert its mask, then paint white along the rim light only.
How do I put clouds in front of the subject?
Duplicate the sky with Cmd/Ctrl + J, move it above the subject, desaturate it with Shift + Cmd/Ctrl + U and set it to Screen. Darken its shadows with Cmd/Ctrl + L so only the light clouds show.
How do I angle the title text like a comic book?
Select the text group, press Cmd/Ctrl + T and Cmd/Ctrl-drag a corner. Add a Drop Shadow and Alt/Option-drag the fx icon to copy it to other text layers; duplicating a text layer keeps its angle.
Are the sample files free?
Yes, with a free PHLEARN account. You get 1 Photoshop brush: the snow brush built in part one of this series, used here for the foreground snow. The portrait, sky and city photos aren’t included.
From the Magazine View all
Stories, interviews and guides for photographers, new every week.
 EditingHow to Color Grade Photos in Photoshop and LightroomCorrect the photo first, then put color in the shadows, midtones and highlights. Aaron Nace on the order, the tools and skin.
 BusinessHow to Compete With AI: Give Your Clients MoreEveryone has the same tools now, and your clients know it. The way to compete is to give them more.
 EditingLightCraft vs Lightroom: I Edited the Same RAW Files in BothThe free clone on the same RAW files: what matches, what breaks and who should switch.
Master Photoshop, Lightroom and Photography
Join PHLEARN PRO for $12.99 a month, or $99.99 a year (save 36%). Cancel anytime, with a 100% money-back guarantee.





