
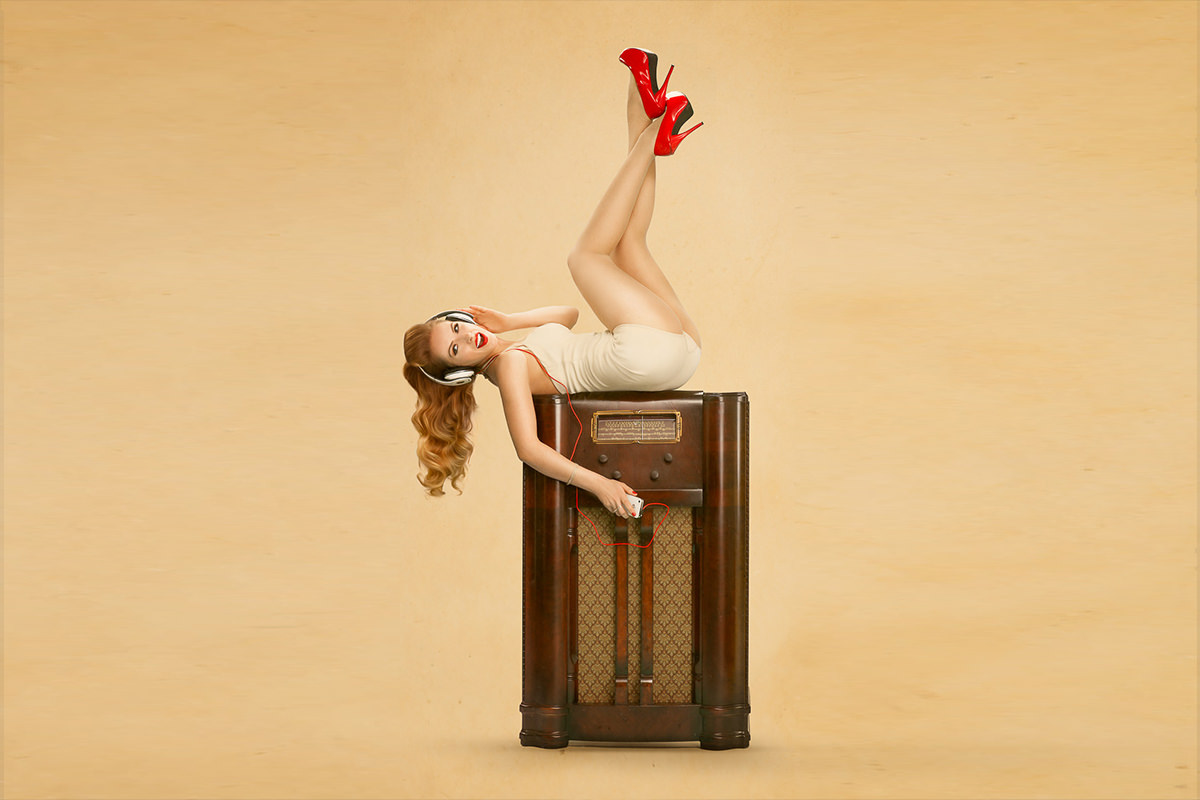

A pinup shoot built around a real idea beats a pretty outfit every time. Go behind the scenes on a series that contrasts vintage props with the smartphone that replaced them, including how to rent antiques instead of buying them, the four-light setup (hair light, two rim lights, and a broad fill) that keeps a pinup bright and dimensional, and how to edit a whole series so every frame reads as one set.
We publish a new free tutorial every week, each one with sample images and PSDs you can download and follow along with. Sign up and they land straight in your inbox, along with early word on sales, events and subscriber-only offers.

Pinup: Behind the Scenes
A pinup shoot can easily default to a pretty person in a fun outfit, but building a concept around something more specific, in this case the way a single smartphone has quietly replaced dozens of older devices, gives a shoot a stronger point of view. This behind-the-scenes breakdown covers the concept research, the four-light setup used to sculpt the subject, and the series-editing approach that ties a whole set of images together.
Researching the Concept Before Shooting
The specific concept for this shoot came out of genuine research into what classic pinup photography actually looked like and represented, rather than starting from a generic idea of what a pinup shot should be.
-
Study Reference Material Before Committing to a Concept
Research the visual conventions and era-specific details of the style you are aiming for, in this case vintage pinup photography from the 1940s through 1960s, before locking in a specific concept.
Building the Concept Around Old and New Technology
The core idea that emerged from research was a play on how a single modern smartphone now replaces many individual pieces of older technology.
-
Find a Modern Parallel for Vintage Props
Identify a piece of modern technology and think through what older, single-purpose devices it has effectively replaced: a smartphone’s map feature standing in for an old globe or paper map, its internet access replacing a set of encyclopedias, its messaging replacing a typewriter.

Sourcing Vintage Props From Antique Stores
Finding period-accurate props like an old radio or typewriter does not require purchasing them outright.
-
Ask an Antique Store About Renting Props
Contact local antique stores and ask about renting rather than buying specific pieces. Many are willing to rent an item for roughly 5 to 15 percent of its sale price, and some will even deliver and pick up the pieces on the day of your shoot.

Why Antique Stores Are a Practical Prop Source
Buying an expensive, hard-to-find prop outright for a single shoot rarely makes financial sense, but antique dealers are generally friendly, are used to hauling pieces around in their vans and trucks, and are often open to a short-term rental arrangement. It is worth simply asking, since the rental cost is typically a small fraction of the item’s full price.
Building a Four-Light Setup to Sculpt the Subject
Pinup lighting needs to stay visually interesting without going so far into deep shadow that it loses the genre’s characteristic brightness, which called for a specific four-light approach.
-
Add a Hair Light Above the Subject
Position a light directly above, or above and behind, the subject as a dedicated hair light. This light draws attention to hair and facial features and is often the light that gets skipped by less experienced photographers.
-
Add Two Rim Lights Behind the Subject
Add two additional lights behind the subject on opposite sides, in this case a large 86-inch parabolic on one side and a medium soft box on the other, to create rim highlights of two different characters and intensities.
-
Add a Broad Fill Light in Front
Add a large, broad fill light in front of the subject, such as another 86-inch parabolic, to keep shadows soft rather than harsh. If a front fill is not possible in your space, bouncing a light off the ceiling works as an alternative.

Why a Hair Light Makes Such a Noticeable Difference
A hair light adds a distinct highlight along hair and the top of the head that is easy to overlook until you compare a shot with and without one. Especially in a genre like pinup photography, where hair and styling are central to the look, that extra highlight noticeably improves the overall impression of a well-lit, professional portrait.
Improvising a Hair Light Without a Boom Stand
If a dedicated boom arm is not available, a light stand paired with a horizontal backdrop crossbar and a super clamp can hold a hair light in position above and behind a subject just as effectively.
Coordinating Hair, Makeup, Props, and Wardrobe Together
Selling a specific era convincingly depends on several separate elements all working together, not any single one carrying the whole concept.
-
Book a Hairstylist Familiar With the Era’s Styles
Work with a hairstylist who can execute period-specific hairstyles, since a modern hairstyle can undercut an otherwise well-executed vintage concept.
-
Match Makeup, Wardrobe, and Props to the Same Era
Coordinate makeup style, wardrobe, and props so they all clearly reference the same time period, since a mismatch in any one of these elements can make the whole concept feel inconsistent.

Why All Four Elements Need to Match
Hair, makeup, props, and wardrobe each carry their own visual signals about time period. If even one of the four does not match the others, such as modern hair with vintage wardrobe and props, the mismatch tends to be immediately noticeable and undermines the whole concept, even if the other three elements are executed perfectly.
Staying Open to Unplanned Opportunities on Set
Not every strong image from a shoot needs to fit the planned concept directly.
-
Photograph Interesting Props Even Outside Your Concept
If an interesting prop or moment presents itself on set that does not fit your planned series, photograph it anyway. It can become a strong standalone image even if it never joins the main series.

Combining Dodging, Burning, and Custom Textures in Post
The post-production style for this series layered two seemingly opposite qualities together: a modern, carefully sculpted dodge-and-burn look, and an intentionally old, low-contrast, textured finish.
-
Apply Dodging and Burning for Dimension
Use dodging and burning techniques throughout each image to sculpt light and shadow, adding the kind of dimensional, polished quality associated with modern retouching.
-
Photograph and Apply Custom Textures
Create and photograph your own textures, then layer them over the retouched images using an appropriate blending mode to introduce an aged, low-contrast quality.

Why Combining New and Old Techniques Reinforces the Concept
Pairing a modern dodge-and-burn approach with an aged texture overlay mirrors the shoot’s core concept directly: new technology and techniques layered over something intentionally old-feeling. The editing style itself becomes part of how the concept is communicated, not just a finishing touch applied afterward.
Editing Multiple Images So They Read as One Series
Editing images that belong to a series requires a different process than editing a single standalone photo.
-
Edit Each Image While Referencing the Previous One
Edit your first image fully, then keep it visible while editing each subsequent image, actively comparing and adjusting to keep the look and feel consistent across the set.
-
Re-Edit the Whole Series for Consistency
After editing every image individually, go back through the entire series again, since a handful of images will likely stand out as inconsistent once viewed alongside all the others.
-
Crop Every Image to the Same Aspect Ratio
Crop every image in the series to a consistent aspect ratio, since matching crops reinforce the sense that the images belong together as much as matching color and tone do.

Why a Second Editing Pass Across the Whole Series Matters
Editing images one at a time, even while referencing the previous image, tends to produce small inconsistencies that only become visible once every image in the series is viewed together. A dedicated second pass across the whole set, specifically looking for outliers, catches those mismatches that individual editing sessions miss.
Why This Approach Works
What separates this shoot from a generic pinup concept is that every decision, from props to lighting to post-production style, was built around one specific idea rather than assembled from genre conventions alone. The four-light setup did more than just look good: the hair light, rim lights, and fill each solved a specific problem inherent to keeping a pinup image both dimensional and appropriately bright. And treating post-production as part of the storytelling, layering modern dodge-and-burn work with intentionally aged textures, reinforced the old-versus-new concept all the way through to the final edit rather than stopping at the wardrobe and props.
Final Thoughts
A strong concept shoot benefits enormously from research done before a single light is turned on. Understanding what made a genre look the way it did historically, rather than guessing at surface-level conventions, is what let this shoot build a genuinely specific idea instead of a generic one. The four-light lighting pattern used here, a hair light, two rim lights, and a broad fill, is also a solid, reusable template any time a shoot calls for a bright, dimensional look rather than a moodier, more shadow-heavy one.
Quick Reference: Settings and Tips
- PropsRent from antique stores, often 5 to 15 percent of the price, delivery included
- Hair lightDirectly above or above and behind the subject; boom, or a backdrop bar and super clamp
- Rim lights86-inch parabolic camera right and a medium soft box camera left, both behind the subject
- Fill light86-inch parabolic in front, camera right; or bounce a light off the ceiling
- Sell the eraHair, makeup, props and wardrobe from the same period
- PostDodge and burn, then your own photographed textures and low contrast
- SeriesEdit next to the first image, re-edit the set, same aspect ratio crop
Pinup Photoshoot: Common Questions
How do you come up with a concept for a pinup shoot?
Research the genre first. Classic pinups from the 40s, 50s and 60s often used older technology, which led to this shoot’s idea: one smartphone now replaces many of those old devices.
Where can I find vintage props for a photoshoot?
Try antique stores. Ask to rent instead of buy; many will rent a piece for around 5 to 15 percent of its price, and this store even delivered everything on the day of the shoot and picked it up afterward.
What lighting setup works for pinup photos?
Four lights: a hair light above or above and behind the subject, two rim lights behind (an 86-inch parabolic camera right and a medium soft box camera left), and a big broad fill in front.
Why is the hair light so important?
It puts a nice highlight on the hair and face, which is where a pinup shot draws attention. Aaron calls it the most important light of the shoot and one many photographers skip.
How do I set up a hair light without a boom?
Use two light stands and the horizontal bar of a backdrop stand behind the subject, then fix the light to the bar with a super clamp.
What if I can’t put a fill light in front of the subject?
Fire the light into the ceiling so it bounces around the room. The point is to keep the shadows from getting too harsh and deep.
What makes a pinup look true to the era?
Hair, makeup, props and wardrobe all have to match the period. Get a hairstylist who can do pinup styles; great props and wardrobe fall apart if the hair looks modern.
How were the pinup photos edited?
With a lot of dodging and burning for a modern, sculpted look, plus textures the team photographed themselves and a low-contrast finish for an old feel.
How do I make a set of photos look like one series?
Edit the first image, then edit each next one with the first open beside it. When all are done, re-edit the whole set to fix the outliers, and crop every image to the same aspect ratio.
From the Magazine View all
Stories, interviews and guides for photographers, new every week.
 EditingLightCraft vs Lightroom: I Edited the Same RAW Files in BothThe free clone on the same RAW files: what matches, what breaks and who should switch.
 InspirationRare Historical Photos: 13 of the Rarest Pictures Ever TakenFrom the earliest surviving picture of a person to the last passenger pigeon: who took each one and why it survives.
 EditingArtCraft: Photoshop Cloned by AI in Two Weeks. Is It Legal?ArtCraft cloned Photoshop and Lightroom with AI and gave them away. Any good? Legal? Safe?
Master Photoshop, Lightroom and Photography
Join PHLEARN PRO for $12.99 a month, or $99.99 a year (save 36%). Cancel anytime, with a 100% money-back guarantee.





