
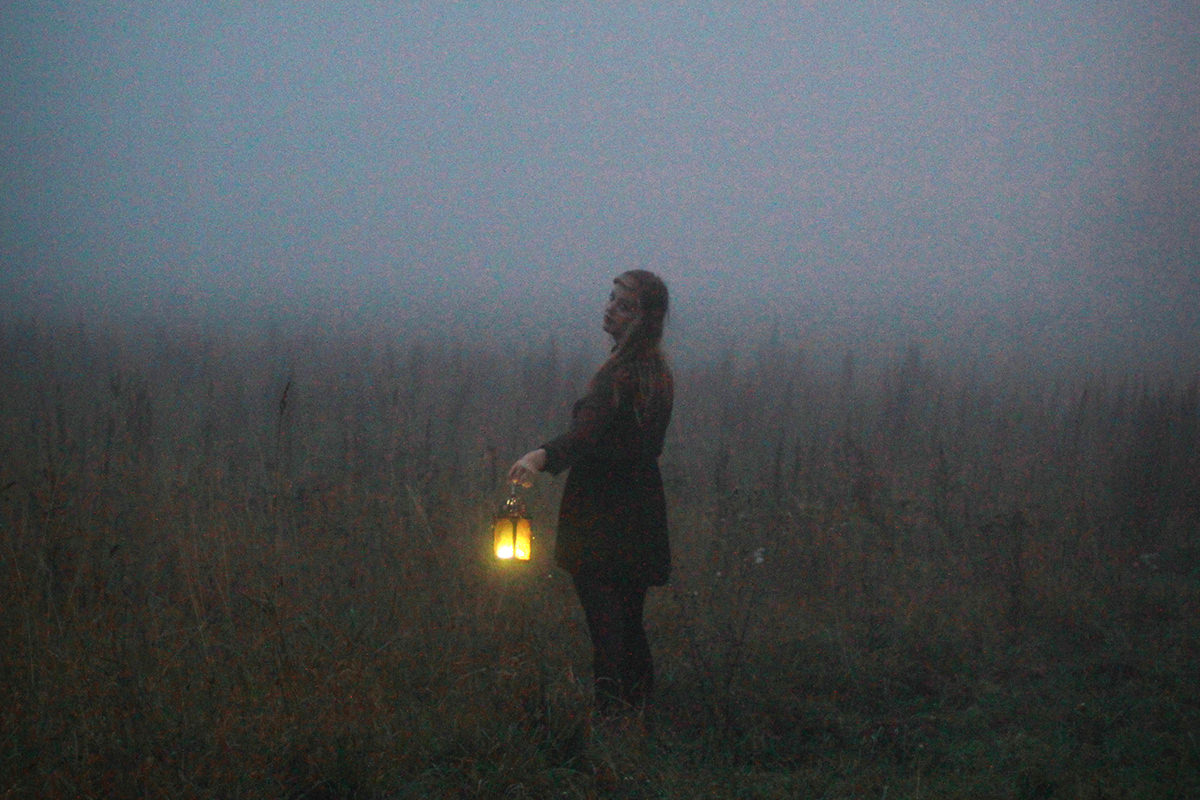

Noise is really two problems wearing one name: colored specks that do not belong, and the light-and-dark grain that adds texture but no detail. Learn how Surface Blur set to the Color blending mode cleans up the first without touching sharpness, how Dust and Scratches handles the second, and how layer masks keep faces and bright objects out of the smoothing entirely.
We publish a new free tutorial every week, each one with sample images and PSDs you can download and follow along with. Sign up and they land straight in your inbox, along with early word on sales, events and subscriber-only offers.

How to Reduce the Noise in Your Image
Noise shows up most often when a smaller sensor or a higher ISO has to work harder to capture a scene, and it comes in more than one flavor: color noise, where random red, green, and blue specks appear where they should not, and luminance noise, the light-and-dark grain that adds visual texture without adding real detail. Rather than reaching for a single filter and hoping for the best, combining a few targeted techniques gets far better results than any one of them alone.
Duplicating Your Layer Before Making Changes
Before doing any noise reduction, it is worth preserving the original background layer untouched so you always have something to compare against or fall back on.
-
Duplicate the Background Layer
Select your background layer and press Command + J to duplicate it, keeping the original layer available if you need to start over or check the original image.
Removing Color Noise With Surface Blur and a Blending Mode
Color noise, where you see scattered red, green, or blue specks that do not belong, responds well to a technique that blurs the image and then uses a blending mode to keep only the color information from that blur.
-
Apply a Surface Blur
Go to Filter > Blur > Surface Blur on your duplicated layer. Use a relatively high Radius, and adjust the Threshold: a lower threshold limits how much blurring happens, while a higher threshold lets more of the image be affected.
-
Change the Layer’s Blending Mode to Color
Set the surface-blurred layer’s blending mode to Color. This discards the blur’s effect on brightness and detail, keeping only its smoothed-out color information, which replaces the scattered color noise with a cleaner, blended color.
Why Surface Blur Targets Color Noise So Well
Surface Blur is designed to preserve edges while still blurring flatter areas, which averages out small, randomly colored specks into a smoother, more consistent color. Setting the blending mode to Color then applies only that smoothed color information back onto the sharp original, leaving detail and brightness untouched while the distracting color speckling disappears.
Protecting Specific Areas With a Layer Mask
Not every part of an image benefits equally from this color-noise fix, and some areas may look better with their original, unprocessed color.
-
Mask Away the Effect Where Needed
Add a layer mask to your Surface Blur layer and paint black over any area where the original color looked better, such as a brightly colored object like a lantern, to restore its original, unsmoothed color there.
Reducing Light-and-Dark Noise With Dust and Scratches
With color noise addressed, a separate technique tackles the light-and-dark grain, or luminance noise, that is left behind.
-
Create a Stamp Visible Layer
Press Shift + Option + Command + N to create a new layer, then Shift + Option + Command + E to stamp a flattened copy of everything visible onto it.
-
Apply the Dust and Scratches Filter
Go to Filter > Noise > Dust and Scratches and adjust the Radius and Threshold sliders. A higher radius produces a more noticeable smoothing effect on the light-and-dark grain.
-
Lower the Layer’s Opacity to Blend the Effect
If a higher radius produces too much smoothing, lower that layer’s opacity to bring back some of the original detail while keeping most of the noise reduction.
Why Dust and Scratches Can Outperform a Dedicated Noise Filter
Aaron finds the Dust and Scratches filter works a little better on light-and-dark noise than the standard Reduce Noise filter, especially when a higher radius is blended back in with opacity rather than left at full strength.
Masking Detail Back Into Important Areas
Aggressive noise reduction can eat into fine detail in areas that genuinely need to stay sharp, so those areas usually need to be protected separately.
-
Paint Black Over High-Detail Areas
Add a layer mask to your Dust and Scratches layer and paint black over areas with important fine detail, such as a face, to preserve their original sharpness while the rest of the image benefits from the smoothing.
The Trade-Off Between Noise Reduction and Detail
Any noise reduction technique that actually removes visible grain is, by definition, also removing some real image information along with it. The goal is not to eliminate every trace of noise completely. It is to find the point where the noise is no longer distracting without sacrificing more detail than the image can afford to lose.
Finishing With the Reduce Noise Filter
A final pass with Photoshop’s dedicated Reduce Noise filter, applied last, cleans up whatever noise remains after the previous two techniques.
-
Stamp a New Final Layer
Create another stamp-visible layer on top of everything using Shift + Option + Command + E.
-
Apply Reduce Noise and Balance the Sliders
Go to Filter > Noise > Reduce Noise and adjust the Strength and Preserve Details sliders together. Raising Preserve Details too high can cause the filter to barely reduce any noise at all, so balance the two until you see a visible improvement in the before and after preview.
Why Preserve Details and Strength Fight Each Other
Preserve Details tells the filter how much fine texture to protect, while Strength controls how aggressively noise is smoothed. Pushed too far in opposite directions, the two settings can effectively cancel each other out, which is why checking the live preview while adjusting both together matters more than trusting either slider on its own.
Checking Your Results at Different Zoom Levels
How much noise reduction is appropriate often looks very different depending on how closely you are viewing the image.
-
Compare Before and After at Multiple Zoom Levels
Toggle your final grouped noise-reduction layers on and off while viewing the image at both a high zoom, such as 200%, and a more realistic viewing zoom, such as 25%, since a small amount of lost detail at high zoom may hardly show at normal viewing size. If a face has lost too much definition, add a layer mask to the whole group and paint the effect away slightly on areas like the eyes and lips.
Why This Approach Works
No single filter handles both color noise and luminance noise equally well, which is why this workflow layers several targeted techniques instead of relying on one. Surface Blur combined with the Color blending mode isolates and smooths just the color information without touching brightness or detail, Dust and Scratches handles the light-and-dark grain separately, and a final Reduce Noise pass mops up whatever is left. Masking each layer individually, restoring original color to a bright object or protecting fine detail on a face, means the overall noise reduction can be aggressive where it needs to be while staying invisible in the areas that matter most.
Final Thoughts
Noise reduction always involves a trade-off between smoothness and detail, and there is no single setting that works identically across every image. The real skill is in combining techniques, using Surface Blur for color, Dust and Scratches or Reduce Noise for luminance, and layer masks to protect the areas that matter, then judging the result at a realistic viewing size rather than chasing a perfectly noise-free image at 200% zoom.
Quick Reference: Keys, Menus and Settings
- Duplicate the layerCmd/Ctrl + J
- Color noiseFilter > Blur > Surface Blur, fairly high Radius; blend mode Color
- Stamp visibleShift + Alt/Option + Cmd/Ctrl + N, then Shift + Alt/Option + Cmd/Ctrl + E
- Light and dark noiseFilter > Noise > Dust and Scratches, higher Radius, then lower the opacity
- Final passFilter > Noise > Reduce Noise: raise Strength, lower Preserve Details until it works
- Protect detailLayer masks: paint black over the face, the eyes and lips, or a color you want back
- CompareAlt/Option-click the background layer’s eye icon; check at 200% and 25%
No AI, no generative credits.
Reducing Noise in Photoshop: Common Questions
How do I remove color noise in Photoshop?
Duplicate the layer with Cmd/Ctrl + J, apply Filter > Blur > Surface Blur with a fairly high Radius, then set the layer’s blend mode to Color. Only the smoothed color is kept, so the red, green and blue specks blend away.
Surface Blur makes my photo look terrible. Is that right?
Yes, on its own it looks bad. Changing the layer’s blend mode from Normal to Color is what makes it useful, because the blur’s brightness and detail drop away.
What do Radius and Threshold do in Surface Blur?
Radius is how much blur there is. A lower Threshold blurs less of the image, and a higher Threshold affects it a lot more.
What if the color fix changes a color I liked?
Add a layer mask to the Surface Blur layer and paint black over that area. In the video it brings back the original color of the lantern.
How do I reduce light and dark grain?
Make a new layer with Shift + Alt/Option + Cmd/Ctrl + N and stamp it with Shift + Alt/Option + Cmd/Ctrl + E. Run Filter > Noise > Dust and Scratches with a higher Radius, then lower the layer’s opacity.
Is Dust and Scratches better than Reduce Noise?
Aaron finds it works a little better than the standard Reduce Noise filter, and the Surface Blur trick beats Reduce Noise’s color noise setting. He still runs Reduce Noise last as a final pass.
Why does Reduce Noise barely do anything?
Preserve Details is probably too high. The more detail it tries to keep, the less noise it removes, so bring Preserve Details down until the preview shows a difference.
How do I keep detail in a face?
Paint black on the Dust and Scratches layer’s mask over the face. At the end, mask the whole group and paint the effect away slightly on the eyes and lips.
Can I remove all the noise without losing detail?
No. The noise is information in the file, so removing it always takes a little detail with it. Judge the result at a normal viewing size like 25%, not only at 200%.
From the Magazine View all
Stories, interviews and guides for photographers, new every week.
 EditingLightCraft vs Lightroom: I Edited the Same RAW Files in BothThe free clone on the same RAW files: what matches, what breaks and who should switch.
 InspirationRare Historical Photos: 13 of the Rarest Pictures Ever TakenFrom the earliest surviving picture of a person to the last passenger pigeon: who took each one and why it survives.
 EditingArtCraft: Photoshop Cloned by AI in Two Weeks. Is It Legal?ArtCraft cloned Photoshop and Lightroom with AI and gave them away. Any good? Legal? Safe?
Master Photoshop, Lightroom and Photography
Join PHLEARN PRO for $12.99 a month, or $99.99 a year (save 36%). Cancel anytime, with a 100% money-back guarantee.





