
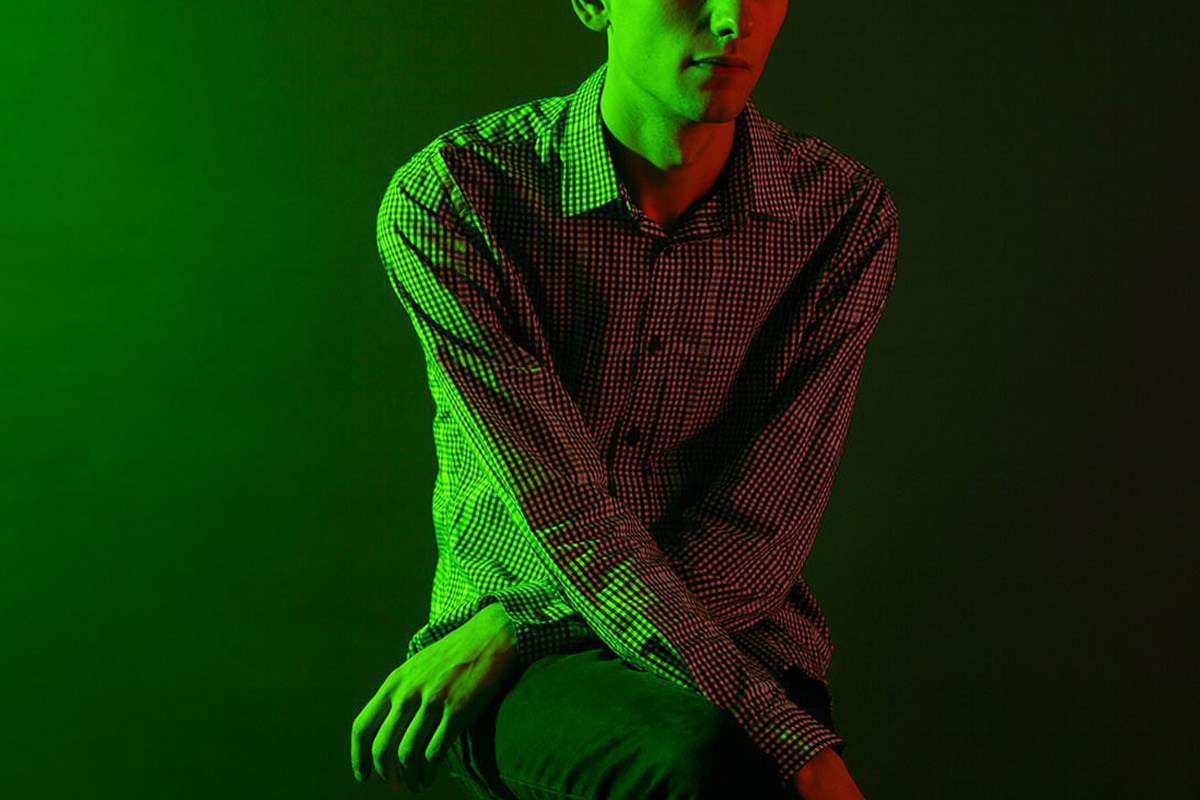

When a single color cast fills nearly the whole frame, one adjustment will not fix it. This free Photoshop tutorial cancels a heavy green cast mathematically: duplicate the layer, invert it, set it to Color at 50% opacity, then restrict that cancellation to the Green and Blue channels so the complementary reds survive. Curves pushes what remains back toward red, and Color Range with Color Balance masks brings skin to a believable orange-leaning tone.
We publish a new free tutorial every week, each one with sample images and PSDs you can download and follow along with. Sign up and they land straight in your inbox, along with early word on sales, events and subscriber-only offers.
How to Remove a Color Cast in Photoshop Using Complementary Colors
This tutorial tackles one of the harder color problems in Photoshop: an image where a single color cast, in this case a heavy green, makes up nearly the entire frame. Rather than trying to correct it with a single adjustment, the technique layers an invert-and-blend trick with targeted channel work and selective masking to bring the green back to a neutral, believable skin tone while leaving the complementary red side of the image untouched.
Duplicating and Inverting to Cancel a Color Cast
The core trick behind this entire technique is that a color and its exact inverse, mixed together evenly, cancel each other out.
-
Duplicate the Background Layer
Press Cmd/Ctrl+J on the background layer to create a duplicate to work on.
-
Invert the Layer and Set Blend Mode to Color
Press Cmd/Ctrl+I to invert the duplicate layer’s colors, then change its blending mode from Normal to Color.
-
Set Opacity to 50%
Press V, then 5, to bring the layer’s opacity to 50%, mixing the original color and its inverse evenly and pushing the image much closer to grayscale.
Why Inverting and Blending at 50% Cancels a Cast
A color and its precise opposite, combined at equal strength through the Color blending mode, mathematically neutralize each other’s hue rather than simply covering it up. Because this affects every color in the image evenly, though, it also cancels out colors you want to keep — in this case, the complementary reds — which is the problem the next step solves.
Protecting the Red Channel With Blend Options
Since the invert-and-blend trick affects all colors equally, it needs to be restricted so it doesn’t also cancel out the reds that should stay intact.
-
Open Blending Options and Adjust Channel Blending
Double-click the inverted layer to open Layer Style, and under Advanced Blending, use the Channels checkboxes (R, G and B) to choose which channels the layer affects. Uncheck R to leave the Red channel untouched so the reds in the image stay intact, and let the effect apply to the Green and Blue channels instead.
Repeating the Process for a Stronger Correction
A color cast strong enough to dominate most of the frame usually won’t fully resolve in a single pass of this technique.
-
Stamp a Visible Layer
Press Shift+Option/Alt+Cmd/Ctrl+E to create a new merged layer combining everything visible so far.
-
Repeat the Invert, Blend, and Channel Restriction
Duplicate this stamped layer, invert it with Cmd/Ctrl+I, set its blending mode to Color and opacity to 50%, then open its blending options again and restrict the effect to the Green and Blue channels, leaving Red alone as before.
Why One Pass Isn’t Enough on a Heavy Color Cast
When a single color makes up most of an image’s tonal range, one round of inverting and blending only pulls it partway back toward neutral. Stamping a new merged layer and repeating the same process builds on the progress already made rather than trying to force a complete correction out of one adjustment.
Pushing Further Toward Red With a Curves Adjustment
With most of the heavy cast reduced, a Curves adjustment layer fine-tunes the remaining balance between cyan and red.
-
Add a Curves Layer and Adjust the Red and Blue Channels
Add a Curves adjustment layer, select the Red channel and drag the curve upward to reduce cyan and increase red, then switch to the Blue channel and drag it downward to push the color further away from cyan and back toward the original red-toned look, minus the green cast.
Selecting and Fine-Tuning Remaining Skin Tone Areas
What’s left after the global corrections is a set of specific areas that still need pushing toward an accurate, neutral skin tone rather than a global tint.
-
Select the Remaining Off-Color Skin With Color Range
Create a new layer, go to Select > Color Range, click the affected skin area, and raise Fuzziness until the selection covers the problem areas without also grabbing the reds you want to leave alone.
-
Load the Selection Into a Color Balance Mask
With the selection active, add a Color Balance adjustment layer — Photoshop automatically loads the active selection into that layer’s mask, restricting the adjustment to only the selected area.
-
Push Toward Red, Yellow, and Away From Green
Adjust the Color Balance sliders toward red and yellow while pulling away from green, since skin tone is fundamentally a mix of red and yellow, until the selected area reads as a neutral, believable skin tone.
Why Skin Should Be Pushed Toward Orange, Not Neutral Gray
Skin is never truly neutral gray — it’s some combination of red and yellow, varying by person, which together read as orange. Pushing a correction toward red and yellow rather than a flat neutral gray is what makes a corrected skin tone look like real skin instead of a washed-out, colorless patch.
Repeating on the Opposite Side for Deeper Reds
The same selective approach works in the other direction, deepening reds that came back lighter than the original image had them.
-
Select and Push the Red Side Further
Create another new layer, use Color Range to select the reds on the opposite side of the face, raise Fuzziness as needed, then add a Color Balance layer and push further toward red, even slightly past magenta if the original image called for deeper reds than what’s currently showing.
Fixing Gaps in a Selection Mask
An imperfect Color Range selection can leave a small amount of the original cast visible at the edges of a mask.
-
Fill the Mask With Black to Reset It
Click the layer mask that’s leaving a gap, press Shift+Delete, and fill it with black to temporarily remove its effect entirely.
-
Reselect With Higher Fuzziness and Reload the Mask
Go back to Select > Color Range, raise Fuzziness further or use the plus eyedropper to add more of the missed area to the selection, then, with the new selection active, click the black layer mask and press Cmd/Ctrl+I to turn the selected area white, covering the gap the first pass missed.
Why Fuzziness Determines How Complete a Selection Is
Color Range’s Fuzziness setting controls how loosely or tightly it groups similar colors into the selection, and a value that’s too conservative will leave small pockets of the original color cast just outside the selected area. Raising Fuzziness, or adding to the selection with the plus eyedropper, closes those gaps without having to rebuild the selection from scratch.
Why This Approach Works
This technique works because it treats color correction as cancellation rather than approximation: inverting a color and blending it back in at equal strength removes that hue mathematically instead of just painting over it with a guess. Restricting that cancellation to specific channels through the blend options is what keeps the technique from wiping out colors worth keeping, and repeating the process on a stamped layer accounts for how much correction a truly dominant cast actually needs. The final selective work with Color Range and Color Balance masks handles what a global correction can’t — pushing specific problem areas, like skin, toward the warm, orange-leaning tone real skin actually has rather than a flat neutral gray. The same layered approach shown here, alongside more foundational color tools like Adobe Camera RAW, applies just as well to a much more common scenario: a subject lit by a stray colored light source, like a neon sign, casting an unwanted tint across part of their face.
Final Thoughts
Removing a severe color cast without losing intentional color, like the complementary reds in this image, comes down to precision: invert and blend to cancel color mathematically, restrict that cancellation to the channels that actually need it, and finish with selective Color Range and Color Balance adjustments to push remaining problem areas toward accurate, natural tones. It looks like an advanced technique, but each individual step is straightforward on its own — the skill is in knowing when to reach for cancellation instead of correction, and this same combination handles everyday problems like colored ambient light just as well as it handles a dramatic, image-wide cast like the one here.
Quick Reference: Keys, Menus and Settings
- Duplicate and invertCmd/Ctrl + J, then Cmd/Ctrl + I; blend mode Color
- Mix evenlyV, then 5 for 50% opacity
- Keep the redsDouble-click the layer > Advanced Blending > Channels: uncheck R
- Second passShift + Alt/Option + Cmd/Ctrl + E, duplicate and repeat
- Toward redCurves: Red channel up, Blue channel down
- Fix the skinSelect > Color Range, raise Fuzziness, then a Color Balance layer toward red and yellow
- Fill mask gapsShift + Delete to fill black, reselect, Cmd/Ctrl + I on the mask
No AI, no generative credits.
Removing a Color Cast: Common Questions
How does inverting a layer remove a color cast?
A color mixed evenly with its opposite cancels out. Duplicate the layer with Cmd/Ctrl + J, invert it with Cmd/Ctrl + I, set the blend mode to Color and the opacity to 50%, and the image moves much closer to grayscale.
What is the quick way to set opacity to 50%?
Press V, then the number 5, and the selected layer’s opacity jumps to 50%. That even mix of the color and its inverse is what cancels the cast.
How do I remove the green without losing the reds?
Double-click the inverted layer to open Layer Style. Under Advanced Blending, uncheck the R channel so the layer only affects the Green and Blue channels, and the reds stay intact.
Why does one pass not remove the whole cast?
When one color makes up almost the entire image, a single pass only pulls it partway. Make a stamp visible layer with Shift + Alt/Option + Cmd/Ctrl + E and repeat the invert, Color, 50% and red-channel steps on a copy of it.
How do I push leftover cyan back toward red?
Add a Curves adjustment layer, drag the Red channel up and the Blue channel down. That reduces the cyan and brings back the red look of the original, without the green.
How do I select only the off-color skin?
Go to Select > Color Range, click the skin and raise Fuzziness until the problem areas are selected. In the video the selection leaves the reds alone.
How do I make an adjustment affect only my selection?
Keep the selection active and add the adjustment layer, here Color Balance. Photoshop loads the selection into the new layer’s mask automatically.
What color should corrected skin be?
Orange, not gray. Skin is a mix of red and yellow, so push the Color Balance sliders toward red and yellow and pull a little green out until it looks like natural skin.
Why is there still a little cyan at the edge of my correction?
The Color Range selection missed some of it. Click the mask, press Shift + Delete and fill it with black, reselect with more Fuzziness or the plus eyedropper, then press Cmd/Ctrl + I on the mask to turn the selected area white.
From the Magazine View all
Stories, interviews and guides for photographers, new every week.
 EditingLightCraft vs Lightroom: I Edited the Same RAW Files in BothThe free clone on the same RAW files: what matches, what breaks and who should switch.
 InspirationRare Historical Photos: 13 of the Rarest Pictures Ever TakenFrom the earliest surviving picture of a person to the last passenger pigeon: who took each one and why it survives.
 EditingArtCraft: Photoshop Cloned by AI in Two Weeks. Is It Legal?ArtCraft cloned Photoshop and Lightroom with AI and gave them away. Any good? Legal? Safe?
Master Photoshop, Lightroom and Photography
Join PHLEARN PRO for $12.99 a month, or $99.99 a year (save 36%). Cancel anytime, with a 30-day money-back guarantee.





