
description
Reshaping a subject in Photoshop is a genuinely useful retouching skill, but it is also easy to push too far and end up with something that looks unnatural. This tutorial works through a handful of small, restrained adjustments, using Puppet Warp with anchor points for the larger structural changes and the Liquify tool for local refinement, along with guidance on brush settings and on keeping every change tasteful and consented to.
Enjoying This Free Tutorial?
We publish a new free tutorial every week, each one with sample images and PSDs you can download and follow along with. Sign up and they land straight in your inbox, along with early word on sales, events and subscriber-only offers.
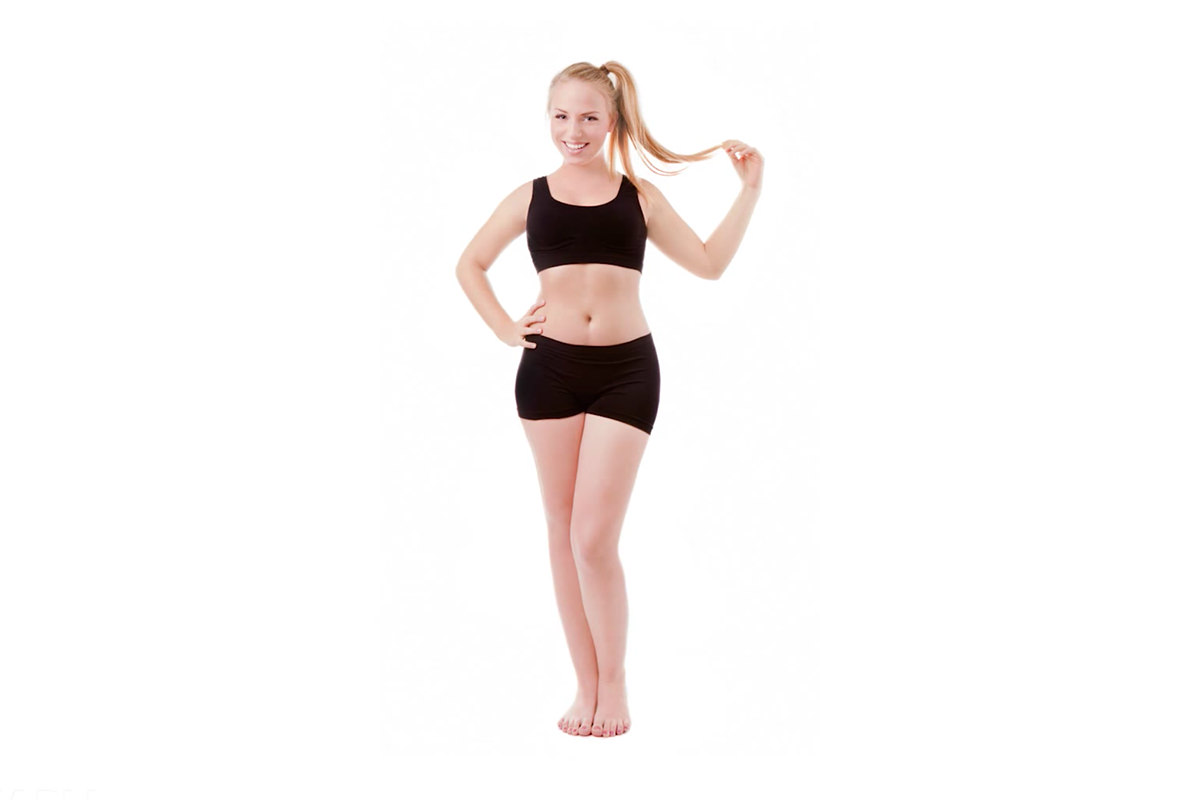
How to Transform the Body in Photoshop
Reshaping a subject’s body in Photoshop is a genuinely useful retouching skill, but it’s also easy to push too far and end up with something that looks unnatural or, worse, offensive. This tutorial covers a handful of subtle, natural-looking adjustments using Puppet Warp and the Liquify tool, along with guidance on keeping every change tasteful and restrained.
Planning Subtle Adjustments Before Making Any Change
Several small, natural-looking adjustments, rather than one dramatic change, tend to add up to a much better final result.
-
Identify a Few Small Areas to Adjust
Look for a handful of small opportunities, such as slightly lengthening the legs, lifting the neck, or gently slimming the waist, arms, or legs.
-
Plan Minor Changes Rather Than One Large One
Plan each individual adjustment to be minor, relying on the combination of several small changes rather than one dramatic transformation.
Lengthening the Legs With Puppet Warp
Puppet Warp’s anchor points make it possible to stretch just the legs downward while keeping everything above them completely stationary.
-
Duplicate the Background Layer
Press Cmd/Ctrl+J to duplicate the background layer.
-
Open Puppet Warp
Go to Edit > Puppet Warp.
-
Place Anchor Points at the Hips
Click once on each hip to create anchor points that will stay fixed in place.
-
Place Movable Points at the Feet
Click once on each foot to create points that can be moved.
-
Select Both Foot Points and Drag Down
Hold Shift, click both foot points to select them together, and drag downward for a natural-looking leg extension.
Why Anchor Points Matter Before Moving Anything
Without anchor points placed above the area being adjusted, moving a Puppet Warp point can distort the entire image unpredictably. Fixing points at the hips before moving the feet is what keeps everything above the hips completely stable while only the legs stretch.
Lifting the Head and Shoulders With Puppet Warp
Surrounding the head with several Puppet Warp points, rather than just one, keeps its shape intact while still allowing the whole head to shift upward.
-
Open Puppet Warp Again
Go to Edit > Puppet Warp on the same layer.
-
Anchor Both Shoulders
Click once on each shoulder to fix them in place.
-
Surround the Head With Multiple Points
Place several points around the head’s edges, increasing the point density setting if needed, so the head moves as one solid shape rather than distorting.
-
Select All Head Points and Drag Upward
Hold Shift, select every point around the head, and drag upward slightly, which also has the effect of bringing the shoulders down a little.
Slimming the Midsection With Puppet Warp
A separate Puppet Warp pass, with the density setting back to Normal, brings the waistline in gently toward the center of the body.
-
Open Puppet Warp With Density Set to Normal
Go to Edit > Puppet Warp again, setting point density back to Normal unless Photoshop indicates more points are needed.
-
Place Points Along the Waistline
Click to place a few points along the sides and top of the waist area.
-
Drag Each Point Slightly Toward the Center
Move each waist point in slightly toward the body’s center for a subtle slimming effect.
Why Puppet Warp Produces More Natural Results Than Liquify Alone
Puppet Warp affects the image on a more global level, shifting connected areas together rather than just pushing and pulling a local region. That broader, more connected effect is part of why Puppet Warp tends to look more natural for larger structural adjustments, like leg length or waist width, compared to relying on Liquify alone.
Refining Details With the Liquify Tool
After the larger Puppet Warp adjustments are finished, the Liquify tool’s Forward Warp option smooths and refines smaller, more local areas like the arms.
-
Duplicate the Layer Again
Press Cmd/Ctrl+J to duplicate the layer with the Puppet Warp adjustments already applied.
-
Open Liquify and Select Forward Warp
Go to Filter > Liquify and select the Forward Warp tool, the first tool at the top of the toolbar.
-
Click and Drag to Smooth Small Areas
Click and drag gently to smooth or slightly narrow small areas like the arms and waist.
Choosing the Right Brush Settings in Liquify
Matching brush size to the area being adjusted, along with a moderate pressure and higher density, keeps Liquify adjustments subtle and controlled.
-
Match Brush Size to the Target Area
Set the brush size to roughly match the width of the specific area being adjusted, such as an arm.
-
Keep Pressure Moderate
Keep pressure in a moderate range, roughly 20 to 30, to avoid making changes that are too large or sudden.
-
Keep Density High for a Natural Falloff
Keep density high so the effect falls off naturally toward the edge of the brush rather than ending abruptly.
Why Subtlety Matters When Transforming a Body
Pushing any single adjustment too far quickly moves a natural-looking retouch into territory that can look unrealistic or make someone unrecognizable from their actual self. Keeping every individual change modest, and always making sure the subject is comfortable with the transformation being made, is what keeps this kind of retouching respectful and effective rather than excessive.
Grouping and Comparing the Final Result
Grouping every adjustment layer together makes it easy to compare the final transformed image against the completely untouched original.
-
Group All Adjustment Layers
Select every layer used for the Puppet Warp and Liquify adjustments and group them together.
-
Toggle the Group to Compare Before and After
Turn the group’s visibility on and off to compare the transformed result against the original, untouched image.
Why This Approach Works
Placing anchor points before moving anything is what keeps a Puppet Warp adjustment, like lengthening legs or lifting a head, contained to just the intended area rather than distorting the whole image. Using Puppet Warp for larger structural changes and reserving Liquify for smaller, local refinement is what produces a more natural overall result than relying on either tool alone. Keeping every individual adjustment modest, and combining several small changes rather than one dramatic one, is what separates a tasteful, respectful retouch from one that goes too far.
Final Thoughts
Transforming a body convincingly in Photoshop comes down to a series of small, careful adjustments rather than any single dramatic change. Keeping the subject’s comfort and consent in mind, and resisting the temptation to push any one adjustment too far, is what keeps this kind of retouching both effective and responsible.
Quick Reference: Keys, Menus and Settings
- Work on a copyCmd/Ctrl + J, then Edit > Puppet Warp
- Longer legsAnchor each hip, a point on each foot, Shift-click both feet and drag down
- Lift the headAnchor the shoulders, surround the head with points (Density: More Points), Shift-select and drag up
- Slim the waistPuppet Warp, Density: Normal, drag waist points slightly toward the center
- RefineCmd/Ctrl + J, Filter > Liquify, Forward Warp, brush the size of the arm
- Liquify settingsPressure 20 to 30, Density high
- CompareGroup the layers and toggle the group’s visibility
No AI, no generative credits.
Reshaping the Body: Common Questions
What changes make a body look better in a photo?
Several small ones: slightly longer legs, a slightly longer neck, and a little taken in at the waist, legs or arms. Together they add up without changing who the person is.
How does Puppet Warp work?
Go to Edit > Puppet Warp on a duplicate layer and click to add points. Points you leave alone act as anchors; dragging another point stretches the image between them.
How do I make legs look longer in Photoshop?
In Puppet Warp, click once on each hip to anchor them and once on each foot. Shift-click both foot points and drag them down a little; everything above the hips stays put.
How do I lift the head without warping the face?
Anchor both shoulders, then surround the head with points so it moves as one piece. Shift-select all the head points and drag up slightly; it also lowers the shoulders a touch.
Puppet Warp says my point is too close. What do I do?
Set Density to More Points in the options bar so you can place points closer together. Start on Normal and switch only when Photoshop says you need to.
How do I slim the waist naturally?
Run Puppet Warp again with Density on Normal, place a few points along the sides and top of the waist, and drag each one in slightly toward the center. Puppet Warp moves connected areas together, so it looks natural.
Should I use Liquify or Puppet Warp?
Start with Puppet Warp for the larger changes, then duplicate the layer and use Filter > Liquify for small local smoothing, like the arms.
What Liquify settings should I use?
Use the Forward Warp tool with a brush about the size of the area, like the arm. Keep Pressure around 20 to 30 and Density high so the effect fades toward the brush edge.
How far should I go when reshaping someone?
Not far. Keep each change toned down so people still look like themselves, and make sure everyone, including the person in the photo, is on board with it.
From the Magazine View all
Stories, interviews and guides for photographers, new every week.
 EditingLightCraft vs Lightroom: I Edited the Same RAW Files in BothThe free clone on the same RAW files: what matches, what breaks and who should switch.
 InspirationRare Historical Photos: 13 of the Rarest Pictures Ever TakenFrom the earliest surviving picture of a person to the last passenger pigeon: who took each one and why it survives.
 EditingArtCraft: Photoshop Cloned by AI in Two Weeks. Is It Legal?ArtCraft cloned Photoshop and Lightroom with AI and gave them away. Any good? Legal? Safe?
Master Photoshop, Lightroom and Photography
Join PHLEARN PRO for $12.99 a month, or $99.99 a year (save 36%). Cancel anytime, with a 30-day money-back guarantee.