


description
A highly detailed illustration, full of fine hash marks that would be tedious to select by hand, turns out to be an ideal candidate for making selections from channels instead. This tutorial covers duplicating a channel and loading it as a selection, inverting it to target the opposite areas, loading that selection into a solid color adjustment layer, and using the resulting transparency to recolor, duplicate, and layer the design into a graphic composition.
Enjoying This Free Tutorial?
We publish a new free tutorial every week, each one with sample images and PSDs you can download and follow along with. Sign up and they land straight in your inbox, along with early word on sales, events and subscriber-only offers.
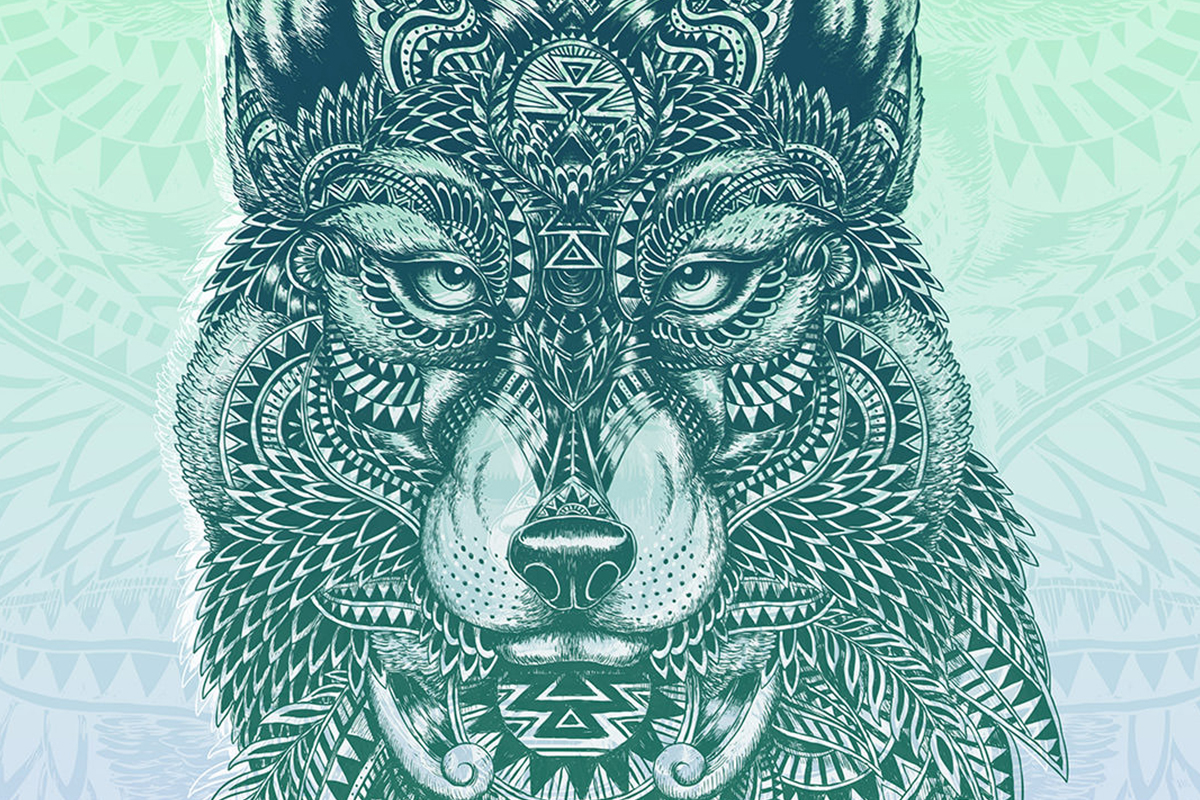
A highly detailed illustration, with fine hash marks and small details that would be tedious to select by hand, turns out to be an ideal candidate for making selections from channels instead. This tutorial covers duplicating and loading a channel as a selection, inverting it to target the opposite areas, loading that selection into a solid color adjustment layer, and then using the resulting transparency to recolor, duplicate, and layer the design into something far more graphic and versatile than the original black-and-white illustration.
Duplicating a Channel to Prepare for a Selection
Duplicating one of the existing color channels, rather than working on the original, gives a safe copy to turn into a selection without affecting the image’s actual color data.
-
Open the Channels Panel
Go to Window > Channels if the Channels panel isn’t already visible alongside Layers and Paths.
-
Duplicate a Color Channel
Click on any single channel, such as Blue, since the specific channel chosen doesn’t matter much for a black-and-white illustration, and drag it onto the New Channel icon to duplicate it.
Turning a Channel Into a Selection With Cmd/Ctrl-Click
Holding Cmd/Ctrl and clicking a channel’s thumbnail loads its lighter areas as an active selection, with partial grayscale values selected only partially.
-
Cmd/Ctrl-Click the Duplicated Channel’s Thumbnail
Hold Cmd/Ctrl and click the thumbnail of the duplicated channel to load it as a selection.
-
Return to the Layers Panel
Switch back to the Layers panel, since the active selection carries over regardless of which panel is currently showing.
Why Channels Select Lighter Areas, Not Darker Ones
Loading a channel as a selection always favors the lighter values in that channel, selecting them fully, while darker areas are excluded, and anything in between gets selected only partially based on its gray value. That partial, graduated selection is exactly what preserves fine detail, like small hash marks in an illustration, that a hard-edged selection tool would struggle to capture as cleanly.
Inverting the Selection to Target the Opposite Areas
Since a channel-based selection defaults to the lighter areas, inverting it is the simple way to target the darker subject instead.
-
Test the Selection by Painting on a New Layer
Create a new layer, choose a bright brush color, and paint across the image to see exactly which areas the current selection covers.
-
Invert the Selection if Needed
Go to Select > Inverse to switch the selection to the opposite areas, such as the darker illustrated subject rather than the lighter background.
Loading a Channel-Based Selection Into a Solid Color Adjustment Layer
Adding a solid color adjustment layer while the channel-based selection is active automatically loads that selection as the new layer’s mask, capturing every bit of the original detail.
-
Add a Solid Color Adjustment Layer
With the selection still active, add a new solid color adjustment layer from the Adjustment Layers button at the bottom of the Layers panel and choose any color to start with. Then delete the original Background layer; it isn’t needed anymore.
-
Inspect the Resulting Layer Mask
Hold Alt/Option and click the layer mask thumbnail to see the fine detail the channel-based selection captured directly in the mask.
Why Solid Color Adjustment Layers Beat a Flattened Fill
Filling a selection directly with color on a flattened layer locks that color in permanently, requiring the selection to be remade from scratch to change it later. A solid color adjustment layer instead keeps the color and the mask as separate, editable pieces, so the color can be changed at any time afterward just by double-clicking the layer’s color swatch.
Duplicating and Offsetting Layers for a Screen-Print Effect
Because the solid color layer’s mask leaves transparent pixels wherever the subject isn’t, duplicating and offsetting it slightly creates an overlapping, screen-print-like effect impossible with a flattened image.
-
Change the Base Color
Press C for the Crop tool, set the ratio to 1:1 (Square) and crop with some space around the wolf. Add a second solid color adjustment layer beneath the wolf as the background color, then double-click the wolf layer’s swatch and choose a new color for the design, a dark blue-green in the video.
-
Duplicate the Layer
Press Cmd/Ctrl+J to duplicate the colored layer.
-
Recolor and Offset the Duplicate
Change the duplicate’s color to a different shade, then use the Move tool to nudge it slightly out of alignment with the original, creating a layered, overlapping look.
Why Transparency Makes Duplicated Layers So Versatile
A flattened JPEG version of the same design would have no transparency to work with, making any duplicate identical and stacking uselessly on top of the original. Because each solid color layer’s mask leaves the background genuinely transparent, duplicating and offsetting it creates real overlap between different colored copies, producing a screen-print-like effect that only works because of that transparency.
Adding a Gradient Layer Mask for a Two-Tone Background
A foreground-to-transparent gradient painted onto a solid color layer’s own mask blends two background colors together instead of using just one flat color.
-
Add a Solid Color Layer for the Background
Add another solid color adjustment layer, a light blue in the video, above the background color layer and beneath the design layers.
-
Paint a Foreground-to-Transparent Gradient on Its Mask
Select the Gradient tool with a foreground-to-transparent linear gradient, then paint across the layer mask from top to bottom.
-
Adjust Both Colors Independently
Adjust the background color beneath the gradient and the solid color layer’s own color separately to fine-tune how the two blend together.
Scaling and Fading a Duplicated Layer for a Subtle Overlay
A duplicated, greatly enlarged, and low-opacity version of the design layered beneath everything else adds a subtle, repeating texture across the whole image.
-
Duplicate the Design Layer Again
Duplicate one of the colored design layers once more, change its color to white and drag it below the other two wolf layers for an offset-print look. Then press Cmd/Ctrl+J to duplicate the white layer again for the overlay.
-
Scale the Duplicate Up Significantly
Press Cmd/Ctrl+T, lock the width and height together, and scale the duplicate up until the design fills much more of the frame.
-
Lower the Opacity for a Subtle Effect
Reduce the enlarged layer’s opacity so it reads as a subtle background texture rather than an obvious repeated shape.
-
Mask the Overlay to Just Part of the Image
Add a layer mask and use a gradient to fade the enlarged overlay so it’s only visible in part of the composition, such as the top.
Why This Approach Works
Using a channel to generate the initial selection is what captures fine illustrated detail, like small hash marks, that would be genuinely tedious to select accurately with a manual tool. Loading that selection into a solid color adjustment layer, rather than filling a selection directly, keeps the color fully editable and the mask reusable for as many duplicates as the design calls for. Once that transparency exists, duplicating, recoloring, offsetting, and scaling the same masked shape is what turns one detailed illustration into a whole layered, graphic composition.
Final Thoughts
What starts as a single black-and-white illustration and one channel-based selection ends up as a multi-layered graphic design, built entirely from solid color adjustment layers sharing the same underlying mask. The same channel selection, solid color layer, and duplicate-and-offset workflow works with any high-contrast illustration or graphic, not just this one wolf.
Quick Reference: Keys, Menus and Settings
- Open ChannelsWindow > Channels; drag the Blue channel onto the New Channel icon
- Load as a selectionCmd/Ctrl-click the channel thumbnail (lights are selected)
- Select the darksSelect > Inverse
- Fill with colorAdjustment layer > Solid Color; Alt/Option-click the mask to view it
- Square cropC, Ratio 1:1 (Square)
- Offset copiesCmd/Ctrl + J, double-click the swatch to recolor, Move tool to nudge
- Overlay and fadesCmd/Ctrl + T with the chain link on, lower opacity; G, foreground-to-transparent gradient on a mask
No AI, no generative credits.
Selections With Channels: Common Questions
Why make a selection from a channel?
A channel turns its gray values into the selection, so fine detail like the hash marks in this wolf illustration is captured exactly. Selecting that by hand would be tedious.
Which channel should I use?
For a black-and-white illustration it hardly matters, since every channel looks the same. The video duplicates the Blue channel by dragging it onto the New Channel icon.
How do I turn a channel into a selection?
Hold Cmd/Ctrl and click the channel’s thumbnail in the Channels panel. Marching ants appear, and the selection stays active when you go back to the Layers panel.
Why did the channel select the background instead of my subject?
A channel selection always takes the lighter areas, and grays are selected partly. To get the dark subject, go to Select > Inverse.
How can I check what is selected?
Make a new layer and paint over the image with a bright brush color, yellow in the video. Only the selected areas take the paint. Undo when you’ve seen it.
Why use a Solid Color adjustment layer for the selection?
With the selection active, the new Solid Color layer gets it as its layer mask automatically. You can change the color any time by double-clicking the layer’s swatch, and the rest of the layer stays transparent.
How do I see the layer mask by itself?
Hold Alt/Option and click the layer mask thumbnail. Alt/Option-click it again to go back to the image.
How do I get the offset screen-print look?
Duplicate the color layer with Cmd/Ctrl + J, give the copy a different shade and nudge it up and to the left with the Move tool. Because the layers are transparent around the design, the copies overlap.
How do I make a two-color gradient background?
Put a second Solid Color layer above the background color and drag a foreground-to-transparent linear gradient on its mask from top to bottom. Then change the top and bottom colors separately.
From the Magazine View all
Stories, interviews and guides for photographers, new every week.
 EditingLightCraft vs Lightroom: I Edited the Same RAW Files in BothThe free clone on the same RAW files: what matches, what breaks and who should switch.
 InspirationRare Historical Photos: 13 of the Rarest Pictures Ever TakenFrom the earliest surviving picture of a person to the last passenger pigeon: who took each one and why it survives.
 EditingArtCraft: Photoshop Cloned by AI in Two Weeks. Is It Legal?ArtCraft cloned Photoshop and Lightroom with AI and gave them away. Any good? Legal? Safe?
Master Photoshop, Lightroom and Photography
Join PHLEARN PRO for $12.99 a month, or $99.99 a year (save 36%). Cancel anytime, with a 100% money-back guarantee.





