Mastering Shutter Speed to Capture and Freeze Motion
“Taking pictures is savoring life intensely, every hundredth of a second.”
– Marc Riboud, French photographer
Too dark, too light, too blurry, too frozen. It’s hard not to feel a little fed up when a shot’s not developing the way we saw it in our minds. Photographers of all skill levels wrestle with finding the right exposure balance in their work, especially when moving toward (or diving into) manual mode. While learning the finer points of the craft is half the fun, there’s no reason to struggle. That’s where we come in!
In this guide, we’ll focus on shutter speed, one of the three elements of the exposure triangle. We’ll also give you a brief refresher on the other components in that triangle: aperture and ISO.
While each of these elements affects the amount of light that reaches your camera’s sensor, shutter speed is unique in that it also controls the degree of motion that is or is not captured in your photograph. For this reason, shutter speed adjustment is central to successfully photographing a subject or object that is in motion, whether it be an athlete on the run, a waterfall, or stars in the night sky. Let’s dig in!
What Is Shutter Speed?
Imagine a curtain covering a window, opening and closing at predetermined intervals. When the curtain is raised and lowered rapidly, only a limited amount of light enters the room and very briefly, so we might only be left with a dim snapshot of the room in our minds.
Conversely, when the curtain is raised, remains open for a longer interval, and is closed again, more light enters the room. This time, we might also notice motion – the spinning blades of a fan, let’s say – that wasn’t apparent before. In this case, we’re left with a much brighter, more “active” image in our minds.
In this example, the “curtain” is the camera’s shutter, an actual physical apparatus that opens and closes at specific time intervals determined by the shutter speed setting on your camera. These settings can be altered manually to your personal preference, depending on what kind of photographic effect you wish to achieve. Let’s take a look at a conventional range of shutter speed settings, measured in seconds or in fractions of a second:

This chart shows commonly used settings ranging from very fast shutter speeds, located on the left of the chart, to rather slow shutter speeds, located on the right. You’ll also notice that the micro images show increasing motion blur from left to right, with the crispest images that give a more “frozen” effect being captured with the faster shutter speeds (such as 1/8000th of a second) and the more blurry or motion-affected images being captured with slower shutter speeds (like 1/8th of a second). We’ll discuss these variations in greater depth later in the article but, for the moment, let’s pin down just what shutter speed is.
You know that little “click” you hear when you press the button to take a picture? Well, that button is also referred to as the shutter (or “shutter button”), and that sound is the physical shutter itself opening and closing within the camera. The reason that the “click” registers in our ears as a single sound is that in most cases we’re using a shutter speed of a mere fraction of a second.
Shutter speed is one of the three basic elements, along with aperture and ISO, responsible for determining the amount of light that enters your camera. It is equivalent to the duration of time in which the physical shutter opens and closes in front of your camera’s sensor, affecting not only how much light is allowed to enter and for how long, but also how much motion is captured along the way.
So, for example, a shutter speed of 1/30 means that your camera’s sensor will be exposed to light for 1/30th of a second. Pretty simple, right? So far so good, but now that we have our basic foundation laid, we need to take a deeper look at the two main variables introduced by the manipulation of shutter speed: light and motion.
Tip
Unlike the chart above, shutter speed will sometimes appear on your camera’s display as a whole number, rather than a fraction. For example, a shutter speed of 1/250 may appear instead as “250” on the LCD. This is merely a space-saving measure. No cause for alarm!
How Does Shutter Speed Relate to Light?
As mentioned above, shutter speed determines how long your camera’s sensor is exposed to light. Very simply, if your shutter is open longer, a greater amount of light will be allowed to reach the sensor. Therefore, a slower shutter speed will allow you to capture a far brighter image. On the other hand, a faster shutter speed will allow less light to enter the camera, meaning the image you capture will appear much darker.
So how do you choose a shutter speed when faced with varied light conditions? Let’s talk about some different conditions you might face when shooting and how to manage each one with your shutter speed setting.
Insufficient/Low Light

The images above are typical examples of underexposed photos. Because these photos were either taken at night – a shooting environment with insufficient light – or with settings that didn’t allow enough light to reach the camera’s sensor, the objects in these images (clouds and the moon in the night sky, and a mountain surrounded by a forest) appear dim and lack rich or distinctive detail.
How could shutter speed have helped these photos? In a circumstance where there is less light, you’ll want to use a slower shutter speed. Again, this allows your camera sensor to receive more of the light that is there. There are many situations where a slower shutter speed would be appropriate, but the two main ones you’ve probably faced are:
- An interior space where the light is dim. A good place to start your shutter speed would be around 1/250, but you may need to adjust this number as you evaluate the exposures you’re getting.
- A night scene, particularly one away from streetlights or other artificial light sources. Here you are dealing with a near total absence of light. You may have to choose a shutter speed of 1/60 or slower in order to capture a high-quality image.
In these conditions, using a faster shutter speed simply wouldn’t allow enough light to reach the camera sensor in order to produce a high-quality image. However, the more light you let in, the more motion you’re introducing into the exposure. We’ll talk about ways to offset that later on.
Abundant/Bright Light

These images are also improperly exposed, but in the opposite way. In this case we’re seeing noticeable overexposure. There is a loss of detail due to an excess of brightness, thanks either to exceptionally bright environmental light or settings that allowed too much light to reach the camera sensor. Here are two main situations where you might experience this:
- A brightly lit room. Try 1/500 for your first test exposure and go from there.
- Outdoors during the day. For an extra bright day with little to no cloud cover, you may find 1/1000 a good place to start.
Using a slower shutter speed in either of these conditions would allow far too much light to reach your camera’s sensor, resulting in an overexposed image with details washed out by bright light. Again, shutter speed affects more than just the amount of light hitting your sensor. When you choose a faster shutter speed, it will affect how motion is portrayed in your image.
How Does Shutter Speed Relate to Motion?
As we briefly mentioned above, shutter speed drastically affects not only how much light reaches your camera’s sensor, but also the degree of motion that is captured in a given image. In order to decide which shutter speed is most appropriate, you first have to determine how you’d like motion to appear in your photo.
There’s a widespread impression among novice photographers that any motion or blur captured in an image is automatically a negative thing. While a moderate or high degree of motion is not always desired for the sake of clarity, sometimes introducing motion into an image can greatly enhance it for aesthetic or conceptual reasons. It’s really a matter of personal taste, style, and preferences. Experimentation is half the fun here, so try different things and enjoy the journey!
When you’re choosing a shutter speed, the first thing you’ll need to evaluate is whether or not there are moving objects in your frame. Then it’s time to think about how you would like them to appear in your image. In other words, do you want to see a degree of motion blur or do you want the moving object to appear “frozen” in time?
Just as a slower shutter speed will allow more light to enter your camera, it will also allow for more motion blur to appear in an image, since the shutter will be open for a longer interval and will therefore capture more movement. Similarly, a faster shutter speed will capture less movement, reducing blur and freezing the object mid-motion, creating a sharper image.

Faster Shutter Speeds for Freezing Motion
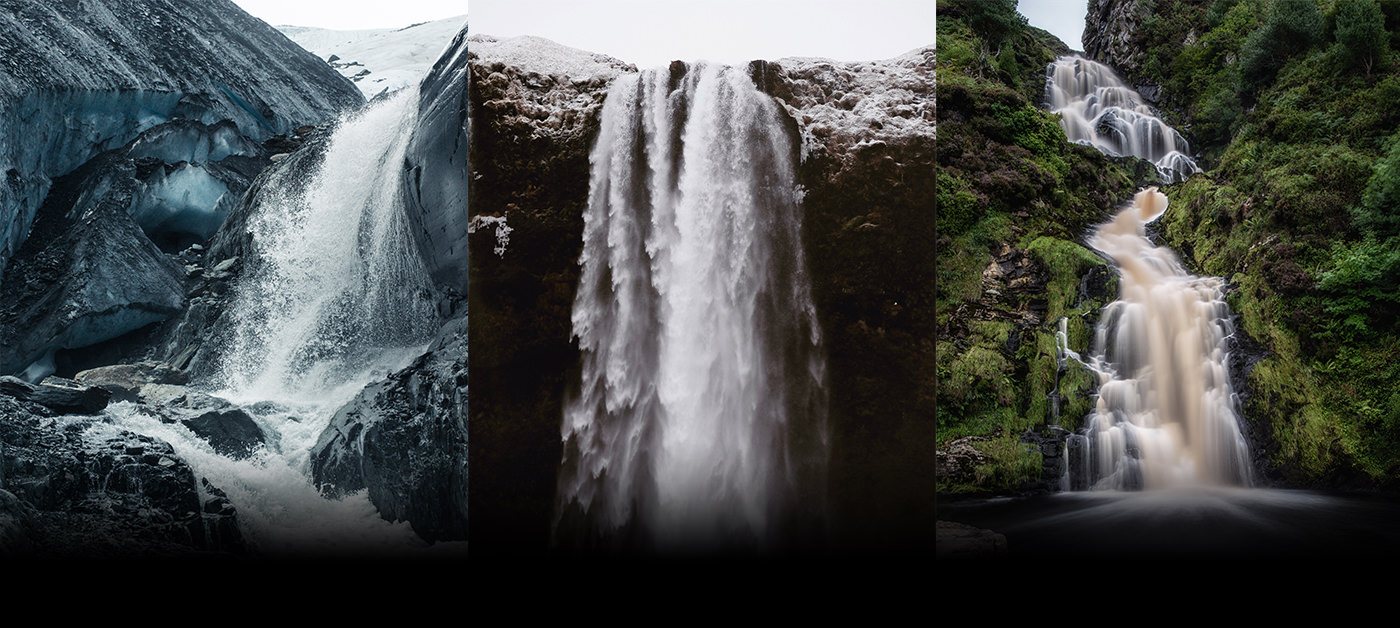
The image below highlights the faster range of shutter speeds (greater than 1/1000th of second). These are better for reducing motion and freezing a moving subject. If your subject is not moving quickly, you may be able to go outside the highlighted range, but notice in the illustration that the further away you get from that highlighted area, the more blur you should expect to see.

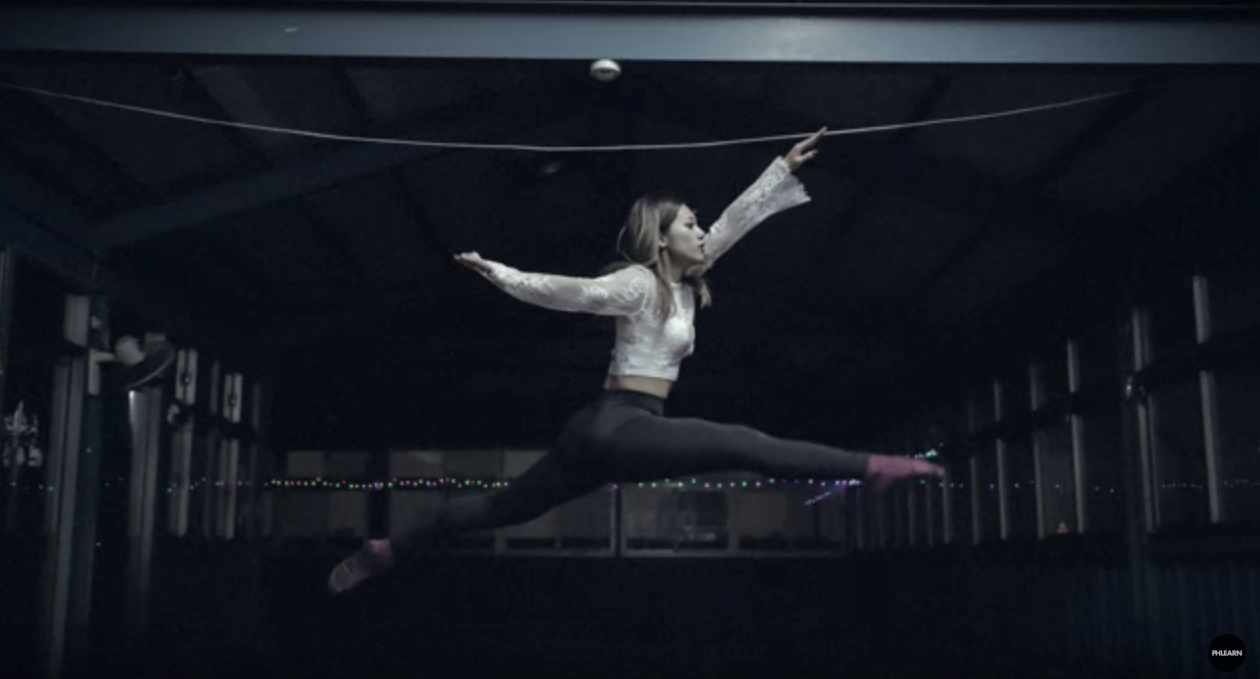
Below, we have three perfect examples of subjects in various stages of movement (and at different rates of speed). Each of the images was photographed at a shutter speed of 1/1000 or faster, so they fall within the highlighted range in the image above. While a great deal of motion is occurring in these scenes – the cascading waves of a waterfall, a body at the peak of a jump, and a dog spriting at high speed – these subjects appear frozen in time due to the employment of a faster shutter speed.
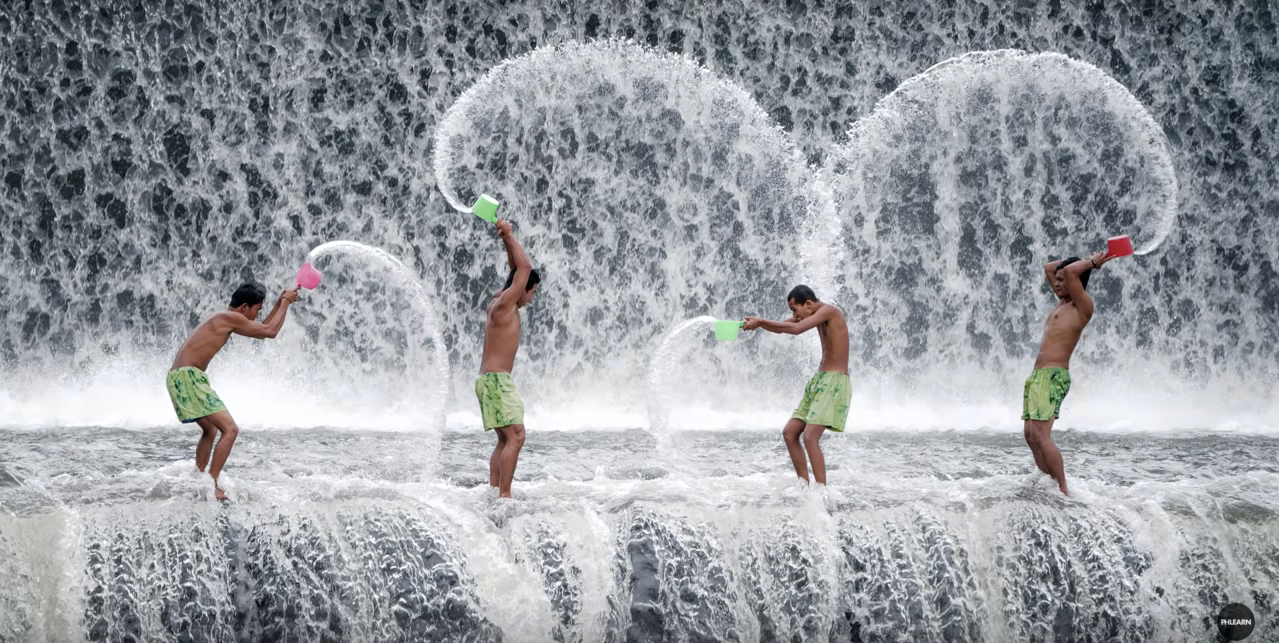
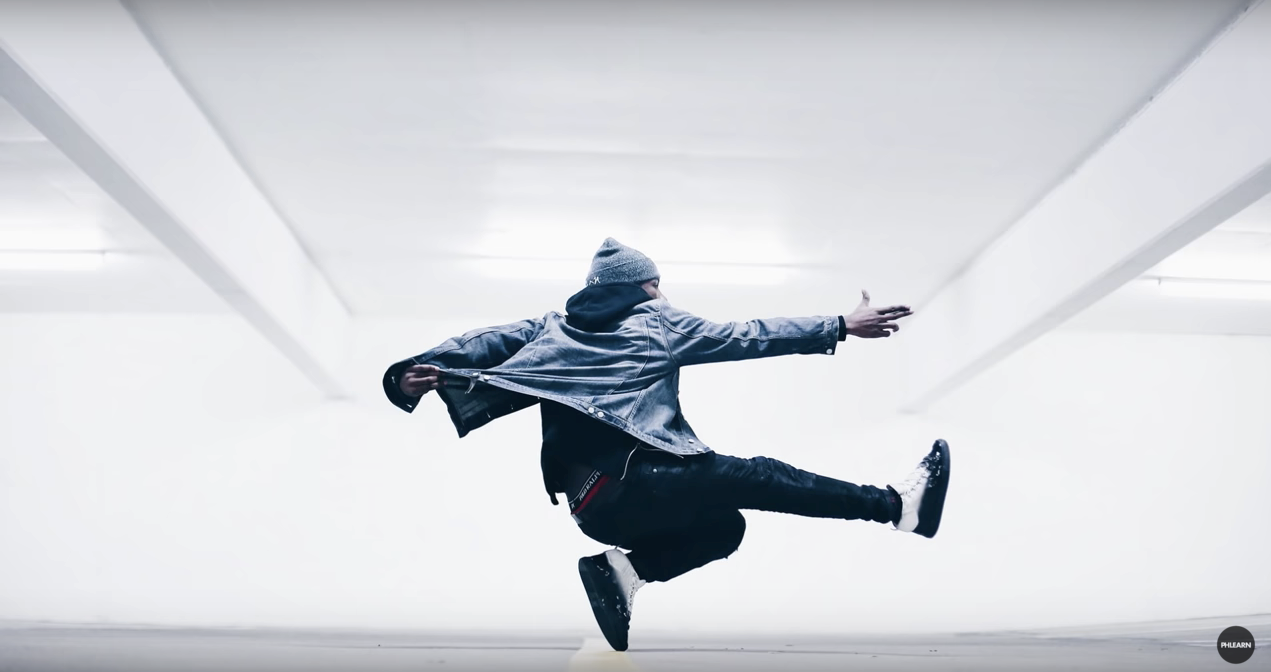
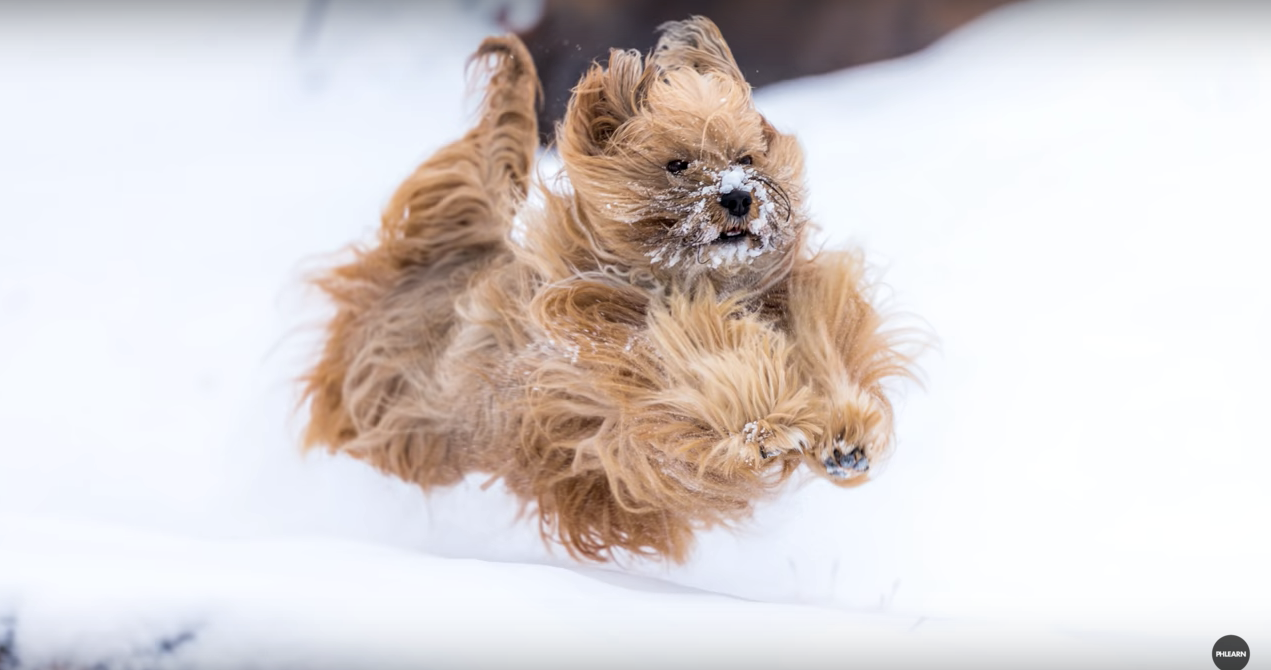
Again, notice how crisp and clear the images appear when using these settings. Also note that all three scenes occur in conditions with a great amount of light, allowing for a faster shutter speed to be used without overly darkening the images.
Moderate Shutter Speeds for Minimal Motion Capture
Referring again to our shutter speed chart, let’s take a look at what’s considered to be a moderate range of shutter speeds. Here 1/250 is highlighted, smack in the middle. Like before, you may find that a speed slightly outside that range will get the effect you desire, but this is a safe starting point for a situation with movement that is happening very slowly or in very small degrees.

The images below were taken at or around 1/250th of a second:

In these examples, we can see that a medium shutter speed produces images that, while crisp and clear, do in fact allow for a slight degree of motion effect. This is most evident in the second and third images, where some motion blur can be detected around the cat’s body and the woman’s extremities, respectively. All three images were captured indoors or in an enclosed space, which limited the amount of light available. The photographers probably chose this shutter speed range over a faster one to compensate for the lighting situation.
Slower Shutter Speed for Capturing Motion Blur
Looking at our handy chart again, this time we are highlighting slower shutter speeds. If you are shooting in the highlighted range of 1/60th of a second or slower, you should expect to see blurred motion in your image, possibly quite a lot of it.

The following images were all captured within this much slower range of shutter speed:
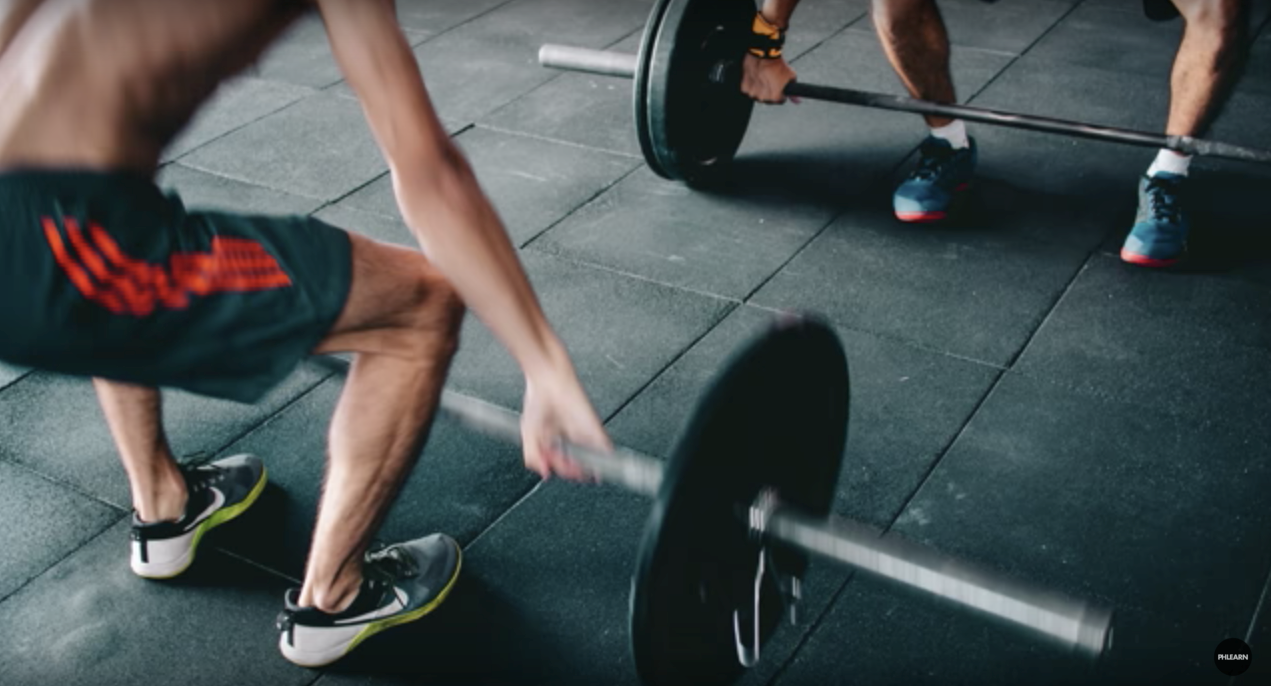
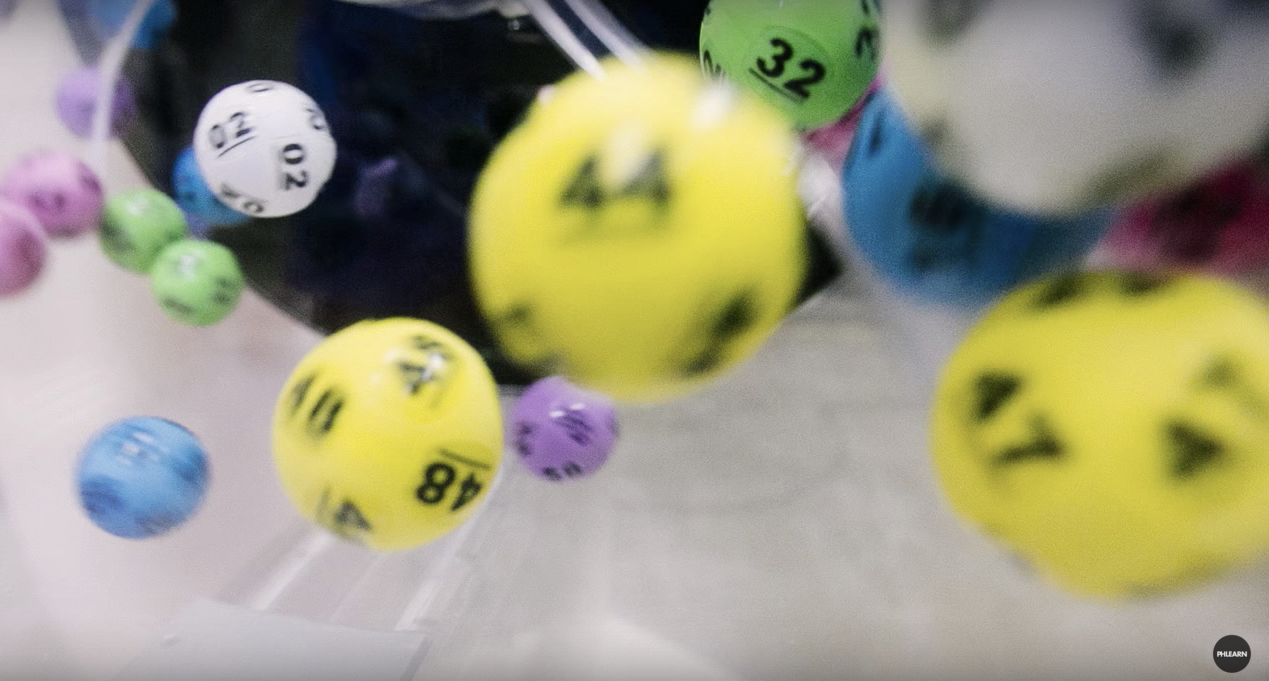
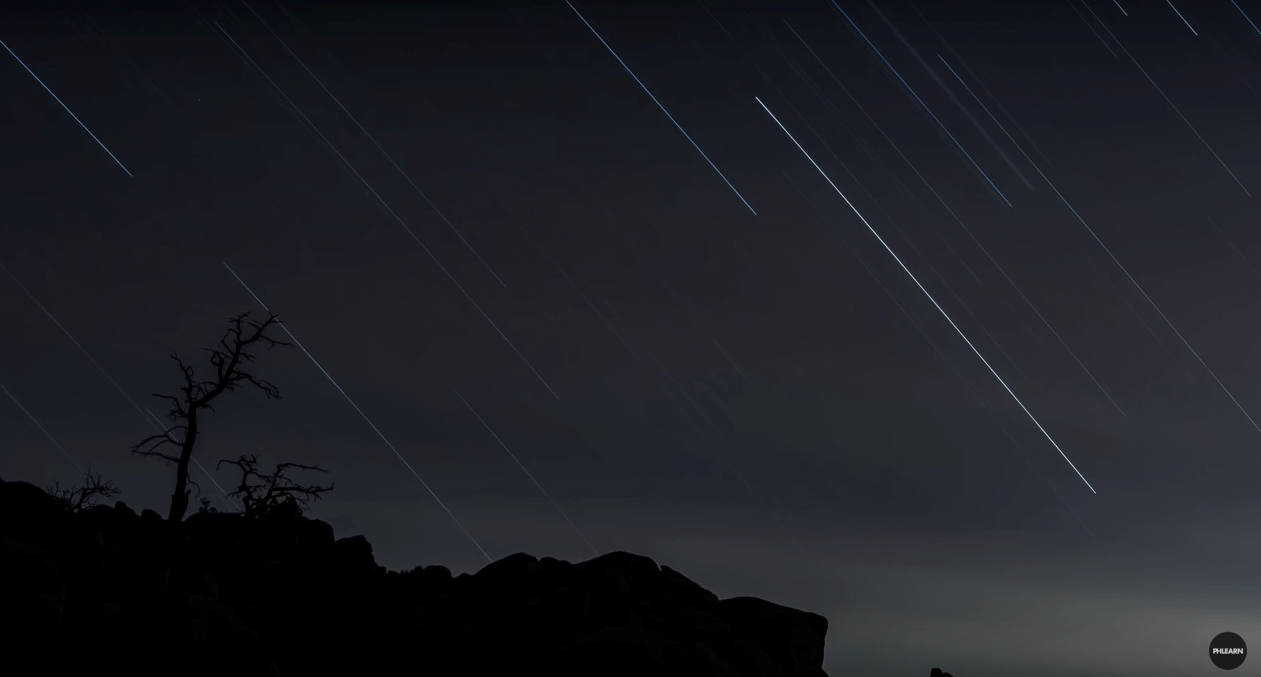
Here we have an interesting variety of images that utilize a motion blur effect in very different ways. In the first image, a slower shutter speed is employed in order to capture the moment of a weightlifter at work, with the motion blur enhancing the effect of the physical action. In the second image, we get a sense of chaos from the motion of lottery balls colliding with each other. The last photo is the slowest shutter speed example we’ve shown so far, since the photographer was attempting to capture star trails.
Motion Blur vs. Camera Shake
Camera shake is technically a form of motion blur, but not all motion blur is due to camera shake. In fact, camera shake is the least desirable form of motion effect in photography. You’ll see it a lot, but you’ll rarely see it done on purpose.
You may be thinking to yourself, “Good thing I don’t have shaky hands!” and we really hate to burst your bubble on that. But no matter how steady-handed you are, leaving your shutter open for a longer time (even by a few fractions of a second) while holding your camera will almost definitely result in camera shake. That’s why it’s advisable to use a tripod once you get around or below 1/125th of a second, even if you’re intentionally trying to capture motion. The idea is to get your effect from objects that are moving in front of your camera, not from the movement of your camera itself.
If it sounds like we’re being a little over the top with this, just give it a shot. Get into a low-light situation, open up that shutter to maybe 1/60 or 1/30, and see what happens. You may even find that a tripod isn’t enough! The action of your finger pressing the shutter button may still create camera shake with a long enough shutter speed. In this case, you’ll want to look for a remote trigger to get everything looking exactly right.
Tip
Don’t judge the crispness of your motion based solely on how it appears on the back of your camera. If you want a completely frozen effect, be sure to zoom in on the image preview or bracket your shutter speeds. Don’t let there be an unpleasant surprise waiting for you when you see it for the first time on your nice, big computer screen!
Balancing the Exposure Triangle
In our previous installment, “Understanding Aperture: Controlling Light Based on the Exposure Triangle,” we took an in-depth look at a variety of different ways that proper light exposure can be achieved by adjusting the camera’s aperture. This time, let’s consider some examples of how this balance can be achieved in relation to shutter speed.
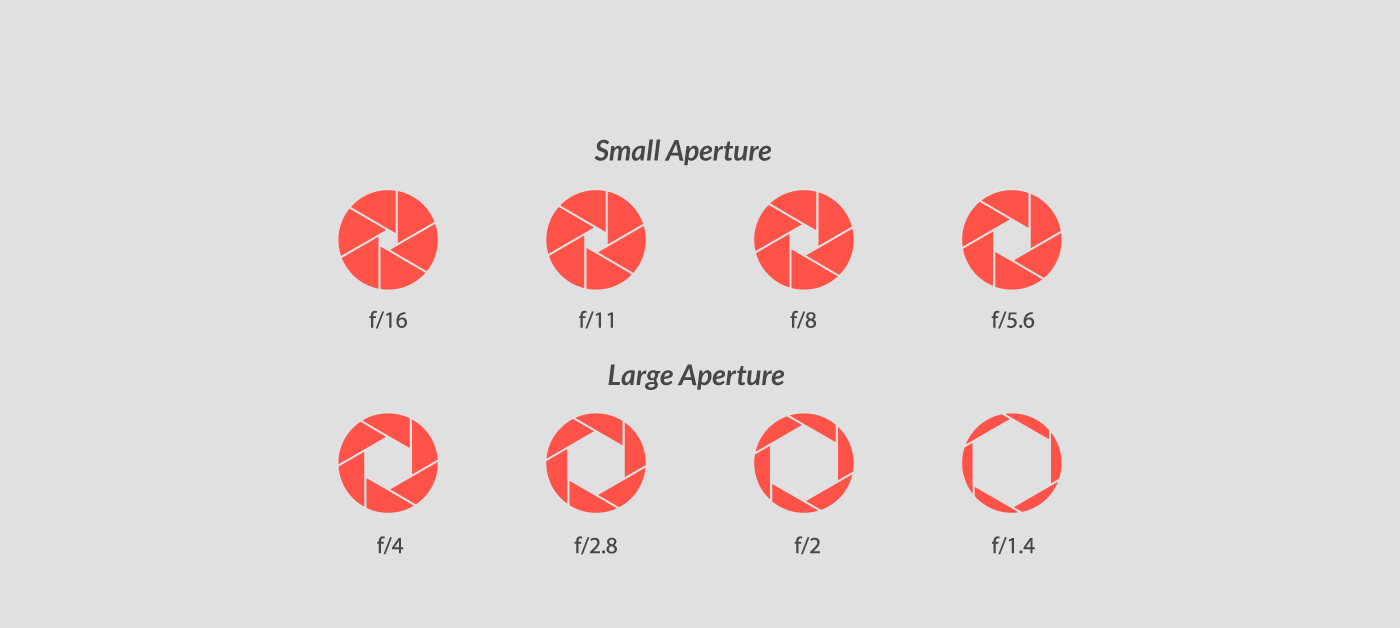
A Note on Aperture
Aperture is the variable size of the opening in the lens when an image is being captured. It not only controls how much light enters the camera, but also determines the depth of field of an image.
Briefly stated, a wider aperture allows a great deal of light to reach the camera sensor, but will result in a shallow depth of field. A shallow depth of field basically means that areas of the image that are farther away from the point of focus will appear blurry, while subjects or objects nearer to it will appear crisp and sharp.
The opposite is true for a narrower (more closed) aperture. Less light will reach the camera sensor, but it will provide a wider depth of field. A wider (deeper) depth of field will keep areas of the image that are farther away from the point of focus looking sharper.
A Note on ISO
ISO (discussed in greater detail in our dedicated guide to ISO) refers to a camera sensor’s relative sensitivity to light, or in other words, its “ability” to capture light. The higher sensitivity setting you choose, the more light there will be available to you. Unfortunately, a higher sensitivity will also increase the amount of digital noise you should expect to see in your image.
A Practical Example
Let’s use an example to demonstrate how we might balance the triangle under a particular circumstance:
Imagine you have a subject you wish to photograph and you adjust your aperture to a wider setting, which provides you with a great deal of light. However, it also provides you with a shallow depth of field, and you’re not content with this as you wish for a greater area of the image to remain in focus.
You then adjust to a narrower aperture setting, which corrects your problem regarding the depth of field and image clarity. Only now, your image appears far too dark for your liking, and another adjustment needs to be made. But what do you adjust?
You remember that a slower shutter speed allows for more light to reach the camera sensor, so you adjust the speed down the scale to a longer exposure time. But in doing so, you’re also reminded that this allows for greater motion blur, and in this case, that simply won’t do.
You want to eliminate that undesired motion blur, so you adjust back to a faster shutter speed so that you can freeze your subject in time. But now the image is back to being a bit too dark.
This is where you turn to the third and final part of the exposure triangle: the ISO. At this point, you’ve achieved both a satisfactory depth of field and your desired amount of motion capture, but you still need more light. The solution here is to raise the ISO to a higher setting in order to increase the camera’s light sensitivity, achieving a brighter exposure without compromising on your depth of field or range of motion.
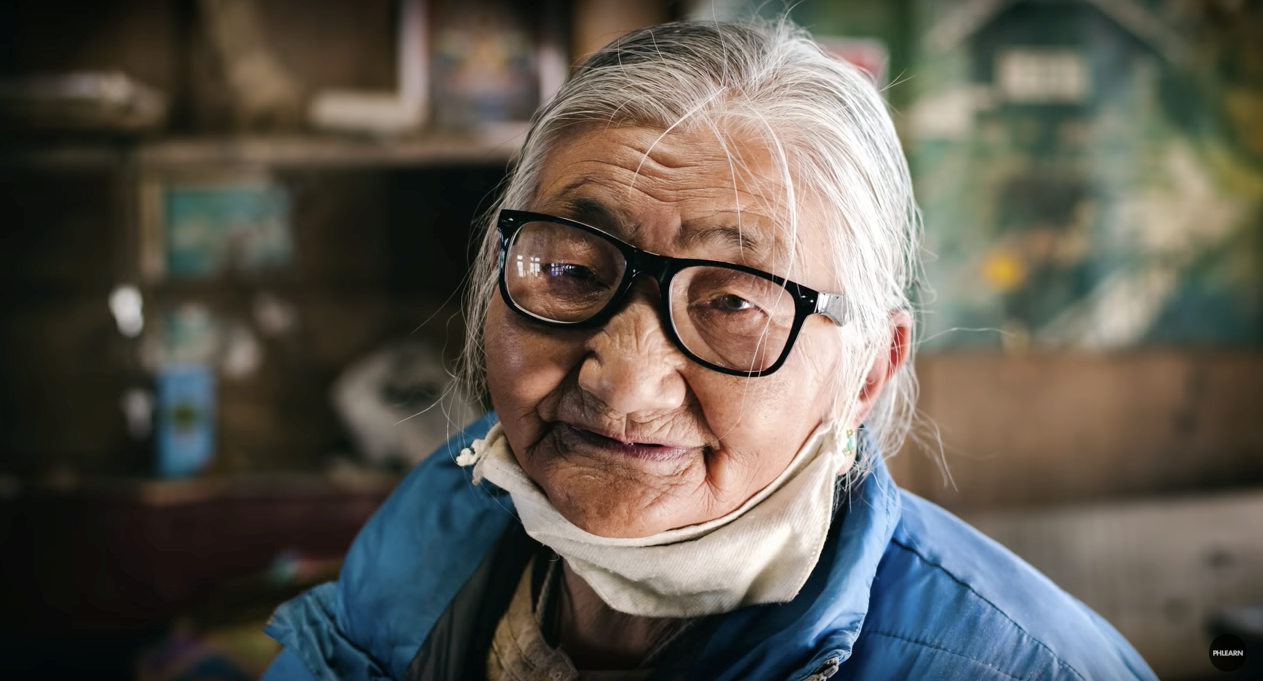
Below is an example of an image noticeably improved in quality by increasing the ISO level:
Tying It All Together
As we like to remind you, experimenting with the settings on your camera is part of the joy of learning photography. Shutter speed is particularly fun to play around with because of the dramatic difference you can get from just a small adjustment. Remember to practice balancing it with your aperture (and depth of field) and ISO to get a good overall exposure.
There is always more to learn and the journey is half the fun! So as you continue to explore and develop your craft, make sure to enjoy the moment and keep an open mind.