The RAW vs. JPEG Showdown: Which File Format Do You Really Want?
Curious about shooting in RAW? That’s no surprise, as it’s certainly a hot topic amongst photographers. During IRL conversations with fellow photography enthusiasts, in online chats, or on photography blogs, you’re probably used to hearing that there’s no contest when RAW and JPEG go head-to-head: RAW comes out on top. While that may be true in many scenarios, it’s not always the case. But how does a photographer know when to make the trade-off between file size and image quality? Here’s some straight shooting on the myths and realities of RAW vs. JPEG:
Myth No. 1: Shooting in RAW is always better than shooting in JPEG.
Reality: There is a time and a place for each method. What if you’re shooting a big event and the coordinator needs their images on the spot? You might not have the chance to export from RAW to JPEG. In that situation, shooting in JPEG is going to be expedient, since the more universal file type is the easiest way for your client to access their images once you turn them over. Because of this, JPEG is the go-to for many photographers shooting in fast-paced events.
Myth No. 2: Processing a RAW image takes ages.
Reality: Processing a RAW image can take longer than shooting in JPEG, but choosing your processing program carefully and setting up an efficient workflow can help to speed up the process. Programs like Lightroom save you time because you can import groups of images at once and view them in a catalog interface.
Myth No. 3: Like JPEG, which stands for Joint Photographic Experts Group, RAW also stands for something.
Reality: Despite the fact that RAW is thought to be an acronym because it’s often expressed in all caps, there is no known meaning behind the individual letters. It’s actually the umbrella term for a whole category of file types, and most manufacturers have one (or more) versions of RAW specific to their own hardware. This means that when you shoot in RAW, your actual file extension will probably be something completely different, as opposed to JPEGs, which appear as .jpg, .jpeg, or .jpe.
Pro Tip
JPEG and JPG are exactly the same thing. Back in the day, file extensions couldn’t exceed three letters. This is why JPEGs appear as .jpg, and why they’re often written as JPG, omitting the E.
Diving In
If you’re interested in shooting in RAW, it’s likely you’ve mastered your camera settings. You’ve probably also become comfortable in Photoshop and know your way around it, and utilize manual mode for some or all of your shooting. But do you know what a RAW image actually looks like?
Here’s a JPEG and RAW image side-by-side. Which one do you think is the RAW image?
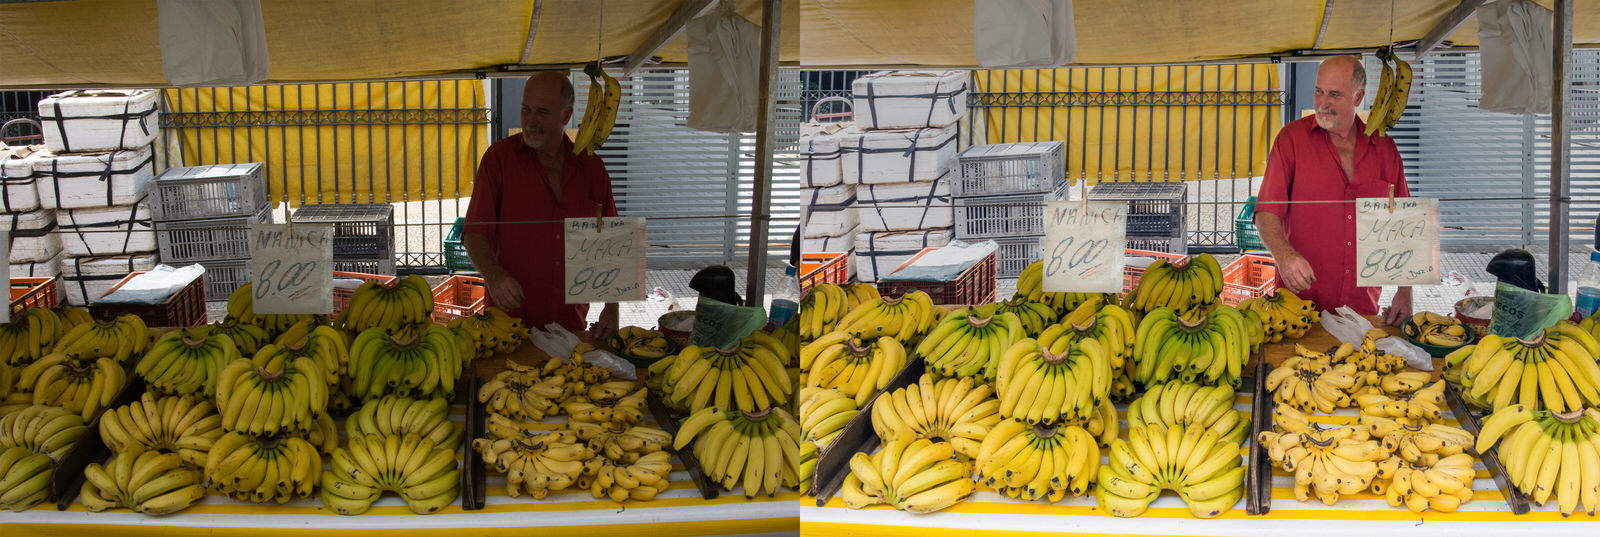
The Photographer [CC BY-SA 4.0], via Wikimedia Commons
If you said the RAW image is the one on the left, you’re correct! As you can see, the RAW image is in need of post-processing, as it appears rather flat and dull, while the JPEG is ready straight out of camera. The bananas look positively vibrant!
In this guide, we’ll cover everything you need to know about taking the leap into shooting in RAW:
- RAW: What is it exactly?
- Why aren’t you shooting in RAW?
- Why should you start shooting in RAW?
- Higher quality images (digital & print)
- Better detail
- Simple correction of under/overexposed images
- Non-destructive editing
- Greater control over sharpness and noise
- Better dynamic range
- Easy adjustment of white balance
- Greater accessibility
- Higher quality enlargements
- When using JPEG may come in handy
- What to adjust in Adobe Camera Raw
- The RAW downside
What Does It Mean to Shoot in RAW?
The two file formats used most often to save digital images are JPEG and RAW. JPEG is the default setting on most cameras – whether that camera is a DSLR, a shiny new mirrorless, an everyday point-and-shoot, or your cell phone’s camera.
Shooting in RAW means you are snapping a picture that will be saved in an uncompressed digital file format. This means that the digital file keeps all of the data from the camera’s sensor. The RAW format is often referred to as “lossless,” because all of the data has been maintained and nothing has been lost.
Shooting in RAW is considered necessary by most for fine art and fashion photography, along with portraits. It is suitable for professionals, whose clients are paying for a finely tuned and flawless end product.
Pro Tip
Sometimes a RAW image file is called a digital negative, because photographers rarely use the photo they initially snapped in RAW as the finished image. You still need to manipulate the data in that image a bit – or a whole lot – to come up with a final, polished image.
Why Aren’t You Shooting in RAW?
Let’s start by troubleshooting a few reasons you might be hesitant to try shooting in RAW:
- You’re not sure of where to start. To learn how to set your camera’s file type to RAW, consult your manual. Don’t worry if you can’t find the copy that came with it! Your camera’s manual should be relatively easy to find online, or a little tinkering in the Settings menu might get you to where you want to be. After that, you’ll be able to open, view and edit these files in the image manipulation software of your choice. Adobe Camera Raw in Adobe Photoshop or Lightroom is the preferred software of most professionals, but many image editors are now able to process RAW files.
- You may still be wondering if RAW is worth the switch. It’s true that, based on what and why you shoot, you may not need (or want) to shoot in RAW. However, you may still want to look at some of the benefits of shooting RAW below, in case there are some situations where it will prove useful to you.
- You may feel intimidated about learning something new. This can be especially true if you’re someone who already knows their way around the camera. It’s hard to expand your horizons when you’re already comfortable with a few great, go-to techniques. But, as Henri Cartier-Bresson said: “Your first 10,000 photographs are your worst.” In other words, there is a learning curve to photography, but the good news is that you will get better the more you shoot!
Shooting in RAW can be time-consuming, but after you’ve learned how to set up your workflow you will find yourself having fun – and it will be time well spent.
Pro Tip
The question of whether or not you should shoot in RAW isn’t new, but arguments for or against it have evolved greatly recently. Technology has been updated significantly since the first DSLRs hit the market and the quality of digital photography equipment (camera sensors, firmware and components) has improved dramatically as well. So, you need to consider your needs carefully when deciding to go RAW or JPEG.
What Are the Benefits of Shooting in RAW?
In a nutshell, shooting in RAW allows you to exert a great amount of control over your finished image. More specifically, shooting in RAW gets you:
1. Higher Quality Images
Shooting in RAW causes your camera to put all of the information gathered from the sensor into an image file. You are going to get the highest quality image possible when you shoot in RAW.
You’ll see the difference in print, too! There is a finer gradation of tones and colors when you print from more detailed files, and you’ll also get fewer occurrences of color banding.
Here’s an example of color banding extending across the sky:
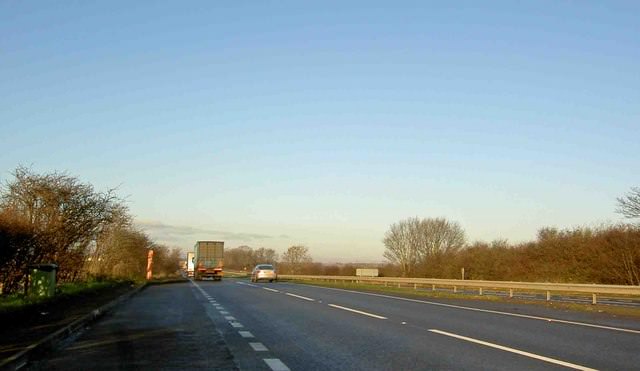
Steve F [CC BY-SA 2.0], via Wikimedia Commons
2. Better Detail
When your camera creates JPEG images, in a sense you are processing the image from RAW into JPEG inside your camera.
In contrast, when you shoot in RAW, you can process your images using your computer, which has much more powerful algorithms (for instance, sharpening and noise algorithms) than your camera.
3. Easy Correction of Over/Underexposed Images
Sometimes it’s hard to get a perfect exposure on the spot, especially if you’re in charge of photographing an event where there isn’t much time for setting up an ideal shot. A RAW file allows for a beautifully wide dynamic range, so if you over- or underexpose by a bit, the visual information for the poorly exposed areas is still available in your file. This is great news when you’re looking at blown highlights or clipped shadows! You can reign those areas back in and recover some of the original scene for a higher quality end product.
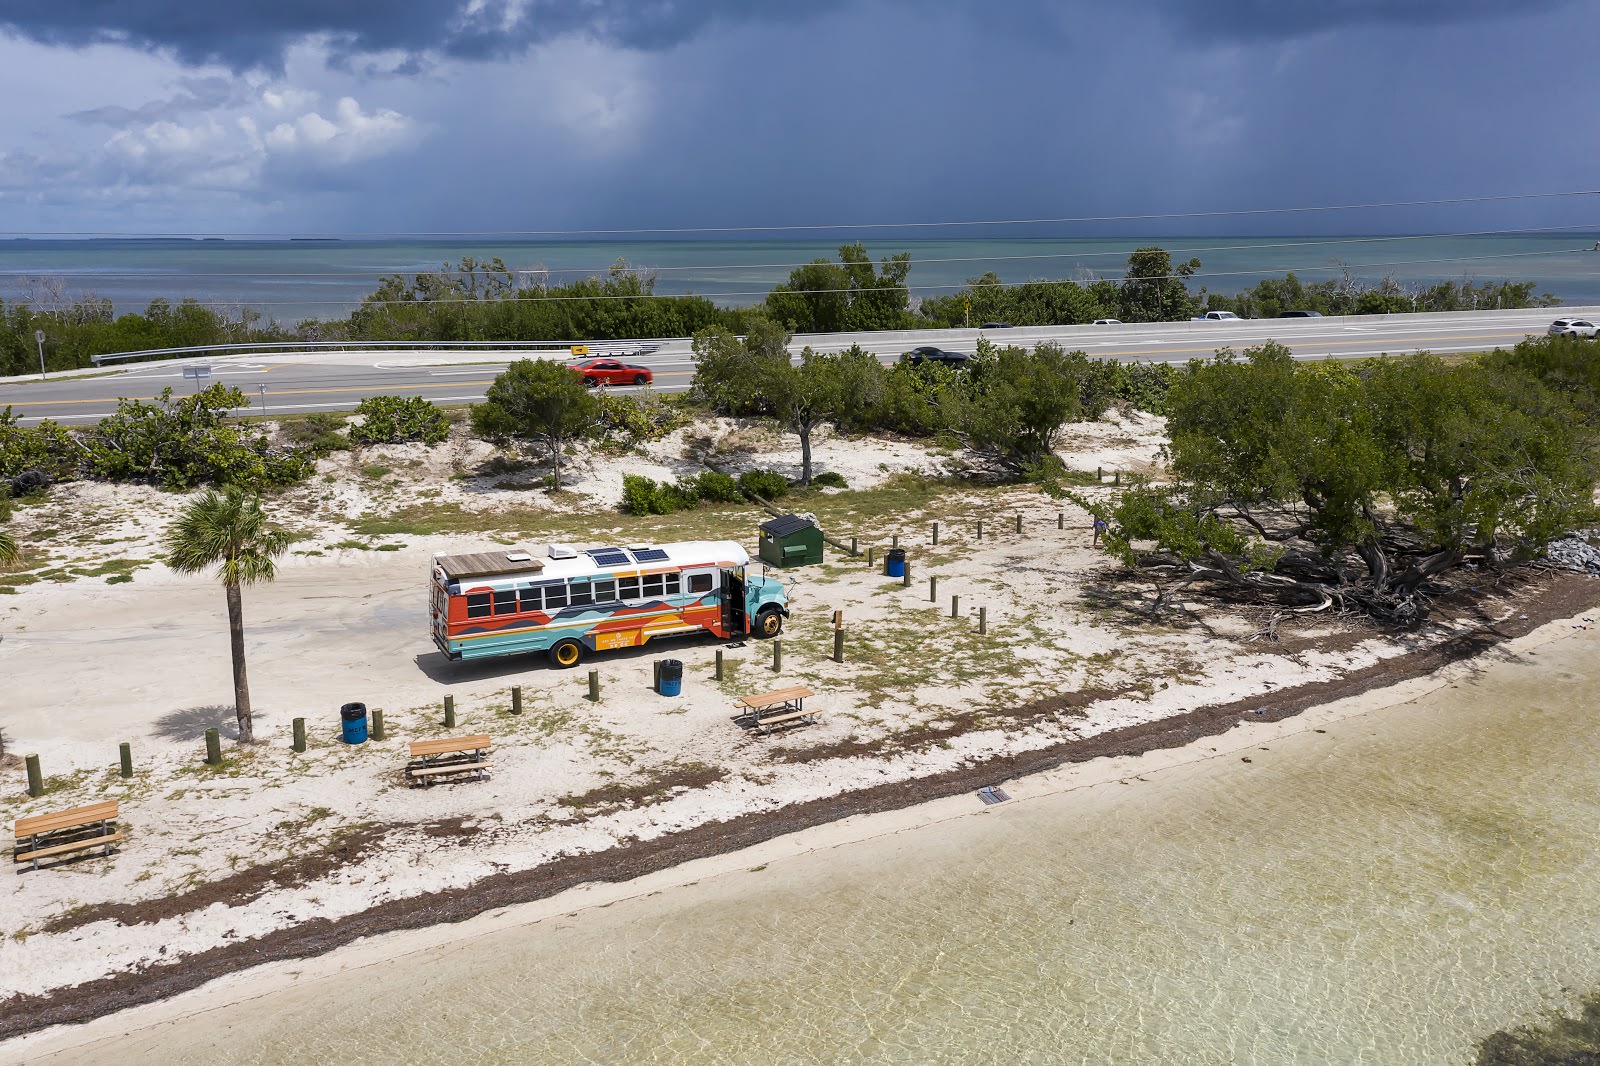
Below is a shot snapped in New York’s Central Park. You’ll notice that there’s a high dynamic range here, so shooting in RAW is a great backup to exposure bracketing. You want to see the detail in those lights and the darks, too!
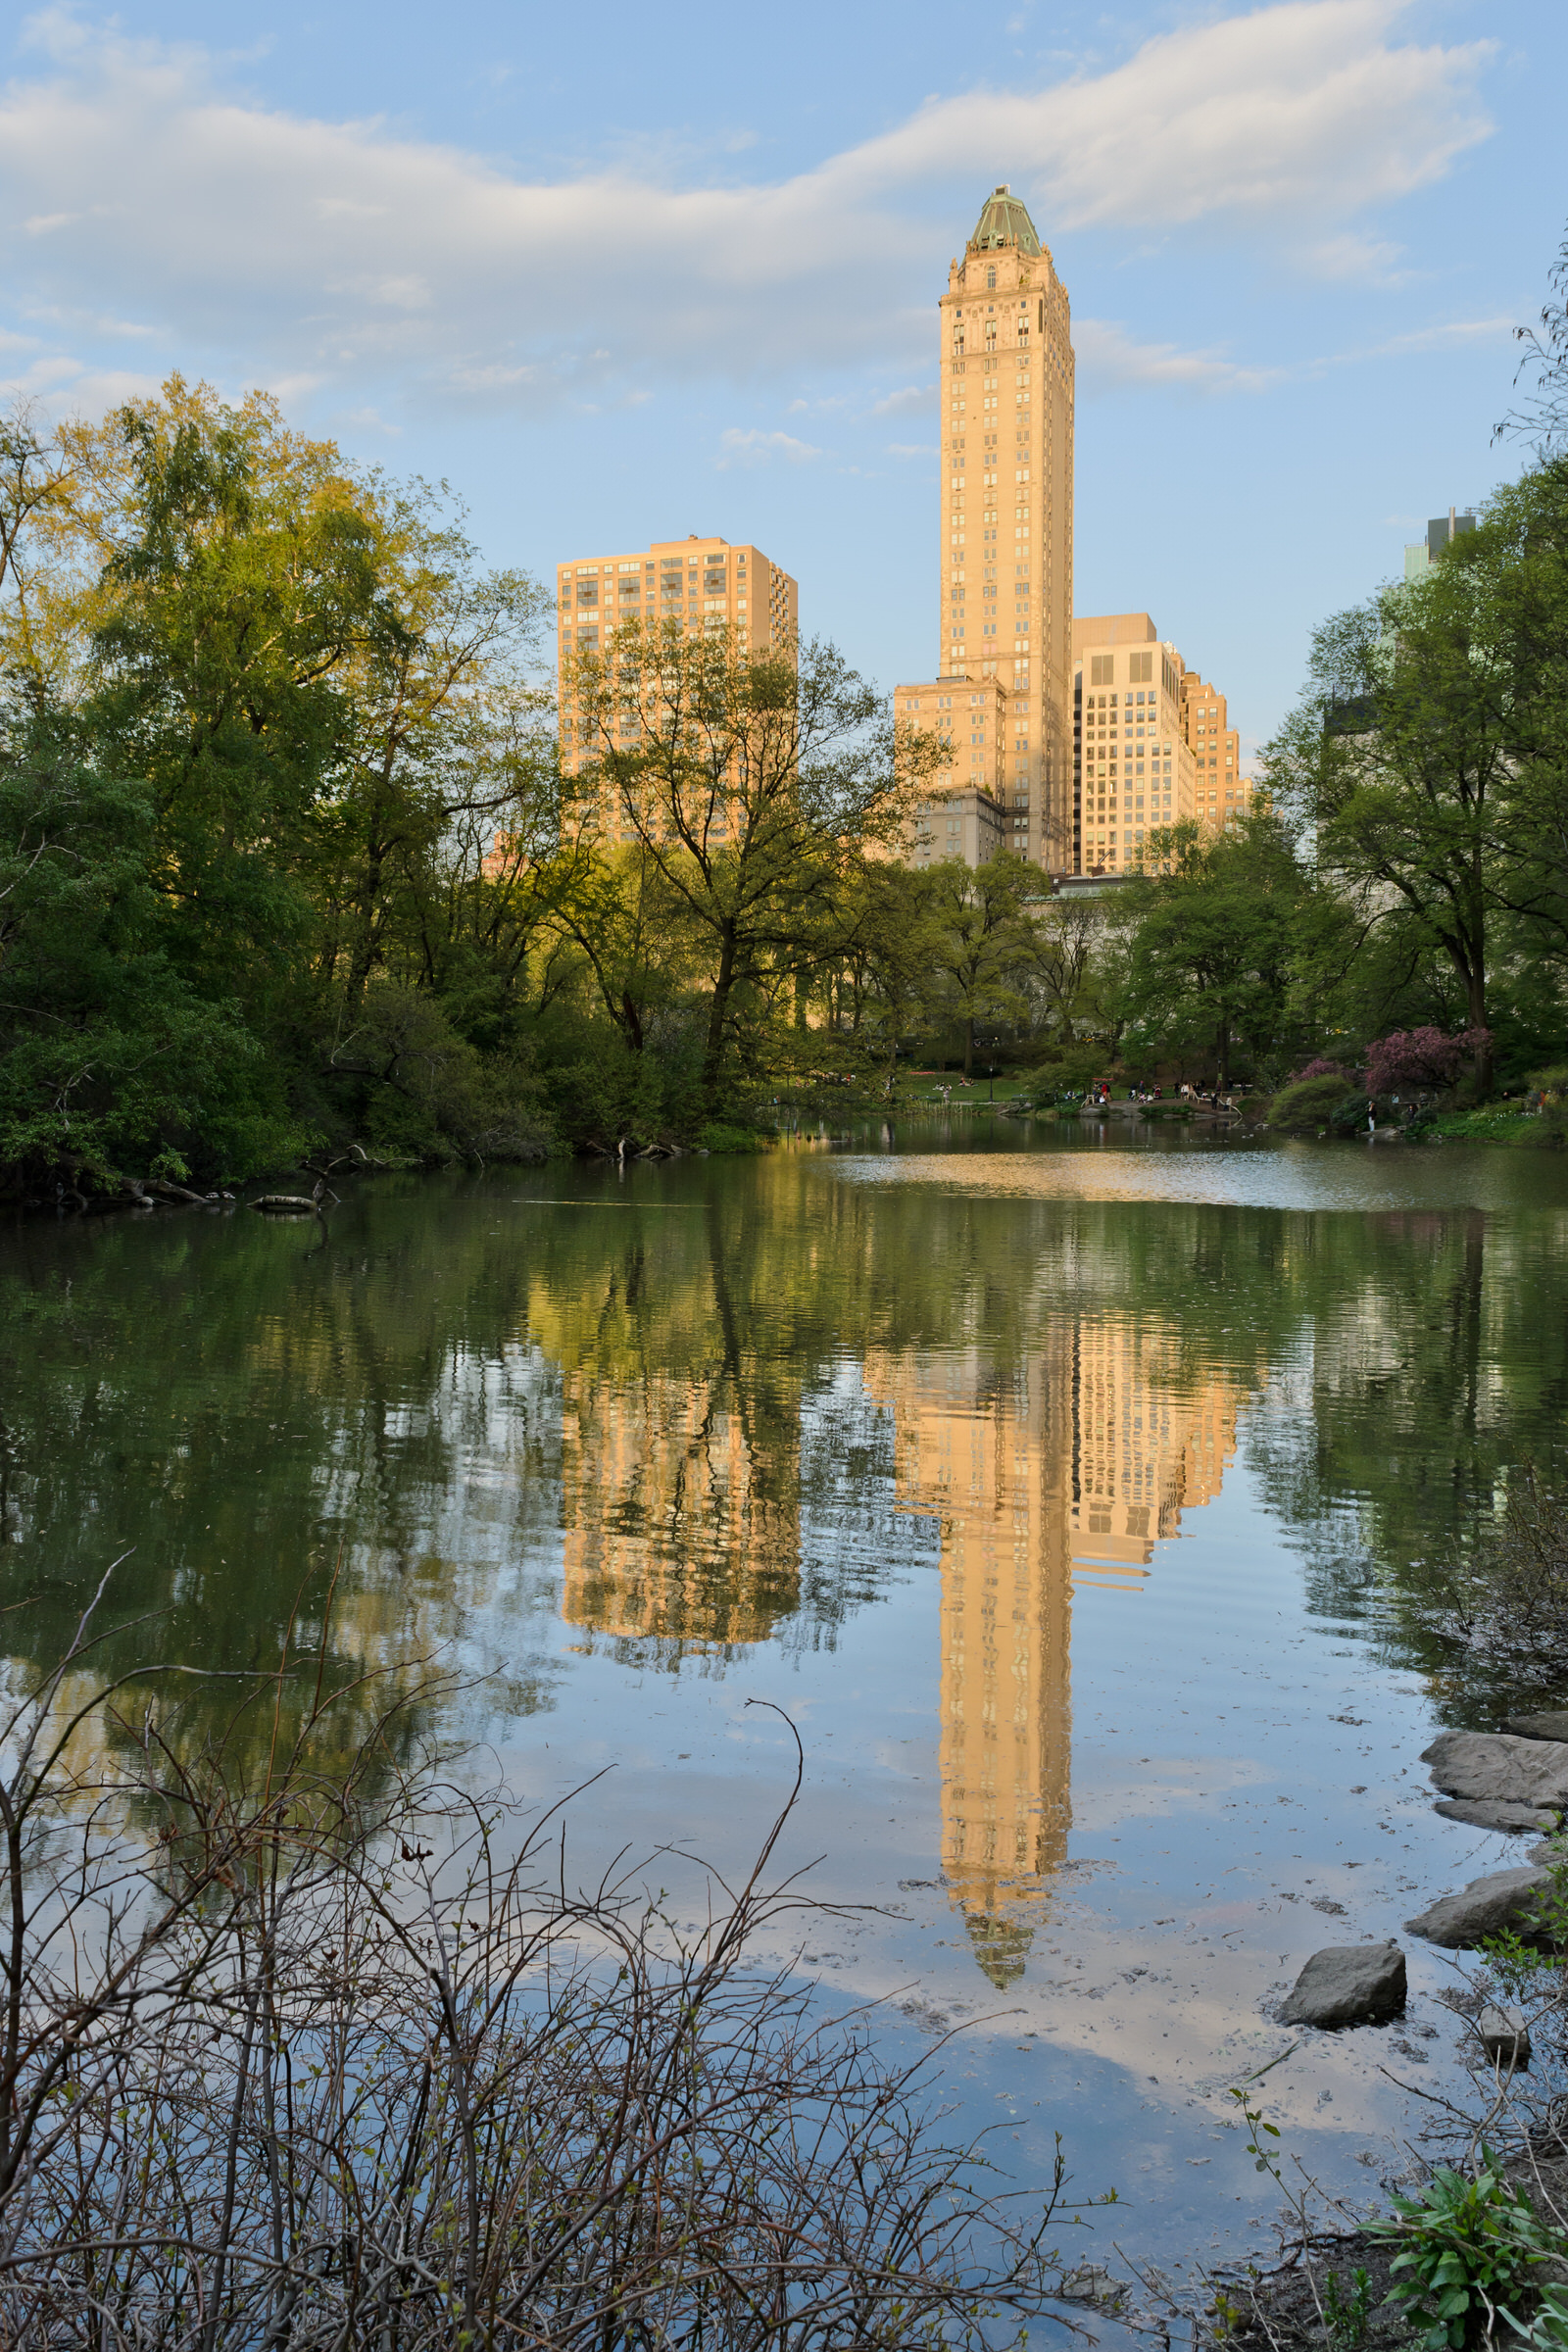
King of Hearts / Wikimedia Commons / CC-BY-SA-3.0 [CC BY-SA 3.0]
4. Non-Destructive Editing
When you’re editing a RAW photograph, you are not making adjustments to the original image file you snapped. Instead, you’ll be essentially making a copy and saving it in a new file format. You should still have the original version as long as you keep it backed up. This keeps everything low-stress: You never have to think about destroying an image to the point of no return! You can go right back to square one any time a project goes off the rails.
5. Greater Control over Sharpness and Noise
We all crave crisp details in our images, so extra control over sharpness is always a good thing. In addition, a photographer is always on the hunt for ways to reduce pesky digital noise in post-processing. This aspect of finer control is especially great for outdoor night shots or indoor shoots where you can’t use a flash. It’s definitely a point in favor of RAW.
6. It’s Accessible
You don’t necessarily need a DSLR to shoot in RAW. Some point-and-shoots come equipped to shoot in RAW as well. We obviously can’t bring up other types of cameras without mentioning the most handy camera of them all: your smartphone. Some phones have a RAW mode built in to their default camera, but for others you’ll have to download an app such as Adobe Lightroom CC, VSCO or Snapseed.
7. Superior Enlargements
When you’re shooting RAW, you have a lot more flexibility when it comes time to enlarge those images. Since the process of compressing a JPEG file involves a permanent loss of some of the data in your image, enlarging the image beyond a certain point may result in noticeable fuzziness or distortion.
Pro Tip
RAW shooting poses similar advantages (and challenges) to filmmakers. Although cameras that film in RAW are becoming more accessible financially, some critique the idea because the file sizes and workflows seem prohibitive. For instance, because your camera’s media storage will likely fill up super quickly, you may have to change media mid-shot. Others argue that managing workflow goes a long way towards making RAW a reality in many environments (with the exclusion of time-sensitive work such as news coverage).
You Might Be a JPEG Photographer If…
Scenario 1: You’re shooting a long event such as a wedding, your kid’s school play, or a birthday party. In these situations, you’re going to want to save on memory space, both in your camera and on your computer. You can get two to three times more images on your card by taking your photos in JPEG.
Scenario 2: You’re shooting a sports event, for instance an amateur hockey game or your friend’s rugby match. Because things are moving at a fast pace, a JPEG could be the key to snagging that perfect action shot. If you were to use RAW in this scenario, you might be stuck waiting for your camera to process the images between shots.
Scenario 3: Your end goal is to post your photos on social media, where you’re pointing, shooting and uploading from the camera. Of course, if you’re a blogger who doesn’t have time to edit and process photos, JPEG could be perfect for you as well.
Scenario 4: You do little or no post-processing. JPEGs are not meant to be changed and saved many times, and you will see a lot of degradation in quality the more you edit them. This is fine if you want to train yourself to make adjustments in-camera or if you’re under a time constraint, but make sure you know your process before deciding on your file type.
Pro Tip
Remember, JPEG images are compressed files. The image looks like a final product right away. However, unlike with RAW, some of the digital information has been carved off of the image file during compression.
Photo by Glenn Carstens-Peters on Unsplash
What to Adjust with Adobe Camera RAW
If you, like most photographers, are using Photoshop to post-process, the Adobe Camera Raw dialogue box might seem a little overwhelming when it first pops up. Here are some of the basics that you can manage through Adobe Camera Raw using the slider menu you’ll see next to your image:
- Exposure: If your image is over- or underexposed, or just not quite perfect, you can work on that here. The higher the number, the brighter your photography becomes. This is often where you’ll start.
- Temperature: Here’s where you control the warm and cool tones in your image.
- Tint: This can offset a green or magenta color cast by adding some of the opposite color.
- Contrast: Works wonders if your image is looking flat. Makes your shadows darker and your highlights brighter.
- Highlights: Recover blown out highlights (portions of your image where the light is too bright and detail has been lost), so you can make out all of the details in your image. Pull back the slider in order to recover these portions of your image.
- Shadows: Bring back details by shedding light on darker areas.
- Whites: Use this slider to brighten things up. The higher you go, the whiter your image will be – if you dial it down, your objects will become grayer in color.
- Blacks: As you might imagine, you use this slider in the opposite way: to make portions of your image blacker.
- Clarity: For RAW files that are lacking in clarity, here’s an opportunity to punch up your photograph by increasing local contrast. It’s a sister setting to sharpening, but works in a slightly different way.
- Vibrance & Saturation: Recall our banana example earlier on in this guide. The RAW photo lacked some color and vibrancy. Use this slider to change that up. (Note: to create a black and white image, turn this dial down as far as it can go.)
Pro Tip
If you’re strapped for time, try hitting the Auto button. The program you’re using will adjust all of the sliders for you. Of course, this doesn’t always end with an aesthetically pleasing image. In such cases, just hit the Default button to go back to the original settings.
The Downside of Shooting RAW
By and large, the positives of shooting RAW outweigh the drawbacks, but you may run into a few hurdles. Here are a few challenges to consider:
1. It’s More Time-Consuming
With RAW, once you’ve captured your initial image, there’s plenty more to do. Basically, until you do your post-processing, all you have is an unfinished image.
2. It Uses Much Larger File Sizes/Takes More Space
RAW files can be up to two to three times larger than their JPEG counterparts. This means you won’t be able to fit as many photos onto one memory card or hard drive. But, as storage devices start to cost less and less, this is becoming a much smaller problem. You can also purchase an external hard drive or pay for reliable cloud storage to mitigate this problem.
However, this large file size has another ramification:
3. It Slows Your Camera Down
The larger file size will cause your camera’s buffer to fill up faster. The burst speed will stay the same, but when the buffer fills up you have to wait for your camera to write to memory card.
4. It’s Probably Not Viewable on Your Computer Without Additional Software
Before you can view (and edit) your photos, you may need to buy software like Photoshop or Lightroom. You’ll then have to learn how to use that software.
Also, the various camera manufacturers use different software (for instance, you can’t read Nikon RAW files with Canon software and vice versa). Thankfully, you can convert these into open source DNG (Digital Negative) format, for easier access.
Pro Tip
What’s a DNG file?
At this point, you may still be determining whether you have a preference for JPEG or RAW.
But many photographers are making another decision: whether to save their RAW files in DNG. DNG is a type of RAW file (created by Adobe) which is highly compatible with other types of software (unlike RAW files, which only work with the format your camera manufacturer has created). Some think that DNG is not becoming the universal standard it was thought to be, so it’s worth checking out the pros and cons of this file type as well when you’re ready to make that decision.
Shooting in RAW has its ups and downs, but the flexibility it offers is a big plus for photographers looking to up their game. This is especially true if you are thinking of getting into photography professionally. Remember that you can always export a RAW file to JPEG, but it doesn’t work the other way around!
Even for those of you who envision yourselves shooting strictly in JPEG, experimenting with RAW will be beneficial. Perhaps you’ll find the benefits of RAW to be useful to you in some scenarios.
Ansel Adams said it best: