

Watch the Full Series
description
Come back from a shoot with three hundred frames and one problem is usually shared by all of them. Fixing that one photo at a time is not editing, it is data entry.
On Day 14 of 30 Days of Lightroom Classic we edit one image and sync it across the set — including AI masks, which recalculate themselves for every photograph.
This is Day 14 of our 30 Days of Lightroom Classic series. Follow along with all 30 episodes as we explore the magic of Lightroom together!
Continue Watching 30 Days of Lightroom Classic
JOIN 30 DAYS OF LIGHTROOM (FOR FREE!)
Ready to jump in? Sign up and we’ll email you a printable calendar and daily class schedule so you can get started right away!
Image Source


AFTER
BEFORE
Sync Settings, Save Time!
Come back from a shoot with three hundred frames and one problem tends to be shared by all of them. Everything is slightly underexposed, or the white balance drifted, or the light was flat all afternoon. Fixing that one photograph at a time is not editing — it is data entry.
Batch editing is the answer, and Lightroom Classic does something genuinely clever with it: even AI masks sync, recalculating themselves for each individual photograph. Day 14 covers how, and the settings that decide whether a sync takes two seconds or two minutes.
Edit One Photograph Properly First
Everything follows from a single reference edit, so make it a good one. In the example that means Auto in the Basic panel, then a mask.
The mask matters for what comes next. Using Select People and choosing All People rather than an individual creates a mask defined by a rule — “the people in this frame” — instead of a fixed shape. Lift the exposure and shadows inside it so your subjects separate from the background.
Choosing the Reference Photo
Back in the Library module, click your edited photo first, then Shift-click the rest, or press Ctrl / Cmd + A to take everything.
Look at the thumbnails: one has a slightly lighter background than the others. That is the reference photo, and it is the one everything else will be synced to. Getting this backwards is the most common batch-editing mistake — click your edited frame first, always.
You can change your mind as often as you like. Edit a different photo later, select it first, and sync again.
Sync Settings
With the selection made, click Sync Settings at the bottom of the right panel in the Library module.
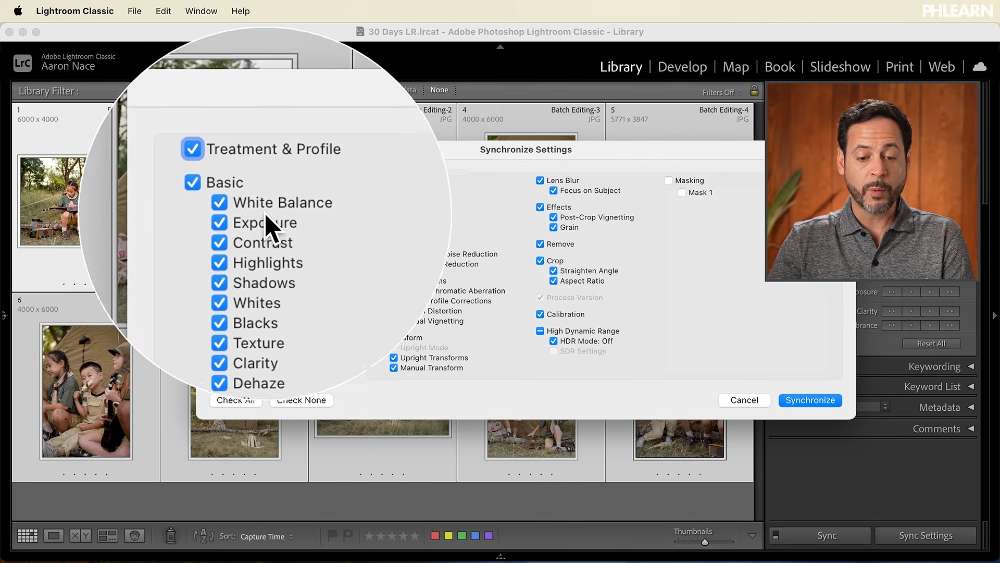
Masking is unchecked by default. This is the detail that catches people out. Check All still leaves it off, so if you built a mask into your reference edit you have to tick it deliberately. Otherwise the tones sync and the mask silently does not.
Everything else works as you would expect. Check All takes the whole edit across; Check None followed by a few deliberate ticks syncs only what you choose.
AI Masks Recalculate Per Image
Click Synchronize with masking ticked and Lightroom warns that updating AI settings may take some time. It is worth the wait.
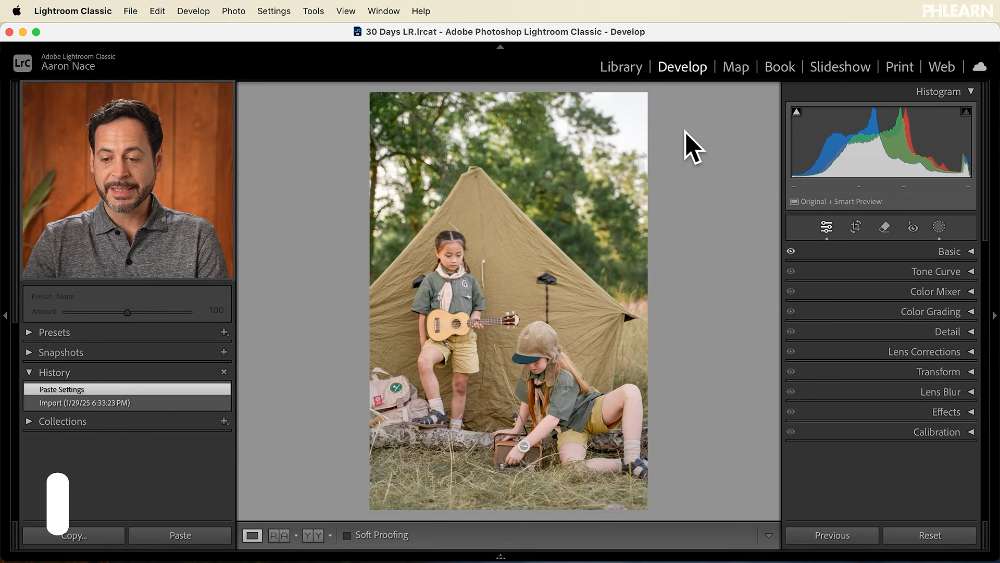
Lightroom is not copying the shape of your mask. It is re-running the selection on every photograph — finding the people in that frame, wherever they are and however many there are — and applying your adjustment to them.
Open another image afterwards, go into its masks and turn on Show Overlay: the selection has been rebuilt correctly around completely different people in a completely different position.
For anyone shooting events this is enormously useful. A wedding with fifty family group shots can have every subject lifted the same amount in one operation, with no two selections being the same shape.
Syncing Again, and the Merge or Replace Question
Batch editing is iterative. A common second pass is to change the look entirely — lower the contrast, lift the shadows, drag the greens towards yellow in the Color Mixer — then push that across as well.
Alt or Option-clicking a panel heading resets that group, which is the quick way to start a new direction without undoing your way back.
When you sync a second time and masks are involved, Lightroom asks a question:
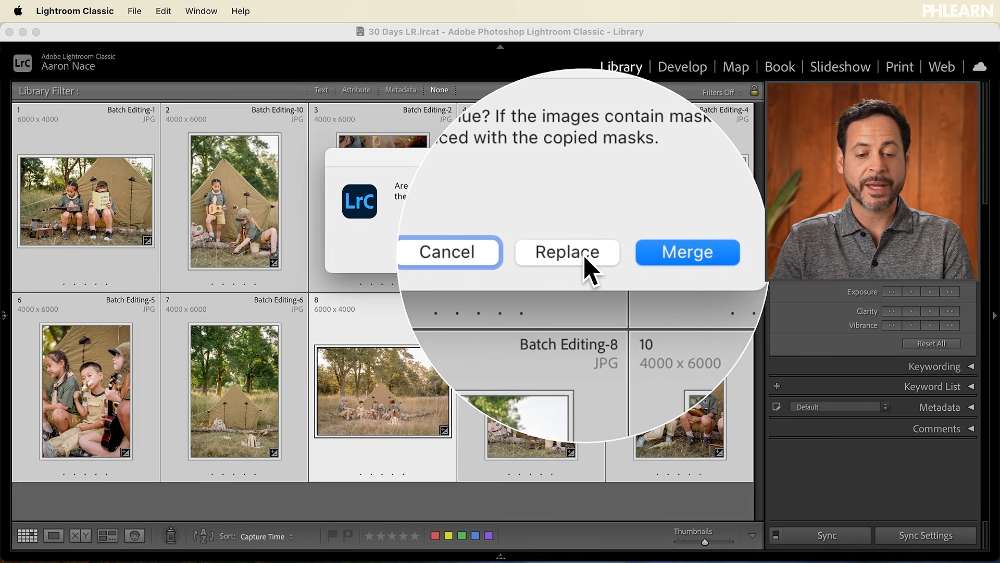
Merge keeps the masks already on those photos and adds the new ones. Replace discards them and applies only what is coming from the reference. Replace is usually what you want when redoing a look; merge is for adding a new local adjustment on top of one that is already working.
Sync Only What Changed
The most useful habit in this whole workflow. If your third pass only cooled the white balance, do not Check All — click Check None and tick White Balance alone.
Syncing everything forces Lightroom to recalculate every AI mask again, which takes real time on a large selection. Syncing one slider is instant. On a few hundred photographs the difference is minutes.
The same discipline underpins building good presets — include what you meant to change, and nothing else. For a deeper look at which adjustments transfer well between frames, our PRO guide to syncing settings in Lightroom goes further.
Where This Usually Goes Wrong
Selecting the reference photo second. The lighter thumbnail is the source. Everything syncs to it, not from it.
Assuming Check All includes masks. It does not. Tick masking separately.
Syncing everything on every pass. Slow, and it re-runs AI selections you already had.
Batching photos that are not alike. Sync works within a consistent set. Frames shot in different light need their own reference — split the shoot into groups first.
Choosing Merge when you meant Replace. You end up with two conflicting masks fighting each other on every image.
Keep Exploring Lightroom
More free tutorials on working faster across a whole shoot:
- New AI Assisted Culling in Lightroom
Narrowing a large shoot down before you start editing it. - How to Create Lightroom Presets
The other way to apply one look to many images. - How to Create a Signature Watermark
Applied automatically to every file on export. - Turn Your Favorite Looks Into Lightroom Presets
Turning a reference edit into something permanent.
Take It From Here
Batch editing is what makes Lightroom Classic viable for real volume. Edit one frame well, sync it, then fix the groups that need something different — a few hundred photographs stop being a day of work and become a handful of decisions.
Tomorrow we slow down and work on one image properly: editing portraits in Lightroom Classic.







Enjoying This Free Tutorial? Go Further with PRO.
Unlock Full Sample Files, PSDs, and Hundreds of Masterclasses!

Download full project assets, original PSDs, and RAW images for every lesson
Unlimited access to our complete library of PRO Photoshop & Lightroom courses
Instant 4K Ultra HD streaming on all devices, anytime, anywhere
Full access to our entire library of Photoshop Actions, Presets, and LUTs
Flexible monthly and annual membership plans
Cancel anytime with zero hassle or commitments