

Watch the Full Series
description
After a shoot you do not have a storage problem, you have a selection problem. Lightroom Classic gives you three marking tools and four ways to look at your work.
On Day 3 of 30 Days of Lightroom Classic we work in rounds with flags, stars and color labels, compare frames in Compare and Survey view, and finish with a smart collection that gathers your best work automatically.
This is Day 3 of our 30 Days of Lightroom Classic series. Follow along with all 30 episodes as we explore the magic of Lightroom together!
Continue Watching 30 Days of Lightroom Classic
JOIN 30 DAYS OF LIGHTROOM (FOR FREE!)
Ready to jump in? Sign up and we’ll email you a printable calendar and daily class schedule so you can get started right away!
Image Source
Pick Your Best!
Coming back from a shoot with four hundred frames is not the problem. Deciding which twelve are worth your time is the problem, and most people try to solve it in a single pass — scrolling back and forth, second-guessing, and eventually giving up somewhere in the middle.
Lightroom Classic gives you three marking tools and four ways of looking at your images. Used together, in rounds, they turn an overwhelming pile into a shortlist in a few minutes. Day 3 covers all of them, and finishes by building a smart collection that surfaces your best work from every shoot you will ever import.
Work in Rounds, Not One Pass
This is the idea that makes the rest of it work. You are not trying to find your single best image on the first pass. You are trying to cut the set roughly in half, quickly, and then do it again on what survives.
Three tools, three rounds. Flags for the first sweep, star ratings for the second, color labels for the final shortlist. Each round looks at fewer images than the last, so you can afford to be slower and more careful as you go.
The important part of round one is speed. Trust your gut, move fast, and do not deliberate — anything you flag can still be cut later, and anything you skip is gone from the process. Being decisive is cheap when you know another round is coming.
None of this is prescriptive. Flags, stars and colors are just three independent channels, and plenty of photographers reverse the order or skip one entirely. What matters is that you use the same system every time, for reasons that become obvious at the end of this tutorial.
Round One: Flag Your Picks
-
Clear the workspace
Collapse the side panels and the filmstrip using the small arrows at their edges, so nothing competes with the photograph. Shift + Tab does the same thing in one keystroke.
-
Double-click your first image to open Loupe view
One image, full screen, is the right way to judge a frame. Grid view is for navigating, not deciding.
-
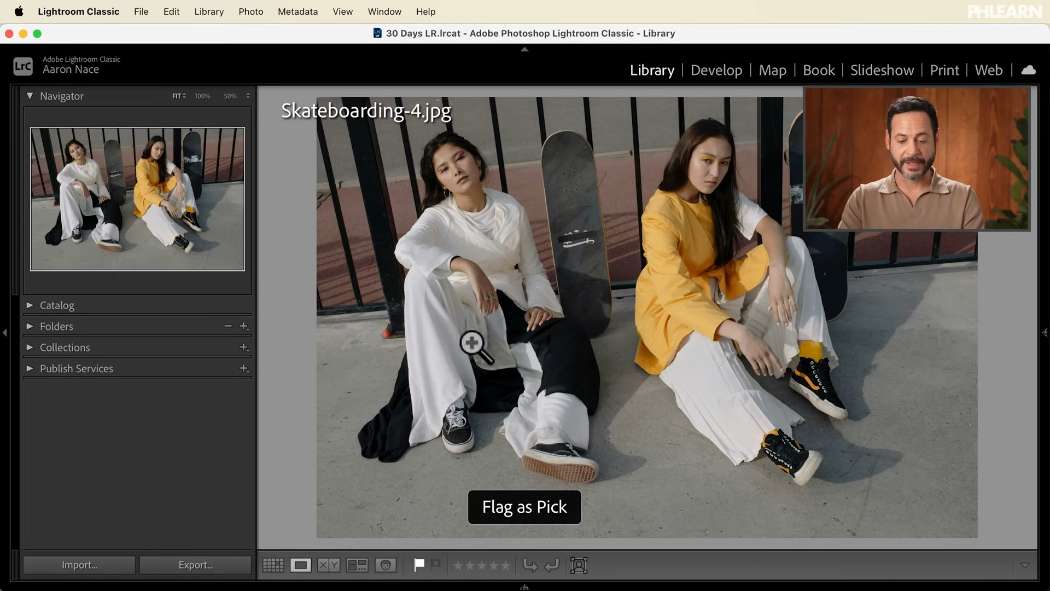
Move with the arrow keys and press P on anything you like
P flags the image as a pick and a small white flag appears. U removes it again. Keep moving — the whole round should take a couple of minutes, not twenty.
Filter Down to What You Flagged
Press G to return to Grid view, then open the Library Filter bar across the top and choose Attribute. Click the flag icon and Lightroom hides everything you did not pick.
This filter stays active while you change views, which is what makes the next section useful — you can switch to Compare or Survey and still be working only with the images that survived round one. Clicking None in the filter bar brings everything back.
The Four Views, and When Each One Helps
Grid
Press G. Everything at once, as thumbnails. This is your home base for navigating and for applying ratings in bulk, but it is a poor place to judge a single photograph.
Loupe
Press E, or double-click. One image filling the window. This is where round one happens.
Compare
Press C with two images selected. Lightroom shows a select on the left and a candidate on the right. The left and right arrows cycle the candidate through your set while the select stays put; when you prefer the candidate, press the up arrow to promote it to select. You are effectively running a knockout tournament, and it is by far the most reliable way to settle two frames that look almost identical.
Survey
Press N with several images selected. All of them on screen at once, evenly laid out. Hover any image and click the small X in its corner — or Ctrl / Cmd-click it — to drop it from the view, and the rest reflow to fill the space. Eliminating rather than choosing is a much faster mental operation, which is why this view is the workhorse of the later rounds. You can rate images directly in Survey view without leaving it.

Round Two: Star Ratings
-
Select a group of flagged images and press N for Survey view
Working one shoot or one segment at a time keeps the comparison meaningful.
-
Drop the weakest frames with the X or Ctrl / Cmd-click
Do not rate anything yet. Just clear away what is obviously not in contention.
-
Rate what is left with the number keys
1 through 5 apply star ratings, and 0 clears them. You can also click the star row beneath each thumbnail. A three-star and five-star split is usually enough — finer gradations sound useful and rarely are.
Round Three: Color Labels
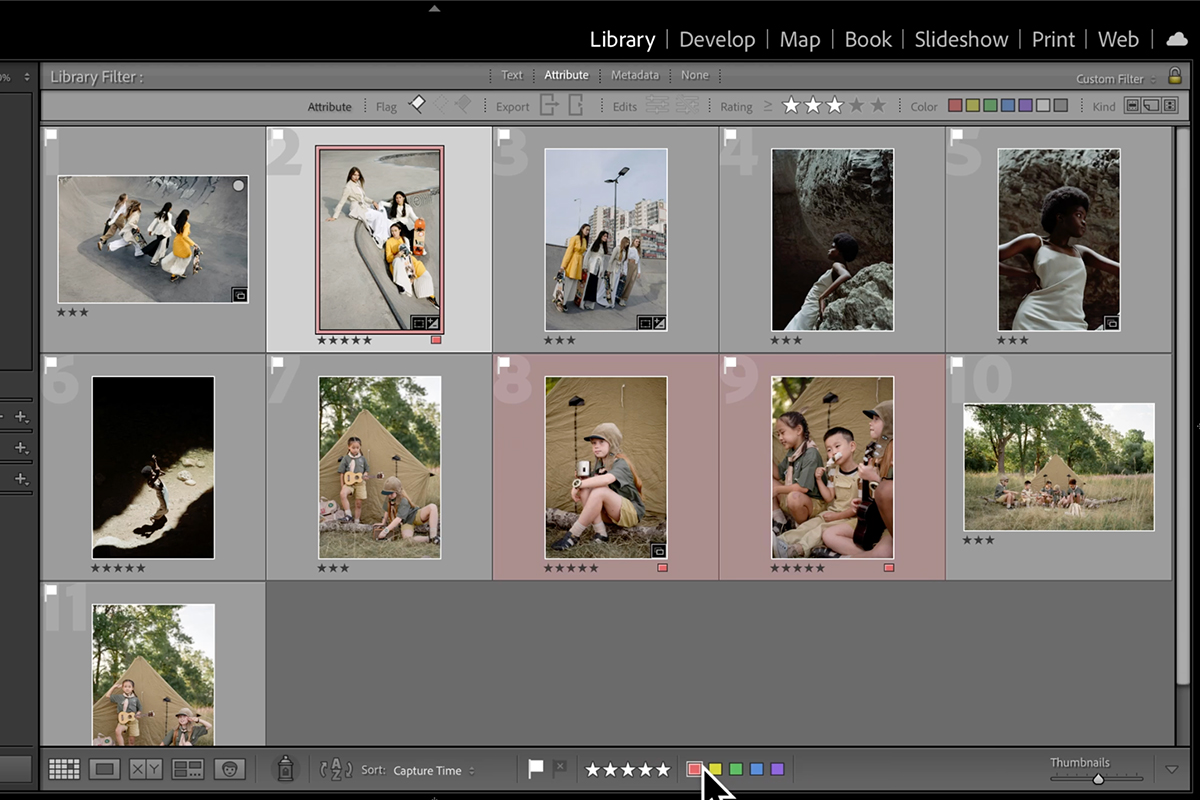
Color labels are the final cut. By this point you may have a dozen five-star images and need to name two or three as the ones you will actually deliver or print. Press 6 for red, 7 for yellow, 8 for green and 9 for blue, or click the color chips beneath the thumbnail. Pressing the same number again removes the label.
Colors are also useful as private notes rather than a ranking. Marking two different treatments of the same file with different labels, so you can find both versions later, is a perfectly good use of the system. There is no built-in meaning here — whatever you decide red means, it means, as long as you are consistent.
Stack the Filters to Find Your Very Best
The Attribute filter combines all three channels at once. Leave the flag icon active, set the star rating to greater than or equal to three, and click the red label chip. Lightroom now shows only images that are flagged, rated three or higher, and labelled red.
Select that result, press N, and you are looking at your portfolio from the shoot. If you want a faster first round on very large sets, Lightroom’s AI assisted culling can do the initial sweep for you and leave you to make the judgement calls.
Build a Smart Collection That Does It Automatically
This is the payoff, and the reason consistency matters. A smart collection is a saved set of rules rather than a saved set of images, so it keeps itself up to date across every shoot in your catalog. Lightroom ships with several — Five Stars, Red, Recently Modified — and you can build your own.
-
Open Collections and expand Smart Collections
It is collapsed by default, in the left panel of the Library module below Folders.
-
Create a new smart collection and name it
Something like Faves. The name is how you will reach it, so keep it short.
-
Add your rules with the plus button
Rating greater than or equal to 3, Label Color is red, Pick Flag is flagged. Set it to match all of them. The minus button removes a rule you added by mistake.
-
Click Create
Every image in the catalog that meets all three conditions appears immediately, and every future image that meets them joins automatically.
Because the rules are evaluated across the whole catalog, this one collection becomes a running portfolio of your best work — as long as you apply the same recipe every time. That is the real argument for picking a system and sticking to it. The Ultimate Guide to Lightroom Classic Workflow goes further into building a selection process you can repeat on deadline.

Clearing Flags, Stars and Labels
Everything is reversible, and the shortcuts are worth knowing because you will use them constantly.
U unpicks a flagged image. 0 clears a star rating. Pressing a color number a second time removes that label. You can also click any of the controls beneath the thumbnail to toggle them off. To set an image completely in one go, press P, then 5, then 6 — flagged, five stars, red.
Where This Usually Goes Wrong
Trying to find the best image in one pass. The rounds exist so that each decision is easy. Judging four hundred frames against each other simultaneously is not a thing anyone can do.
Using all five stars. A five-point scale invites agonising over whether something is a three or a four. Two levels, or even one, gets you to the same shortlist faster.
Changing your system between shoots. Smart collections are only as good as your consistency. If red means “favorite” one month and “needs work” the next, the collection is noise.
Forgetting the filter is still on. If images seem to have disappeared, check the Library Filter bar and click None. This catches everybody at least once.
Keep Exploring Lightroom
With your keepers chosen, these free tutorials are the natural next step into editing:
- How to Correct Exposure in Lightroom
Getting brightness and contrast right before you touch anything else. - How to Adjust Colors in Lightroom
Working with white balance, hue and saturation on a real image. - How to Use the Color Grading Tool in Lightroom Classic
Shaping the mood of a photo through its shadows, midtones and highlights. - Adobe Camera Raw Explained
The same Lightroom controls, living inside Photoshop.
Take It From Here
Selection is a skill, not a chore, and it improves faster than almost anything else in photography. Being able to look at your own work and say clearly which frames are the strong ones is the thing that separates a good shoot from a good set of pictures.
Tomorrow we finally start editing: the Basic panel, and the handful of sliders that do most of the work on almost every photograph.







Enjoying This Free Tutorial? Go Further with PRO.
Unlock Full Sample Files, PSDs, and Hundreds of Masterclasses!

Download full project assets, original PSDs, and RAW images for every lesson
Unlimited access to our complete library of PRO Photoshop & Lightroom courses
Instant 4K Ultra HD streaming on all devices, anytime, anywhere
Full access to our entire library of Photoshop Actions, Presets, and LUTs
Flexible monthly and annual membership plans
Cancel anytime with zero hassle or commitments