
Download Assets
Download Assets
This tutorial includes 1 sample image and 1 sample PSD. Downloads are free with a PHLEARN account.
- Download the sample images and PSDs from every free tutorial on PHLEARN
- New free tutorials published every week
- One free account — sign up once, then download anything
Watch the Full Series
30 Days of Photoshop · 2025 EditionOur most-watched series, updated for 2025 — watch all 30 free
description
The Photoshop interface opens on a screen full of panels, icons and menus, and almost none of it announces what it does. The way past that is not learning every feature — it is learning where things live and how the four main areas of the interface hand work off to each other.
Day 1 is a complete tour of the 2025 interface: the home screen and its templates, the toolbar and its nested tools, the options bar, the contextual task bar and the panels. You will also build and save your own workspace, so Photoshop only shows you the tools you actually use.
This is Day 1 of 30 Days of Photoshop, 2025 Edition — our most-watched series, rebuilt from the ground up for today’s tools.
Continue Watching 30 Days of Photoshop
JOIN 30 DAYS OF PHOTOSHOP (FOR FREE!)
Ready to jump in? Sign up and we’ll email you a printable calendar and daily class schedule so you can get started right away!
Image Source
The Photoshop Interface, in Four Areas
Photoshop opens on a screen covered in panels, icons and menus, almost none of which say what they actually do. That is what makes the first session intimidating, and it is also why “learn Photoshop” is the wrong goal to start with. The program has hundreds of features, and a working photographer uses maybe thirty of them.
What you need on day one is a map: where each area of the interface lives, what it is responsible for, and how the four main areas hand work off to each other. Once that clicks, every tutorial after this one gets easier, because you will know where the thing being demonstrated actually is.
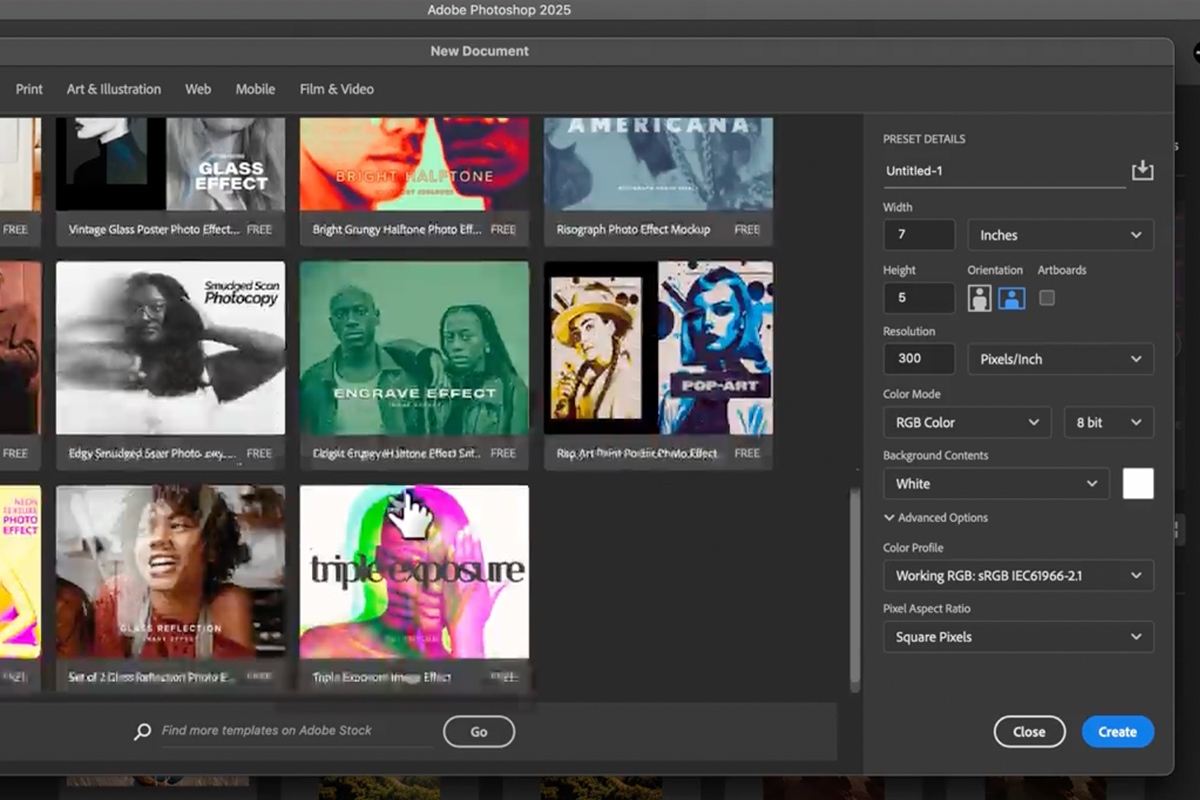
Start From the Home Screen
When Photoshop launches without a document open you land on the home screen. It is a launcher, not a workspace — recent projects sit in the middle, and the buttons for a new file or an existing one are top left.
New File is more useful than it looks. It is not just width, height and resolution: the tabs across the top hold Adobe’s document templates, and they are included free. Photo has print-ready sizes and mockup sets, Print has letter sizes alongside fully designed flyers, Web has device and laptop mockups. You can preview one, download it straight into Photoshop and start editing. If you build the same size document repeatedly, save your own preset here and it lives in the Saved tab from then on.
Two other things on this screen are worth knowing. The Learn tab runs interactive tutorials inside Photoshop itself, which is a genuinely good place to spend twenty minutes if you have never touched the program. And Your Files holds anything stored in Adobe’s cloud, including files shared with you, Lightroom cloud images and a recently deleted bin.
To open an image you can use Open, or simply drag a file from your desktop onto Photoshop. It reads essentially any image format you throw at it.

The Four Areas That Make Up the Interface
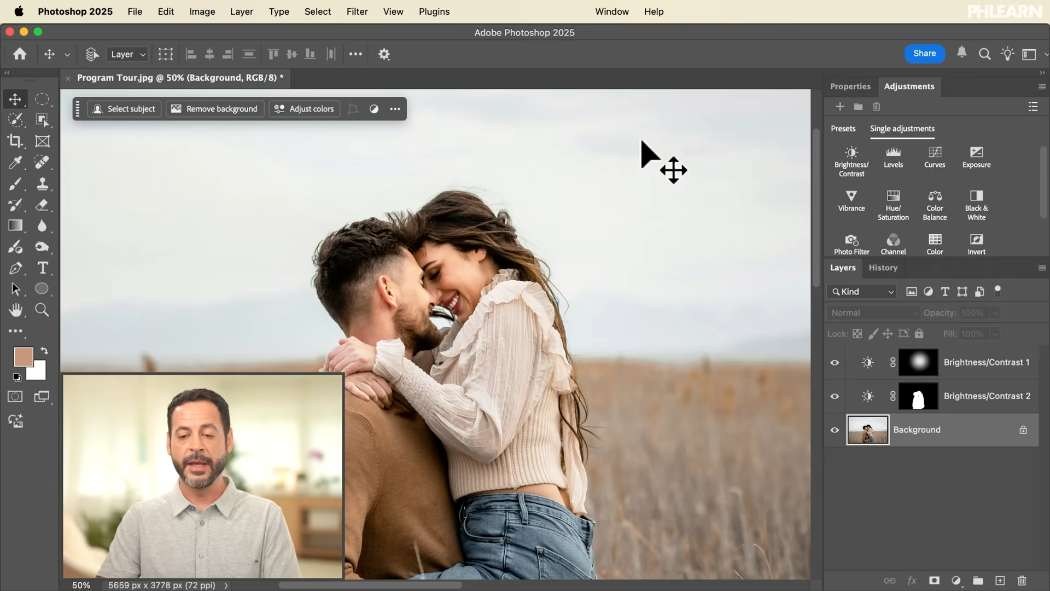
Reset to the default layout before you follow along — Window > Workspace > Reset Essentials — and the screen divides into four regions that each do one job.
The Toolbar
Down the left edge. Every tool you can pick up and use lives here. Click the arrows at the top of the bar to expand it to two columns so you can see everything at once instead of hunting.
The Options Bar
Along the top. It changes completely depending on which tool is active. Choose the Move tool and it fills with alignment controls; choose a selection tool and it fills with selection modes and Select Subject. If a tool is not behaving the way you expect, this strip is almost always where the setting is.
The Contextual Task Bar
The floating bar that appears near whatever you are doing. It reads your active layer and your last action and offers what people usually do next. With a background layer selected it offers Remove Background; with a live selection it offers feather, invert, fill, layer mask and adjustment layer. It is a shortcut menu that guesses well.
The Panels
Docked down the right. Layers, Properties, Adjustments, History, Channels, Paths, Color, Swatches, Gradients, Patterns, Libraries and more. Every one of them can be opened, closed, dragged out into a floating window or re-docked somewhere else, all from the Window menu.
The order matters more than the names. You pick a tool, you configure it in the options bar, you perform an action, and then the contextual task bar offers what comes next while the panels show you what you have built. That loop is most of Photoshop.

Try the Built-In Workspaces Before You Build Your Own
Under Window > Workspace Adobe ships several complete layouts, and switching between them is the quickest way to see the range of what Photoshop does.
Motion adds a timeline for animation. Painting brings brushes, color and the Clone Source panel forward. Photography puts the Histogram, Adjustments and Layers within reach. Graphic and Web surfaces Character, Paragraph and Libraries for type and layout work.
Nothing you do here is permanent. Close a panel, drag the toolbar into the middle of the canvas, switch off the task bar — then choose Window > Workspace > Reset [name] and it snaps back exactly as it shipped. Knowing that reset exists is what makes it safe to experiment.
Build a Workspace Around Photo Editing
A custom workspace is mostly subtraction. Start from a reset Essentials layout and take out everything a photo edit never touches.
-
Expand the Toolbar to Two Columns
Click the double arrow at the top of the toolbar. Every tool becomes visible at once, which matters a lot while you are still learning where things are.
-
Pin the Contextual Task Bar Somewhere Fixed
By default it follows your selection around the canvas. Click the three dots on the bar, choose Pin Bar Position, then drag it by its grip handle to a corner you like. It stays there for every action from then on instead of appearing under your cursor.
-
Drag Out the Panels You Do Not Use
Libraries, Color, Swatches, Gradients, Patterns, Channels and Paths are all genuinely useful for design, painting and vector work. For photo editing they are dead space. Drag each one out of the dock and close it. Every one comes back instantly from the Window menu, so nothing is lost.
-
Keep Layers, Properties, Adjustments and History
These four carry a photo edit between them. Adjustments creates the layer, Properties tunes it, Layers shows the stack, and History lets you walk backwards. Dock History next to Layers so it is one click away rather than floating loose.
-
Save the Layout
Go to Window > Workspace > New Workspace, give it a name you will recognize, and save. It now appears in that same menu permanently, so you can wreck the layout, reset to Essentials, and come straight back to your own setup.
The Tools You Will Actually Reach For
Two things to know before the list. Hover over any tool and the tooltip gives you its keyboard shortcut in brackets — V for Move, M for Marquee, B for Brush. And a small triangle in the bottom right corner of an icon means other tools are nested underneath it, so click and hold to see them.
Moving and Selecting
The Move tool (V) repositions the contents of a layer. The selection tools decide where an edit lands, which is why they matter so much: the Marquee tools draw geometric selections, the Selection Brush lets you paint a selection on freehand, and the Object Selection tool — nested with Quick Selection and the Magic Wand — finds edges for you, including a one-click Select Subject up in the options bar.
Retouching and Painting
The Crop tool reframes, and generative crop can extend the frame and invent what should be there. The Healing Brush and the Remove tool clean up blemishes and distractions. The Brush (B) paints, and just as importantly paints on layer masks. Clone Stamp copies one part of an image over another. Dodge and Burn lighten and darken selectively, and the Adjustment Brush paints an adjustment straight onto an area.
Shapes, Type and Navigation
The Pen tool draws precise vector paths — less essential than it once was now that AI selections are good, but still the way to build clean vector shapes. The Type tool handles text, and the Rectangle, Ellipse and Triangle tools make editable shapes. The Hand and Zoom tools exist, but you will rarely click them: hold Spacebar and drag to pan, and use Ctrl/Cmd + and Ctrl/Cmd – to zoom. On a trackpad, two fingers pan and a pinch zooms.
At the bottom of the toolbar sit the foreground and background color swatches. Click one to open the color picker, then move your cursor over the image and it becomes an eyedropper, so you can sample a color straight out of the photo. Check which layer is active first — sampling while a layer mask is selected pulls from the mask, not from the image.
Two Preferences Worth Changing on Day One
Photoshop’s defaults are sensible, but two of them are worth revisiting before you start real work.
-
Turn On Automatic Background Saving
Open Settings (Preferences) > File Handling and confirm Save in Background is ticked. The recovery interval defaults to ten minutes; five is a better trade if you would rather not lose work to a crash.
-
Raise Your History States
In Settings > Performance, History States controls how many times you can undo. It goes as high as 1,000, but every state is held in memory, so more undos means more RAM. Around 50 is a comfortable starting point.
A Quick Pass Through the Top Menus
File handles everything to do with documents: new, open, recent, close, save, export for web and place. Edit holds undo, copy and paste, plus Generative Fill and Sky Replacement. Image is where you change the file itself — image size, canvas rotation, duplicate, and the adjustment commands.
Layer is the menu you will live in. Layers are what separate Photoshop from a simple photo editor: adjustment layers, layer masks and Smart Objects are all created here, and together they are what makes an edit non-destructive, so you can always get back to the original file. Smart Objects get a day of their own later in this series.
Type collects the text controls. Select is the menu version of the selection tools, including Color Range, Focus Area, Select Subject, Select Sky and Select and Mask. Filter holds blurs, Liquify, stylization and Camera Raw, which is a full raw processor built into Photoshop. View covers zoom levels, screen modes, rulers, grids, guides and snapping. Plugins and Window do what they say.
The Help Menu Is the Shortcut Nobody Uses
The Help menu has a search box, and it does something better than open a web page: type a feature name and hover a result, and Photoshop shows you exactly which menu that feature lives in. In a program this large that is the fastest way to find anything you half-remember. It also links to the hands-on interactive tutorials and to Adobe’s full documentation.
Set It Up Before Day 2
Download the sample image and PSD, open Photoshop, and do the two things that pay off immediately: reset to Essentials so you are looking at the same screen everyone else is, then strip out the panels you do not need and save that as your own workspace. Change the two preferences while you are in there.
Tomorrow, Day 2 covers opening, editing and saving — the full round trip on a single file. If you want to go deeper on the non-destructive habits mentioned above, our PRO Ultimate Guide to Non-Destructive Editing in Photoshop is built entirely around them.
Quick Reference: Keys, Menus and Settings
- Switch or reset layoutsWindow > Workspace: Motion, Painting, Photography, Graphic and Web; Reset Essentials to start over
- Pin the task barThree dots on the Contextual Task Bar > Pin Bar Position, then drag it by its handle
- Pick up toolsHover for the shortcut: V Move, M Marquee, B Brush; click and hold for nested tools
- Pan and zoomHold Space and drag; Cmd/Ctrl + + and Cmd/Ctrl + - to zoom
- Save your layoutWindow > Workspace > New Workspace, name it, Save
- Two preferencesSettings > File Handling: Save in Background on; Settings > Performance: History States about 50
- Find any featureHelp menu search: type the name and hover a result to see its menu

Free Downloads
Follow Along on the Same Photo
Get the sample photo to open while you learn your way around and a layered PSD so the Layers, Properties and History panels have something real in them. Free with a PHLEARN account.
The Photoshop Interface: Common Questions
What are the main parts of the Photoshop interface?
The Toolbar down the left, the options bar along the top, the floating Contextual Task Bar, and the panels docked on the right. You pick a tool, set it in the options bar, act, and the task bar offers what usually comes next.
Why do the options at the top keep changing?
The options bar follows the active tool. Choose the Move tool and it shows alignment controls; choose a selection tool and it shows selection modes and Select Subject.
How do I get Photoshop back to its default layout?
Go to Window > Workspace > Reset Essentials. The reset item is named after whatever workspace you are in, so you can’t break the layout for good.
I closed a panel by accident. How do I get it back?
Open the Window menu and click the panel’s name. It comes back, and you can drag it into the dock wherever you want it.
How do I stop the Contextual Task Bar jumping around?
Click the three dots on the bar and choose Pin Bar Position, then drag it by its handle to a spot you like. It stays there for every action after that.
How do I save my own workspace?
Arrange the panels, then go to Window > Workspace > New Workspace, name it and click Save. It stays in that menu, so you can reset to Essentials and come straight back to it.
How do I zoom and move around the image quickly?
Hold Spacebar and drag to pan, and press Cmd/Ctrl + plus or minus to zoom. On a trackpad, two fingers pan and a pinch zooms.
Which settings should a beginner change first?
In Settings > File Handling, make sure Save in Background is ticked; the video suggests 5 minutes over the default 10. In Settings > Performance, set History States to around 50 for more undos.
Are the sample files free?
Yes, with a free PHLEARN account. You get 1 sample image and 1 sample PSD: a photo to open while you find your way around and a layered file for the Layers, Properties and History panels.
Master Photoshop, Lightroom and Photography
Join PHLEARN PRO for $12.99 a month or $99.99 a year. Cancel anytime, with a 100% money-back guarantee.





