

Download Assets
This tutorial includes 1 PDF guide. Downloads are free with a PHLEARN account.
- Download the sample files from every free tutorial on PHLEARN
- New free tutorials published every week
- One free account: sign up once, then download anything
Free PDF Guide · 2 Pages
This Tutorial as a Step-by-Step PDF
This two-page guide walks through removing the runner with the Spot Healing Brush set to Content-Aware and Sample All Layers, converting the layer to a Smart Object, and adding Filter > Blur > Motion Blur at Angle 0. Then mask the sharp subject back in with a soft round brush. Keep it next to your keyboard.
description
A sharp subject against a streaking background is what sells the feeling of speed, and the order you work in is what makes it believable. Aaron removes the subject from the frame entirely with the Spot Healing Brush, converts the cleaned-up background to a smart object so the blur stays editable, applies Motion Blur or Path Blur depending on the direction of travel, then masks the original sharp subject back in on top.
Enjoying This Free Tutorial?
We publish a new free tutorial every week, each one with sample images and PSDs you can download and follow along with. Sign up and they land straight in your inbox, along with early word on sales, events and subscriber-only offers.
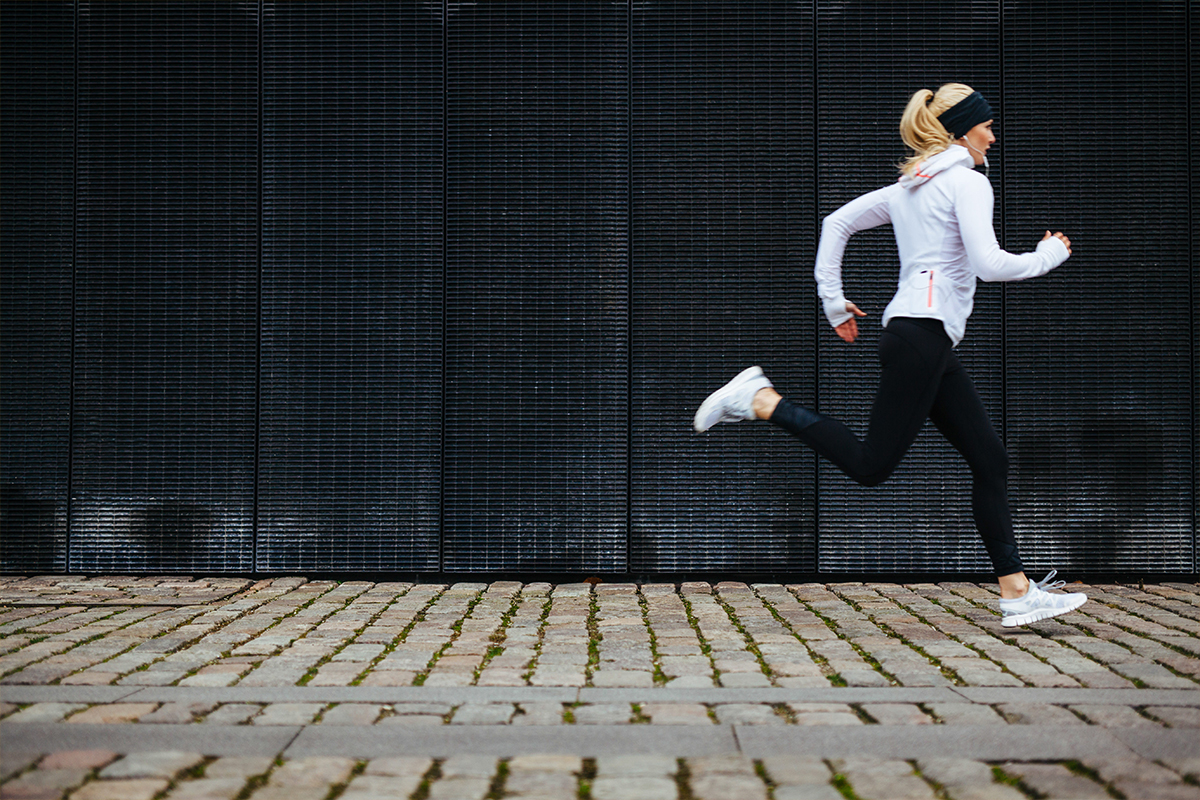
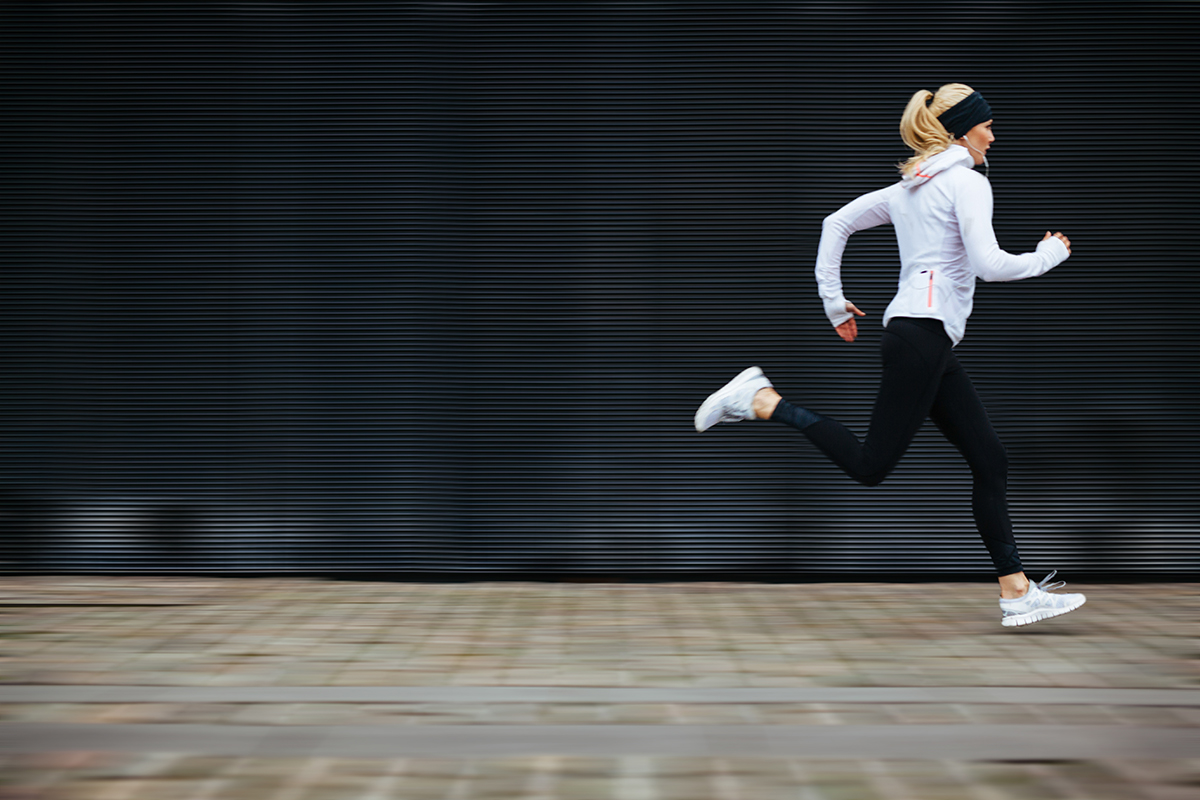
A convincing motion blur behind a runner, a cyclist, or a moving car sells the illusion of speed far more effectively than a sharp, static background ever could. The trick is keeping your subject perfectly crisp while everything around them streaks with motion, and that requires a specific order of operations. In this tutorial we’ll remove the subject entirely, blur what’s left, and mask the subject back in on top of the newly blurred background.
The Problem with Blurring Directly
The obvious approach, duplicating your background layer and applying a motion blur straight to it, runs into an immediate issue: the blur affects your subject along with the background, since they’re both on the same layer. Trying to mask the blur away from just your subject doesn’t fully solve it either, since the boundary between subject and background gets blurred together in a way that’s difficult to separate cleanly afterward. The background and the subject need to be handled as two completely separate problems.
Removing Your Subject with the Spot Healing Brush
Duplicate your background layer with Ctrl+J (Cmd+J on Mac). Grab the Spot Healing Brush Tool, make sure Content-Aware and Sample All Layers are both active, and paint directly over your subject to remove them from the frame. This doesn’t need to look perfect, since the entire layer is about to receive a blur that will hide most small imperfections. Work through your subject a section at a time, the leg first, then the body, head and hand, until the area they occupied is filled in with a reasonably clean approximation of the background.
Converting to a Smart Object Before Blurring
Before applying any blur, right-click your cleaned-up background layer and choose Convert to Smart Object. This lets you come back and adjust the blur amount at any point later without redoing the whole effect, which matters a lot once you’re trying to match the blur’s intensity to your final composite.
Applying the Motion Blur
With your subject-free background now a smart object, go to Filter > Blur > Motion Blur. Set the Angle to match your subject’s direction of travel, zero degrees works well for a subject moving left to right, and adjust the Distance slider to control how strong the streaking looks.
Standard Motion Blur for Side-to-Side Movement
For a subject running or driving across the frame from one side to the other, a plain Motion Blur set to an angle of zero degrees gives you a clean, uniform horizontal streak. This is the simplest and most common case, and usually the first thing worth trying before reaching for a more complex tool.
Using Path Blur for Movement Into the Distance
If your subject is moving back into space, toward the horizon, rather than side to side, use Filter > Blur Gallery > Path Blur instead, which lets you draw a path the blur follows so it can converge toward a vanishing point rather than streaking uniformly in one direction. This better matches how a subject moving into the distance would actually blur in a real photograph.
Masking Your Subject Back In
With your background fully blurred, click on that layer’s opacity and lower it temporarily so you can see through to the original subject underneath. Add a layer mask to the blurred layer and paint black over the area where your subject should be visible again, using a soft, round brush for a natural-looking edge, or the Pen Tool if you need a more precise selection. Painting black here tells this blurred layer to become invisible wherever your subject stands, letting the original, sharp subject show through from the layer beneath.
Working with a Soft, Round Brush
A soft-edged round brush at a moderate size is usually the fastest way to paint your subject back in, since its feathered edge blends naturally into the surrounding blur rather than leaving a hard, obviously masked outline. Increase the brush size for large, simple areas like a torso or jacket, and reduce it for tighter spots like fingers or shoelaces.
Refining the Mask and Restoring Opacity
Work through your subject’s edges carefully, hair, hands, shoelaces, any area that got missed on the first pass, since a rough or incomplete mask will leave visible streaks of blur crossing over parts of your subject. Remember that a layer mask is fully reversible: paint white to bring the blur back into an area, or black to reveal more of your sharp subject, without any risk of permanently damaging either layer. Once your subject looks clean and fully intact, bring your blurred layer’s opacity back up to 100%.
Changing Your Blur Amount After the Fact
Because the background is a smart object, double-click the Motion Blur (or Path Blur) entry in the Layers panel at any time to reopen its settings and adjust the amount without starting over. You can also toggle the smart filter’s visibility on and off using its eye icon to compare the blurred and unblurred versions side by side. If you want to see the difference this whole process makes, try applying a motion blur directly to a layer that still includes your subject; the result blurs subject and background together and immediately looks unnatural, which is exactly the problem this cut-out-then-blur method avoids.
Why This Approach Works
This technique works because it separates a problem that seems like it should be solved with one step into two much simpler ones. Removing the subject first means the blur filter never has to make a judgment call about where the subject ends and the background begins, since there’s no subject there when the blur is applied at all. Bringing the sharp subject back afterward with a layer mask means your subject and your blurred background can be adjusted completely independently, change the blur amount, refine the mask, or reposition either layer without the other ever being affected. That separation is exactly what makes a convincing motion effect achievable without ever needing to photograph actual camera movement.
Final Thoughts
A believable motion-blurred background comes down to sequencing: remove your subject, blur what’s left as a smart object, then mask your sharp subject back on top. Skipping the removal step and blurring everything at once is the single most common mistake, and it’s immediately obvious in the result. Take the extra few minutes to separate subject from background first, and you’ll get a clean, professional-looking sense of speed and motion every time.
Quick Reference: Keys, Menus and Settings
- Copy the backgroundCmd/Ctrl + J
- Remove the subjectSpot Healing Brush: Content-Aware, Sample All Layers
- Keep it editableRight-click > Convert to Smart Object
- Side-to-side blurFilter > Blur > Motion Blur, Angle 0, Distance to taste
- Into the distanceFilter > Blur Gallery > Path Blur
- Mask back inLower the layer’s opacity, add a layer mask, paint black with a soft round brush; opacity back to 100%
- Change it laterDouble-click Motion Blur in the Layers panel
No AI, no generative credits.

Free Downloads
Take the Guide With You
Get the PDF guide with every step for removing a runner, blurring the background as a smart object and masking the sharp runner back on top. Free with a PHLEARN account.
Motion Blur Backgrounds: Common Questions
Why not just blur a copy and mask my subject?
The blur smears the subject and the background together at the edges, so no mask can separate them cleanly. Remove the subject first, then blur.
How do I remove the subject before blurring?
Duplicate the background with Cmd/Ctrl + J and paint over the subject with the Spot Healing Brush, set to Content-Aware with Sample All Layers on. It does not need to be perfect; the blur hides it.
Why convert the layer to a smart object first?
The blur becomes a smart filter, so you can switch it off or change the amount at any time.
What angle should the Motion Blur use?
Match the direction of travel. For the runner moving left to right, the Angle is 0; set the Distance for how strong the streaks look.
What if my subject moves toward or away from the camera?
Use Filter > Blur Gallery > Path Blur instead and draw paths that converge toward a point.
How do I see my subject while masking?
Lower the blurred layer’s opacity so the sharp original shows through, then paint black on its mask with a soft round brush. Bring the opacity back to 100% when you finish.
What if I need a more precise edge?
Use the Pen Tool for a more accurate selection instead of painting the mask by hand.
I masked too much. Can I fix it?
Yes. Paint white on the mask to bring the blur back, or black to show more of the sharp subject.
How do I change the blur afterward?
Double-click Motion Blur under the layer in the Layers panel and change the Distance. Click its eye icon to compare with and without the blur.
Is there a free download?
Yes, with a free PHLEARN account. You get 1 PDF guide with the steps for removing the subject, blurring the background and masking the subject back in.
Master Photoshop, Lightroom and Photography
Join PHLEARN PRO for $12.99 a month or $99.99 a year. Cancel anytime, with a 100% money-back guarantee.





