


Download Assets
This tutorial includes 1 sample image and 1 PDF guide. Downloads are free with a PHLEARN account.
- Download the sample images and PSDs from every free tutorial on PHLEARN
- New free tutorials published every week
- One free account — sign up once, then download anything
Free PDF Guide · 2 Pages
This Tutorial as a Step-by-Step PDF
The guide walks through Select Subject with Subtract > Color Range on the skin, dragging Hue to turn the dress purple, a Select Sky mask with Exposure, Temp and Tint moved left, and two Radial Gradient vignettes, one inverted to darken the edges. Keep it next to your keyboard.
description
Learn how to adjust colors selectively in Lightroom Desktop using AI masks. Start with Select Subject, then use Color Range to subtract the skin so only the dress stays selected, and shift its Hue to a complementary color that stands out from the background. Add a Select Sky mask to darken and cool a washed-out sky, then build a natural vignette with two radial gradients: one to brighten the subject and an inverted one to darken the edges.
Enjoying This Free Tutorial?
We publish a new free tutorial every week, each one with sample images and PSDs you can download and follow along with. Sign up and they land straight in your inbox, along with early word on sales, events and subscriber-only offers.
Image Source
Photo by Megan Ruth via Pexels
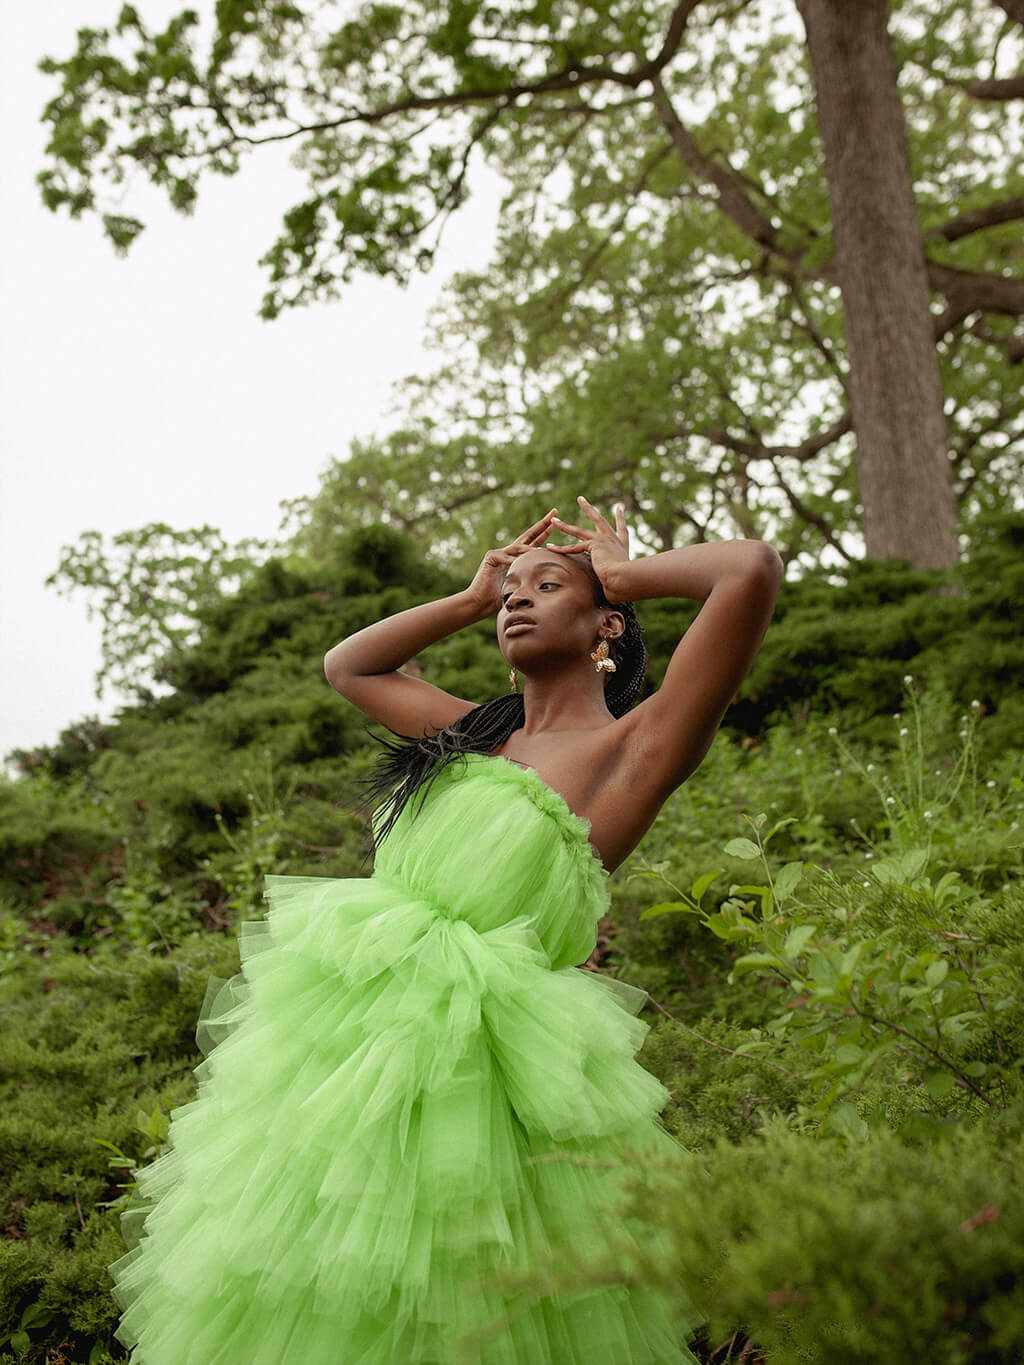
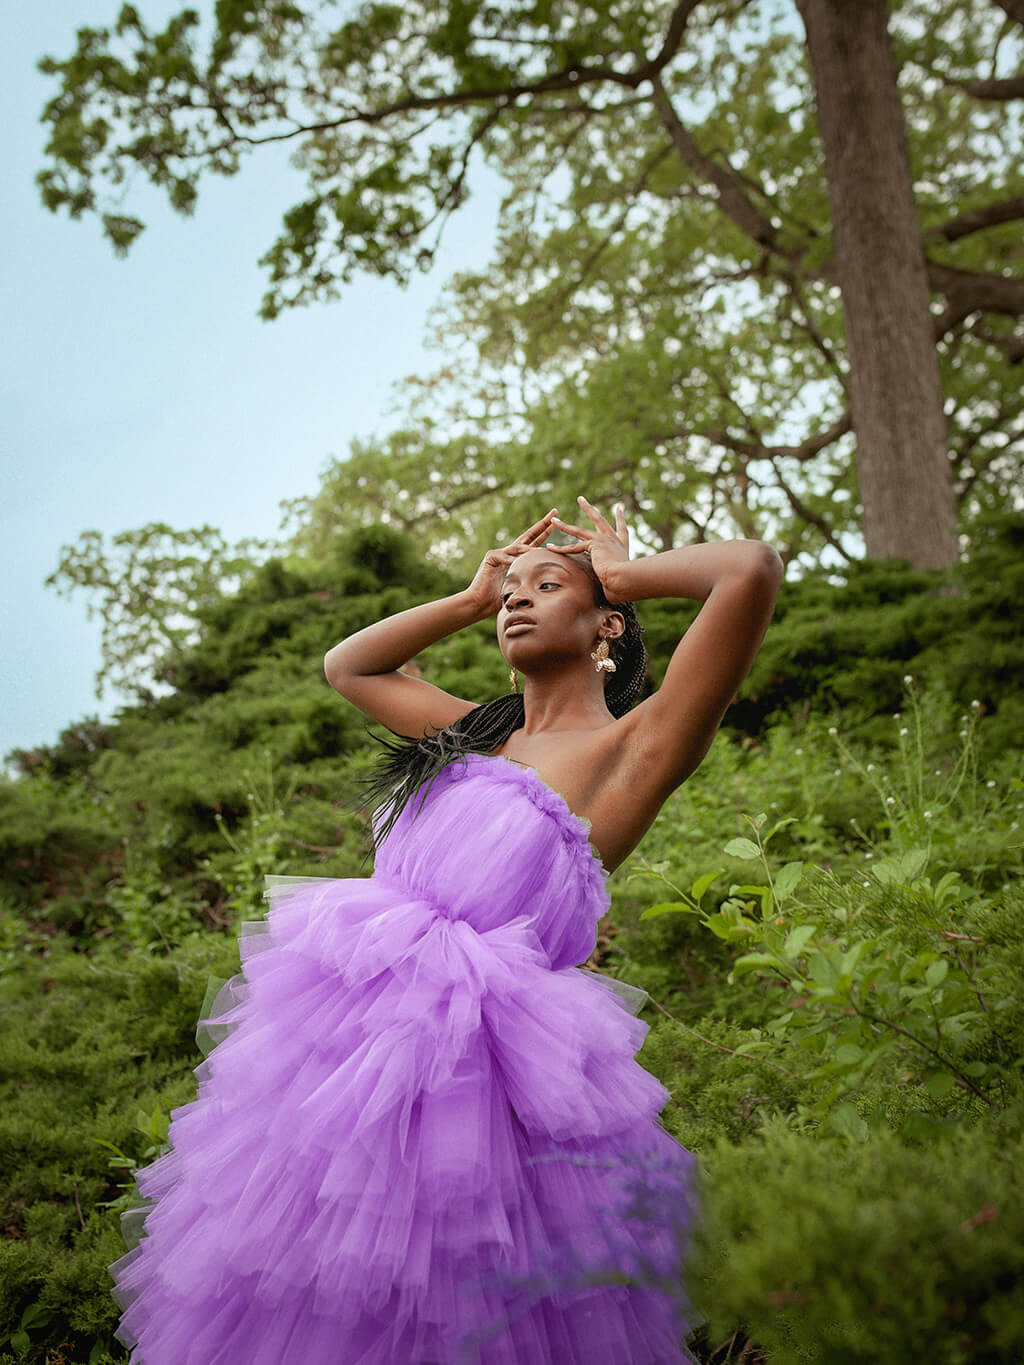
How to Change Colors Selectively in Lightroom Desktop
Global color sliders — white balance, tint, vibrance — adjust the whole photo at once, which is a problem the moment only one specific element, like a subject’s clothing, actually needs a different color. Lightroom Desktop’s AI masking tools make it possible to isolate exactly that one element and change it on its own.
Starting with Select Subject, Then Narrowing the Selection
In the Masking panel (M), Select Subject automatically isolates the person in the frame — but a mask built this way typically includes everything about them, skin and clothing alike, when the goal might be to change only one specific piece of clothing.
Subtracting Skin Tone from a Mask Using Color Range
With the Select Subject mask active, choosing Subtract opens up several ways to remove part of the selection. Color Range is the fastest option when the areas to remove have a clearly different color from what should stay selected — clicking and dragging directly on the subject’s skin samples that color and removes every instance of it from the mask, leaving just the clothing selected.
Why Color Range Works Better Than the Brush Here
Manually brushing away skin from a selection takes time and can miss awkward edges around hands, neck, or hairline. Since skin tone and fabric color are usually distinct enough for the software to tell apart automatically, Color Range removes all of it in one or two clicks instead of a careful manual paint job.
Shifting Hue to Change the Dress to a Complementary Color
With just the dress selected, the Hue slider in the mask’s adjustment panel can shift its color anywhere around the color wheel — dragging it left or right recolors the fabric in real time while leaving everything else in the photo untouched.
Why Complementary Colors Draw the Eye
When a subject’s clothing is close in color to the background, the two blend together and the subject doesn’t stand out. Shifting the clothing to its background’s complementary color — purple against green, for instance — creates immediate visual contrast that pulls a viewer’s eye straight to the subject.
Selecting the Sky with Its Own Dedicated Mask
Creating a new mask and choosing Select Sky isolates the sky specifically, independent of any other mask already built. From there, lowering Exposure slightly darkens a washed-out sky, and shifting Temperature and Tint toward blue and cyan brings genuine color into what would otherwise be a flat white sky.
Adding a Brightening Vignette on the Subject with a Radial Gradient
A new mask set to Radial Gradient, dragged out and centered roughly on the subject, creates a soft, custom vignette. Raising Exposure slightly within that gradient brightens the subject just enough to draw more visual attention toward them without looking obviously edited.
Adding a Darkening Vignette Around the Edges with an Inverted Gradient
A second Radial Gradient mask, this time inverted, affects everything outside the gradient’s circle instead of inside it — lowering Exposure there darkens the edges of the frame, completing a manually built vignette that pushes attention toward the center of the image.
Inverting a Radial Gradient to Affect the Outside Instead
The Invert button on a gradient mask flips which area gets affected — without it, a Radial Gradient always targets its own interior, so inverting it is what turns the same tool into an edge-darkening vignette instead of a subject-brightening spotlight.
Revisiting Any Mask to Fine-Tune the Result Later
Every mask created during this process stays listed and fully editable afterward — if the subject-brightening vignette turns out too strong once everything else is in place, clicking back into that specific mask and lowering Exposure again refines it without disturbing any of the other masks.
Editing Syncs Automatically Across Devices
Because this is Lightroom Desktop, every mask and adjustment made here syncs automatically to the cloud, so the same edit is immediately available on a phone, tablet, or any other signed-in device.
Why Layered, Mask-Based Color Edits Work
Each mask in this workflow — the dress, the sky, the subject-brightening gradient, the edge-darkening gradient — targets one specific problem without any risk of disturbing the others. Building the final look out of several small, independently editable adjustments rather than one global change is what allows something as precise as recoloring a single piece of clothing to complementary-color the subject against its background, while every other adjustment stays completely unaffected.
Final Thoughts
Selective color work like this comes down to isolating exactly the right area — using Select Subject and Color Range together to land on just a dress, Select Sky for the sky, and radial gradients for a hand-built vignette — and then adjusting each one independently. Because every mask stays editable and syncs automatically across devices, the whole edit can keep evolving long after the first pass.
Quick Reference: Keys, Menus and Settings
- Open maskingM, or the mask icon on the right side
- Select the dressSelect Subject, then Subtract > Color Range and click and drag on the skin
- Recolor itUncheck Use Fine Adjustment, drag Hue (green to purple)
- Color the skyCreate New Mask > Select Sky; Exposure down a little, Temp left, Tint left
- Brighten the subjectCreate New Mask > Radial Gradient centered on her, Exposure up a little
- Darken the edgesSecond Radial Gradient, Invert, Exposure down a little
- Before and afterEyeball next to a mask, or at the top of the Masks panel for all of them

Free Downloads
Follow Along on the Same Photo
Get the outdoor portrait in the green ball gown and the 2-page PDF guide that walks through all four masks. Free with a PHLEARN account.
Adjusting Colors in Lightroom: Common Questions
How do I change the color of just one thing in Lightroom?
Use a mask. White balance, tint and vibrance change the whole photo, but a mask lets you select only the dress and drag its Hue while everything else stays the same.
Where are the masking tools in Lightroom Desktop?
Click the mask icon on the right side, or press M. Select Subject and Select Sky are both there.
How do I take skin out of a Select Subject mask?
Click Subtract under the mask and choose Color Range, then click and drag a small box on the skin to sample more than one point. Drag over one more area and the skin drops out while the dress stays selected.
Should I use the Brush or Color Range to subtract?
You could paint the skin away with the Brush, but here the skin is a very different color from the dress, so Color Range is easier and quicker.
Which slider changes the color of the dress?
Hue, in the mask’s sliders. Uncheck Use Fine Adjustment, then drag Hue left or right and the dress can become any color you like.
Why turn the green dress purple?
The dress and the background were both green, so she did not stand out. Purple is the complementary color to that green, so your eye goes straight to the dress.
How do I add blue to a white sky in Lightroom?
Choose Create New Mask > Select Sky. Bring Exposure down a little, drag Temp to the left for blue, then drag Tint to the left to push it toward cyan.
How do I make a vignette by hand in Lightroom?
Add a Radial Gradient centered on the subject and raise Exposure a little. Add a second, larger Radial Gradient, click Invert so the outside is affected, and bring Exposure down a little.
Can I change a mask after I make it?
Yes. Click that mask again and change its sliders any time. The eyeball next to a mask shows its before and after, and the edit syncs to the cloud, so it is on your iPad or phone too.
Are the sample files free?
Yes, with a free PHLEARN account. You get 1 sample image and 1 PDF guide: the portrait in the green ball gown and a 2-page guide to the four masks.
From the Magazine View all
Stories, interviews and guides for photographers, new every week.
 BusinessHow to Compete With AI: Give Your Clients MoreEveryone has the same tools now, and your clients know it. The way to compete is to give them more.
 EditingLightCraft vs Lightroom: Is the Free Clone Any Good?The free clone on the same RAW files: what matches, what breaks and who should switch.
 EditingHow to Tell If a Photo Is AI, and Prove Yours Is RealThe tells that still work in 2026, why detectors disagree, and how to prove your own photos.
Master Photoshop, Lightroom and Photography
Join PHLEARN PRO for $12.99 a month, or $99.99 a year (save 36%). Cancel anytime, with a 100% money-back guarantee.





