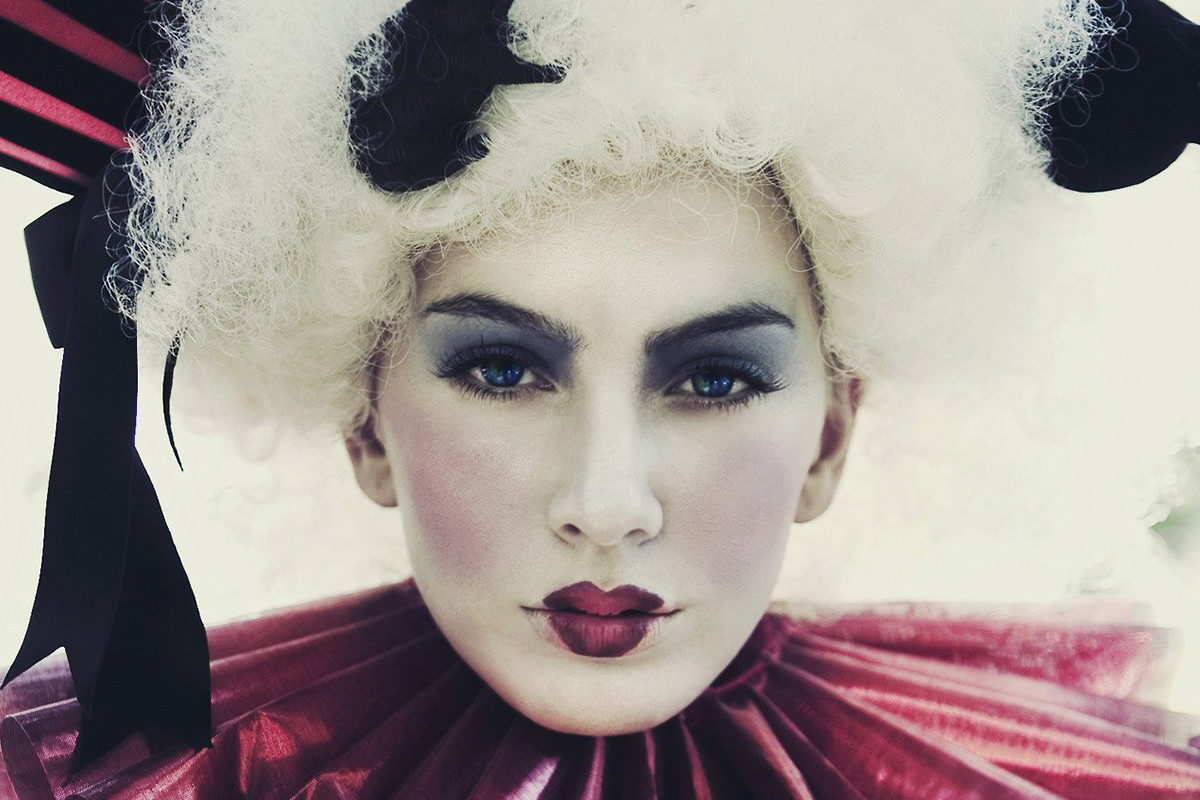

Smoothing patchy eyeshadow with an ordinary round brush flattens the very texture that makes makeup look applied by hand. This free Photoshop tutorial builds a custom brush instead: a square of scattered black dots defined as a brush tip, with Size Jitter and Angle Jitter pushed to maximum so no two stamps repeat, then painted with colors sampled straight out of the makeup itself.
We publish a new free tutorial every week, each one with sample images and PSDs you can download and follow along with. Sign up and they land straight in your inbox, along with early word on sales, events and subscriber-only offers.
How to Apply Amazing Makeup in Photoshop With a Custom Brush
Eye makeup and blush often carry a lot of fine texture — tiny variations in tone that give them a natural, hand-applied look. Smoothing out uneven or splotchy makeup with a regular brush wipes all of that texture away, leaving something that reads as obviously retouched. This technique instead builds a custom Photoshop brush made of randomized dots, which blends colors together the same way real makeup actually looks up close: as countless tiny points of color rather than one flat wash.
Why a Regular Brush Destroys Texture
Sampling nearby colors with a standard round brush and painting over uneven eye makeup does smooth things out, but it also flattens the texture that was there — the small variations in the eyeshadow and blush that make makeup look real rather than airbrushed. The goal here is to preserve that texture, and even add more of it deliberately, rather than erase it.
Creating a New Document and Painting Dots for the Brush
The brush starts as nothing more than a handful of black dots on a white square.
-
Create a New 500 by 500 Pixel Document
Go to File > New and create a new document at 500 by 500 pixels — a size this large keeps the resulting brush usable even at close range with plenty of detail.
-
Paint Black Dots of Varying Size
On the background layer, paint a scattering of black dots with a regular round brush — a few larger dots toward the center and several smaller ones toward the outer edges.
Defining the Brush Preset
Photoshop turns that square into a brush tip in one menu command.
-
Define the Brush Preset
Go to Edit > Define Brush Preset and name it something identifiable, like “Makeup Dots.” Photoshop treats whatever is dark on the layer as the brush shape and whatever is white as transparent.
Adding Shape Dynamics to Vary the Dot Sizes
Painted at its default settings, the new dot brush will repeat the exact same pattern every time it’s applied, which looks obviously artificial and repetitive.
-
Open the Brush Settings Panel
Go to Window > Brush to access the custom brush settings.
-
Turn On Shape Dynamics and Raise Size Jitter
Click Shape Dynamics and raise Size Jitter all the way up, then set Minimum Diameter to around 26% so the dots vary in size without any of them shrinking down to nothing.
Why Size Jitter Alone Isn’t Enough
Varying only the size of each stamped dot cluster still leaves the same underlying arrangement of dots repeating across the canvas, since the pattern itself never rotates or reshuffles. Size variation on its own is a start, but it doesn’t fully break the sense that the same shape keeps stamping down over and over.
Randomizing Rotation With Angle Jitter
One more slider is what finally makes the repeat disappear.
-
Raise Angle Jitter to Maximum
Still inside Shape Dynamics, raise Angle Jitter all the way up so each stamp of the brush rotates to a random angle.
Why Angle Jitter Breaks the Repeating Pattern
Once every stamp of the dot cluster lands at a different rotation, the underlying pattern becomes unrecognizable as a repeated shape — it reads instead as a naturally random speckling, much closer to how real texture actually looks, rather than something obviously generated by a single repeating brush tip.
Painting With the Custom Brush to Blend Makeup
With the brush built, the actual retouching is a matter of sampling and painting, one color at a time.
-
Sample a Color and Paint With the Custom Brush
On a new layer, hold Option/Alt to sample a color directly from the makeup — a dark eyeshadow tone, for instance — then paint with the custom dot brush over the area that needs smoothing. Adjust the brush size as you go, since a larger or smaller brush changes how large or small the individual dots appear.
-
Sample Multiple Colors as Needed
Sample additional colors from elsewhere in the makeup — a blue eyeshadow tone, a skin tone along the transition edges — and continue painting with each, building up the blended look one sampled color at a time rather than relying on a single flat tone.
Why Sampling Directly From the Photo Matters
Every color used in this technique already exists somewhere in the original makeup, which means the blended result can never look mismatched or out of place the way an arbitrarily chosen color might. Because the brush lays down countless tiny dots instead of one continuous stroke, those sampled colors blend together the way actual makeup does at close range, rather than looking like a single smudge of color painted over the area.
Saving Your Custom Brush Settings
Saving the jitter settings turns a one-off trick into a permanent tool.
-
Save the Brush as a New Preset
Once the Size Jitter, Angle Jitter, and Minimum Diameter settings feel right, go to Window > Brush, click New Brush Preset, and give it a name like “Eye Makeup Brush.” The brush will then be available anytime by right-clicking with the Brush tool active and selecting it from the preset list, with all of its custom settings intact.
Masking Areas That Shouldn’t Be Painted Over
Eyebrows and lashes need to stay out of the effect.
-
Add a Layer Mask
Add a layer mask to the painted makeup layer, then use a regular round brush to paint black over any area the effect shouldn’t cover, such as the eyebrows or eyelashes, so the smoothed makeup color doesn’t spread onto features it doesn’t belong on.
Softening the Dots With a Slight Gaussian Blur
A tiny blur melts the dots together if they still read as individual marks.
-
Apply a Very Light Gaussian Blur if Needed
If the individual dots look too well-defined or crisp, select the layer and go to Filter > Blur > Gaussian Blur, applying a very slight amount — around 0.2 to 3 pixels — to help the dots melt together further.
More Free Photoshop Retouching Tutorials
If building a custom texture brush this way was useful, these free tutorials cover related retouching techniques:
- How to Remove Marks on Skin in Photoshop
- Remove Dark Circles and Brighten Eyes in Photoshop
- How to Select Subjects and Refine Edges in Photoshop
Why This Approach Works
The core insight here is that makeup, viewed up close, isn’t a flat wash of color at all — it’s made up of countless tiny variations in tone that a single brush stroke can never recreate. Building a custom brush out of randomly scattered dots, then randomizing both their size and rotation with Shape Dynamics, gives Photoshop a tool that lays down color the same fragmented way real makeup actually sits on skin, rather than the single continuous stroke a normal brush produces. Sampling colors directly from the makeup itself, one area at a time, means every color used already belongs in the photo, and layering several sampled colors with the dot brush builds up a blend that looks assembled from many small touches rather than one sweeping edit. Saving the finished brush as a preset also means the same technique, and the same careful jitter settings, can be reapplied instantly on a completely different photo without rebuilding it from scratch.
Final Thoughts
This is a technique worth keeping on hand any time smoothing or evening out makeup, skin, or any other texture-heavy area risks flattening the very detail that makes it look real. A regular brush will always be faster for a rough first pass, but a custom dot brush with randomized size and angle is what keeps the final result from looking obviously retouched. Once built and saved, the brush becomes a reusable tool rather than a one-time trick, ready for the next photo that needs the same careful touch. Photo by contest winner Jerome Dayao.
Related Tutorials






Enjoying This Free Tutorial? Go Further with PRO.
200+ PRO courses. 1,000+ practice files. One membership.

Unlimited access to every PRO course
New PRO courses every month
Layered PSDs and RAW files to follow along
100+ Lightroom Presets, LUTs, Actions and Brushes
Stream in up to 4K, with captions and chapters
Watch on any device: desktop, tablet or phone
4.93 average from 3,900+ reviews · 2M+ students